Showing posts with label dill. Show all posts

Saturday, July 10, 2010

Recipe for Squash Blossom Frittata (Κολοκυθοανθοί με Αυγά)


Haul from Wednesday's Farmers' Market: parsley, dill, Swiss chard, beets, spinach, broccoli, orach, zucchini, squash blossoms, cucumbers, tomatoes

Farmers’ market season is upon us. Stalls are bursting with fresh greens and herbs. Early broccoli and zucchini are spottily available. The first bunches of baby carrots appeared today. 


Making Tostadas

Surprises abound at the markets: scarlet vine-ripened tomatoes from Delta Junction, Matanuska Creamery's Caramel Cashew ice cream made using only milk from Alaska, steaming pots of homemade pozole and elote, blowsy ‘Flemish Antique’ peony poppies, freshly gathered duck and chicken eggs from Future Farmers of America.

Among the abundance, golden squash blossoms stand out as a rare treat. Never in stores, they're available only during their short season to home gardeners and farmers’ market shoppers. So far this year, only Rempel Family Farm is selling squash blossoms in Anchorage (50 cents each on Wednesday at Northway Mall Farmers’ Market and Saturday at South Anchorage Farmers’ Market).


Delicate squash blossoms don't like plastic bags. If paper bags aren't available, wrap in newspaper.

All squash blossoms are edible and may be used interchangeably. Because we grow zucchini at home, I’ve gotten used to calling them zucchini flowers. The more generic term, squash blossoms, is usually more accurate when buying from farmers who grow a wider range of squash.

I love stuffing squash blossoms with cheese and cooking them until they’re crispy and oozing with hot, melted cheese. (Tastes Like Home: Mediterranean Cooking in Alaska has recipes for 2 different cheese fillings for zucchini flowers.) Herby essence of basil brightens the flavor of Cheesy Potato-Basil Stuffing for zucchini flowers, and pairs well with a side of fresh greens. Squash blossoms are also tasty dipped in a tempura batter and simply fried.


Blue and brown eggs from Future Farmers of America; both had deep golden yolks.

On days when I want the flavor of squash blossoms, and don’t want to fiddle around or mess with hot oil, I make Squash Blossom Frittata.  Today we had farm-fresh, golden-yolked eggs, fresh herbs, and creamy fresh goat cheese to pair with the squash blossoms. Sighs of satisfaction replaced conversation as we ate; I finished by licking my fingers, wanting more.


Squash Blossom Frittata (Κολοκυθοανθοί με Αυγά)
Serves 2-4
Food writers often advise to remove pistils and stamens from inside squash blossoms, as well as the green bases (calyxes/calyces) and stems. Don’t do it. These parts are all edible and add wonderful flavor and texture. I remove the stems in this recipe purely for decorative reasons; without stems, the blossoms form a perfect pinwheel in the frittata. Use enough flowers to complete a pinwheel; about 8 large, 10 medium, or 12 small.  Accompany Squash Blossom Frittata with a crisp garden lettuce salad and dry white wine.

8-12 squash blossoms
5 eggs
2 Tbsp. minced fresh dill
1/2 cup diced shallots, 1/4” dice (may substitute green onions, see Note below)
1 Tbsp. butter, plus 1 tsp. (divided)
Salt
Freshly ground black pepper
3-4 Tbsp. fresh goat cheese
Dill sprigs for garnish (optional)

Prepare the Squash Blossoms:  If necessary, gently brush off dirt or debris from flowers; don’t wash or get them wet. Carefully open flowers and shake out any insect hitchhikers. Cut off stems, but leave green bases attached. 

Prepare Eggs:  Whisk together eggs and dill with a light seasoning of salt and freshly ground black pepper.  Using a heavy 9-10” oven-proof frying pan (cast iron works best), sauté shallots, lightly seasoned with salt and freshly ground black pepper, in 1 Tbsp. butter until they soften and start to turn golden.  Add sautéed shallots to eggs and whisk to blend (reserve excess butter in pan for cooking frittata).

Cook Frittata:  Preheat broiler to high.

Melt remaining 1 tsp. butter in pan used to cook shallots, arrange squash blossoms in pinwheel around bottom, and cook over medium heat for 30 seconds. Turn blossoms, and evenly pour whisked egg mixture over them. Break goat cheese into pieces and scatter over eggs. Turn heat down to low, cover pan, and cook until eggs are almost set, but still runny on top, about 4-5 minutes.  Put under broiler to finish cooking eggs. Flip out onto platter, garnish with dill sprigs, and serve.

Note: Green onions may, but don’t need to, be sautéed. If you use green onions and don’t sauté them, reduce butter to 2 tsp. and whisk green onions into eggs with dill.

~~~~~~~~~~~~~~~~~~~~~~~~~~~~~
This post is included in Weekend Herb Blogging compiled by Cinzia from Cindystar.


Peony Poppy 'Flemish Antique', Papavar somniferum paeoniflorum

Saturday, June 19, 2010

Recipe: Spinach Saganaki (Σπανάκι Σαγανάκι)

Fresh garden greens started trickling into Anchorage farmers’ markets this morning. In two weeks, the trickle will turn into a flood. Greens of all kinds thrive in our cool maritime climate.

Though cultivated greens are only now appearing, we’ve been eating wild greens for the past month. As soon as the snow melted, dandelion greens insistently pushed their way through the saturated earth and were ready to be harvested.  Fireweed shoots, devil’s club, and nettles; chickweed, dock, lamb’s quarters, and shepherd’s purse; all end up in the pot. (For tips on harvesting wild plants, go here.)

Until my husband and I first lived in Greece (1987), eating wild plants never once crossed my mind. I grew up in a family where picky eating was an art form. My father didn’t eat cheese, yogurt, or sour cream. My mother didn’t eat lamb, broccoli, cauliflower, cucumbers, squash, green pepper, and so many other foods I could never keep track.  If my parents didn’t eat it, neither did we.  Plus I had my own food quirks; raw tomatoes didn’t pass my lips until I was 24.

So wild greens? Not likely. It wasn’t just my family; the concept of eating wild greens didn’t remotely exist in the small Pacific Northwest town in which we were raised.  In our world, food came from the grocery store. Food could also come from the garden, but only from seeds that were planted and carefully tended. For wild food, we only knew berries, seafood, and dead animals. 

When  the first rains came the autumn of our arrival in Greece, there was a palpable sense of excitement in the village.  Once the rain stopped, half the village took to the fields, quickly gathering the emerging flush of snails. Over the next week, the dirt roads surrounding the village became peppered with the bent-over backsides of black-clad women, systematically working their way through the fields, gathering an abundance of fresh wild greens.

Though my Greek was limited in those days, I learned by example which greens were tastiest, how to harvest them, and how to clean them. I learned a mixture of different greens cooked together tastes better than a single variety cooked on its own.  I learned to love and crave greens of all kinds, wild and domesticated.  Most importantly, foraging became a permanent, enriching part of our lives.

These days, we eat greens several times a week, and I regularly post recipes using them.

For the past year, my favorite greens recipe has been Spinach Saganaki, based on a dish we had at Tzitzikas and Mermigas (Τζίτζικας και Μέρμηγκας), a restaurant on Mitropoleos Street, just off Syntagma Square, in downtown Athens. (A tasty place to eat on a shady street, particularly if you’re carrying a heavy load of way too many cookbooks; but that’s another story.) I’ve made the dish with a wide range of different greens, alone and combined, including spinach, Swiss chard, kale, amaranth, nettles, and dandelions; every version has been a success.

Two notes about the name:

1) I like calling it Spinach Saganaki only because it translates in Greek to the perfectly alliterative “Spanaki Saganaki.” Ignore the name and don’t limit yourself to making it with spinach; the dish is delicious with all kinds of greens. 

2) I recently described this dish to someone who asked why it had “saganaki” in the name since it didn’t include flaming cheese.  In Greek, “saganaki” is a small two-handled frying-pan, and gives its name to a range of dishes that are traditionally served in the pan, including shrimp saganaki, mussels saganaki, and cheese saganaki. As for setting cheese saganaki on fire, I’ve seen it done in Greece rarely, though it’s common in the US. I can’t explain the difference.

Spinach Saganaki (Σπανάκι Σαγανάκι)
Serves 4 as vegetable or 8 as part of appetizer spread (mezedes/μεζέδες)
Inspired by Βλητοκορφές Σαγανάκι at Tzitzikas and Mermigas/Τζίτζικας και Μέρμηγκας in Athens, Greece
Any wild or domesticated greens, alone or in combination, may be used for Saganaki. Because they cook fastest, it's easiest with greens like spinach, Swiss chard, domesticated dandelions, nettles, vlita (amaranth greens), or poppies. The recipe may be assembled hours in advance and refrigerated; bring to room temperature before baking.)

1/4 cup chopped fresh dill
1/4 cup chopped Italian parsley
3/4 cup chopped green onions, both white and green parts
3/4 cup diced fresh tomatoes, 3/4” dice
1/2 - 3/4 cup roughly crumbled feta cheese
3 -4 Tbsp. olive oil
Salt
Freshly ground black pepper
1/2 pound spinach, or any roughly chopped, cleaned greens (6 packed cups raw, 1 1/2 cups cooked)

Preheat the oven to 400°F.

Mix together all the ingredients except the spinach.

Bring a large pot of salted water to the boil. Add the spinach and cook just until it wilts (NOTE: The length of cooking time depends on the greens used. Spinach is done after 10 seconds; tougher greens will take longer.) Drain the spinach, quickly squeeze out any excess liquid, and mix it with the other ingredients. (The recipe may be made ahead to this point.)

Put the greens mixture in a 9” glass pie pan or other shallow baking dish.  Bake for 10 minutes.  Serve immediately with crusty bread and olives.

Variation: Substitute Peppadew peppers, or roasted red peppers, for the tomatoes. I’ve done this when I’ve been out of tomatoes and it changes the dish entirely, but in a very delicious way.  With tomatoes, the flavor of the dish is lighter and fresher; with peppers the flavor is deeper and heartier.

Variation: Substitute wild sea lovage or purslane for the parsley. (I’ll write about wild sea lovage and purslane tomorrow or the next day.)

~~~~~~~~~~~~~~~~~~~~~~~~~~~~~
This post is included in Weekend Herb Blogging hosted by Rachel from The Crispy Cook.

Monday, November 10, 2008

Recipe for Beet Soup (Παντζαρόσουπα)

Rushes of adrenaline are surging through my body. My hands are shaking so hard it’s difficult to type.

For the last half hour, I’ve been trying to chase a gathering of moose out of the garden. Whistling and yelling and waving my arms convinced two of them to leave. The remaining two ignored me, continuing to eat the currant bushes with equanimity.

To assist their departure, I opened the garden gate, hooting and hollering the whole time. This only motivated the largest moose to charge in my direction. I ran back to the house - and safety - as fast as my legs would carry me.

Both moose calmly returned to chomping the currant bushes, working their way unacceptably close to our precious apple tree.

I grabbed a baseball bat and headed back into the fray. This time I approached the garden through the woods, whacking trees with the bat and making the scariest noises I could muster. As I neared the garden fence, being careful to stay out of sight and to keep the fence between me and the moose, they finally turned tail and ran, not through the open gate but over the 7-foot fence.

Such are the challenges of gardening in Alaska. It’s clear we’ll have to raise the fence to keep out rapacious moose.

No doubt the moose were in the garden because snow covers the grass on which they normally graze. With temperatures well below freezing, Alaska is settling into winter.

Cold weather goes hand in hand with soup. Last night we sat in front of a roaring fire, cozy in our log house, enjoying bowls of ruby-red Beet Soup.

Hearty Beet Soup is chockfull of vegetables. Because they cook for a relatively short time, the vegetables retain their individual flavors. They swim in a savory-yet-sweet broth, which is perfectly balanced by the sour cream and fresh dill garnish.

Now that I’ve calmed down from my moose encounter, I’m ready for lunch: a delicious bowl of leftover Beet Soup.

Beet Soup (Παντζαρόσουπα)
Serves 6
Bacon adds wonderful flavor to the soup, but it’s equally delicious without it; if you omit the bacon, sauté the vegetables in 2 tablespoons olive oil. If you don’t want to bother with dicing the beets, parsnips, and carrots, grating them by hand or in a food processor works just fine. Ketchup is an unusual addition, but it boosts the
umami, thus enhancing the soup’s lusciousness. I prefer roasting beets to concentrate their flavor; however, the soup may also be made with boiled, steamed, or microwaved beets. If the beets are cooked ahead of time, Beet Soup makes a quick and tasty meal.

1 cup diced bacon, 1/4” dice (optional)
1 cup diced parsnips, 1/8” dice
1 cup diced carrots, 1/8” dice
1 1/2 cups diced celery, 1/4” dice
1 1/2 cups diced onions, 1/4” dice
2 Tbsp. minced garlic
6 cups vegetable or beef stock
1 14.5 ounce can diced or crushed tomatoes
1/4 cup ketchup
4 medium-sized beets, roasted and cut in 1/4” dice
1 1/2 cups finely shredded cabbage
Sour cream
Minced dill

Sauté the bacon in a Dutch oven until the fat has rendered and the bacon begins to brown. Add the parsnips, carrots, celery, and onions, and sauté until the onion softens. Add the garlic and cook for one minute. Stir in the stock, tomatoes, ketchup, beets, and cabbage. Bring to a boil, cover, turn down the heat to low, and simmer for 30 minutes. Uncover and cook for 10 minutes, or until the vegetables are cooked through and the broth is flavorful.

Serve the soup immediately, topped with a dollop of sour cream and minced fresh dill.

NOTE on Roasting Beets: Preheat the oven to 400°F. Wash the beets, cut off the greens leaving an inch of stem (don't cut into the beet itself), rub the beets with olive oil, and wrap tightly in a foil packet (or place in a tightly covered baking dish). Bake for 40 minutes to 1 1/2 hours, depending on the size of the beets and how fresh they are. The beets are done when they're tender if poked with a knife or skewer. Let the beets cool, and slip off their skins (I wear gloves when I do this to protect my hands from staining). (These can be made ahead and kept in the refrigerator for about a week.)

~~~~~~~~~~~~~~~~~~~~~~~~~~~~~
This is my entry for Weekend Herb Blogging hosted this week by Heather from Diary of a Fanatic Foodie.

Tuesday, May 13, 2008

Recipe: Braised Green Beans (Fasolakia) with Lemon (Φασολάκια Λαδερά με Λεμόνι)

“If there are three Greeks in a room, you’re bound to hear five different opinions about the correct way to cook just about anything.”

Or so goes the self-deprecating joke at Holy Transfiguration Greek Orthodox Church in Anchorage, Alaska. Although it may not be literally true, the joke helps lighten the mood at festival time.

For the annual Greek festival held in August, parishioners join together to make classics of the Greek table. The correct ways to make Moussaka, Fasolakia (braised green beans), and Dolmades (stuffed grape leaves) trigger the most vigorous debates. Everyone knows the “correct” recipe, but none of them are the same.

At Mama’s Taverna, Lulu captured the essence of these debates as she described how Zoe came up with
her wonderful Fasolakia recipe.

The truth is, Greek braised green beans taste great no matter the recipe. As I commented to Lulu, “I’ve sautéed, I’ve not sautéed, I’ve layered, I’ve stirred, I’ve added potatoes, I’ve added zucchini, I’ve cooked the beans plain, I’ve cooked them with meat, I’ve cooked them without and, shockingly, I’ve even made them sans tomatoes. In all their incarnations, I’ve NEVER had a pot of Fasolakia that tastes anything other than absolutely wonderful.”

I no sooner sent the comment than I started obsessing about Fasolakia made without tomatoes (the most common recipe includes them). I used to make tomato-less Fasolakia all the time. In recent years I’ve been stuck on versions with tomato, one of which I wrote about in February:
Greek Beef and Green Bean Stew and two of which are included in Tastes Like Home: Mediterranean Cooking in Alaska (Fasolakia and Fasolakia with Zucchini and Potatoes).

Last night I made the tomato-less version. It was everything I’d been wanting. The braised beans and onions were soft and sweet, rich with oil and herbs, and tangy from the fresh lemon juice finish. This is a dish where bread is a necessary accompaniment; it’s a shame to let the remarkably good juices go to waste.

Fasolakia belongs to a class of Greek dishes called Ladera, which means “oily” (ladi/λάδι is the Greek word for oil). The oil and vegetable juices cook together to make a wonderfully unctuous sauce. However, for many today, traditional Ladera has too much oil. Adjust the amount of oil in the recipe to suit your taste; for the traditional version, use the larger amount.

When considering the amount of oil to use, keep in mind that olive oil is a heart-healthy fat. According to the
Mayo Clinic, “Olive oil contains monounsaturated fat, which can lower your risk of heart disease by reducing the total and low-density lipoprotein (LDL, or "bad") cholesterol levels in your blood.”

The FDA says there is "limited but not conclusive evidence" that 2 tablespoons of olive oil daily can reduce the risk of heart disease. (Olive oil should be substituted for fats already in the diet, and not just added to what you’re already eating.)

This recipe’s dedicated to Lulu and Zoe.

Braised Green Beans (Fasolakia) with Lemon (Φασολάκια Λαδερά με Λεμόνι)
Serves 4 - 6 as a main course
In this easy recipe, the herbs and vegetables are layered in a Dutch oven and cooked without stirring until the beans are soft and tender. The beans shouldn’t be crunchy, and must be cooked through. Adjust the amount of olive oil as desired. Serve with slices of feta cheese, Kalamata olives, bread, and lemon wedges.

1 1/2 pounds green beans (6 cups cleaned)
4 cups thinly sliced onions
1 1/2 cups minced parsley
1/2 cup minced dill
1/2 cup minced mint
3 Tbsp. minced garlic
Salt
Freshly ground black pepper
1/2 – 1 cup olive oil
1/4 - 1/3 cup fresh lemon juice
Lemon wedges

Wash the beans, break off both ends, and break them in half. Mix the herbs and garlic together.

In a Dutch oven, layer 1 cup of onions on the bottom of the pan, top with 1/3 of the beans, then 1/3 of the herb mix, season with salt and freshly ground black pepper, and drizzle with 1/3 of the olive oil. Repeat. Repeat again but finish with the remaining cup of onions before drizzling with the last 1/3 of olive oil.

Cover and cook over medium high heat until the pan lid is hot. As soon as the lid is hot, turn the heat down to low and simmer for 1 hour, or until the beans are very soft and tender. Stir in 1/4 cup lemon juice. Taste and add lemon juice, salt, or freshly ground black pepper, as needed. Serve hot or at room temperature.
~~~~~~~~~~~~~~~~~~~~~~~~~
This is my entry for
Heart of the Matter’s May heart-healthy herb challenge hosted this month by Michelle at The Accidental Scientist.

Sunday, May 4, 2008

Recipe: Pastitsio with Greens (Παστίτσιο με Χόρτα)

The snow is gone, the grass is greening, and the dandelions’ first tiny leaves are poking through the earth. I’ve been walking the yard daily, impatient for enough wild greens to make a salad.

In the meantime, I’m making do with spinach and Swiss chard from my
Full Circle Farm CSA box.

Teeny had
another Mediterranean potluck last night and several guests made dishes from Tastes Like Home: Mediterranean Cooking in Alaska. From the book, Teeny made Halibut with Onions, Pine Nuts, and Tahini Sauce and Lemon-Marinated Dungeness Crab, Tissy made Oregano Chicken and Potatoes, Moira made Tabbouleh, and I made Hummus and Roasted Kalamata Olives.

Everything was delicious. It’s heartening, and a little magical, to see people using the recipes in
Tastes Like Home and succeeding in making delicious food.

In addition to cooking from
Tastes Like Home, I brought Pastitsio with Greens to Teeny's potluck. Like Pastitsio with Meat Sauce, a traditional Greek dish sometimes called “Greek lasagna,” Pastitsio with Greens is full of complex flavors.

Because it includes three cheeses (feta, kasseri, and manouri or ricotta), Pastitsio with Greens is rich and creamy. The luxuriant pasta and cheese is balanced by abundant greens and flavored with fresh mint, dill, and parsley. My husband describes it as macaroni and cheese that tastes better and isn’t as heavy as regular mac and cheese.

For potlucks or entertaining, one of the best things about Pastitsio with Greens is it can be assembled ahead of time and baked at the last minute. Its creamy goodness is a hit with adults, children, and everybody in between.

Pastitsio with Greens (Παστίτσιο με Χόρτα)

Serves 6 as a main course or 12 as a side dish

Any wild or domesticated greens may be used for Pastitsio with Greens. For better flavor, I prefer using at least two types of greens. I also prefer Pastitsio when most of the greens are sweeter varieties, like spinach, Swiss chard, nettles, vlita (amaranth greens), or poppies, with bitter or stronger flavored greens used only as an accent. In Greece, use fresh
manouri, myzithra, or anthotyro instead of ricotta. The Pastitsio can be assembled up to 24 hours ahead and baked just before serving. Because made-ahead Pastitsio has been refrigerated, it takes at least 10 minutes longer to bake.

1/2 pound miniature penne or other hollow pasta

Filling:
1 bunch spinach or other wild or domesticated greens
1 bunch Swiss chard or other wild or domesticated greens
2 cups diced yellow onions, 1/4” dice
2 Tbsp. olive oil
Salt
Freshly ground black pepper
1 Tbsp. minced garlic
1 cup thinly sliced green onions
1/2 cup minced fresh parsley
1/4 cup minced fresh dill
1/4 cup minced fresh mint
1 1/2 cups crumbled feta
1 1/2 cups kasseri or fontina cheese
3/4 cup fresh manouri or ricotta cheese

Béchamel:
1/4 cup butter
1/4 cup flour
2 1/2 cups whole milk
1/4 tsp. nutmeg
Salt
Freshly ground black pepper
2 egg yolks

Topping:
1/3 cup freshly grated parmesan cheese
1/3 cup Panko breadcrumbs

Cook the Pasta: Bring a large pot of salted water to the boil. Add the pasta and cook until it is almost, but not quite, done. Remove the pasta with a slotted spoon to a bowl; reserve the pasta water for blanching the greens. Rinse the pasta with cold water, drain, and reserve.

Make the Filling: Wash the greens very carefully. Discard any tough or damaged stems, leaves, roots, and any flower buds. Bring the pasta water to a boil, and blanch the greens for 1 minute. Drain and immediately rinse the greens with cold water. Using your hands, squeeze as much water as possible from the greens. Chop the greens and put them in bowl.

Sauté the yellow onions, lightly seasoned with salt and freshly ground black pepper, in olive oil until the onions soften and start to turn golden. Stir in the garlic and cook for 1 minute. Add the onions to the bowl with the greens. Add the green onions, parsley, dill, mint, and cheeses to the bowl and toss well to combine thoroughly. Taste and add salt or freshly ground black pepper as needed.

Make the Béchamel: Warm the milk over low heat or in the microwave; don’t bring the milk to a boil. Melt the butter in a large saucepan, mix in the flour to make a smooth paste, and cook for two minutes, stirring constantly. Slowly whisk in the warm milk and cook, stirring, until the sauce is smooth and the thickness of heavy cream. Add the nutmeg, salt, and freshly ground black pepper to taste. Pour 1/2 cup of hot milk sauce into the pasta, and stir to evenly distribute. Put the egg yolks in a small bowl and quickly whisk in 1/2 cup of hot milk sauce. Whisk the egg mixture back into the sauce. Cook over very low heat for two minutes, stirring constantly, and being careful not to let the sauce get hotter than a low simmer. Taste and correct the seasoning.

Make the topping: Mix the parmesan and Panko.

Assemble the Pastitsio: Preheat the oven to 350°F.

For use as a main course: Place half the pasta in the bottom of a well-oiled 9”x9” baking pan. Spread half the filling over the pasta. Top with the remaining pasta, and then with the remaining filling. Spread the béchamel over the filling. Sprinkle the topping over the béchamel. Bake for 35 – 40 minutes, or until the top of the Pastitsio is golden and the juices are bubbling. Let cool for at least 15 minutes before cutting into rectangles and serving. If you cut Pastitsio immediately after removing it from the oven, it will fall apart (but still tastes great).

For use as a side dish: Stir the pasta into the filling. Place the mixture in the bottom of a well-oiled 9”x13” baking pan. Top with the béchamel and then with the topping. Bake for 35 – 40 minutes, or until the top of the Pastitsio is golden and the juices are bubbling. Serve immediately by the spoonful or after 15 minutes if you prefer cutting it into squares.
~~~~~~~~~~~~~~~~~~~~~~~
This is my entry for
Weekend Herb Blogging, hosted this week by Anh of Food Lover's Journey. This week, May 5 to May 11, I'm hosting Weekend Herb Blogging. Please send me your entries to tasteslikehome[at]hotmail[dot]com by May 11!

Monday, March 31, 2008

Filo Tips and Recipe for Greek Leek Pie – Prasopita (Πρασόπιτα)

Friday night’s Prasopita (prah-SO-pee-tah, Greek leek pie) tasted great, but producing it was not pretty. I learned, yet again, to embrace kitchen disasters for their educational benefits.

It was one of those evenings where everything went wrong. From dodging falling knives to cleaning up egg-splattered floorboards, the frustrations accumulated. It was typical that I opened the filo and found the sheets of pastry inseparably stuck together. All but six were unusable and went straight into the garbage.

I quickly mixed up dough for an olive oil crust, and switched to making tri-cornered hand pies. Unfortunately, I didn’t make nearly enough pastry dough. It started running out while I still had a bowlful of filling. Too impatient to make more pastry, I rolled up the remaining dough and made an open-face, free-form tart.


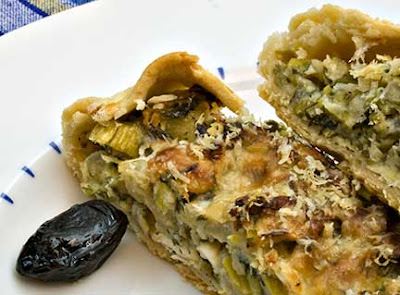
Prasopita and Leek TartWhen I was done, I had three filo-wrapped traditional Prasopites, six tri-cornered leek hand pies, and one free-form leek tart. Although I hadn’t planned it, this gave us the opportunity to directly compare filo-wrapped pies with those having a simple olive oil crust. The comparison was enlightening.
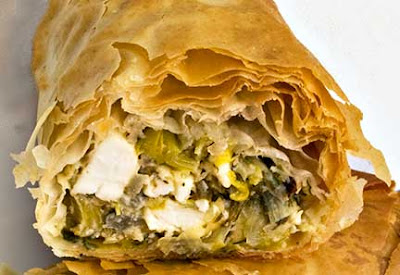
As between the filo and hand pies, it wasn’t a close call; the filo pies were far superior. Crisp filo pastry was the perfect counterpoint to the savory leek filling. Although the hand pie crust was flaky, the filling to crust ratio was too low and the crust’s flavor too dominant.

The open-face tart was another story. In this version, the single layer of olive oil crust nicely balanced the flavorful leek filling. Even better, the crust held its integrity and remained crispy even after it had been in the refrigerator for two days. This is not true of filo-wrapped pies; they rapidly lose their crispness after even a short time in the refrigerator.

So what will I do in the future? For a party, or any situation where pites are likely to be eaten quickly, I’ll stick with traditional filo. Nothing beats buttery-rich filo wrapped around leek and herb filling. I’ll also use filo when I’m not planning to bake all the pies at one time – unbaked filo-wrapped pies freeze well and can be popped in the oven direct from the freezer.

On days when I want Greek pie, but am in a hurry and don’t want to mess with filo, or when I want to limit the amount of fat I ingest, I’ll make an open-face tart. It’s an easy, extremely flavorful, savory treat. I’d happily serve it for any occasion, special or not.

Filo Tips – Working with Filo is Easy
First, pronunciation; in English, there are multiple ways to spell filo (fillo, fyllo, phyllo) because Greek to English isn’t transliterated consistently. But no matter the spelling, the pastry is pronounced FEE-low.

As with the ruined mess I faced on Friday, stuck together filo sheets are the bane of a cook’s existence. It is generally caused by improperly storing filo, by thawing and refreezing filo, or by leaving filo for too long at room temperature. To avoid this problem, buy from stores that sell a lot of filo. When you are ready to use it, thaw filo overnight in the refrigerator, bring it to room temperature before you start to work with it, and use the thawed filo within a week.

Finish making the filling, including cooling it, before you open the package of filo.

Filo is a lot more forgiving than it might seem. A few rips and tears don’t make any difference at all, and usually disappear in the many layers of filo or when a pie is shaped or rolled.

Dried out filo breaks apart and makes working with it difficult to impossible. Once filo is removed from the package, you either must work very quickly or must cover the filo sheets with a slightly damp cloth. The first few times you work with filo, the damp cloth is a must. As you gain confidence, you’ll be able to work quickly enough that the damp cloth is unnecessary.

If you want to make your own filo, Peter Minakis explains how
here.

If you want to see how filo is traditionally made in Greece, Maria Verivaki has a video and explanation here.

PrasopitaRecipe for Greek Leek Pie – Prasopita (Πρασόπιτα)
Makes 10 large or 20 small filo-wrapped pastries or 1 10” free-form tart
For vegans or those who are fasting, leave out the feta and eggs, and brush the filo sheets only with olive oil. Freeze extra Prasopites and bake frozen, adding 5 – 10 minutes to the baking time.

Leek Filling:
3 cups diced leeks, white and light green parts only, 1/2” dice (3 medium leeks)
1 1/2 cups diced yellow onions, 1/2” dice
3 Tbsp. olive oil
Salt
Freshly ground black pepper
1 1/2 cups sliced green onions (1 bunch)
1 Tbsp. minced garlic
1/2 cup minced fresh dill
1/2 cup minced fresh parsley
1 cup crumbled feta
2 eggs

Filo:
1 pound box of filo (18” x 14”)
1/2 cup (1 stick) butter
1/4 cup olive oil

Make the Filling: Sauté the leeks and onions, lightly seasoned with salt and freshly ground black pepper, in olive oil until the onions soften and start to turn golden. Put in a bowl and mix with all the remaining filling ingredients, except the eggs. Taste and add salt or freshly ground black pepper, as needed. Stir in the eggs.

Preheat the oven to 400°F.

Clarify the butter (see NOTE below for why and how to clarify butter). Mix the clarified butter and olive oil, and brush a rimmed baking sheet with the mixture.

Rolling Filo for PitaAlternative 1 - Shaping Large Prasopita: Remove the filo from the box, unroll it, and cover any you are not actively using with plastic wrap or a slightly damp cloth. Lay one 18” x 14” sheet of filo out on the counter and brush it lightly with butter-oil. Cover with another sheet of filo and brush it lightly with butter-oil. Spread 1/2 cup of filling along one of filo’s short edges. Fold in the sides and roll up the filo. Place roll on the prepared baking sheet seam side down and brush lightly with butter-oil. Repeat until all the pastries are rolled.

Alternative 2 – Shaping Small Prasopita: Follow the directions for shaping large Prasopita, but use 9” x 14” filo sheets or cut 18” x 14” filo sheets in half and use 1/4 cup filling.

Open-Face Leek TartAlternative 3 – Make Open-Face, Free-Form Tart: In a food processor mix 2 cups flour, 6 Tbsp. olive oil, and 1/2 tsp. salt. Mix in as much water as necessary (4 – 6 Tbsp.) to make dough that sticks together. Form into a ball and let rest at room temperature for 30 minutes. Roll out the dough into a 12” circle, place on a baking sheet, and spread the filling out on the dough, leaving a border of 1 1/2”. Sprinkle a little freshly grated parmesan cheese over the filling. Fold up the edges, sealing with water as necessary for folds in the dough to stick together.

Place the Prasopites (or tart) in the oven and bake for 30 – 40 minutes, or until the filo is brown and crispy (or the tart pastry is set and lightly browned).

Serve immediately.

NOTE: Clarified butter is butter with the milk solids removed. To clarify butter, melt it in a saucepan or microwave and skim off and discard the white foam that rises to the top. Pour the clear yellow butter into a bowl, being careful to keep the milky liquid that sinks to the bottom of the pan out of the clarified butter. Discard the milky liquid. If you don’t clarify butter used for separating layers of filo, the pastry won’t cook correctly, and will be soggy rather than crisp.

UPDATE: Maria Verivaki recently made this Prasopita, and shaped it into one large sprial pie (called Strifti - Στριφτή - in Greek). Here's Maria's post about Prasopita Strifti.
~~~~~~~~~~~~~~~~~~~~~~~~
More Leek Recipes:
Beet, Fennel, and Leek Salad with Lemon-Ginger Dressing (Παντζάρια, Μάραθο και Πράσο Σαλάτα με Πιπερόριζα Σάλτσα) (I make a winter salad and spice it up with ginger salad dressing)
Leek Pilaf (Πρασόρυζο) (I make Greek leeks with rice.)
Leek Soufflé
Leek and Tomato Crumble
The Easiest Grilled Leeks Ever

~~~~~~~~~~~~~~~~~~~~~~~~
This is my entry for
Weekend Herb Blogging, hosted this week by its creator Kalyn of Kalyn’s Kitchen.

Sunday, February 17, 2008

Recipe: Celery Root Waffles with Smoked Salmon and Horseradish Cream

I love second-hand stores.

What do I buy? Pretty much anything. Most frequently it’s clothes, dishes, glassware, kitchen tools, or books.

I’m happier wearing clothes that didn’t cost an arm and a leg. Because I'm a thrift store regular, I make amazing finds. Lately, my husband’s been looking debonair in an Armani blazer I bought for $1.00. It’s in flawless condition and fits him perfectly.

Since I’ve been writing Mediterranean Cooking in Alaska, I’ve purchased an assortment of second-hand plates and bowls. They help make my photographs more interesting and allow me to use dishes that best set off each individual recipe.

Since we’re both notorious breakers, I long ago gave up buying nice wine glasses. The few we have left are put away and brought out only for company. For us, thrift store glassware is definitely the way to go.

Most of the dishes, pots and pans, and kitchen tools in our Greek house came from American second-hand stores and were hauled to Greece in our baggage. The pride of my Greek kitchen is a Kitchenaid stand mixer I bought for $12.50 at Salvation Army.

Our Greek relatives don’t understand why I would buy anything second-hand. They find the whole concept to be confusing and vaguely distasteful. Why would we want something that had been previously owned by a stranger? Not surprisingly, there isn’t a single second-hand store on the island.

I’ve bought and thoroughly enjoyed used books I never would've bought new. One of these books is A Passion for Vegetables: Simple and Inspired Recipes from Around the Globe by British chef Paul Gayler. Published in 2000 for $35.00, I brought the book home for the shockingly high price of $3.50.

A Passion for Vegetables is full of interesting ideas for cooking vegetables (it is not 100% vegetarian). Gus Filgate’s photographs are gorgeous and very inspirational.

Lately I’ve been thinking about Gayler’s recipe for celery root (celeriac) waffles and smoked salmon. I had a celery root from Full Circle Farm and plenty of Gravlax in the freezer. I paired the two for brunch last Saturday.

Although I liked Gayler’s concept, I modified his recipe to eliminate waste and make a batter that worked in my waffle iron. The result was a crisp waffle with a mild celery flavor that nicely complemented Gravlax. I finished the dish with a dollop of tasty horseradish cream and a sprinkling of fresh dill.

Although we enjoyed it for brunch, Celery Root Waffles with Smoked Salmon (or Gravlax) and Horseradish Cream would make a scrumptious cold appetizer. I’m definitely making this again.

Celery Root Waffles with GravlaxCelery Root Waffles with Smoked Salmon and Horseradish Cream
Makes 6 6 - 7” waffles (serves 4 for brunch) or 24 appetizer pieces
Adapted from
A Passion for Vegetables by Paul Gayler (Lyons Press 2000)

Waffles:
1 pound celery root (3/4 pound cleaned)
1 1/2 cups milk
2 eggs
1/2 cup all purpose flour
2 tsp. baking powder
1/2 tsp baking soda
1/4 tsp. salt
Freshly ground black or pepper
3 Tbsp. butter

Horseradish cream:
6 Tbsp. whipping cream
1 1/2 Tbsp. prepared horseradish
3 Tbsp. finely minced red onion or chives
1 Tbsp. lemon juice
1/8 tsp. salt

6 - 8 ounces thinly sliced smoked salmon, lox, or gravlax
2 Tbsp. minced dill

Prepare the Celery Root: Cut the top and bottom off the celery root, leaving broad flat surfaces on either end. Put the celery root on a cutting board with a flat side down. Use a sharp knife and cut down towards the board to remove the peel; doing this in small pieces makes the job faster and easier. Once the celery root is peeled, cut it in half and then in wedges. Use a paring knife to remove the soft cottony center of each wedge. For pictures of how to do this, go
here.

Cut the wedges of celery root into chunks. Put the milk and celery root in a saucepan, bring to a boil, turn down the heat, and simmer for 20 minutes, or until the celery root is tender.

Make the Horseradish Cream: While the celery root is simmering, whisk the whipping cream until it starts to stiffen. Whisk in the horseradish, minced onions, lemon juice, and salt until the cream is fully whipped.

Make the Waffles: When the celery root is tender, remove it from the heat. Puree the milk and celery root using a stick blender, food processor, or blender. Quickly whisk 1/2 cup of celery root puree into the eggs, and then whisk this mixture back into the celery root puree.

Whisk in the flour, baking powder, baking soda, salt, and freshly ground black pepper. Melt the butter and whisk it into the batter.

Preheat the waffle iron and cook the waffles. As each waffle is done, put it on a baking rack to cool; this helps prevent condensation and keeps the waffles crisp.

To Serve: Cut or break each waffle into quarters. Arrange a slice of smoked salmon or gravlax on the waffle, top with a small dollop of horseradish cream, and sprinkle with minced dill.

~~~~~~~~~~~~~~~~~~~~~~~~~~~~~~
This is my entry for Weekend Herb Blogging, hosted this week by Lia from Swirling Notions.

Wednesday, January 23, 2008

Recipe: Gravlax

Gravlax, salmon cured in sugar and salt until it is silky smooth, is expensive to buy, but easy to make. Once the fish is filleted, it takes about 10 minutes to put the gravlax together. Two or three days later, you'll have perfectly cured fish.

I make gravlax from sea-caught wild Alaska salmon, the best tasting salmon I’ve ever had. Its great taste reflects the salmon’s varied diet and the clean environment in which it grows to maturity.

Wild Alaska salmon is on the Top 10 list of “Eco-best” fish to eat because it comes from healthy, well-managed fish populations and is caught with low-impact fishing gear. In contrast, farmed salmon is on the Top 10 list of “Eco-worst” fish due to the impact of salmon farms on the environment and the elevated levels of PCBs in the fish.

We live within driving distance of the sea waters where wild Alaska salmon congregate. By the end of summer, our freezer contains a year’s supply of fish caught by my husband and his friends. I’ve previously described how we freeze salmon and how best to thaw it.


Gravlax
Makes two sides of gravlax
This recipe makes enough curing mix for two 2 – 3 pound sides of filleted salmon. You can easily make the recipe with a 1 – 2 pound salmon fillet: cut the curing mix in half and the curing time to 24 to 36 hours. Once cured, gravlax should be stored in the refrigerator or freezer. I crack the peppercorns in a mortar and pestle, but you can also do it by whacking the peppercorns with a meat mallet.


 Mediterranean Cooking in Alaska has moved as of March 2011. To read this post please go to


Please click on over and visit my new site. Thank you!


Friday, December 28, 2007

Seven Seafoods 2007: Recipe for Periwinkles in Dill-Onion Wine Broth (Όστρακα “της Πλώρις”)

Periwinkles are usually in stock at Sagaya, our local Asian grocery. I’ve looked at them for years, but Christmas Eve was the first time I bought them. They were delicious; from now on, I will buy periwinkles regularly.

Common periwinkles, Littorina littorea, are small edible sea snails. They are hand harvested from the rocky Maine coast by local periwinkle pickers, shipped to distributors in Boston and then to Alaska, other states, Europe, and Asia.

The flavor is similar to clams, although periwinkle meat is slightly sweeter. Based on their flavor, I would substitute periwinkles for clams in any steamed clam recipe. They were surprisingly tender and easily slipped out of their shells on the point of a toothpick.

Last September we ate at an Athens restaurant called Logia tis Ploris, and enjoyed shellfish cooked in wine with dill and onions. This combination went beautifully with the periwinkles, as it would with any kind of shellfish.

PeriwinklesPeriwinkles in Dill-Onion Wine Broth (Όστρακα “της Πλώρις”)
Serves 2 as a main course or 4 – 6 as an appetizer


2 pounds live periwinkles
1/4 cup olive oil
1 cup diced yellow onions, 1/4” dice
1 cup thinly sliced green onions
1/4 cup minced dill
1 cup white wine
Freshly ground black pepper
Wedges of lemon

Wash the periwinkles to remove any sand or dirt.

Using a pot that has a lid and is large enough to hold all the periwinkles, sauté the yellow onion in olive oil until the onion softens and starts to turn golden. Add the periwinkles, green onions, dill, wine, and lots of freshly ground black pepper. Stir to evenly distribute the ingredients. Bring the wine to a boil, cover, turn down the heat to medium-low, and cook for 5 minutes, or until the periwinkle meat can easily be slipped out of the shell.

Serve the periwinkles and broth with toothpicks, wedges of lemon, and plenty of crusty bread. To eat the periwinkles, use a toothpick to knock off the operculum, a thin scale that covers the periwinkle’s opening (don’t worry if the periwinkle doesn’t have an operculum; it may have fallen into the broth). Stick the toothpick down into the periwinkle shell, hook the meat, and carefully slide it out of the shell. Eat and enjoy. The broth is delicious and can be eaten with a spoon, or soaked up on pieces of bread.

Wednesday, December 12, 2007

Recipe: Chicken with Pomegranate-Wine Sauce

I hardly knew Tom and Joanna when they first invited me for dinner. I thought they were smart, funny, and sarcastic, and looked forward to an amusing evening. The evening was entertaining, but not in the way I’d expected.

The pair made their home in a nondescript apartment complex, which they managed in exchange for reduced rent. The kitchen was tiny. The walls were sterile. The kitchen equipment was rudimentary.

When I arrived, Tom and Joanna hadn’t yet started cooking. The intended main course was chicken in pomegranate sauce. It was an ambitious undertaking; in those days, we experimented with complex recipes calling for skills we did not yet possess.

The difficulty with the recipe was it required juiced pomegranates. This was before pomegranate juice was readily available, and Tom and Joanna had purchased a pile of pomegranates to liquify.

Joanna had no idea how to juice a pomegranate. Neither did Tom and neither did I; the only pomegranates I’d ever had were Christmas treats, savored seed by seed. I was dubious whether pomegranates could actually be turned into juice. The kitchen equipment was clearly not up to the task.We steeled ourselves with stiff shots of Jack Daniels.

I don’t remember the exact juicing method we finally settled on. What I do remember is the pomegranates contained very little juice; not nearly enough to make the recipe. What juice there was ended up on the counters. And on the walls and backsplash, no longer sterile. And on our clothes, hands, and faces. It was a dramatic mess.

By the time all the pomegranates had been mangled, we couldn’t quit laughing. It was that laughter that sealed our lifetime friendship. In circumstances where some might be frantic or upset, Joanna just laughed and poured us another drink.

The evening left me with an indelible impression that cooking with pomegranates was more trouble than it was worth. I steered clear of them until recently, when I read
Maryann’s advice on Finding La Dolce Vita to juice pomegranates by breaking them down in the blender and straining out the seeds. This sounded easy enough to try.

Pomegranate SeedsMaryann's advice came at a time when the local Costco store was carrying flats of huge, gorgeous pomegranates. It was kismet; I had to buy them. Once the pomegranates were piled on my counter, I couldn’t stop thinking about Tom and Joanna’s chicken in pomegranate sauce. I decided to create my own version.
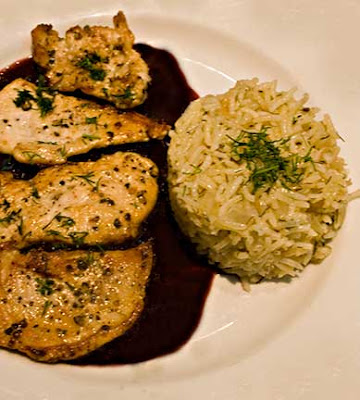
I removed the pomegranate seeds in the sink, under water, to prevent their staining juice from spraying all over the kitchen. I whirred batches of seeds in the food processor and used my mom’s old
Foley food mill to strain out the pits. Each large pomegranate made two cups of cleaned seeds which, in turn, made 3/4 cup of juice.

The final dish was a rousing success. The chicken, pounded thin and cooked quickly in butter, had a nutty taste that complimented the slightly sweet, but tangy, pomegranate-wine sauce. I'm not ashamed to admit I licked my plate.

I will make this recipe over and over again. Each time I do, I will laugh at the happy memory of that first dinner with Tom and Joanna, so many years ago.

Chicken with Pomegranate-Wine SauceChicken with Pomegranate-Wine Sauce
Serves 4
For a more refined sauce, strain out the shallots after the sauce has thickened, and before stirring in the butter. I love the shallots' added texture, so I leave them in. Serve with Dill and Rice Pilaf, and crusty bread for mopping up the sauce.

Sauce:
3/4 cup diced shallots, 1/4” dice
2 Tbsp. olive oil
Salt
Freshly ground black pepper
3/4 cup dry red wine
3/4 cup chicken stock
1 1/2 cups pomegranate juice (2 – 3 pomegranates)
1 bay leaf
2 Tbsp. butter

Chicken:
2 skinless, boneless chicken breast halves
Salt
Freshly ground black pepper
2 Tbsp. butter
Fresh dill or parsley, minced for garnishk

For the sauce: Sauté the shallots, lightly seasoned with salt and freshly ground black pepper, in olive oil until they soften and start to turn golden. Stir in the wine, bring to a boil, and cook until the wine is reduced by half. Add the chicken stock, pomegranate juice, and bay leaf. Bring to a boil, turn the heat to medium, and cook until the sauce is reduced to 1 cup, and is slightly syrupy. (I made the sauce ahead to this point.) Just before serving, warm up the sauce. When the sauce is hot, turn off the heat and whisk in the butter, 1 Tbsp. at a time.

For the chicken: Wash the chicken breasts, and dry them well. Remove the “fillet” from each breast, and cut the rest into two slices by holding the pieces flat with one hand and cutting parallel to the cutting board. Pound the sliced chicken pieces, including the fillets, between pieces of waxed paper or plastic wrap until they are 1/4” thick. Cut the pounded chicken into approximately 3” pieces. Season both sides with salt and freshly ground black pepper. (The chicken may be prepared ahead to this point and refrigerated until ready to cook).

Heat the butter in a frying pan until it just starts to bubble. Quickly cook the chicken pieces until they are lightly browned and cooked through. Cook the chicken in batches, being careful not to crowd the pan, or the chicken will steam rather than brown. When all the pieces are done, quickly toss them in the frying pan to make sure all pieces are hot.

For serving: Spoon a pool of sauce onto each of 4 plates, top with pieces of browned chicken, and sprinkle with minced fresh dill or parsley.

~~~~~~~~~~~~~~~~~~~~~~~~~~~~~~~~~~~

This is my entry for Weekend Herb Blogging #113, hosted this week by Astrid from Paulchen's Food Blog.
~~~~~~~~~~~~~~~~~~~~~~~~~~~~
Pomegranates are a popular item this season, in part because of "the heavy promotion of the crimson fruit and its juice as rich in antioxidants." This antioxidant rich dish is my entry for this week's Antioxident Rich Food/Five-a-Day Tuesday sponsored by Sweetnicks.
~~~~~~~~~~~~~~~~~~~~~~~~~~~~~~~~~~~
Don't forget to buy your Menu for Hope raffle tickets no later than December 21-- all proceeds go to the UN World Food Program. The Menu for Hope prize I am offering is here (wild oregano, handmade sheep cheese, handmade egg noodles, and autographed copy of Tastes Like Home: Mediterranean Cooking in Alaska), the list of all West Coast Menu for Hope prizes is here, and the list of all worldwide Menu for Hope prizes is here. For more information about Menu for Hope, go here.

Tuesday, November 27, 2007

Onion Day Recipes: Winter Squash with Onions (Κολοκύθι Κόκκινο με Κρεμμύδι) and Leek Pilaf (Πρασόρυζο)

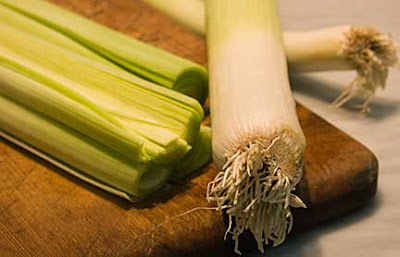
LeeksBetween Thanksgiving feasting, leftovers, and dinner out at a steakhouse, we’ve been eating entirely too much meat. Or at least more meat than normal.

I’m ready for vegetables. Thanks to my CSA box from Full Circle Farm, all I had to do for inspiration was open the refrigerator.

Delicata SquashGiant leeks caught my eye first: four leeks, weighing a little over a pound each. I also noticed Delicata squash, a mild-tasting, thin-skinned heirloom variety that had been in the refrigerator a couple weeks. The skin was shiny and the flesh was firm, but it was time to cook the Delicata.

The traditional onion market (Zibelemärit) opens November 26 in Berne, Switzerland. Zorra of Kochtopf blog decreed the 26th to be Onion Day, and challenged cooks around the world to use onions in honor of the market. I decided to take up the challenge and showcase Delicata squash, onions, and leeks, a member of the onion family.

Kimolos, a tiny Greek island in the Aegean Sea, is part of the Cyclades island group. In 2001, less than 800 people lived on its 20 square miles. That year, Filena Venardou, who came to Kimolos as a teacher, published a book of traditional recipes from Kimolos: Η Κουζίνα της Κιμώλου (The Cuisine of Kimolos).

Winter Squash with Onions (Κολοκύθι Κόκκινο με Κρεμμύδι) is one of the traditional recipes Venardou collected. She says winter squash is much tastier than summer squash, and the Kimolos method of cooking it in hot oil gives the squash a crispy crust and seals in its juices.

I adapted Venardou’s recipe using Delicata squash and finished the fried squash and onions with a dusting of the dried wild thyme we collected last summer in Greece. The resulting dish, which must be served hot, was robust and filling. It would be a good side dish for any kind of meat or poultry, although Venardou suggests serving it as an appetizer and we enjoyed it as an Onion Day main course.

Chopping LeeksTo round out the meal, I made Leek Pilaf (Πρασόρυζο), an easy and flavorful Greek dish enjoyed during the many fasting periods that fill the Greek Orthodox calendar. The light, herby flavors of dill and mint contrasted nicely with the rich flavors of fried squash and onions.

Since it is difficult for me to cook without using onions or garlic, it is fitting that Onion Day closes my first month of serious food blogging. It is also the day on which the thousandth visitor stopped by my blog. Happy Onion Day!

Squash&Onions and PrasorizoWinter Squash with Onions (Κολοκύθι Κόκκινο με Κρεμμύδι)
Serves 4 - 6
Delicata squash is easily peeled with a sturdy vegetable peeler. After peeling the squash, cut it in half, use a spoon to scrape out the stringy centers and seeds, and dice the flesh.

3 cups diced Delicata or other winter squash, 3/4” dice (approximately one squash)
4 cups diced yellow onions, 3/4” dice
3/4 cup flour
Salt
Freshly ground black pepper
1 tsp. dried thyme, crushed
Oil for frying

Put the diced squash and onions in a bag with the flour, salt, and freshly ground pepper. Shake the bag around so the flour evenly coats the vegetables. Dump the floured vegetables into a strainer and shake the strainer to remove the excess flour.

Heat 1/2” of olive oil in a large frying pan until it is very hot, but not smoking. Add 1/3 of the floured squash and onions to the hot oil, and fry until the undersides are browned. Turn the vegetables over, and brown the other side. Using a slotted spoon, remove the vegetables from the oil and place on paper towels to drain. Repeat with the remaining vegetables, being careful not to crowd them in the frying pan, or they will steam rather than brown.

Sprinkle the crushed dried thyme over the browned vegetables, taste and add salt or freshly ground black pepper, as needed.

Leek Pilaf (Πρασόρυζο)
Serves 6
Leek pilaf is good on its own, or as a tasty accompaniment to any kind of fish, seafood, or poultry. Before dicing leeks, be sure to slit them lengthwise and clean thoroughly under running water to remove the dirt and grime that often is trapped between the leek’s layers.

6 cups diced leeks, white and pale green parts only, 1/2” dice (2 – 3 leeks)
1/4 cup olive oil
Salt
Freshly ground black pepper
1 cup rice
1 Tbsp. tomato paste
2 cups water
1/3 cup minced fresh dill
1/3 cup minced fresh mint

Sauté the leeks, lightly seasoned with salt and freshly ground black pepper, in olive oil until they soften and start to turn golden around the edges. Add the rice and sauté for one minute, stirring constantly to evenly distribute the leeks and oil. Add the tomato paste, and thoroughly mix it into the rice. Stir in the water, dill, and mint, bring to a boil, cover, and turn the heat down as low as possible. Cook for 20 minutes, or until the rice absorbs all the water. Turn off the heat, and let the pilaf sit covered for 15 minutes before serving. Taste and add salt or freshly ground black pepper, as needed.


Sunday, November 18, 2007

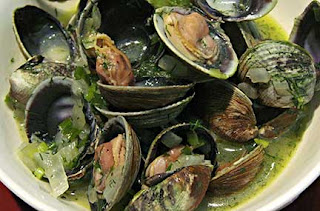
Recipe: Clams with Onions and Dill (Όστρακα “της Πλώρης”)


Clams with Onion and DillOne of the dishes we enjoyed
during our recent visit to restaurant Logia tis Ploris in Athens was Clams with Onions and Dill (Όστρακα “της Πλώρης”). The mixed clams were steamed in wine, and seasoned with green onions and dill, wonderful flavors to enjoy outside on a balmy evening. Although the flavors seem summery, when we had this dish last Friday in snowy Alaska, it was hearty, warming, and satisfying.


Mediterranean Cooking in Alaska has moved as of March 2011. To read this post please go to


http://www.laurieconstantino.com/recipe-from-athens-seafood-restaurant-logia-tis-ploris/


Please click on over and visit my new site. Thank you!