Showing posts with label dessert. Show all posts

Monday, October 25, 2010

Recipes: Bev's Apple Cake & Plum Torte (Κεικ με Μήλα & Κεικ με Δαμάσκηνα)

We stepped off the plane in Anchorage a month ago. The sun was shining brightly; the air crisp and cold. Our clothing, suitable for 75°F weather we left behind in Greece, left us shivering in Alaska.

We were one of the last to pass customs; our suitcases, fully packed with delicious Greek ingredients (including 30 pounds of cheeses), attracted intense governmental scrutiny. We helplessly stood by while a neophyte customs agent mauled delicate cheeses, sticking his thumb through their centers. Puzzled, he gave the cheese to a more senior agent for scrutiny, who immediately approved its entry. At long last, all our food passed muster, albeit a little worse for wear.

Because of the customs hold up, we missed the normal 30-people-fighting-for-10-taxis that happens after every international flight lands in Anchorage. Tired and relieved, we stepped into a waiting taxi and headed home.

Anchorage was awash with color: the sky, brilliant blue; the trees, gloriously gold. The mountains surrounding the city were deep green and snowless. Since we’ve been back, supermarket produce sections have been overflowing with fall fruits.


With all the fall fruit that’s landed in my kitchen, I’ve been doing a lot of baking. So far, my favorite treats are a pair of simple to mix, one-bowl cakes that are packed with fruit and wonderful flavor.

Bev’s Apple Cake is moist, has lots of apples, and isn't overly sweet. When fresh from the oven, the top crust crackles, nicely contrasting with the moist crumb and juicy fruit.


Plum Torte is one of the New York Times most requested recipes of all times. First created by Lois Levine and popularized by Marion Burros in her New York Times column, Plum Torte is moist, buttery, and absolutely delicious. Like Bev’s Apple Cake, it takes minutes to put together, but seems as if it took a lot of effort.


Mediterranean Cooking in Alaska has moved as of March 2011. To read this post please go to


http://www.laurieconstantino.com/quick-and-easy-cake-recipes-with-fruit/


Please click on over and visit my new site. Thank you!


Wednesday, November 26, 2008

Recipe for Pomegranate Ice Cream in Pistachio-Cardamom Cookie Sandwiches, with Bonus Recipe for Crispy Pistachio-Cardamom Cookies

Christmas is coming faster than you’d think, which means Christmas baking season is nearly upon us.

For the last few days, I’ve been working on a fun, new, seasonally appropriate, and colorful Christmas dessert. After several attempts, I’ve finally perfected my recipe for Pomegranate Ice Cream in Pistachio-Cardamom Cookie Sandwiches.

The recipe is amazing. Tart pomegranate, rich pistachio, and aromatic cardamom come together harmoniously in every bite of the ice cream sandwich.

I originally made mini-sandwiches because I was testing successive versions of the recipe in small batches. I soon realized the small sandwiches were ideal for serving after a holiday meal. They provide just enough sweetness to finish the meal with a flourish, yet are light enough to prevent that overstuffed feeling.

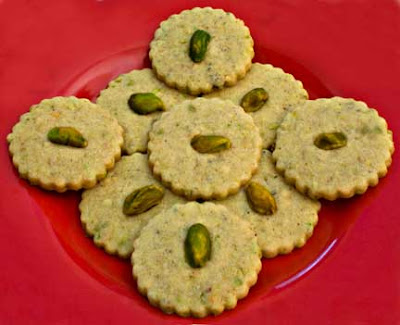
One version of my cookie recipe was light and crisp; too crisp for ice cream sandwiches, but perfect for serving on its own as a cookie. This cookie is so delicious, I’ve included the recipe below. I’m also adding Crispy Pistachio-Cardamom Cookies to the mixed plates of Christmas cookies I make every year for friends.

Pomegranate Ice Cream is also terrific on its own, and extremely easy to make. It takes less than 5 minutes to mix the ingredients, and the ice cream maker does the rest of the work. Serve scoops of the ice cream plain, with a few pomegranate seeds (arils) sprinkled over the top, or even with Crispy Pistachio-Cardamom Cookies on the side. This is another tart-yet-light dessert for serving after holiday meals.

Besides their deliciously tart flavor, pomegranates are good for your health. They contain large amounts of Vitamin C and B5, as well as many other phytochemicals. Tests show pomegranates may reduce heart disease risk factors and reduce blood pressure.

Here's my theory: So long as you eat it during the holiday season, the heart healthy benefits of pomegranate counteract the negative effects of eating cream, making Pomegranate Ice Cream a guilt-free treat.

Pomegranate Ice Cream in Pistachio-Cardamom Cookie SandwichesPomegranate Ice Cream in Pistachio-Cardamom Cookie Sandwiches
Makes 20 1 1/2” sandwiches or 10 3” sandwiches


1 recipe Pistachio-Cardamom Cookies for Ice Cream Sandwiches (see recipe below)
1 recipe Pomegranate Ice Cream
(see recipe below)

Make the Pistachio-Cardamom Cookies for Ice Cream Sandwiches and let them cool completely.

Make the Pomegranate Ice Cream. When it's done, put it in the freezer for 1/2 hour to firm up.

Lay out the plain cookies, underside up, on a cookie sheet. Using a 1 Tbsp. scoop for 1 1/2” sandwiches or a 2 Tbsp. scoop for 3” sandwiches, place a scoop of ice cream on each plain cookie. Top the ice cream with cookies that have pistachios in the center, pushing down carefully to flatten out the ice cream without breaking the soft top cookie.

Freeze. Serve straight from the freezer. If you are storing the ice cream sandwiches for any length of time, wrap them individually in plastic wrap.

Pomegranate Ice Cream with Pistachio-Cardamom CookiesPomegranate Ice Cream
Makes about 3 cups of ice cream (enough for 20 small, or 10 large, ice cream sandwiches)
Alcohol
lowers the freezing point of ice cream, which makes it slightly softer and easier to serve than ice cream that doesn’t include alcohol. Even without the alcohol, Pomegranate Ice Cream is delicious, although it may form noticeable ice crystals. Pomegranate liquor enhances the pomegranate flavor, but raspberry-flavored vodka and plain vodka also work well and both have the benefit of being sold in miniature bottles. If you are making this to serve on its own, and your ice cream maker is large enough, double the recipe.

1 cup pomegranate juice from fresh pomegranates OR 1 cup 100% Pomegranate Juice
(see Note below)
1 cup half and half
1/2 cup cream
1 Tbsp. pomegranate liqueur or vodka
1 Tbsp. lemon juice
1/4 cup sugar
1/8 tsp. salt

Thoroughly whisk all the ingredients together. Put the mix in an ice cream maker and freeze according to the manufacturer’s instructions.

Note on pomegranate juice: Here’s how to juice pomegranates: Cut the pomegranates in half, and juice with a citrus juicer. If you don't have a citus juicer, remove the pomegranate seeds (more accurately,
arils) from the skins, discarding the white fibrous matter separating the seeds. (You’ll make less of a mess if you do this underwater.) Whir batches of the seeds in a food processor and then put through a strainer to remove the pits (a Foley food mill works well for this task). If you don't have access to fresh pomegranates, 100% pomegranate juice works just fine in this recipe.

Pistachio-Cardamom Cookies (for use in ice cream sandwiches)
Makes 40 1 1/2” cookies (20 sandwiches) or 20 3” cookies (10 sandwiches)
With added cornstarch to reduce the protein content of the flour, egg yolk instead of whole egg, and slightly underdone cookies, this version is tenderer than cookies intended to be served on their own. The tenderness makes the cookies softer and easier to bite through, an important consideration for ice cream sandwiches. These cookies are more highly seasoned than cookies that aren’t served frozen. If you want Pistachio-Cardamom Cookies for eating on their own as cookies, see the recipe below for Crispy Pistachio-Cardamom Cookies. In a pinch, if you can’t find raw pistachio nuts, buy roasted, salted nuts (Costco often carries these), rinse off the salt, and dry them very well before using in the recipe. If you have a convection oven, you can bake multiple sheets of cookies at one time; if not, bake the cookies one sheet at a time.

1/2 cup shelled, unsalted pistachio nuts
1/2 cup sugar
1/2 cup unsalted butter (1 stick), softened
1 egg yolk
1 tsp. vanilla extract
1/2 – 3/4 cup all purpose flour
1/4 cup cornstarch
1/8 tsp. salt
3/4 tsp. freshly ground cardamom (1 tsp. if using pre-ground cardamom)
Coarse sugar crystals for topping the cookies
Extra pistachio nuts for topping the cookies

Preheat the oven to 325°F (or 300°F convection).

Add the pistachios and sugar to a food processor or blender, and process just until the pistachios are finely ground.

Using the mixer’s whisk attachment, cream the butter and half the pistachio sugar until they are light and creamy. Beat in the egg yolk and vanilla, scraping down the sides of the bowl, as needed. Mix in the remaining pistachio sugar.

Sift together 1/2 cup flour, cornstarch, salt, and ground cardamom. Using the mixer’s paddle attachment, slowly mix the dry ingredients into the wet ingredients. Add the remaining flour, as needed; the dough should be pliable, but not at all sticky.

Roll out the dough on a floured cloth until it is 3/16” thick (gather up the trimmings and reroll them). Cut out the dough with a cookie cutter (I like 1 1/2” circles for mini ice cream sandwiches), and place on cookie sheets lined with parchment paper or
Silpats. Sprinkle each cookie with coarse sugar crystals. Push one pistachio nut into the center of half the cookies.

Bake for 7 - 8 minutes, or until the cookies have firmed up, but are still underdone. Remove from the oven and place the cookie sheets on wire racks to cool (don’t remove the cookies from the cookie sheets until they are completely cool).

Crispy Pistachio-Cardamom CookiesCrispy Pistachio-Cardamom Cookies (for serving as cookies)
Makes 80 1 1/2” cookies or 40 3” cookies
This recipe produces crispy cookies that are perfect for serving on their own, with a cup of tea, or as part of a mixed plate of Christmas cookies. (Crisp cookies aren’t suitable for ice cream sandwiches because they’re too hard to bite through when frozen.) In a pinch, if you can’t find raw pistachio nuts, buy roasted, salted nuts (Costco often carries these), rinse off the salt, and dry them very well before using in the recipe. If you have a convection oven, you can bake multiple sheets of cookies at one time; if not, bake the cookies one sheet at a time.

1 cup shelled, unsalted pistachio nuts
1 cup sugar
1 cup unsalted butter (2 sticks), softened
1 large egg
1 tsp. vanilla extract
1 3/4 – 2 cups all purpose flour
1/4 cup cornstarch
1/4 tsp. salt
1 tsp. freshly ground cardamom (1 1/2 tsp. if using pre-ground cardamom)
Coarse sugar crystals for topping the cookies
Extra pistachio nuts for topping the cookies

Preheat the oven to 325°F (or 300°F convection).

Add the pistachios and sugar to a food processor or blender, and process just until the pistachios are finely ground.

Using the mixer’s whisk attachment, cream the butter and half the pistachio sugar until they are light and creamy. Beat in the egg and vanilla, scraping down the sides of the bowl, as needed. Mix in the remaining pistachio sugar.

Sift together 1 3/4 cup flour, cornstarch, salt, and ground cardamom. Using the mixer’s paddle attachment, slowly mix the dry ingredients into the wet ingredients. Add the remaining flour, as needed; the dough should be pliable, but not at all sticky.

Divide the dough in half. Roll the halves out on a floured cloth until they are 3/16” thick (gather up the trimmings and reroll them). Cut out the dough with cookie cutters (I like 1 1/2” circles), and place on cookie sheets lined with parchment paper or
Silpats. Sprinkle each cookie with coarse sugar crystals and push one pistachio nut into the center of each cookie.

Bake for 10 – 12 minutes, or until the cookies just barely start to brown. Remove from the oven, and use a spatula to place the cookies on wire cooling racks. Store in an airtight container.
~~~~~~~~~~~~~~~~~~~~
Pomegranate Ice Cream in Pistachio-Cardamom Cookie Sandwiches is my contribution to Sugar High Friday:
All That Glitters hosted this month by Susan of The Well-Seasoned Cook

Crispy Pistachio-Cardamom Cookies is my contribution to
Eat Christmas Cookies: Season 2, which is created and hosted by Susan of Food Blogga. Check out Susan’s round-up page to see all the cookie recipes submitted this year (Susan will continuously update the page as new cookie recipes are submitted).

Saturday, November 22, 2008

Recipe for Pear Pecan Cake with Lemon Glaze (Κέικ με Aχλάδια και Πεκάν)

Pear Pecan CakeWhen I was growing up, cupcakes were a homey lunchbox treat. They weren’t seen in upscale bakeries or on fancy tables.

That all changed in 1996 when New York City’s
Magnolia Bakery started making cupcakes with extra cake batter. After Magnolia’s cupcakes were featured on Sex and the City, it set off a nationwide cupcake craze. Cupcakes’ popularity continues; Barack Obama recently gave Joe Biden a dozen for his birthday.

In 1999, the owners of Magnolia Bakery, Allysa Torey and Jennifer Appel, published
The Magnolia Bakery Cookbook: Old-Fashioned Recipes from New York’s Sweetest Bakery. The slim volume is filled with old-fashioned recipes for cake, cookies, and other desserts, all made with the best possible ingredients.

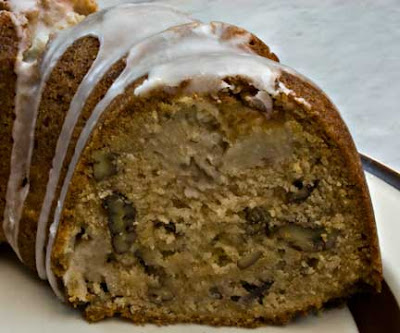
Last week, I had ripe pears that needed to be used immediately. Magnolia Bakery’s Pear Pecan Cake seemed a wonderful way to use them. I modified the original recipe by adding grated lemon peel to the batter and finishing the cake with a light lemon glaze. The clear lemon flavor balances the pear cake’s richness.

Pear Pecan Cake with Lemon Glaze is moist and delicious. With a cup of hot coffee or tea, it makes a decadent breakfast or mid-morning snack.

Pear Pecan CakePear Pecan Cake with Lemon Glaze (Κέικ με Aχλάδια και Πεκάν)
Adapted from
The Magnolia Bakery Cookbook
The batter for this cake is thicker than normal cake batter, so don’t worry if you can't pour it. Apples may be substituted for the pears, and walnuts may be used instead of pecans.


Cake:
2 – 3 ripe pears (2 cups chopped)
3 cups all-purpose flour
2 cups sugar
1/2 tsp. baking soda
1/2 tsp. salt
1 cup plus 2 Tbsp. vegetable oil
3 eggs
1 tsp. vanilla extract
1 Tbsp. freshly grated lemon peel
1 1/3 cups coarsely chopped pecans

Glaze:
2 cups powdered sugar
3 – 4 Tbsp. lemon juice

Preheat the oven to 350°F.

Thoroughly oil a Bundt or tube pan. After it’s oiled, if the pan isn’t nonstick, lightly flour it to ensure the cake will properly release from the pan.

Peel and quarter the pears. Remove the core, cut each quarter in half lengthwise, and then cut each slice in crosswise pieces.

Sift together the flour, sugar, baking soda, and salt. Stir the oil, eggs, and vanilla extract into the dry ingredients. Fold in the chopped pears and pecans. Evenly spoon the batter into the prepared pan, lightly smoothing out the top. Bake for 60 minutes or until a thin skewer inserted into the middle of the cake comes out clean. Let the cake cool in the pan for 20 minutes, turn the cake upside down onto a wire rack to release it, and finish cooling the cake.

Mix the powdered sugar and 3 Tbsp. lemon juice in a small bowl. If the glaze is too thick, mix in the remaining lemon juice. Spoon the glaze over the very top of the cake so that it drips down the sides and center of the cake.

Slide the cake onto a serving plate. To store, cover the cake with aluminum foil.


~~~~~~~~~~~~~~~~~~~~~~~
Nuria, who writes
Spanish Recipes from Barcelona, Spain and Maryann of Finding La Dolce Vita from the state of New York are two of the world’s nicest people. Both are excellent cooks. At their requests, I’ve completed a know-your-fellow-bloggers meme. For those whose blogs I’ve named below, if you want to complete the meme on your blog, feel free, but please don’t feel obligated, to do so. Here goes:

Who are the last 10 people who commented on your blog?

10) Peter from Souvlaki for the Soul
9) Joan from FOODalogue: Meandering Meals and Travels
8) Maria from Organically Cooked
7) MAG from Hommus & Tabbouli
6) Lydia from The Perfect Pantry
5) Maryann from Finding La Dolce Vita
4) Mariana from History of Greek Food
3) Bijoux from
Keep It Simple
2) Kalyn from Kalyn’s Kitchen
1) Susan from The Well-Seasoned Cook

Now answer the following:

1. Has number 10 taken any pictures that moved you? Peter at Souvlaki for the Soul takes some of the best pictures in the food blogosphere. His moody pictures of the Acropolis may be the best I’ve ever seen of this well-photographed site.

2. Have you ever tried something from number 9's blog? I only recently learned about Joan’s blog. As someone who grew up eating Pigs in a Blanket and who loves greens of all kinds, I want to try Joan’s recipe for “This Ain’t Yo Mama’s Pigs in a Blanket.” It looks wonderful.

3. Do you wait excitedly for number 8 to post? Yes. Maria of
Organically Cooked is one of my favorite writers; as a storyteller she is without peer among food bloggers.

4. If you could give one piece of advice to number 7 what would it be? MAG’s Lebanese recipes at
Hommus & Tabbouli are mouth-wateringly good. She doesn’t need any advice; MAG knows what she's doing!

5. Does number 6 reply to comments on her blog? Yes, Lydia does reply to comments left on
The Perfect Pantry. She also gives us a weekly peek into other people’s pantries, a series I find endlessly entertaining.

6. How did number 5's blog change your life? When
Finding La Dolce Vita had its first anniversary, Maryann did a drawing for an anniversary present that I was lucky to win. The package included a pizza chopper that has revolutionized how I cut up pizzas and tarts. Thanks Maryann!

7. How often do you comment on number 4's blog? I comment on most, if not all, posts on Mariana’s blog,
History of Greek Food.

8. What is your favorite post from number 3's blog? Bijoux of Keep It Simple helps keep me current on modern design trends. Her latest post on a
cutting-edge Japanese product is my current favorite.

9. Where is number 2 from? Kalyn of Kalyn’s Kitchen is from Salt Lake City, Utah.

10. Has number 1 blogged something that inspired you? Pretty much everything Susan of The Well-Seasoned Cook puts on her blog is inspirational. Her photographs jump off the screen and her descriptions of food are smoothly creative.

11. Do you know any of the 10 bloggers in person? Yes, I know Maria from Organically Cooked.

12. Do any of the 10 bloggers know each other in person? Yes, Kalyn and Lydia met at this year’s BlogHer conference. Maria from Organically Cooked and Mariana from History of Greek Food are friends. If others know each other, it’s news to me.

13. Out of the 10, who updates her blog most frequently? Kalyn of Kalyn’s Kitchen, Queen Mother of Weekend Herb Blogging, updates most frequently.

14. Which of the 10 makes you laugh? Maria’s quirky sense of humor is just one of the reasons I keep going back to Organically Cooked.

15. Which of the 10 makes you cry (good or bad tears)? Cry? Why in the world would I cry when reading about good food and looking at pictures that make my mouth water?
~~~~~~~~~~~~~~~~~~~~
This is my recipe for Bookmarked Recipes, hosted and created by Ruth of Ruth’s Kitchen Experiments.


Monday, August 18, 2008

Greek Wild Thyme Honey with Recipe for Cinnamon-Honey Tart (Melopita – Μελόπιτα)

Thyme Covered Hillsides at Tigani BaySandy beaches and rocky promontories alternate along the island’s irregular coastline. Mounds of wild thyme cover the hills sloping down to the sea, and scent the sea air with their heady aroma.

Harvesting Wild Thyme

Harvesting Wild Thyme

By the start of summer, the wild thyme is in bloom. Yiannis, our beekeeper friend, has already moved his hives to fields near the shore and the abundantly blooming thyme. The bees spend their summer making thyme-flavored honey that Yiannis harvests and sells to locals and tourists alike.

I fell in love with thyme honey years ago at a galakatopoleio, a type of Greek store that sells milk, yogurt, and desserts like rice pudding (rizogalo) and custard pies (galaktoboureko). We’d stopped for a late breakfast and I ordered yogurt.

Used to American yogurt, which has a much thinner consistency than its Greek counterpart, I was surprised to see the galaktopoleio’s proprietor slice off a thick slab from a long yogurt loaf. He served the yogurt slice with liberal drizzlings of thyme honey. Despite its simplicity, the combination was utter perfection. Thyme honey, unlike the bland clover honey I grew up with, has a robust flavor.

When we return from Greece each year, we always have a supply of wild thyme honey in our baggage. However, in Alaska, Greek yogurt is difficult, and usually impossible, to find. When available, it’s too expensive for my budget.

Greek Yogurt and Honey
If I crave Greek yogurt and honey in Alaska, I buy plain, whole-milk yogurt (Pavel’s Original Russian Yogurt, available at Natural Pantry in Anchorage, is my favorite brand), and strain it for at least an hour through a paper towel set in a colander. Strained American yogurt mimics the texture of the yogurt we buy in Greece. I like straining yogurt right when I bring it home from the market; that way, it’s ready to eat at my convenience. All I need do is drizzle a scoop of strained yogurt with Yiannis’ honey, and my favorite breakfast is ready to serve.

Honey isn’t a newcomer to the Greek table. It’s been an important ingredient in Greek cooking throughout recorded history and continuing to the present day. In
The Deipnosophistae of Athenaeus, which includes excerpts from the earliest Greek writings about food and cooking, honey appears regularly. Among other uses, the ancient Greeks combined honey with wine, added it to savory sauces, and drizzled it over all kinds of sweets.

Athenaeus (circa 200 AD) catalogs “cheesecakes of every sort and every name,” including many that contain honey. In a recent post, Mariana of History of Greek Food wrote about her version of one cheesecake described by Athenaeus.

Cinnamon-Honey Tart (Melopita), a dessert using many of the same ingredients as the cheesecakes documented by Athenaeus, is still popular in Greece today. There’s also a Greek honey cake called Melopita; for clarity, I’ve translated the cheesecake-style Melopita as Cinnamon-Honey Tart.

On some Greek islands, and notably on
Sifnos, Cinnamon-Honey Tart is traditionally made for Easter feasts. It’s worthy of a place at any special occasion table.

Cinnamon Honey Tart(Melopita)Cinnamon-Honey Tart (Melopita – Μελόπιτα)
Serves 10 - 12
The texture of Cinnamon-Honey Tart filling is similar to pumpkin pie filling, and is better when made with whole-milk ricotta. In Greece, fresh, unsalted myzithra is used instead of ricotta, but this product isn’t available in Alaska. The myzithra sold in most US supermarkets is dried, salted, and not suitable for a sweet tart filling.

I like making Cinnamon-Honey Tart in an 11” tart pan with a removable bottom to increase the crust to filling ratio. Use a 9” springform cake pan if you prefer cheesecake to tarts (more filling, less crust), a 9”x13” pan if you want to serve the dessert as bar cookies (great for potlucks), or pastry-lined cupcake tins or tartlet pans to make individual-size servings. In developing the recipe, I baked various versions of the filling as custards (without the crust) in a water bath at 325°F for 30 minutes. The custards are tasty, dead simple to make, and may be made ahead (the flavor develops over time).

Crust:
1 1/2 cups all-purpose flour
1/2 cup powdered sugar
1 Tbsp. finely grated lemon peel (peel from 1 lemon)
1/8 tsp. salt
1/2 cup cold butter (1 stick) cut in chunks
2 Tbsp. lemon juice


Filling:
15 – 16 ounces ricotta, preferably whole milk, or fresh, unsalted myzithra
2/3 cup thyme honey or other full-flavored honey
3 large eggs
1 Tbsp. cinnamon, preferably true Ceylon cinnamon (see About Cinnamon below)
1/8 tsp. salt

Make and Bake the Crust: Put the flour, sugar, lemon peel, and salt in the bowl of a food processor and pulse to mix the ingredients. Add butter chunks to the processor bowl, and process until the butter and flour are evenly mixed. Sprinkle in the lemon juice and process until the dough just holds together. If the dough is too dry, add 1 – 2 Tbsp. ice-cold water.

Dump the dough onto a sheet of plastic wrap, and knead lightly to form a flat disk. Wrap and let rest for at least 30 minutes before using.

Preheat the oven to 450°F.

Roll out the dough into a round with a diameter 3” wider than the tart pan (or enough to cover the bottom and 1” of a 9” springform pan’s sides). Use the rolling pin to lift the dough and place it in the pan; press the dough firmly into pan’s sides and bottom. Trim the dough’s edges so there is just enough to fold under and cover the sides of the tart pan with a double layer of dough (if using a springform pan, trim the dough so it goes 1” up the sides. Prick tiny holes all over the crust with a fork.

Press a double layer of aluminum foil directly onto the dough-covered bottom and sides. Bake the crust for 15 minutes. Remove the foil and bake for 5 minutes or until the crust is set and lightly golden. Remove from oven and place on a cooling rack. Reduce the oven heat to 375°F.

Make and Bake the Filling: Mix all the ingredients together to form a smooth batter. Pour the batter into the pre-baked pie crust. Bake for 20 – 25 minutes, or until the sides of the tart are set and the middle is still a little jiggly; residual heat will finish cooking the filling (because the springform pan is deeper, the filling in it will take a little longer to cook). Overcooking Cinnamon-Honey tart causes the filling to crack.

About Cinnamon:

I tested the filling recipe multiple times, using a different kind of cinnamon each time (Ceylon “True” Cinnamon, Korintje (Indonesian) Cassia Cinnamon, China Tung Hing Cassia Cinnamon, and Vietnamese “Saigon” Cassia Cinnamon), as well as a mixture of “True” Cinnamon and allspice. My favorite was the version made with “True” Cinnamon; the citrus notes in this variety blended perfectly with the lemon-flavored crust. Although Vietnamese “Saigon” Cassia Cinnamon is the cinnamon I prefer in most dishes, its flavor was too overpowering for this dish. I order my cinnamon online from The Spice House, Penzeys, or World Spice Merchants. Supermarket cinnamon is just fine for this recipe.

Saturday, April 26, 2008

Recipe: Clove Custard and Petimezi (Grape Syrup) (Κρέμα με Γαρίφαλο και Πετιμέζι)

I’m writing this in the dark.

It’s been snowing all day. Around 6 pm we lost power. When I called the electric company to report the power out, a recorded message listed outages all across the city. Ours was apparently caused when a falling tree took out the main electrical line going into a substation.

[4/16/08 UPDATE:
According to the Anchorage Daily News, yesterday’s snowstorm was unprecedented for so late in the year.]

Recently, I’ve been playing around with grape syrup, called Petimezi in Greek and Saba in Italian. I started by making
Thyme-Braised Lentils with Petimezi and Pan-Fried Salmon; it was a great success.

My next foray with grape syrup was cool and creamy Clove Custard served with warm Petimezi. Clove is a strong enough spice that it stands up well to full-flavored Petimezi. If the sign of a good dessert is one that leaves you wanting more, Clove Custard and Petimezi met that test. Sadly, I only made half a recipe.

The recipe for Clove Custard was adapted from Lynn Rossetto Kasper’s recipe for Cinnamon and Clove Custard (Budino all’Emiliana) in
The Splendid Table: Recipes from Emilia-Romagna, the Heartland of Northern Italian Food. This is my favorite Italian cookbook, and Kasper one of my favorite food writers and commentators. Links to Kasper’s writings, recipes, and podcast are on her Splendid Table website.

Clove Custard and Petimezi (Grape Syrup) (Κρέμα με Γαρίφαλο και Πετιμέζι)
Serves 4 - 5

Adapted from The Splendid Table by Lynn Rossetto Kasper
The custard is wonderful on its own. Because it’s richly sweet with warm spices and flavorings, the custard doesn’t need the syrup. On the other hand, sweet and tart grape syrup is the perfect foil for creamy, clove scented custard. Since different people like different amounts of grape syrup, warm it and serve on the side.

2 1/4 cups milk
6” strip of lemon zest
9 whole cloves
1 cinnamon stick, broken into pieces
1 tsp. vanilla extract
1/2 cup sugar

4 large eggs
1 large egg yolk
Petimezi, Saba, or Grape Syrup (optional) (see NOTE 1)

Mix the milk, lemon zest, cloves, cinnamon stick, and vanilla in a saucepan. Bring to a boil over medium high heat, and cook for 10 minutes, being careful not to let the milk boil over. Remove the pan from the heat, stir in the sugar until it melts, and cool the milk to room temperature.

Preheat the oven to 350°F.

Butter five 1/2 cup ramekins or one 7” baking dish.

Strain the cooled milk into a mixing bowl. Whisk in the eggs and egg yolk until the mix is thoroughly combined. Pour the mix into the ramekins or baking dish, and cover each dish with foil. Bake in a water bath (see NOTE 2) for 25 – 30 minutes for the ramekins or 50 – 55 minutes for the baking dish. The custard is done when a knife inserted halfway between the custard’s center and its edge comes out clean. Turn off the oven, open the door, and let the custard sit in the water bath for 15 minutes. Cool on a rack.

Turn the custard out on a plate or plates. Cover and chill. When ready to serve, heat up the grape syrup (if using), and drizzle it over or around the custard.

NOTE 1: To make grape syrup (Kasper calls it sapa), wash and stem 4 1/2 pounds of red grapes. Finely chop them in a food processor, and refrigerate for 48 hours in a glass or stainless steel container. Strain the grapes, pressing as much liquid out of the solids as possible, and scraping any solids on the underside of the strainer into the juice. Boil for 20 – 30 minutes or until reduced to 2 1/4 – 2 3/4 cups. When it’s close to the right thickness, the syrup will foam with large bubbles. Blend in 1 cup wine, boil for 1 minute, and cool.

NOTE 2: To make a water bath, you need a baking pan large enough to hold the ramekins or 7” baking dish. Cover the bottom of the baking pan with a folded dish towel. Boil 2 quarts of water. Pour enough water into the baking pan so it will go 3/4 of the way up the sides of the ramekins or baking dish. Put the baking pan in the oven on the center rack, and set the foil-covered ramekins or baking dish into the water. Shut the over door and bake the custard.
~~~~~~~~~~~~~~~~~~~~~~~
This is my entry for
Think Spice … Think Cloves an event created by Sunita from Sunita’s World and hosted this month by Canela & Comino.

Wednesday, April 23, 2008

Mediterranean Cooking in Alaska on SKAI with Recipe for Tsoureki – Greek Easter Bread (Τσουρέκι)


Καλώς ορίσετε στο Mediterranean Cooking in Alaska!

Welcome to Mediterranean Cooking in Alaska!

SKAI, the Greek television and radio station, recently ran three articles by Lamprini Thoma about my efforts to cook Greek and Mediterranean food in Alaska and about Holy Transfiguration, Alaska’s only Greek Orthodox Church. Unfortunately, the articles no longer appear on SKAI’s website.

One article described how I wrote the cookbook Tastes Like Home: Mediterranean Cooking in Alaska to help raise money for a new church building. This effort is very important because our church holds services in a converted house that is way too small for our parish. All proceeds from the sale of the cookbook go directly into Holy Transfiguration’s building fund. Many thanks to Lamprini Thoma for highlighting Holy Transfiguration’s efforts to raise money.

Another article had my recipe for Tsoureki (Greek Easter Bread), made using ingredients readily available in Alaska. Although we make the bread for Easter, it’s delicious any time of the year.

Tsoureki (Greek Easter Bread)Alaskan Tsoureki
Makes 2 loaves
Like classic Tsoureki, Alaskan Tsoureki is rich with butter and light with eggs. However, maxlepi and mastixa, the flavors of classic Tsoureki, aren’t available in Alaska. Instead, we create special spice mixes that give wonderful flavor to our Tsoureki. When Alaskan Tsoureki is in the oven, the entire house fills with the wonderful aroma of sweet spices.


Mediterranean Cooking in Alaska has moved as of March 2011. To read this post please go to


http://www.laurieconstantino.com/skai-tv-features-mediterranean-cooking-in-alaska/


Please click on over and visit my new site. Thank you!


Saturday, March 29, 2008

Recipe: Pistachio Biscotti (Παξιμαδάκια με Φιστίκια)

Pistachio Biscotti are light, crunchy, and nutty. They’re simple to make and taste wonderful. They’re a great way to use extra egg whites and are low fat. What more can you ask of a cookie?

Last night I brought Pistachio Biscotti to Antonia’s birthday party. More than one person took seconds; the ultimate complement. I wish I had one right now. It’d be the perfect breakfast.

I ferried raw pistachios back to Alaska after my r
ecent trip to Seattle, but in the absence of pistachios, almonds are a fine substitute. The egg whites were left from making a Piemontese homemade pasta specialty called tajarin.

This recipe is so good I might start making tajarin just so I’ll have enough leftover egg whites to make Pistachio Biscotti.

Pistachio Biscotti (Παξιμαδάκια με Φιστίκια)
Makes about 36 cookies.
Adapted from
Gourmet Magazine, April 1998
The slices are easier to cut when the meringue is fully cool after its first baking.

6 egg whites
1/8 tsp. salt
1 cup sugar
1 cup plus 2 Tbsp. flour
1 cup shelled raw (not roasted) pistachio nuts or blanched, slivered almonds
1 tsp. pure vanilla extract

Preheat oven to 350°F (325°F convection). Line the bottom and sides of a 9” x 9” baking pan with parchment paper.

In a large bowl, beat the egg whites and salt until they form soft peaks. Gradually beat in the sugar and continue to beat until the meringue holds stiff, glossy peaks. Quickly beat in the vanilla. Sift the flour over the meringue and evenly distribute the pistachios over the flour. Fold in the flour and pistachios gently but thoroughly.

Pour batter into the prepared baking pan and smooth out the top. Bake until the meringue is set and golden on top, about 25 - 30 minutes. Remove the pan from the oven, place it on a rack, and let cool for 15 minutes. Turn the baked meringue out onto the rack, carefully peel off parchment paper, and let cool completely.

Turn the oven down to 300°F (275°F convection).

Using a serrated knife, cut the baked meringue in half. Cut each half crosswise into 1/4-inch-thick slices. Arrange the slices about 1/2 inch apart on 2 baking sheets and bake, rotating the baking sheets halfway through, about 20 minutes total, or until the biscotti are pale golden and crisp. Turn off the oven, leave the cookies on the baking sheets and the oven door open, and let cool. Serve or store in an airtight container.

Saturday, January 19, 2008

Recipe: Pear and Almond Tart (Τάρτα Αμύγδαλο και Αχλάδια)

My friend Teeny had her own recipe disaster last week. Her problem had the same cause as mine: a restaurant cookbook that hadn’t been adequately vetted for home use.

Teeny attempted a Pear and Almond Tart that looked good on paper. However, the 12” tart had 2 sticks of butter in the crust and 3 sticks of butter in the filling (a little less than a 1/2 stick butter per serving). Since the recipe said to cook it at 300°F for only 40 minutes, the unfortunate tart came out of the oven a partially cooked, slagged down mess.

I decided to come up with an alternate version. I studied the recipe; its flaws were too significant to bother modifying it. I started from scratch with only the concept in mind.

My first attempt looked gorgeous. I was afraid if I cut into it at home, I’d have “an accident” and eat it all myself. Instead, I took it to the sushi restaurant where I was lunching with friends. A whole table of tasters; nothing is better for food in beta testing.

The tart was tasty. Everyone liked it, although one taster thought it a little sweet. I liked the flavor, but the texture of the almond filling was off.

When I got home, I tried again. I made three different variations of the filling, and baked them in separate ramekins. I changed the proportions of eggs, sugar, and flavorings. When the three came out of the oven, the filling using egg whites only was my clear favorite.

I tried a final batch and added a little lemon peel to the egg white filling, and it was exactly what I’d been aiming for. The filling was rich with ground almonds, slightly crunchy on the top, and laced with the full clear flavor of pear.

Pear and Almond Tart is easy to make, easy on the eyes, and easy to enjoy.

Pear and Almond Tart (Τάρτα Αμύγδαλο και Αχλάδια)
Makes one 9” tart – Serves 8
Ground almond meal can be substituted for the whole almonds, and is a good choice for those who don’t have a food processor. Bob’s Red Mill, a brand available in many US supermarkets, sells ground almond meal. Health food stores often carry almond meal in the refrigerator section. If you have leftover almond meal, store it in the refrigerator as it can easily turn rancid. I used unblanched almonds in the tart because almond skins have abundant antioxidants and also taste good; blanched almonds work fine too. Apples may be substituted for the pears in this tart.

Crust:
1 1/2 cups all purpose flour
1/2 cup powdered sugar
Pinch of salt
2 tsp. finely grated lemon peel
10 Tbsp. unsalted butter (1 stick plus 2 Tbsp.)
1 egg, whisked to combine the white and yolk

Filling:
1 1/2 cups whole unblanched almonds
3/4 cup sugar
3 egg whites
1/4 tsp. pure almond extract
1 Tbsp. finely grated lemon peel

2 large ripe pears
Sugar for sprinkling on top of tart

Make the crust: Mix the flour, powdered sugar, salt, and lemon peel together in a food processor. Cut the butter into 3/4” squares, add to the food processor, and pulse five or six times to break up and distribute the butter. When you are done, the butter pieces should be the size of small lentils. Add the whisked egg and pulse to mix. Pinch together some of the dough to see if it holds together (it should). If it does not, add small amounts of water, pulsing to mix, until the dough holds together when pinched.

Dump the dough onto a piece of plastic wrap, press the dough together, and shape it into a flat disk. Wrap the disk in plastic wrap, and refrigerate for at least 30 minutes.

Preheat the oven to 400°F.

Roll out the dough on a well-floured pastry cloth until it forms a 10 1/2 inch circle. Use the rolling pin to lift the dough and place it over a 9” tart pan with removable bottom. Press the dough firmly into the sides and bottom of the tart pan. Cut the edges of the dough so there is just enough to fold under and cover the sides of the pan with a double layer of dough. Use a fork to prick tiny holes all over the bottom crust.

Press a double layer of aluminum foil onto the dough (this will prevent it from bubbling up when it bakes). Bake the crust for 15 minutes. Remove the foil and bake for 5 minutes or until the crust is set and lightly golden. Remove the tart crust from the oven and place it on a cooling rack. Reduce the oven heat to 350°F.

Make the filling: Put the almonds and sugar in the food processor and process until the almonds are very finely ground. Add the egg whites and almond extract and process until the mixture is smooth, scraping down the sides from time to time. Add the lemon peel and pulse to evenly distribute.

Make the tart: Spread the almond filling in the bottom of the pre-baked tart crust.

Peel the pears and cut them in half. Use a melon baller or teaspoon to scoop out the core. Place each pear half flat on a cutting board, and cut crosswise into 1/8” slices. Keep the slices together in the shape of a half pear. Remove the last three slices from the wide end of each half pear and reserve. Lightly push down the slices in each half pear to fan them out, fanning from the narrow end to the wide end.

With a spatula, carefully lift each fan of pear slices and place it on top of the almond filling, with the narrow end at the center, and the four fans of pear slices spaced evenly apart. Put the reserved three slices from each pear half in the spaces between the pear fans. Lightly press the pears into the filling. Sprinkle the pears with granulated sugar.

Bake for 30 minutes at 350°F. Turn the heat down to 300°F and cook for 30 minutes, or until the filling is set and the tart golden.

Serve plain or with scoops of vanilla gelato.

~~~~~~~~~~~~~~~~~~~~~~~~~~~~~~~
This is my entry for In the Bag, with the ingredients being pears, lemons, and nuts, hosted by A Slice of Cherry Pie.

Monday, December 17, 2007

Recipe: Christmas Nougat Cookies

I met Kate in college. She was my first friend who liked to cook as much as I did, a rarity in the days before celebrity chefs, non-stop televised cooking shows, and internet recipe exchanges.

I haven’t seen Kate in ages, but I fondly think of her every year when I make Christmas cookies. Since the years Kate and I joined together for holiday baking binges, I’ve made Christmas Nougat Cookies (aka Angel Cookies), a recipe her mom sweet-talked out of a commercial baker in Seattle and scaled down for home use.

Christmas Nougat Cookies are sweet and crisp, nutty and almost like candy. Their flavor is similar to Torrone, the white Italian nougat that is my favorite candy. They're also a dead ringer for Archway holiday nougat cookies, a Christmas treat that, sadly, has disappeared from the grocery store.

Over the years, I’ve made Christmas Nougat Cookies with every kind of nut – cashews are my current favorites, but the cookies are also delicious with pecans, walnuts, hazelnuts, almonds, macadamias, and peanuts. I make at least 15 dozen every year; Christmas Nougat Cookies are one of the most requested items on my annual holiday cookie tray.

Before I tasted Christmas Nougat Cookies, I questioned making them with pure vegetable shortening rather than butter. Even in those days, I was a believer in baking only with butter; shortening in cookies seemed just plain wrong. Tasting made a believer out of me; these cookies are amazingly good.

Christmas Nougat Cookies (Angel Cookies)
Makes 5 1/2 dozen cookies

The soft dough doesn’t need to be refrigerated, and rolls out easily. The cookies do not spread when they are baked, so can be placed closely together on the baking sheet. As a result, they are quick and easy to make.

1 1/2 cups vegetable shortening
3 cups powdered sugar
1 1/2 tsp. salt
2 tsp. vanilla
2 cups flour
2 cups roasted nuts, chopped

Preheat oven to 325°F (300°F for convection ovens).

In an electric mixer, cream the shortening and powdered sugar, scraping down the sides from time to time. Add the salt and vanilla, and mix thoroughly. Using the mixer’s paddle attachment, mix in the chopped nuts. Add the flour, and mix just until it is thoroughly combined with the other ingredients.

On a well-floured surface, with a well-floured rolling pin, roll out the dough 1/4” thick. Using a 1 1/2” round cookie cutter, cut out the cookies and place 1/2” apart on a cookie sheet.

Bake 8 minutes, being careful not to let the cookies brown (they should still be white when you remove them from the oven). Transfer to racks and let the cookies cool completely. Store Christmas Nougat Cookies in an airtight container.

~~~~~~~~~~~~~~~~~~~~~~~~~~~~~
Christmas Nougat CookiesThis is my entry for Eat Christmas Cookies, sponsored by Food Blogga. Susan's round-up of all the cookie recipes is here.


~~~~~~~~~~~~~~~~~~~~~~~~~~

Don't forget to buy your Menu for Hope raffle tickets no later than December 21-- all proceeds go to the UN World Food Program. The Menu for Hope prize I am offering is described here (wild oregano, handmade sheep cheese, handmade egg noodles, and autographed copy of Tastes Like Home: Mediterranean Cooking in Alaska), the list of all West Coast Menu for Hope prizes is here, and the list of all worldwide Menu for Hope prizes is here. For more information about Menu for Hope, go here.

Saturday, December 8, 2007

Gold Out of Straw: Recipe for Lemon Yogurt-Raisin Cake with Crunchy Almond Topping (Γιαουρτόπιτα με Σταφίδα Γλυκό του Κουταλιού)

I made the cake for my friend Teeny’s birthday. It was astonishingly good. The cake was dotted with tender raisins, and was lemony, not too sweet, and very flavorful. The crunchy, lemon-glazed, roasted almonds on top contrasted nicely with the moist cake. My kitchen disaster became one of the best cakes I’ve ever made.

For Christmas presents, I’m making raisins in syrup accompanied by copies of the Lemon Yogurt-Raisin Cake recipe. And this time, I’m cooking the raisins too long on purpose.

Lemon Yogurt-Raisin Cake with Crunchy Almond Topping (Γιαουρτόπιτα με Σταφίδα Γλυκό του Κουταλιού)
Serves 10
The cake must be glazed while it is still hot, so make the glaze while the cake is baking.


Mediterranean Cooking in Alaska has moved as of March 2011. To read this post please go to


http://www.laurieconstantino.com/gold-out-of-straw-a-kitchen-disaster-that-wasnt/


Please click on over and visit my new site. Thank you!


Raisin Spoon Sweets
Makes 3 1/2 cups


Mediterranean Cooking in Alaska has moved as of March 2011. To read this post please go to


http://www.laurieconstantino.com/gold-out-of-straw-a-kitchen-disaster-that-wasnt/


Please click on over and visit my new site. Thank you!

Thursday, November 22, 2007

Thanksgiving Variations (with Recipes for Rosemary and Garlic Roasted Sweet Potatoes and Frozen Meyer Lemon Yogurt)

Thanksgiving dinners are studies in brown and white: brown turkey, brown dressing, white potatoes, brown gravy, white rolls, brown fried onions on green beans, white marshmallows on sweet potatoes. Even the pies are brown: dark brown pecan pie, beige apple pie, burnt sienna pumpkin pie, all topped with dollops of white whipped cream. Cranberry sauce can be the only vivid color on the table.

This year we decided to opt out of brown and white, and instead made a rainbow of colorful food, the brighter, the better. Orange sweet potatoes roasted in the oven with rosemary and garlic, blood red prime rib roasted at 200°F to retain its color, green beans sautéed with shallots, green lettuces and red radicchio dressed with aged balsamic vinegar and best quality olive oil. For dessert we had yellow Meyer lemon frozen yogurt topped with fresh deep fresh blueberries.

No one missed our traditional Thanksgiving dinner.

The best part about the meal is how easy it was to make. The dishes were straightforward and simple. Without complex sauces, or the need to brine a bird too big for its own good, we spent our Thanksgiving enjoying each other. Instead of stressing over getting the turkey in early enough, or whether it would dry out, or prepping ingredients for convoluted recipes, we sat by the fire counting our blessings and reminiscing about our families.

I churned the frozen yogurt during the 3 1/2 hours it took the roast to reach 130°F. When it was done, the prime rib rested for 20 minutes while I finished the meal. Since all the ingredients were trimmed and washed ahead of time, this was plenty of time to make salad, green beans with shallots, and roasted sweet potatoes.

The Meyer lemon frozen yogurt was a particular treat. Seven years ago, my husband’s brother and his wife planted a Meyer lemon tree in their South Carolina yard. This year, the tree had a profusion of lemons.


Meyer lemonsMy mother-in-law packed four of the surprisingly large, tree-ripened lemons and shipped them to Alaska. Meyer lemons I’ve seen in the past have been smaller than regular lemons; these were so large I doubted their pedigree. The largest of the lemons weighed one half pound.

We cut one of the Meyer lemons to squeeze over fresh halibut. It was heavy with juice, and had the characteristic sweet-scented flavor of mandarin and lemon that complimented, but did not overpower, the halibut. With the remaining three lemons, I wanted to make something special. When I read Lucy's recipe for frozen lemon yogurt on Nourish Me, I found an ideal use for the Meyer lemons -- and my Thanksgiving dessert.

Frozen Lemon Yogurt showcases the complex flavors of Meyer lemon, and contrasts nicely with fresh ripe blueberries. It is light, slightly tart, and a terrific end to a filling meal.


Roasted Sweet Potatoes with Garlic and RosemaryRosemary and Garlic Roasted Sweet Potatoes
I prefer using small garnet “yams” for this dish.

1 small garnet yam per person
1 tsp. minced rosemary per garnet yam
1 tsp. minced garlic per garnet yam
Salt
Olive oil

Preheat oven to 475°F.

Slice the sweet potatoes 1/8” thick. Toss with rosemary, garlic, salt, and sufficient olive oil to coat the potato slices. Spread out in a single layer on a rimmed baking sheet. Roast for 10 – 15 minutes, or until the potatoes are cooked through and the edges are starting to turn dark brown.

Frozen Lemon YogurtFrozen Meyer Lemon Yogurt with Fresh Blueberries
Adapted from a recipe by Lucy at Nourish Me. This makes 1 quart of ice cream. If you don’t have a food processor, you can mix it by hand. If you do mix by hand, make sure to grate the lemon peel as finely as possible and to fully dissolve the sugar before pouring the mixture into the ice cream maker.

1 cup granulated sugar
3 Tbsp. finely grated Meyer lemon peel
1 1/2 cups plain whole milk yogurt
1 1/2 cups half-and-half
3/4 cup Meyer lemon juice
1 cup fresh blueberries

Process the sugar and Meyer lemon peel in a food processor until the peel is very fine. Add the remaining ingredients, except the blueberries, and process until the mixture is smooth. Freeze the mixture in your ice cream maker, according to the manufacturer’s instructions.

Scoop into bowls and top with fresh blueberries.

~~~~~~~~~~~~~~~~~~~~~~~~~~~~~~~~~~~

This is my entry for Antioxidant Rich-Foods/5 a Day Tuesday hosted by Sweetnicks.

Thursday, November 15, 2007

I Swear I Was Sleepwalking (with Recipes for Pear and Apple Tarte Tatin and Salted Honey Caramels)

I rarely eat sweets. I don’t make them (except for Christmas presents, of course). I don’t buy them.

It’s not that I don’t want them; it’s that when they are in my house, they won’t shut up. They talk to me. They say, “Please eat me. Please, now. I want to be eaten now. Please don’t abandon me in the kitchen. Please eat me.”

So what can I do? Who wants to be cruel to a cookie? Or a tart? Not me, that’s for sure. So I do. Eat them, that is. Eat them until they are gone. I’m the ultimate can’t eat just one girl. My sister is the same way.

I can’t explain what happened today. One minute I was reading the Apples & Thyme round-ups here and here, and the next thing I knew there were honey caramels bubbling on the stove and a Pear and Apple Tarte Tatin in the oven. The power of the recipes that cooks had submitted to Apples & Thyme was too much for me.

I may have to extend the “don’t make them, don’t buy them” rule to include a new proviso: don’t read about them. I'm too suggestible.

As soon as they were done, I bundled up the Pear and Apple Tarte Tatin (minus one piece) and the Salted Honey Caramels (honest, I only had one) and delivered them to my husband's office. The cacophony of pleading coming from the kitchen overwhelmed me. The sweets had to get out of the house before I succumbed.

The worst part is, both items tasted absolutely delicious. But they had to go, so they did.


Pear and Apple Tarte TatinPear and Apple Tarte Tatin
Adapted from Riana Ligarde’s recipe for Tarte Tatin at Garlic Breath.
Tarte Tatin is a tart cooked upside down, usually made with apples. In this variation, I’ve combined apples with pears for a lovely fall dessert.

Crust
1 1/3 cups flour
1/3 cup sugar
1/4 tsp. salt
6 Tbsp. butter
1/3 cup milk

Filling
1/3 cup dark brown sugar
4 Tbsp. butter
2 apples
3 pears

Preheat the oven to 350°F.

Crust: Combine the flour, sugar, and salt in a food processor (if doing by hand, whisk the dry ingredients together). Cut the butter into cubes, add the cubes to the dry ingredients, and pulse until the mixture looks like coarse cornmeal (if doing by hand, cut the butter into the dry ingredients). Add the milk and pulse (or stir) just until the dough starts to come together. Form the dough into a disk, wrap in plastic wrap, and refrigerate while you make the filling.

Filling: Peel and core the apples and pears. Slice into eighths. Put the sugar in a dry cast iron frying pan, and cook over medium low to medium heat just until the sugar starts to melt. Quickly whisk in the butter. Evenly distribute the melted butter and sugar over the bottom of the cast iron pan. Arrange the apples and pears over the butter and sugar, alternating slices of apples and pears. (If you don't have a cast iron pan, you can make the Tarte Tatin in a 10-inch buttered cake pan, make the caramel in a saucepan, and pour the caramel into the bottom on the cake pan.)

Roll out the dough until it is slightly larger than the frying pan. Place the rolled-out dough over the apple and pear slices. Tuck the edges under. Place in the oven and bake for 45 – 50 minutes, until the dough is nicely golden brown.

Take the pan out of the oven and run a knife or spatula around the edges of the Tarte Tatin to make sure the dough won’t stick to the pan when you turn it over. Place a serving plate over the frying pan, and flip the pan so the Tarte Tatin is fruit side up on the serving plate. If any fruit sticks to the bottom on the pan, return it to where it belongs on the Tarte. Serve warm.

Salted Honey CaramelsSalted Honey Caramels
Makes 18 1 1/2” square caramels
Adapted from Pille at Nami Nami’s version of Heidi’s Honey-Espresso Caramels. I wanted to emphasize the flavor of the excellent thyme honey I brought back from Greece, so made the caramels using only honey, cream, and coarse Greek sea salt. These are very easy and quite delicious, although it takes about an hour for them to reach the proper temperature.

1 cup heavy cream
1 cup thyme honey (or other strong-flavored honey)
1 tsp. coarse sea salt, plus extra to sprinkle over

Mix the cream, honey, and salt in a heavy-bottomed, deep-sided saucepan. Bring to a boil, then lower the heat (or else the pan will boil over; trust me, I know what I'm talking about here), and cook at a low boil until the mixture reaches 245 - 250°F or the firm ball stage (firm ball is when a tiny bit of the caramel is dropped in cold water it will form a firm, but pliable, ball). Remove the pan of caramels from the heat.

Shaping CaramelsLightly butter a piece of parchment paper, and pour the caramels onto the paper. Lightly sprinkle with salt. I placed boxes of plastic wrap and waxed paper under the parchment paper, and against the edges of the candy, to square up the sides. When the caramels firm up, cut into squares and, if you desire, wrap them in parchment paper.