Showing posts with label pasta. Show all posts

Sunday, August 15, 2010

Gathering Wild Mushrooms in Alaska, Drying Wild Mushrooms, and 5 Recipes for Wild Mushrooms


Perfect 1 pound 10 ounce Boletus edulis

Steve arrived home from work last Friday, a briefcase in one hand and a massive Boletus edulis in the other. A smile of pure joy lit his face. “It’s time to go mushrooming.”

He handed me the mushroom, a king bolete, also known as porcino in Italy and cep in France. I weighed it: 1 pound 10 ounces. When I cut into it, the flesh was firm and pure white, untouched by worm, fly, slug, squirrel, or rot. I’d never seen anything like it. Normally, porcini this big have been heavily predated upon and are chock full of worms.

“Where’d you get this?” “Right in front of the house.” “Whataya mean, right in front of the house?” “Let me show you.” Steve brought me to a spot twenty feet from our front door.

“It’s definitely time to go mushrooming,” I said, thoughts of dinner already a distant memory. “Let’s get changed.”


Leccinum subglabripes

It’s been raining for weeks, so on went rain coats, rain pants, and waterproof hiking boots. Going mushrooming involves tromping through woods, pushing through understory, going up and down hillsides, seeking out terrain where desirable mushrooms thrive. Staying dry is key to maintaining proper enthusiasm.

Mediterranean Cooking in Alaska has moved as of March 2011. To read this post please go to


http://www.laurieconstantino.com/gathering-wild-mushrooms-in-alaska-drying-wild-mushrooms-and-5-recipes-for-wild-mushrooms/


Please click on over and visit my new site. Thank you!


Rules for Gathering and Handling Wild Mushrooms
The first and most important rule for mushroom foragers is: “When in doubt, throw it out.” Do not gather mushrooms that you can’t absolutely, positively identify.
Leave all unknown or questioned mushrooms alone, even if it means walking past many mushrooms of every color and shape before finding one you recognize.

1. The best way to learn about mushrooms is to have someone show you the edible species; spending time studying field guides also helps. The perfect field guide for Alaska doesn’t exist.


The books I like best are...

Mediterranean Cooking in Alaska has moved as of March 2011. To read this post please go to


http://www.laurieconstantino.com/gathering-wild-mushrooms-in-alaska-drying-wild-mushrooms-and-5-recipes-for-wild-mushrooms/


Please click on over and visit my new site. Thank you!


Wild Mushroom Pasta Sauce


Fresh Porcini Salad with Shaved Fennel and Parmesan Cheese


Pasta with Wild Mushroom and Clam Sauce


Wild Mushroom Ragu (Pasta Sauce)


Port Duxelles

Mediterranean Cooking in Alaska has moved as of March 2011. To read this post please go to


http://www.laurieconstantino.com/gathering-wild-mushrooms-in-alaska-drying-wild-mushrooms-and-5-recipes-for-wild-mushrooms/


Please click on over and visit my new site. Thank you!


Sunday, May 9, 2010

Recipe: Asparagus Pistachio Pesto

The sun is shining, the sky is blue, wood frogs are singing love songs in the pond, and the last bit of snow on our property melted this afternoon.  Life is good.

Today’s good fortune follows yesterday’s happy evening spent with life-long friends. The food was excellent; the conversation even better (except, perhaps, when I was motor-mouthing). Ali and Tissy made richly delicious Salmon Chowder, using wild Alaska salmon. Moira and Jake oven-roasted vegetables, always a treat.  Teeny made her famous wild blueberry pies with berries she foraged and froze last summer.

I took advantage of asparagus flooding local markets to make seasonally fresh Asparagus Pistachio Pesto sauce for pasta.  I was inspired to create pesto with asparagus by my recent success with Lime, Cilantro & Edamame Spread, one of the tastiest things I’ve made all year. If edamame beans worked for pesto, I thought, why not asparagus?

Asparagus Pistachio Pesto was a resounding success. Lemon balanced the sweetness of asparagus, pistachios enhanced its nutty flavor, parmesan added richness, and garlic and mint downplayed asparagus’s grassiness without overpowering its spring green freshness. Even 2-year-old Maggie was a fan!


Asparagus Pistachio Pesto
Serves 6-8
Asparagus Pistachio Pesto is quite versatile. It’s perfect for pasta, but would also be good with boiled potatoes, sautéed vegetables, grilled/pan-fried seafood, poultry, sandwiches, and countless other partners. Roasting or grilling asparagus adds depth to pesto’s flavor, but you may instead blanch the asparagus for 2-3 minutes in boiling, salted water, and then cool it quickly in cold water. To speed things up, on a day when you’re grilling and have a hot fire, grill asparagus and save it to make Asparagus Pistachio Pesto the next day.  Pesto may also be made ahead; if you do, leave out the lemon juice and mix it in just before serving; this helps preserve pesto’s lovely green color.  To add richness and crunch, pistachios are used in both the pesto and as a garnish, for a total of 1/2 cup plus 2 tablespoons nuts. If you don’t have pistachios, pine nuts make a fine substitute. 

Parmigiano Reggiano is the best quality of “parmesan” cheese available; I like using it (and best quality extra virgin olive oil) in uncooked sauces where the flavors of individual ingredients really make a difference in the finished dish.  However, any cheese suitable for grating may be substituted for Parmigiano Reggiano. (In Anchorage, Costco sells reasonably priced Parmigiano Reggiano.)  I list the amount of cheese in ounces because 1 ounce of cheese can measure 1/4 cup or 3/4 cup depending on the type of grater used.  If you can’t measure cheese by weight, add a little at a time to the processor bowl until there’s enough to richly flavor the pesto, but not enough to overpower the asparagus.

For the asparagus:
1 pound asparagus
2 tsp. olive oil
Salt
Freshly ground black pepper

For the asparagus pesto:
Prepared asparagus stalks (tips reserved for garnish)
1/2 cup raw pistachio nuts, lightly toasted (to toast pistachios, see NOTE below)
2 ounces freshly grated Parmigiano Reggiano cheese
3 Tbsp. best quality extra virgin olive oil
2-3 cloves garlic, chopped
2 Tbsp. fresh mint chiffonade (thinly sliced)
1/2 tsp. salt
1 Tbsp. finely grated lemon peel
2-3 Tbsp. fresh lemon juice

For the pasta:
1 pound dry pasta of any shape or size
1 recipe asparagus pesto
Reserved asparagus tips
2 Tbsp. lightly toasted pistachio nuts, roughly chopped
Freshly grated Parmigiano Reggiano cheese

Precook the Asparagus:  For grilling, heat the grill to high.  For oven-roasting, preheat the oven to 510°F (if your oven doesn’t go that high, preheat it as high as your oven goes); put in a baking sheet to preheat with the oven. 

Snap woody ends off asparagus.  Toss asparagus with olive oil and season with salt and freshly ground black pepper.  Cook asparagus until just barely tender, about 4 minutes on the grill and about 5 minutes on the preheated baking sheet in the oven.  If using oven, when asparagus is done, take it off baking sheet immediately after removing it from oven.  Cut tips off asparagus and reserve for garnish.  Cut asparagus stalks into 1”lengths. 

Make the Pesto:  Put asparagus stalks in food processor bowl.  Add pistachios, cheese, olive oil, garlic, mint, salt, lemon peel, and 2 Tbsp. lemon juice (if making pesto ahead, don’t add lemon juice until final assembly to preserve pesto’s color).  Process until the ingredients are thoroughly combined, being sure to scrape down the bowl’s sides from time to time.  Taste and add lemon juice, as needed.

Cook the Pasta and Assemble:  Put a large pot of well-salted water over high heat until it’s rapidly boiling. Add the pasta and give it a stir to make sure pasta isn’t sticking to the pot’s bottom. Cook just until pasta is al dente.  Reserve 1 cup of pasta cooking water. Drain pasta.

Stir together cooked pasta, prepared pesto, and 1/2 cup of pasta cooking water until ingredients are well combined (add lemon juice if it wasn’t previously added to pesto). If the mixture is too thick, add the remaining pasta cooking water, as needed.  Taste and add salt, freshly ground black pepper, or lemon juice, as needed.  Top with reserved asparagus tips and pistachio nuts; toss lightly. Serve with bowl of freshly grated Parmigiano Reggiano cheese on the side.

NOTE:  To toast raw pistachio nuts, put them on a baking sheet in a preheated 325°F oven for 6-8 minutes, watching carefully to make sure they don’t burn. Take pistachios off baking sheet as soon as you remove it from oven.
~~~~~~~~~~~~~~~~~~~~~~~~~~~~~~~~~~~~~~~~
This is my entry for Weekend Herb Blogging, hosted this week Marija from Palachinka.

Sunday, November 15, 2009

Recipe for Kale Puttanesca (Μακαρονάδα Πουτανέσκα με Κατσαρό Λάχανο)

Kale added to spicy puttanesca sauce makes a surprisingly delicious topping for chewy pasta. We recently enjoyed Kale Puttanesca for dinner and spent the whole meal alternating sounds of satisfaction with “this is really good” and “mmmmm -- I want this again.”

My recipe calls for more capers, garlic, and anchovies than are often used in puttanesca recipes; kale and chewy pasta balance the strong flavors.  Even so, Kale Puttanesca is best served to those, like us, who like assertively seasoned food.


To complement Kale Puttanesca sauce, I used Maccheroni al Ferratto, rustic artisanal pasta, originally from Calabria, that was traditionally shaped around iron umbrella spokes.

Lately, I’ve been comparing regular dried pasta from the supermarket with more expensive “artisanal” pastas found in specialty stores and upscale markets.  All dried pasta is made using extrusion dies, metal patterns that create unique pasta shapes.  However, the dies used to make regular and artisanal pastas differ: regular pasta is made using dies with a Teflon insert and artisanal pasta is made with bronze dies.

Regular pasta has a hard, slick finish, while artisan pasta is rough and uneven: “Traditional dies made entirely of bronze make the pasta surface rough [and more porous], which helps to capture the sauce, whereas the Teflon insert gives the product an even surface and a smoother texture,” according to food scientists. On the other hand, makers of Teflon-die pasta claimthe rougher surface [of bronze-die pasta] allows cooking water to penetrate too quickly, making for less-than-ideal quality.”

The two types of pasta also differ in how they’re dried. Regular pasta is dried in ovens “the size of a football field” for 2-4 hours over high heat.  Artisanal pasta is dried for 24 to 50-plus hours “in very warm (but never hot), humid environments in which moisture can be reduced slowly, without damaging the texture of the finished product.”

I prefer artisanal pasta with very simple pasta sauces, such as oil and garlic, where the texture of the pasta makes a significant difference. I also prefer artisanal pasta in dishes, like Kale Puttanesca, that call for thicker, chewier pastas.  For all other purposes (and when I don’t want to spend the money on artisanal pasta) I happily use regular dried pasta from the supermarket.

No matter what type of pasta you use, be sure to cook it al dente; soft, overdone pasta is the bane of even the best pasta sauce.


Kale Puttanesca  (Μακαρονάδα Πουτανέσκα με Κατσαρό Λάχανο)
Serves 4
Any sturdy green, wild or domesticated, can be substituted for kale. The amount of crushed red pepper depends on how spicy you like your food.

Sauce:
1 bunch kale
3 Tbsp. capers, preferably salt-cured
3 Tbsp. olive oil
2 Tbsp. minced garlic
10 anchovy fillets, minced
1/2-1 tsp. crushed red pepper flakes
2 14.5 ounce cans diced tomatoes, with juice
1/2 cup oil-cured black olives or throumbes, pitted and roughly chopped
Freshly ground black pepper

12-16 ounces Machheroni al Ferratto or other chewy-style pasta

Wash the kale to remove any dirt.  Strip the greens from the tough center kale stems. Shred the kale greens and discard the stems (or save them for another use).

Rinse the capers well. If using salt-cured capers, soak them in a bowl of cold water for at least 10 minutes.

Fill a large pot with enough water to cook the pasta, salt it well, and put on a burner over high heat.

Heat the olive oil until it's just warmed though, using a pan large enough to hold all the ingredients. (If oil is too hot, garlic will burn; it’s best to warm the oil over medium heat.) Stir in the garlic, anchovies, and red pepper flakes and cook, stirring, for 1 minute. Stir in the tomatoes, olives, freshly ground black pepper, shredded kale, and drained capers. Bring to a boil, cover, turn down the heat, and simmer for 20-30 minutes, or until the kale is tender.

While the sauce is cooking, and when the salted water reaches a full boil, cook the pasta until it’s al dente (exact cooking time depends on the type of pasta).  Reserve 1 cup of pasta cooking water. Drain the pasta.

When the kale is tender, stir in the cooked pasta, making sure all of it is coated with sauce. Taste and add freshly ground black pepper, as needed. If the sauce is too thick for your taste, thin it with a little pasta cooking water. 

Serve immediately with plenty of crusty bread and a crisp green salad.
~~~~~~~~~~~~~~~~~~~~~~~~~~~~~~~
This is my entry for Weekend Herb Blogging, sponsored by Haalo and hosted this week by Winnie from Healthy Green Kitchen.

Wednesday, February 18, 2009

Recipe for Artichoke Pastitsio with Basil Béchamel (Παστίτσιο με Αγκινάρες και Κρέμα Βασιλικό)

Artichoke Pastitsio with Basil BechamelIs it possible to make vegetarian Pastitsio with more zest than its traditional namesake? The answer is an emphatic yes. Artichoke Pastitsio with Basil Béchamel is so alive with flavor it will make your tastebuds stand up and sing the Greek national anthem.

Pastitsio is a traditional Greek dish. As with most foods that’ve been around for a long time, there’s a million and one ways to make Pastitsio. Family and regional variations are the norm rather than the exception. A typical Pastitsio recipe has layers of tube pasta surrounding a meat-based tomato sauce and is topped with creamy béchamel.

When Tony Tahhan and Peter Minakis
laid down a challenge to recreate Pastitsio using my own individual style, at first I was stumped. I’d already created a wonderful recipe for Pastitsio with Greens and was doubtful I could come up with anything better.

For nearly a week, I laid in bed at night coming up with Pastitsio ideas, and rejecting them all as uninspired. Then I went to Costco, lost my shopping list, and found my inspiration.

Losing the list forced me to go up and down every Costco aisle, something I rarely do, in hopes that seeing what was there might remind me of what we needed at home. Roaming the aisles helped, but also led to impulse buys (the exact reason I avoid wandering around without a list).

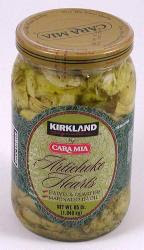
Marinated Artichoke HeartsOne of my impulse buys was a 65-ounce jar of Kirkland/Cara Mia marinated artichoke hearts. That’s right – a jar of artichokes weighing just over 4 pounds. I didn’t have any particular plans for the artichokes; even so, I had to have them.

That evening when I went to bed for my nightly game of Pastitsio, Pastitsio, What Kind of Pastitsio, a partial answer came almost immediately. I’d make my Pastitsio with marinated artichoke hearts.

In 1982, I bought the
ground-breaking Silver Palate Cookbook. The day I bought it, before I had time to crack the book, I went to a friend’s house for dinner. She served tortellini and a spicy tomato sauce full of artichoke hearts. It was love at first taste. I asked for the recipe; she’d made it from the very cookbook I’d just purchased.

Pasta Sauce Raphael, the recipe I’d fallen in love with, was named after a cook at the Silver Palate, the New York City take-out shop that gave its name and recipes to the cookbook. Recently, I read an interview with one of the owner/authors, on the occasion of the Silver Palate Cookbook’s 25th anniversary. She said Pasta Sauce Raphael is one of the all-time most requested Silver Palate recipes. I understand why; it’s delicious.

Since I first encountered it, I’ve never stopped making Pasta Sauce Raphael, a blend of tomatoes, marinated artichoke hearts, herbs, and lots of black pepper. It’s always a hit, no matter to whom I serve it. Best of all, it’s made with pantry staples.

My well-used Silver Palate Cookbook has a notation that I made Raphael Sauce in July 1987 for Alaska Governor Steve Cowper when he visited our home in
Bethel, Alaska. I also made it in 1990 when I catered a fundraising dinner in Juneau, Alaska for not-then-but-later Alaska Governor Tony Knowles. Both Governors loved Pasta Sauce Raphael. At least, they said they did and Alaska Governors never lie, right?

After settling on a Raphael Sauce variation for the Pastitsio filling, I needed a topping that would stand up to its robust flavors. I started with béchamel, the standard topping for Pastitsio, and enhanced it with fresh ricotta cheese and lots of fresh basil.

The end result, Artichoke Pastitsio with Basil Béchamel, was everything I wanted: spicy, but not overwhelming; layers of distinct flavors that taste good on their own and even better blended together; vegetarian, with no compromise on flavor; a recipe for slow evenings at home or rollicking dinner parties; creative fare that fits the traditional Pastitsio mold.

Most importantly, Artichoke Pastitsio with Basil Béchamel is distinctly my own style of food: colorful and bold tasting, using Mediterranean flavor principles and simple techniques. This is a recipe I’ll make again and again.

Artichoke Pastistio with Basil Bechamel
Artichoke Pastitsio with Basil Béchamel (Παστίτσιο με Αγκινάρες και Κρέμα Βασιλικό)
Serves 12 as a main course or 24 as a side dish
Be sure to crush all the peppercorns; most eaters won’t want to bite into large peppercorn chunks. Though 2 tablespoons of crushed peppercorns sounds like a lot, it's balanced by the mild pasta, cheese, and topping. (The original recipe for Raphael Sauce calls for a whopping 3 tablespoons of freshly crushed black peppercorns.) Don't cut up the artichoke pieces, leaving them large protects the flavor of artichokes from being lost in the spicy sauce. Instead of small jars of marinated artichoke hearts, it’s more cost-effective to buy large jars.

Sauce:
3 6-ounce jars marinated artichoke hearts (or 24 artichoke pieces and 3/4 cup of marinade from a giant jar of artichokes)
4 cups diced yellow onions, 1/2” dice
2 Tbsp. olive oil
Salt
1 tsp. Aleppo pepper or 1/2 tsp. crushed red pepper flakes
28-ounce can crushed tomatoes
14.5-ounce can diced tomatoes, preferably fire-roasted
1 Tbsp. dried oregano, crushed
2 Tbsp. freshly crushed black peppercorns

Béchamel:
1/2 cup butter
1/2 cup flour
4 cups whole milk
Salt
3 ounces parmesan cheese, freshly grated
1 cup ricotta cheese, preferably whole milk
1 packed cup fresh basil leaves

Pasta:
1 pound Pastitsio pasta, small penne, or other hollow pasta
1 cup freshly grated parmesan cheese

Make the Sauce: Separate the artichoke pieces from the marinade. Remove as much oil from the marinade as possible; a fat separator makes this task easy. Discard the oil and reserve the rest of the marinade.

Sauté the onions, lightly seasoned with salt, in olive oil until the onions soften and start to turn golden. Add the Aleppo pepper and cook for 1 minute. Stir in the crushed tomatoes, diced tomatoes, oregano, and crushed black peppercorns, bring to a boil, turn down the heat, and simmer uncovered for 30 minutes.

Add the reserved artichoke marinade and simmer for 30 minutes.

Add the artichoke pieces and simmer until the sauce is very thick, about 30 minutes. (The sauce may be made ahead to this point.)

Make the Béchamel: While the artichoke sauce is cooking, make the béchamel. Warm the milk over low heat or in the microwave; don’t bring the milk to a boil. Melt the butter in a large saucepan, thoroughly mix in the flour and cook for 2 minutes, stirring constantly. Slowly stir in the warm milk and cook, stirring, until the sauce is smooth and the thickness of heavy cream. Season with salt to taste. Stir in the 3 ounces of freshly grated parmesan cheese and take the béchamel off the heat.

Measure out 1 1/2 cups of béchamel and set aside to mix into the pasta. Thoroughly mix the ricotta into the remaining 2 1/2 cups béchamel. In a blender or food processor, purée the basil and one cup of the béchamel-ricotta mix; stir this purée back into the remaining béchamel-ricotta mix.

Cook the Pasta: Bring a large pot of salted water to a boil, and cook the pasta until it’s al dente (the length of cooking time depends on the size of the pasta). Drain the pasta in a colander, and mix it with the reserved 1 1/2 cups béchamel.

Assemble the Pastitsio: Preheat the oven to 375°F. Place half the pasta in the bottom of a well-oiled 9” x 13” baking pan. Sprinkle the pasta with 1/3 cup freshly grated parmesan cheese. Spread the artichoke sauce over the cheese, making sure the artichoke pieces are evenly distributed. Top with the remaining pasta and another 1/3 cup freshly grated parmesan cheese. Spread the Basil Béchamel over the pasta and top with the remaining 1/3 cup freshly grated parmesan cheese.

Bake at 375°F for 20 minutes. Reduce the heat to 350°F and cook for 40-45 minutes, or until the top of the Pastitsio is golden and set. Let cool for at least 15-20 minutes before cutting into squares and serving (if you cut Pastitsio immediately after removing it from the oven it will fall apart).

Wednesday, February 11, 2009

Recipes for Oxtail Braised in Sherry & Oxtail Ravioli in Leek-Mushroom Broth

Anchorage Pond in WinterYesterday the sun was shining and the temperature a balmy 15°F (-9°C).

I came in from my walk invigorated, but wanting something that would warm me from the inside out. Luckily, I had some leftover Oxtail Ravioli in Leek-Mushroom Broth, a remarkably delicious dish I’d made with leftover Oxtail Braised in Sherry.

As I’ve mentioned before, using leftovers as an ingredient is one of the easiest ways to create full-flavored food. Instead of eating the same dish twice in a row, try using all the flavors you worked hard to put in the original dish to create something new and exciting.

Although no longer the bargain it used to be,
oxtail (actually, beef tail) is ideal for braising in sherry or other wine. The cartilage, marrow, and tendons in the tail dissolve into the braising liquid when oxtails are cooked long and slow. The meat becomes meltingly tender and the sauce rich and unctuous.

On a recent evening, we feasted on Oxtail Braised in Sherry. There were only two pieces of oxtail left over. That night, I lay in bed scheming and planning how best to use the luscious leftovers. I decided to stuff the meat into Oxtail Ravioli and to enrich the already wonderful braising liquid with earthy mushrooms and sweet leeks.

The next day, I hesitated. Making homemade ravioli seemed like too much of a hassle. But I didn’t have any other ideas, so I persevered and discovered, as I do anew each time I make ravioli, they are easy to make and way less trouble than I always anticipate.

The key to making ravioli is having the right equipment. The dough takes 2 minutes to make in a food processor. A
pasta machine quickly rolls out perfect sheets of pasta. Because the machine can roll pasta so thinly, the resulting ravioli are light and tender. If you don’t have the equipment to make your own pasta, store-bought wonton or gyoza wrappers make tasty ravioli.

For another take on ravioli making with leftovers, check out Maria's recipe for Ravioli with Parsley-Pesto.
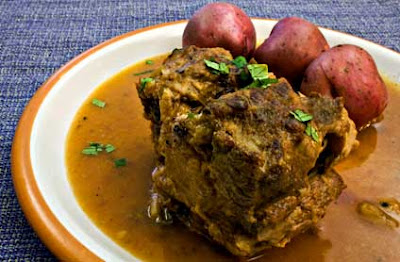
Oxtail Braised in SherryOxtail Braised in Sherry
Serves 6 - 8

Oxtail is sold cut into 1” thick slices; buy the meatiest pieces you can find. You will inevitably have a few slices from the tail’s end that have no meat on them. Be sure and add these pieces to the stew; their cartilage adds richness to the broth. Oxtail is delicious braised in any kind of dry wine; I use sherry because I enjoy its subtle flavor. I like the soupy sauce this recipe makes, in part because it leaves me more sauce for playing with leftovers. However, if you want thicker sauce, remove the lid when the meat is done and cook the stew at a medium boil until the sauce is the thickness you prefer.


Braised Oxtail is a good recipe to make ahead. Refrigerating the cooked oxtail hardens any excess fat and makes it easier to remove. As with most braised meats, Oxtail Braised in Sherry freezes well. I make the full recipe, even though I’m cooking for 2, and freeze the leftovers in serving size containers. Other ways of using the leftovers are in Oxtail Ravioli (see recipe below) or for soup (cut up the meat, add it, diced leftover potatoes, and beef stock to the oxtail broth and vegetables, and simmer for 15 minutes).

6 pounds oxtail slices
1 Tbsp. olive oil
Salt
Freshly ground black pepper
1/4 pound diced
thick-cut pancetta, 1/4” dice
4 cups diced onions, 1/2” dice
1 cup diced carrots, 1/2” dice
1 cup diced celery, 1/2” dice
1 Tbsp. minced fresh garlic
1 750ml. bottle dry Sherry
2 cups beef stock
1 14.5 ounce can diced tomatoes, preferably fire-roasted, juices included
3 bay leaves
Fresh parsley, minced, for garnish

Wash and dry the oxtails. Cut off as much fat as you can. Season the oxtails with salt and freshly ground black pepper on both sides. Heat the olive oil in a Dutch oven and, cooking the oxtails in batches, thoroughly brown them on all sides. Remove the browned oxtails from the pot and set them aside.

Add the pancetta to the same pot and cook until it is nicely browned. Add the onions, carrots, and celery, seasoned lightly with freshly ground black pepper, and cook until the onions are translucent, being sure to scrape up any browned bits from the bottom of the pot as you cook the vegetables. Add the garlic and cook for 1 minute.

Stir the Sherry, beef stock, tomatoes, and bay leaves into the vegetables. Return the browned oxtails to the pot. Bring the liquid to a boil, cover, turn down the heat to low, and simmer for 2 1/2 – 3 1/2 hours, or until the meat is very tender and falling off the bone. (The recipe may be made ahead to this point.)

Remove as much fat as possible from the sauce (a
fat separator works well for this task or, if you have time, separate the meat and sauce and refrigerate to harden the fat, which makes it easier to remove from the liquid). If the oxtails have been refrigerated, cook over low heat until the sauce is liquid and the oxtails warmed through. Taste and add salt or freshly ground black pepper, as needed.

Sprinkle with minced fresh parsley and serve with boiled or roasted potatoes.

Oxtail Ravioli in Leek-Mushroom BrothOxtail Ravioli in Leek-Mushroom Broth
Serves 4 – 6 as a main course (makes 12 ravioli, 3 - 4” diameter)
I make this with leftover oxtail because its unctuousness is well-suited for ravioli. However, any leftover braised beef, such as pot roast or stew, may be used instead. Oxtail broth gels when cold, so you need to warm the leftovers to separate the liquids and solids. Use the oxtail liquids, supplemented with rich beef or chicken stock as needed, to make 4 cups of stock for the Leek-Mushroom Broth. Bone enough oxtails to make 1 cup of chopped meat; one large oxtail slice makes about this amount. You can substitute the vegetable-pancetta mix from the oxtails for up to half the meat. Ravioli freezes well uncooked, so if I’m making ravioli, I usually double the pasta and filling recipes so I can freeze some for another day. As for the truffle cheese and truffle oil, they add satisfying
umami to the dish, but neither is necessary; the dish will be very tasty even without them. If you have access to wild mushrooms, by all means use them. Be sure to carefully rinse off any dirt that is trapped between the leeks' many layers.

Pasta:
3/4 cup plus 2 Tbsp. all purpose flour
1 large egg
1/8 tsp. salt
1/2 - 1 Tbsp. water, if needed


Ravioli Filling:
1 cup chopped oxtail meat
3/4 cup grated
sottocenere al tartufo (truffle cheese) or Italian fontina (about 4 ounces)

Leek-Mushroom Broth:
4 cups sliced cremini or wild mushrooms (about 1/2 pound), 3/8” slices
1 Tbsp. olive oil
3 Tbsp. butter, divided
1 Tbsp. minced garlic
1 Tbsp. minced rosemary
4 cups sliced leeks, white and light green parts only, 3/8” slices (2-3 leeks)
4 cups beef stock (or oxtail broth and beef stock to make 4 cups)
1 tsp. white truffle oil
1/2 cup freshly grated parmesan cheese

Make the Pasta: Put the flour, eggs, and salt in a food processor. Process until the ingredients are thoroughly mixed and the dough starts forming clumps. If the dough is too dry, add water in 1 Tbsp. increments and process again. Dump the dough out onto plastic wrap and knead for 1 minute, adding a small amount of flour if the dough is sticky. When you’re done, the dough should be smooth and firm. Divide the dough into two portions, wrap with plastic wrap, and let sit at room temperature for at least 30 minutes. (The dough can be made ahead to this point.)


Run each portion of dough through the rollers of a pasta machine, starting with the thickest setting. Fold the dough in thirds as if folding a letter, turn it 45 degrees, and again run it through the thickest setting. Repeat the folding, turning, and rolling at least three more times, or until the dough is smooth and shiny. Lay the sheets of dough out on dish cloths while they're waiting their turn to be rolled.

Set the pasta machine at the next thinnest setting. Run the sheets of pasta through, dusting with flour as necessary. Continue reducing the setting of the pasta machine and running the pasta through until you reach the machine’s lowest setting. When the sheets of pasta become too long to comfortably handle, cut them into manageable lengths.

Oxtail RavioliForm the Ravioli: Put 2 tsp. chopped meat on a sheet of pasta in clumps far enough apart so you can cut out 3”- 4” round ravioli. Top each clump with 1 tsp. truffle cheese or fontina. Brush water all around the pasta sheet where there isn’t stuffing (use a pastry brush for this task). Top with a second sheet of pasta. Press down to seal the top pasta sheet onto the bottom sheet, being careful to squeeze all the air out from around the stuffing. Cut out the ravioli and place them on a dishcloth while you boil water.

Cook the Ravioli: Bring a large pot of salted water to a rapid boil, then adjust the burner so the water boils slowly. Gently slide in the ravioli and cook until the pasta is tender, about 4 minutes. Remove the ravioli from the water with a slotted spoon and spread out on parchment paper while you make the Leek-Mushroom Broth.

Make the Leek-Mushroom Broth: Sauté the mushrooms, lightly seasoned with salt and freshly ground black pepper, in the olive oil and 2 Tbsp. butter until they’re well browned on all sides. Add the garlic and rosemary and cook, stirring regularly, for 2 minutes. Remove the mushrooms and seasonings from the pan with a slotted spoon and set aside.

Stir the leeks into the same pan, scraping up any browned bits on the pan’s bottom; add oil or butter, as needed. Sauté the leeks until they’re soft and tender. Stir in the stock, bring to a boil, turn down the heat and simmer for 10 minutes. Stir in the mushrooms and simmer for 10 minutes. Taste and add salt or freshly ground black pepper, as needed.

Stir in the truffle oil, and gently add the cooked ravioli to the broth. Spoon some broth over the ravioli (I use a turkey baster for this task) and simmer until the ravioli are warmed through.

Serve: Divide the ravioli between 4 – 6 warmed pasta bowls. Divide the broth and vegetables between the bowls, sprinkle with freshly grated parmesan cheese, and serve immediately.
~~~~~~~~~~~~~~~~~~~~~~~~~~~
This is my entry for the 100th post celebration of
Presto Pasta Nights, created and hosted by Ruth of Once Upon a Feast.

Bob in a Blanket Bob in a Blanket

Sunday, January 11, 2009

About Pancetta with Recipes for Pasta with Squash, Arugula, and Pancetta & Pasta with Pork in Garlic-Wine Sauce (Ιταλική Πανσέτα με Ζυμαρικά)

Alaska has been having a cold snap.

I imagine many of you thinking, “So what else is new?” Even though Alaskans expect and are used to cold weather, the last couple weeks really have been colder than usual. To see what cold weather looks like, check out Marc Lester's
lovely photo-essay showing Southcentral Alaska’s chilly wonderland.

Hearty food, including pasta, is a good antidote for cold weather blues. One of my favorite ways to boost the flavor of winter pasta sauces is adding pancetta (cured Italian pork belly). Only a small amount of pancetta is needed improve the taste of savory sauces (a corollary to the principle that everything tastes better with bacon).

Salumi's hand-crafted pancetta

Pancetta is often sold in packages of very thinly cut pre-sliced meat. Although I use pre-sliced pancetta in a pinch, I mostly buy pancetta direct from the deli counter. I ask for either a chunk of pancetta, which I hand slice and dice at home, or have the deli staff cut the pancetta into slices the thickness of regular bacon. With thicker slices, eaters enjoy bursts of pancetta flavor when devouring the sauce; thinner slices tend to melt into the other flavors.

I was recently at Seattle’s
Metropolitan Market where I bought several pounds of hand-crafted pancetta from Salumi Artisan-Cured Meats. This is far and away the best pancetta I’ve ever eaten; Salumi’s hand-rolled pancetta is meaty, with superior texture and flavor. Although more expensive than pre-sliced pancetta, Salumi’s product is well worth the price, and may be ordered online.

Two delicious pasta sauces that benefit from pancetta are Pasta with Squash, Arugula, and Pancetta and Pasta with Pork in Garlic-Wine Sauce. Either is just right for even the coldest winter day.

Pasta with Squash, Arugula, and Pancetta
Serves 4

Inspired by Cookthink
If using artisan-cured pancetta, it may be quite salty, so be careful not to over-salt the other components of the dish.

Squash:
1 small Kabocha, butternut, or other winter squash, peeled and cut into 3/4” chunks (4 cups)
1/4 cup olive oil
Salt
Freshly ground black pepper

Pancetta and Onions:
3 thick slices pancetta, cut in 1/2” dice (1/2 cup)
2 Tbsp. olive oil
3 cups diced onion, 1/2” dice
Freshly ground black pepper
1 Tbsp. minced fresh garlic
2 Tbsp. minced fresh sage

Pasta:
1/2 pound casarecci or similarly shaped pasta
4 cups arugula, cleaned and roughly chopped
1 cup freshly grated parmesan cheese

Make the Squash: Preheat the oven to 515°F. On a baking sheet with rims, toss the squash cubes with olive oil, salt, and freshly ground black pepper. Put the squash in the oven and immediately turn the heat down to 475°F. Bake for 20 to 25 minutes, turning the squash cubes halfway though, until the squash is cooked through and lightly browned.

Put a large pot of salted water on a burner over high heat.

Make the Onions and Pancetta: Sauté the pancetta in olive oil until it begins to brown. Stir in the onions and freshly ground black pepper, scraping up any browned bits on the bottom of the pan, and sauté until the onions soften. If the onions start sticking to the bottom of the pan, add 1/4 – 1/2 cup water. When the onions are lightly browned, stir in the garlic and sage and keep warm over very low heat.

Make the Pasta: Add the pasta to the boiling salted water and cook until it is al dente. While the pasta is cooking, put the arugula in a large bowl. When the pasta is done, remove 1 cup of pasta cooking water, drain the pasta well, and put the drained pasta on top of the arugula in the bowl. Add the roasted squash and cooked onions to the bowl and toss all the ingredients well. If the dish is too dry, add as much of the pasta cooking water as necessary (usually 1/4 - 1/2 cup). Taste and add freshly ground black pepper or salt, as needed.

Serve sprinkled with freshly grated parmesan cheese.

Pasta with Pork in Garlic-Wine Sauce
Serves 4
Spruce vinegar and salt-cured spruce buds add interesting highlights to the sauce, but aren’t necessary to the success of the dish. If you’re among the 99.99% of people who don’t have either ingredient, red wine vinegar and capers work equally well. For capers, I prefer the taste of salt-cured; when I can’t find salt-cured, I use capers in brine. If using artisan-cured pancetta or salt-cured capers, they may be quite salty, so be careful not to over-salt. Bacon may be substituted for pancetta; it adds a pleasant smoky flavor.

Sauce:
1 pork tenderloin (about 1 pound), cut in 3/4” dice
1 Tbsp. minced garlic
1/2 tsp. black peppercorns, crushed
1 Tbsp. spruce vinegar or red wine vinegar
3 thick slices pancetta, cut in 1/4” dice (1/2 cup)
2 Tbsp. olive oil
1 cup finely diced onion, 1/8” dice
1/4 cup sun-dried or regular tomato paste
1 Tbsp. salt-cured spruce buds or capers, well-rinsed and minced
3/4 cup dry red wine
2 cups chicken stock

Pasta:
1/2 pound
gemelli or similarly shaped pasta
1/2 cup freshly grated parmesan cheese

Mix the pork, garlic, peppercorns, and vinegar and let marinate at least 1 hour (overnight is fine).

Sauté the pancetta in olive oil until it begins to brown. Add the pork mixture and cook until the pork is browned on all sides. Stir in the onion, using the moisture in the onions to scrape up any browned bits on the bottom of the pan. Continue cooking until the onions soften and begin to turn golden. Stir in the tomato paste until it is thoroughly combined. Mix in the wine and cook until it is reduced by half. Stir in the chicken stock and bring to a boil. Turn down the heat and simmer for 40 - 45 minutes, until the sauce slightly thickens. Taste and add salt or freshly ground black pepper, as needed.

Cook the pasta in boiling salted water until it is al dente. Drain the pasta and toss it with the pork sauce. Serve sprinkled with freshly grated parmesan cheese.

The road we live on

Friday, January 9, 2009

Recipe for Leek Mousaka (Μουσακάς με Πράσα)

Happy New Year to one and all!

I’m back from recent travels and recovered from holidays full of family, parties, and baking. You heard it here first: I’m never eating cookies or candy again. Ever. Or at least until memories of the last month fade into nothingness.

It’s hard to decide what to write about because I have a giant backlog of recipes and photographs. So instead of actually making a decision, I jumbled my stack of notes, and randomly drew out the recipe for Leek Mousaka.

When we arrive in Greece from Alaska, the first thing we do is go to an airport newsstand for newspapers and at least one cooking magazine. Properly armed, we head for our hotel to read and relax from the long trip.

Lately, my favorite Greek magazine is
Olive (a spin-off of BBC Olive). Sprightly Greek food personality Ilias Mamalakis first drew me to Olive, but I continue reading it for updates on the Greek food world and interesting recipes. Sadly, Olive isn’t available in Alaska, even by subscription.

LeeksAs a leek lover and someone with a healthy supply of homemade Greek egg noodles (hilopites), Olive’s recipe for Leek Mousaka was intriguing. Out of curiosity, I googled “Μουσακάς + Πράσα” (Mousaka + Leeks) to see if Olive’s recipe was unique. A number of websites had identical Leek Mousaka recipes, but only one credited the magazine. None credited Georgia Kofinas (Γεωργία Κοφινάς), who Olive identifies as the recipe’s creator.

There’s no way for me to know whether the recipe actually originated with Kofinas or someone else. However, the issue of copying recipes without attribution is one that, sooner or later, all food writers must confront. It’s infuriating when others appropriate recipes without permission or attribution. On the other hand, it’s easy to give credit to those whose work contributed to your creation.

Here's my practice and, if I could wave a magic wand, it’s one all food bloggers and writers would follow:


1. If I use a recipe exactly as written (which I rarely do), under the name of the recipe I write “recipe by” and identify the author and source of the recipe. My article about the recipe also includes a review of the source book, magazine, or blog and applicable permalinks.


2. If I make only minor changes to a recipe, under the name of the recipe I write “recipe adapted from” and identify the author and source of the original recipe.

3. If I make major changes to someone else’s recipe, under the name of the recipe I write “recipe inspired by” and identify the author and source of the inspirational recipe.

4. If I don’t designate “recipe by,” “recipe adapted from,” or “recipe inspired by,” the recipe is my creation.

Of course, there are simple dishes that many cooks discover or invent on their own, without ever having seen a similar recipe. Oven-roasted vegetables, vinaigrettes, risottos, soups, and eggs are only a few examples of such recipes. Any similarities in recipes like this are, more likely than not, coincidental.

In the case of Leek Mousaka, I significantly changed the original recipe. I cooked the leeks without water to boost their flavor, used a personal recipe for tomato-meat sauce, enhanced the topping with cream and cheese, and adapted the recipe so it can be made with ingredients available in the United States. Even though I made major changes to the original recipe, I wouldn’t’ve made it without Olive’s inspiration, so included a credit for both the magazine and the recipe’s creator.

Leek Mousaka is quite different from the
typical Mousaka found in Greek restaurants around the world, and is wonderfully delicious. The sweetness of sautéed leeks enhances the minty tomato-meat sauce and contrasts with the tart yogurt. Noodles play harmony to Leek Mousaka’s aromatic flavors, and form a pleasurably crispy top crust. The resulting dish is attractive, delectable, and suitable for any occasion.

Leek MousakaLeek Mousaka (Μουσακάς με Πράσα)
Serves 6 – 9
Inspired by Μουσακάς με Πράσα, <<Φθινοπωρινή συμφωνία>> by Γεωργία Κοφινάς in BBC Olive (Greek version),
Issue 19, October 2008
Leek Mousaka can be made for vegetarians by using my recipe for
Tomato Sauce with Celery and Mint (and simmering it until it’s thick) instead of the meat sauce described below. Although Leek Mousaka has many steps, it goes together quickly once the component parts are done. The meat sauce may be made days ahead (or months ahead if you freeze it). The yogurt may also be made well ahead (or purchased, if strained Greek yogurt is available where you live). Because I prefer strained yogurt for all purposes, I usually strain yogurt right after I bring it home from the market so it’s ready when I want it. Leeks can hold dirt between their layers, so must be carefully cleaned. After removing the dark green portions and the root ends (both of which can be saved for vegetable stock), cut the leeks in half. Under running water, rinse out any dirt trapped between the leeks’ layers, using your fingers to help remove any stubborn clumps of dirt. Every layer of Leek Mousaka is separately salted (doing so brings out the full flavor of each ingredient), so be careful not to over-salt any one layer or the finished dish will be too salty.

Yogurt Filling:
2 cups plain yogurt, preferably whole-milk (or 1 1/4 cup strained yogurt, see Note above)
2 medium-sized garlic cloves
1/4 tsp. salt

Meat and Tomato Sauce with Celery and Mint:
1 pound ground beef
Salt
Freshly ground black pepper
2 cups diced onions, 1/4” dice
1 cup diced celery, 1/4” dice (2 – 3 stalks)
1 Tbsp. minced garlic
1 tsp. Aleppo pepper or 1/2 tsp. crushed red pepper
1 14.5-ounce can, or 2 cups fresh, crushed tomatoes
3/4 cup dry white wine
1/4 cup minced fresh mint

Noodles:
1/2 pound
thin egg noodles, vermicelli, fides, broken-up angel hair pasta, or any other similarly-shaped pasta

Leeks:
8 cups diced leeks, white and light green parts only, 1/2” dice (4-5 leeks)
3 Tbsp. olive oil
Salt
Freshly ground black pepper

Topping:
2 eggs
1/2 cup heavy cream
Salt
Freshly ground black pepper

Olive oil for coating the baking pan
1 cup freshly grated kefalotyri, parmesan, or Romano cheese, divided

Straining YogurtMake the Yogurt Filling: Line a strainer with a paper towel and dump in the yogurt. Let the yogurt drain for at least 1 hour (straining for 2 hours is better if you have time). Purée garlic by mashing it into the salt with the flat of a knife or in a mortar and pestle. Mix the puréed garlic into the strained yogurt.

Make the Meat and Tomato Sauce with Celery and Mint: Sauté the ground meat, lightly seasoned with salt and freshly ground pepper, until it is nicely browned. Add the diced onions and celery and sauté until the onions begin to brown. Stir in the garlic and Aleppo pepper and cook for 1 minute. Stir in the crushed tomatoes and white wine and bring to a boil. Cook rapidly for five minutes, stirring constantly. Turn the heat down to medium, and simmer for 15 – 20 minutes or until most of the liquid in the sauce has evaporated. Taste and add salt and freshly ground black pepper, as needed. Stir in the mint and take the sauce off the burner.

Cook the Noodles: Add the noodles to boiling salted water and cook until they’re half done. (Because the noodles are small, they cook quickly.) Drain and set aside.

Make the Leeks: Sauté the diced leeks in olive oil, lightly seasoned with salt and freshly ground black pepper, until the leeks are soft.

Make the Topping: Whisk together the eggs, cream, a little salt, freshly ground black pepper, and 1/3 cup of grated cheese.

Assemble the Mousaka: Preheat the oven to 400°F.

Thoroughly oil a 10” x 10” baking pan. Spread half the noodles over the bottom of the pan. Evenly sprinkle 1/3 cup grated cheese over the noodles. Evenly spread the leeks over the grated cheese, the yogurt filling over the leeks, the meat sauce over the yogurt, 1/3 cup grated cheese over the meat sauce, the remaining noodles over the grated cheese, and the egg/cream topping over the noodles.

Bake for 50 to 55 minutes. Let cool for at least 10 minutes before cutting into pieces with a very sharp or serrated knife.

Serve with a crisp green salad, Kalamata olives, and crusty bread.
~~~~~~~~~~~~~~~~~~~~~~~~~~~~~
This is my entry for
Weekend Herb Blogging, hosted this week by Pam from The Backyard Pizzeria.

Friday, October 31, 2008

PESD with Recipe for Pasta with Spicy Cauliflower Sauce

Between the US presidential contest and Alaska’s senatorial election, I’ve developed a severe case of PESD (Pre-Election Stress Disorder).

Even when I’m not compulsively checking my favorite political websites, the upcoming election dominates my thoughts. Since I can’t seem to write coherently about food, I’m officially giving up until after November 4.

Though writing is beyond me, I’m still cooking dinner every night. One of my favorite recent meals was Pasta with Spicy Cauliflower Sauce, a dish I created to honor the gorgeous, creamy-white cauliflower that arrived in last week’s CSA box.

Pasta with Spicy Cauliflower Sauce is delicious and gives cauliflower the attention its wonderful flavor deserves. (One day, when I’m fully recovered from PESD, I’ll explain why steaming or boiling cauliflower is almost always a mistake.)

And for my American readers, please vote!

Pasta with Spicy Cauliflower Sauce
Serves 4
The anchovies in the breadcrumbs are optional, but their salty flavor nicely complements cauliflower. The amount of rosemary needed will depend on how strongly flavored your rosemary tastes.

Cauliflower Sauce:
1 cauliflower
2 cups diced yellow onions, 1/2” dice
1/4 cup olive oil
Salt
Freshly ground black pepper
2 – 3 tsp. minced rosemary
1 tsp. Aleppo pepper or 1/2 tsp. crushed red pepper flakes

Spiced Breadcrumbs:
3 cloves fresh garlic
1/4 tsp. Aleppo pepper or 1/8 tsp. crushed red pepper flakes
6 anchovy fillets (optional)
1 cup fresh bread crumbs or
Panko
2 Tbsp. olive oil
Salt
Freshly ground black pepper

Pasta:
2 cloves fresh garlic
1/4 tsp. salt
3 Tbsp. olive oil
1/2 pound
gemelli, fusilli, or other dried pasta

Finish:
1/4 cup dried currants
1/2 cup chicken stock, plus more as needed
1/2 cup grated fontina cheese
1/2 cup finely grated fresh parmesan cheese

Make the Cauliflower Sauce: Wash the cauliflower, cut out the stem and discard it, and break the cauliflower into florets. Roughly chop the florets.

Sauté the onions, lightly seasoned with salt and freshly ground black pepper, in olive oil until the onions soften and start to turn golden. Stir in the chopped cauliflower, rosemary, and Aleppo pepper, and cook over medium heat for 15 - 20 minutes, or until the cauliflower is tender and starts to caramelize.

Make the Spiced Breadcrumbs: While the cauliflower is cooking, puree together the garlic, Aleppo pepper, and anchovies (if using). Toss the puree with the breadcrumbs until they are thoroughly combined. Season with freshly ground black pepper and salt (if using anchovies, which are salty, it may not be necessary to add salt). Sauté the seasoned bread crumbs over medium heat, stirring frequently, until the crumbs are crispy. Pour the crumbs onto a plate to cool.

Make the Pasta: Puree the garlic and salt together; this is easiest to do with a mortar and pestle. Whisk the olive oil into the garlic and salt. Boil the pasta in boiling salted water until it is al dente; be careful not to overcook. Drain the pasta and immediately mix in the garlic oil.

Finish the Dish: Stir the pasta and garlic oil into the cooked cauliflower. Stir in the currants, and 1/2 cup chicken stock. Let cook over medium heat for 1 minute or until the pasta is heated through. If the pasta is too dry, add a little more chicken stock. Stir in the fontina and half the parmesan cheese.

Divide the Pasta with Spicy Cauliflower Sauce between four plates or pasta bowls, sprinkle with spiced breadcrumbs and the remaining parmesan cheese, and serve immediately.
~~~~~~~~~~~~~~~~~~~~~~~
This is my entry for the third anniversary edition of
Weekend Herb Blogging, hosted this week by its creator Kalyn of Kalyn’s Kitchen.

Sunday, September 21, 2008

Andrea Camilleri's Montalbano with Recipe for Spaghetti with Eggplant and Tomato Sauce (Pasta alla Norma) (Μακαρόνια με Μελιτζάνες και Ντομάτες)

Andrea Camilleri, photograph by Pensiero

(From Greece)

English language books are hard to find on the island.

I carefully select those to bring with us, focusing on books we’ll both enjoy and want to reread. After several years, most books recede far enough into memory that rediscovering them is a pleasure. Since airlines have cracked down on weight limits, prudent book selection is more important than ever.

Two years ago my parents sent us the first six volumes of
Andrea Camilleri’s wondrously good Inspector Montalbano series, set in Sicily and skillfully translated by poet Stephen Sartarelli. A few pages into the first book, I realized the series was perfect for the island. I quit reading and put the Camilleri books in my “bring to the island” corner.

Then my head
exploded and I was off reading for longer than I’d planned. Shortly before we left for Greece this year, to my great joy, I finally was able to read books again. I dug out the Montalbano series and packed them for the trip.

I began getting to know Inspector Montalbano our first day on the island. One week later, thoroughly captivated by the cantankerous, world-weary, enigmatic inspector, I finished the last of the six books. I’m already looking forward to rereading them, but first I’ll track down and devour the rest of the series.

Here’s Camilleri/Sartarelli describing the inspector in the opening scene of
The Terra-Cotta Dog (book 2):

To judge from the entrance the dawn was making, it promised to be a very iffy day – that is, blasts of angry sunlight one minute, fits of freezing rain the next, all of it seasoned with sudden gusts of wind – one of those days when someone who is sensitive to abrupt shifts in weather and suffers them in his blood and brain is likely to change opinion and direction continuously, like those sheets of tin, cut in the shape of banners and roosters, that spin every which way on rooftops with each new puff of wind. Inspector Salvo Montalbano had always belonged to this unhappy category of humanity.

Camilleri’s prose brings Sicily’s people, and its highways and byways, vividly to life. In the original Italian, Camilleri uses Sicilian dialect to create colorful characterizations and bring humor to stories that might otherwise be overly dark. Sartarelli effectively captures the dialect’s essence in his creative translation.

Inspector Montalbano loves to eat, and insists on doing so silently, the better to appreciate every nuance in the dishes set before him. He thinks poorly of those who cook badly, and when forced to eat bad food (“… shamefully overcooked pasta, a beef stew conceived by an obviously deranged mind, and dishwater coffee of a sort that even airline crews wouldn’t foist on anyone…”), he heads out for a meal good enough to lift him out of the gloom into which bad food plunges him.

In the course of investigating a disappearance in
The Snack Thief (Book 3), Inspector Montalbano interviews a “well-dressed seventy-year-old lady … in a wheelchair.” When the interview is over, the woman invites the inspector to lunch:

“Well, signora, thank you so much …,” the inspector began, standing up.
“Why don’t you stay and eat with me?”
Montalbano felt his stomach blanch. Signora Clementina was sweet and nice, but she probably lived on semolina and boiled potatoes.
“Actually, I have so much to –“
“Pina, the housekeeper, is an excellent cook, believe me. For today she’s made pasta alla Norma, you know, with fried eggplant and ricotta Salata.”
“Jesus!” said Montalbano, sitting back down.
“And braised beef for the second course.”
“Jesus!” repeated Montalbano.
“Why are you so surprised?”
“Aren’t those dishes a little heavy for you?”
“Why? I’ve got a stronger stomach than any of these twenty-year-old girls who can happily go a whole day on half an apple and some carrot juice. Or perhaps you’re of the same opinion as my son Giulio?”
“I don’t have the pleasure of knowing what that is.”
“He says it’s undignified to eat such things at my age. He considers me a bit shameless. He thinks I should live on porridges. So what will it be? Are you staying?”
“I’m staying,” the inspector replied decisively.

Although food plays only a supporting role in the Montalbano books, Camilleri’s descriptions of traditional Sicilian dishes are inspirational. I read the above passage just before lunch and, coincidentally, had the ingredients on hand to make Pasta alla Norma. So I did.

Montalbano was right to stay for lunch with Signora Clementina. Eggplant and Tomato Sauce with Spaghetti is absolutely delicious.

Spaghetti with Eggplant and Tomato Sauce (Pasta alla Norma) (Μακαρόνια με Μελιτζάνες και Ντομάτες)
Serves 4 - 6

Pasta all Norma comes from Catania, a city in eastern Sicily, and is named after Catania native Vincenzo Bellini's famous opera, Norma. Traditionally, eggplant for Pasta all Norma is fried, as described by Signora Clementina. Because fried eggplant absorbs a lot of oil, I oven-roast it instead. If you want to fry the eggplant, sprinkle the eggplant slices with a lot of salt and let drain for an hour or so (salt collapses eggplant’s cell structure and helps reduce its oil absorption). Rinse off the salt, pat the eggplant dry, fry in olive oil until the slices are golden brown, and drain on paper towels.

Tomato Sauce:
2 pounds ripe tomatoes or 2 15-ounce cans whole tomatoes, roughly chopped
1 cup roughly chopped onion
1/4 cup chopped fresh basil or mint
Salt
1/4 olive oil
1 tsp. sugar
1 tsp. Aleppo pepper or 1/2 tsp. crushed red pepper flakes (optional)

Eggplant:
2 globe eggplants
Olive oil
Salt
Freshly ground black pepper

Pasta:
1 pound spaghetti
2 Tbsp. olive oil
1 - 2 garlic cloves, grated or finely minced (optional)
Freshly ground black pepper
1/2 – 1 cup grated or crumbled
ricotta salata or myzithra

Make the Tomato Sauce: Put the tomatoes, onions, basil and salt in a large pot and cook over medium heat for 15 minutes, stirring regularly. Put the tomato mixture through a food mill to remove the skins and seeds. Return the tomato mixture to the pot with the olive oil and sugar. Bring to a boil, turn down the heat, and simmer for 30 minutes, stirring regularly. Taste and add salt, as needed.

Make the Eggplant: Preheat the oven to 450°F. Slice the eggplant into 1/2” cross-wise slices. Brush the slices on both sides with olive oil and season with salt and freshly ground black pepper. Bake the eggplant for 15 minutes or until the eggplant slices are golden brown, remove from the oven, and let cool. Cut into 1” wide slices. Add the eggplant to the tomato sauce and stir gently, being careful not to break up the eggplant slices.

Make Pasta alla Norma: Cook the pasta in boiling, salted water until it is al dente. Drain the pasta, reserving 1/2 cup of the pasta water. Return the pasta to the pot and stir in the reserved pasta water, olive oil, garlic, and freshly ground black pepper. Add all but 1 cup of the Tomato and Eggplant Sauce and toss with the pasta. Pour the sauced pasta into a large bowl and top with the remaining sauce and crumbled cheese. Serve immediately.
~~~~~~~~~~~~~~~~~~~~~~
This is my entry for
Novel Food #5, hosted and created by Simona of Briciole and Lisa of Champaign Taste, both of whom love Inspector Montalbano. You can find the Novel Food #5 round-ups here and here.