Showing posts with label anchovies. Show all posts

Sunday, November 15, 2009

Recipe for Kale Puttanesca (Μακαρονάδα Πουτανέσκα με Κατσαρό Λάχανο)

Kale added to spicy puttanesca sauce makes a surprisingly delicious topping for chewy pasta. We recently enjoyed Kale Puttanesca for dinner and spent the whole meal alternating sounds of satisfaction with “this is really good” and “mmmmm -- I want this again.”

My recipe calls for more capers, garlic, and anchovies than are often used in puttanesca recipes; kale and chewy pasta balance the strong flavors.  Even so, Kale Puttanesca is best served to those, like us, who like assertively seasoned food.


To complement Kale Puttanesca sauce, I used Maccheroni al Ferratto, rustic artisanal pasta, originally from Calabria, that was traditionally shaped around iron umbrella spokes.

Lately, I’ve been comparing regular dried pasta from the supermarket with more expensive “artisanal” pastas found in specialty stores and upscale markets.  All dried pasta is made using extrusion dies, metal patterns that create unique pasta shapes.  However, the dies used to make regular and artisanal pastas differ: regular pasta is made using dies with a Teflon insert and artisanal pasta is made with bronze dies.

Regular pasta has a hard, slick finish, while artisan pasta is rough and uneven: “Traditional dies made entirely of bronze make the pasta surface rough [and more porous], which helps to capture the sauce, whereas the Teflon insert gives the product an even surface and a smoother texture,” according to food scientists. On the other hand, makers of Teflon-die pasta claimthe rougher surface [of bronze-die pasta] allows cooking water to penetrate too quickly, making for less-than-ideal quality.”

The two types of pasta also differ in how they’re dried. Regular pasta is dried in ovens “the size of a football field” for 2-4 hours over high heat.  Artisanal pasta is dried for 24 to 50-plus hours “in very warm (but never hot), humid environments in which moisture can be reduced slowly, without damaging the texture of the finished product.”

I prefer artisanal pasta with very simple pasta sauces, such as oil and garlic, where the texture of the pasta makes a significant difference. I also prefer artisanal pasta in dishes, like Kale Puttanesca, that call for thicker, chewier pastas.  For all other purposes (and when I don’t want to spend the money on artisanal pasta) I happily use regular dried pasta from the supermarket.

No matter what type of pasta you use, be sure to cook it al dente; soft, overdone pasta is the bane of even the best pasta sauce.


Kale Puttanesca  (Μακαρονάδα Πουτανέσκα με Κατσαρό Λάχανο)
Serves 4
Any sturdy green, wild or domesticated, can be substituted for kale. The amount of crushed red pepper depends on how spicy you like your food.

Sauce:
1 bunch kale
3 Tbsp. capers, preferably salt-cured
3 Tbsp. olive oil
2 Tbsp. minced garlic
10 anchovy fillets, minced
1/2-1 tsp. crushed red pepper flakes
2 14.5 ounce cans diced tomatoes, with juice
1/2 cup oil-cured black olives or throumbes, pitted and roughly chopped
Freshly ground black pepper

12-16 ounces Machheroni al Ferratto or other chewy-style pasta

Wash the kale to remove any dirt.  Strip the greens from the tough center kale stems. Shred the kale greens and discard the stems (or save them for another use).

Rinse the capers well. If using salt-cured capers, soak them in a bowl of cold water for at least 10 minutes.

Fill a large pot with enough water to cook the pasta, salt it well, and put on a burner over high heat.

Heat the olive oil until it's just warmed though, using a pan large enough to hold all the ingredients. (If oil is too hot, garlic will burn; it’s best to warm the oil over medium heat.) Stir in the garlic, anchovies, and red pepper flakes and cook, stirring, for 1 minute. Stir in the tomatoes, olives, freshly ground black pepper, shredded kale, and drained capers. Bring to a boil, cover, turn down the heat, and simmer for 20-30 minutes, or until the kale is tender.

While the sauce is cooking, and when the salted water reaches a full boil, cook the pasta until it’s al dente (exact cooking time depends on the type of pasta).  Reserve 1 cup of pasta cooking water. Drain the pasta.

When the kale is tender, stir in the cooked pasta, making sure all of it is coated with sauce. Taste and add freshly ground black pepper, as needed. If the sauce is too thick for your taste, thin it with a little pasta cooking water. 

Serve immediately with plenty of crusty bread and a crisp green salad.
~~~~~~~~~~~~~~~~~~~~~~~~~~~~~~~
This is my entry for Weekend Herb Blogging, sponsored by Haalo and hosted this week by Winnie from Healthy Green Kitchen.

Sunday, January 18, 2009

Two Recipes for Bagna Càuda (Δύο Συνταγές για Μπάνια Καούντα)

Last night, we had a hot olive oil bath and went to bed happy. We didn’t dive into olive oil; our dinner did.

Bagna Càuda, a specialty of Italy’s
Piedmont Region, combines oil with anchovies and garlic to make a hot dip for vegetables and bread. Cooked over low heat, anchovies melt into oil and garlic’s strength turns smooth and mild.

I was first introduced to Bagna Càuda by the proprietors of
Genoa Restaurant in Portland, Oregon (now closed). It was love at first taste. Genoa’s Bagna Càuda was rich and luxurious, creamy and indefinably delicious. I wanted more.

After I discovered Genoa’s recipe in a cookware store handout, its Bagna Càuda regularly showed up on the tables of me and my friends. Unlike the Bagna Càuda I make now, Genoa’s recipe doesn’t contain a speck of olive oil; its richness comes exclusively from butter and cream.

In the Portland years, I was young and undeterred by buckets of cream and butter. As time passed, I lost my enthusiasm for both. I used to cook with butter, using olive oil mostly for salad dressings. Now, I rarely use butter; olive oil has replaced it in my kitchens. I stopped making Bagna Càuda.

Even so, when my husband and I travelled to Italy’s Piedmont Region in 1997, I was eager to try Bagna Càuda in its homeland. We found it in a tiny lakeside restaurant in
La Morra, where we were the only customers. The television was blaring, the florescent lights blazing, and our expectations for the food low.

When the Bagna Càuda arrived at our table, it was a revelation. It didn’t contain cream or butter. Instead, garlic and anchovies were melted in olive oil and served in a roasted red pepper half. Every bite was a pleasure.

As with Genoa’s Bagna Càuda so many years ago, the taste and aroma of this new-to-me version lingered in my memory. Back in Alaska, I developed a simple recipe incorporating its flavors, using only olive oil, garlic, and anchovies.
.
Last Thursday, my regular
CSA box of vegetables arrived from Full Circle Farm. The refrigerator was overflowing; I couldn’t find space for an extra-large bunch of broccoli. Bagna Càuda (my version) was the solution. While the anchovy and garlic sauce simmered, I steamed broccoli and roasted a couple red peppers over a gas burner.

When the Bagna Càuda was done, we dipped our vegetables and bread in the hot savory bath, ate our fill, and licked our fingers clean.


Bagna CaudaLaurie's Bagna Càuda (Μπάνια Καούντα)
Makes about 1 1/2 cups
Though the recipe contains a lot of garlic and anchovies, their pungency disappears after simmering in hot oil. For a group, serve Bagna Càuda in a fondue dish or other pot which keeps the sauce hot. For quick weekday meals, serve the sauce in individual unheated dishes for dipping, or even just spooned, straight from the stove, over the vegetables.

Sauce:
1/4 cup chopped anchovy fillets (2 ounces/24 cleaned fillets)
(see Note below)
1/3 cup chopped fresh garlic
1 1/4 cups olive oil

Selection of Vegetables: Raw or roasted red peppers, raw or lightly steamed broccoli or cauliflower, celery, carrots, zucchini, cardoons, radishes, green onions, radicchio, fennel, cherry tomatoes, boiled potatoes


Selection of Bread: artisan-style bread, foccacia, breadsticks

Put the anchovy fillets, garlic, and olive oil in a saucepan over medium-low heat. Cook, stirring from time to time, until the oil starts to bubble. Cook for 20 – 30 minutes, until the anchovies melt into the oil and the garlic is very soft. Don’t let the garlic brown; if the oil is cooking hard enough to brown the garlic, immediately turn down the heat.

While the sauce is cooking, cut the vegetables and bread into shapes appropriate for dipping. When the sauce is done, dip the cold vegetables in the hot sauce.

NOTE:
Anchovies preserved in salt have much more flavor than anchovies canned in olive oil. In dishes like Bagna Càuda, where anchovies are a central ingredient, I prefer the salt-cured variety (the dish is delicious even when made with oil-canned anchovies). Some places, you can buy salted anchovies by the ounce from the deli counter; in Alaska, this isn’t possible. Instead, I buy large cans of salt-preserved anchovies in Greece or when I travel outside the state (Big John’s PFI in Seattle carries them, as does Amazon.com). Anchovies packed in salt keep in the refrigerator for up to a year. To clean salt-cured anchovies, carefully rinse off all the salt. Starting from the head end, peel each fillet off the backbone, and then remove as many of the fine bones from the fillet as possible. Dry the cleaned fillets on paper towels before using in recipes.


Genoa's Bagna Càuda (Μπάνια Καούντα)
Makes about 1 1/2 cups
Adapted from Genoa Restaurant recipe, Portland, Oregon
Genoa’s Bagna Càuda must be kept warm over a burner at all times; the reduced cream stiffens up when it cools. The anonymous author of Genoa’s recipe explains how to eat it: “[This] is a dish to be enjoyed without ceremony – pick up vegetable or bread stick with fingers, dip it in the sauce until well covered, and consume. If butter and cream separate, pour in a bit of cold cream and whisk hard. The sauce will return to its former velvet-like texture.”

Sauce:
2 cups heavy cream
8 cloves garlic, roughly chopped
1 2-ounce can anchovy fillets, drained of oil
Dash of cayenne
1/4 cup unsalted butter

Selection of Vegetables: Raw or roasted red peppers, raw or lightly steamed broccoli or cauliflower, celery, carrots, zucchini, cardoons, radishes, green onions, radicchio, fennel, cherry tomatoes, boiled potatoes

Selection of Bread: artisan-style bread, foccacia, breadsticks

In a heavy saucepan, simmer cream with garlic until the cream is thick and reduced to 1 cup. Watch the cream carefully as it cooks; don't let it boil over. Put the reduced cream, anchovies, and cayenne into a blender and purée until the mixture is very smooth. (The recipe may be made ahead to this point.)

Return the mixture to the pan and bring to a very slow simmer. Stir in the butter until it melts. While the dip simmers, cut the vegetables and bread into shapes appropriate for dipping.

Serve in a fondue dish or other pot which can keep the dip hot. Dip the cold vegetables in the hot sauce.

~~~~~~~~~~~~~~~~~~~~~~
This is my entry for Foodie Films: Big Night - Italian! created and hosted by Joelen's Culinary Adventures.

Friday, October 31, 2008

PESD with Recipe for Pasta with Spicy Cauliflower Sauce

Between the US presidential contest and Alaska’s senatorial election, I’ve developed a severe case of PESD (Pre-Election Stress Disorder).

Even when I’m not compulsively checking my favorite political websites, the upcoming election dominates my thoughts. Since I can’t seem to write coherently about food, I’m officially giving up until after November 4.

Though writing is beyond me, I’m still cooking dinner every night. One of my favorite recent meals was Pasta with Spicy Cauliflower Sauce, a dish I created to honor the gorgeous, creamy-white cauliflower that arrived in last week’s CSA box.

Pasta with Spicy Cauliflower Sauce is delicious and gives cauliflower the attention its wonderful flavor deserves. (One day, when I’m fully recovered from PESD, I’ll explain why steaming or boiling cauliflower is almost always a mistake.)

And for my American readers, please vote!

Pasta with Spicy Cauliflower Sauce
Serves 4
The anchovies in the breadcrumbs are optional, but their salty flavor nicely complements cauliflower. The amount of rosemary needed will depend on how strongly flavored your rosemary tastes.

Cauliflower Sauce:
1 cauliflower
2 cups diced yellow onions, 1/2” dice
1/4 cup olive oil
Salt
Freshly ground black pepper
2 – 3 tsp. minced rosemary
1 tsp. Aleppo pepper or 1/2 tsp. crushed red pepper flakes

Spiced Breadcrumbs:
3 cloves fresh garlic
1/4 tsp. Aleppo pepper or 1/8 tsp. crushed red pepper flakes
6 anchovy fillets (optional)
1 cup fresh bread crumbs or
Panko
2 Tbsp. olive oil
Salt
Freshly ground black pepper

Pasta:
2 cloves fresh garlic
1/4 tsp. salt
3 Tbsp. olive oil
1/2 pound
gemelli, fusilli, or other dried pasta

Finish:
1/4 cup dried currants
1/2 cup chicken stock, plus more as needed
1/2 cup grated fontina cheese
1/2 cup finely grated fresh parmesan cheese

Make the Cauliflower Sauce: Wash the cauliflower, cut out the stem and discard it, and break the cauliflower into florets. Roughly chop the florets.

Sauté the onions, lightly seasoned with salt and freshly ground black pepper, in olive oil until the onions soften and start to turn golden. Stir in the chopped cauliflower, rosemary, and Aleppo pepper, and cook over medium heat for 15 - 20 minutes, or until the cauliflower is tender and starts to caramelize.

Make the Spiced Breadcrumbs: While the cauliflower is cooking, puree together the garlic, Aleppo pepper, and anchovies (if using). Toss the puree with the breadcrumbs until they are thoroughly combined. Season with freshly ground black pepper and salt (if using anchovies, which are salty, it may not be necessary to add salt). Sauté the seasoned bread crumbs over medium heat, stirring frequently, until the crumbs are crispy. Pour the crumbs onto a plate to cool.

Make the Pasta: Puree the garlic and salt together; this is easiest to do with a mortar and pestle. Whisk the olive oil into the garlic and salt. Boil the pasta in boiling salted water until it is al dente; be careful not to overcook. Drain the pasta and immediately mix in the garlic oil.

Finish the Dish: Stir the pasta and garlic oil into the cooked cauliflower. Stir in the currants, and 1/2 cup chicken stock. Let cook over medium heat for 1 minute or until the pasta is heated through. If the pasta is too dry, add a little more chicken stock. Stir in the fontina and half the parmesan cheese.

Divide the Pasta with Spicy Cauliflower Sauce between four plates or pasta bowls, sprinkle with spiced breadcrumbs and the remaining parmesan cheese, and serve immediately.
~~~~~~~~~~~~~~~~~~~~~~~
This is my entry for the third anniversary edition of
Weekend Herb Blogging, hosted this week by its creator Kalyn of Kalyn’s Kitchen.

Tuesday, July 29, 2008

Garden Treasure with 4 Recipes for Arugula: with Eggs, in Salads, and in Pasta Sauce (4 Συνταγές για Ρόκα)

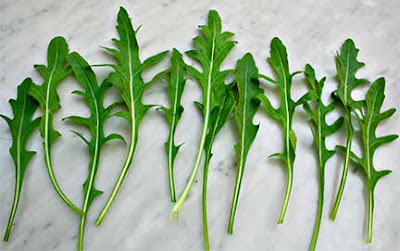
Arugula SelveticaArugula (also known as Roka, Roquette, and Rocket) wins my garden’s miracle plant of the year award.

We’ve grown arugula often over the years. We usually get a salad or two before it bolts; a common problem in Alaska. With our long days, nearly 20 hours of daylight at the solstice, many herbs and green vegetables go to seed prematurely.

Despite its tendency to bolt, we grow arugula because we enjoy its bite in salads. Last year, the arugula followed its typical pattern: two salads at the beginning of summer and it bolted. I assumed that was it. I was wrong.

This spring, after the snow melted, we noticed radicchio we’d harvested last year, but hadn’t pulled up, coming back. In the same bed, mystery plants were emerging; they had tiny green leaves growing around slender dead stalks.

We had no idea what they were (I guessed domesticated Italian dandelions we grew last year in the same bed), but let them grow so we could find out. As the plants grew larger, I realized last year’s arugula had wintered over.

I was initially confused, as I’d thought arugula was an annual (Eruca vesicaria subspecies sativa). Although I'd only grown annual arugula, it turns out “arugula,” actually refers to three separate plants: E. vesicaria ssp. sativa, Diplotaxis tenuifolia, and Diplotaxis muralis.

Last year we planted arugula seeds brought back from Greece. When I dug out the seed packet, I discovered it was Diplotaxis tenuifola, also known as wild arugula or Selvetica, an extremely cold hardy perennial (as plants must be to survive Alaskan winters). I’m thrilled to have stumbled upon it, and will give it a permanent place in my garden.

Arugula in the GardenMost commonly I use arugula in mixed green salads, or on its own with blue cheese and best quality balsamic vinegar. This year the arugula was so prolific I branched out. Arugula, briefly sautéed with shallots, adds a nice bite to omelets and frittatas. Mixed with tomatoes and anchovies, it makes a delicious pasta sauce.

My mother, upon hearing of my arugula glut, recommended the wonderful Arugula and Tomato Salad from Carol Field’s
In Nonna’s Kitchen: Recipes and Traditions from Italy’s Grandmothers. Mother was right; arugula goes really well with tomatoes.

Anchovies are the secret ingredient that makes both the salad and pasta sauce special. When minced and incorporated into other ingredients, anchovies add flavor without overwhelming the taste buds.

More Arugula Recipes:
Grilled Radicchio and Arugula Salad with Parmesan Shavings
Watermelon, Feta, and Arugula Salad
Arugula and Eggs
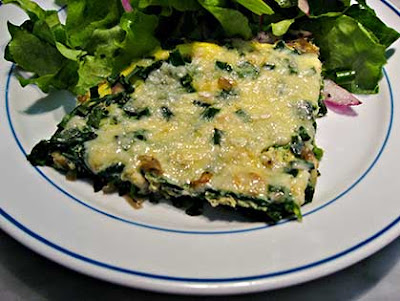
Arugula and Eggs
Serves 2 – 4


4 large eggs
1 cup diced shallots, 1/4” dice
Salt
Freshly ground black pepper
1 Tbsp. olive oil
4 packed cups cleaned arugula
3/4 grated kasseri or fontina cheese
1/4 cup minced chives

Crack the eggs in a bowl, season lightly with salt and freshly ground black pepper, and whisk to combine.

Sauté the shallots, lightly seasoned with salt and freshly ground black pepper, in olive oil until they soften and start to turn golden. Add the arugula, in batches if necessary, and cook just until all the arugula has wilted.

Evenly distribute the arugula in the pan and pour the eggs over. Cover and turn the heat down to low. Keep checking the eggs and when they’re almost-but-not-quite set, sprinkle the cheese and minced chives over, cover, and cook until the cheese melts.

Sprinkle with freshly ground black pepper, cut into wedges, and serve.

Arugula and Tomato Salad
Serves 4

Adapted from In Nonna’s Kitchen: Recipes and Traditions from Italy’s Grandmothers by Carol Field (HarperCollins 1997)
Lightly salting the tomatoes helps bring out their flavor, but be careful not to overdo as anchovies can be quite salty. I made this with the smaller amount of anchovies, but we both thought it would benefit from more; next time I’ll use the larger amount. I originally made this with whole anchovies, as shown in the picture, but we prefer the salad when the anchovies are minced in the dressing. Either way, it's tasty.

8 medium tomatoes, sliced 1/2” thick
Salt
1/4 cup olive oil
2 Tbsp. red wine vinegar
Freshly ground black pepper
8 - 16 anchovy fillets (1 - 2 ounces)
2 cups thinly cut shreds of arugula

Divide the tomato slices between 4 salad plates and salt lightly. Whisk the olive oil into the red wine vinegar and season with freshly ground black pepper. Mince the anchovy fillets and mix them into the dressing. Taste and add freshly ground black pepper or salt as needed. Toss the dressing and arugula (there may be leftover dressing), and mound on the tomatoes. Serve immediately.

Arugula, Blue Cheese, and Balsamic Salad
Serves 4

I never tire of this tasty salad. Because there are so few ingredients, it’s important to use best quality balsamic vinegar.

4 packed cups arugula
1/2 cup thinly sliced red onion
1/4 crumbled Roquefort or other blue cheese
2 Tbsp. extra virgin olive oil
1 Tbsp. best quality balsamic vinegar
Salt
Freshly ground black pepper

Wash and dry the arugula and tear large leaves into pieces. Add the arugula, red onion, and half the blue cheese to a salad bowl. Whisk together the olive oil, balsamic vinegar, salt, and freshly ground black pepper. Toss the dressing with the salad ingredients. Taste and add more balsamic vinegar, if needed. Sprinkle with the remaining blue cheese, grate freshly ground black pepper over the salad, and serve.

Arugula, Anchovy, and Tomato with OrecchietteArugula, Anchovy, and Tomato Sauce with Orecchiette
Serves 4
This recipe calls for a large quantity of arugula, which I measured after it had been cleaned and roughly chopped. If you don’t have arugula, dandelions or other wild greens are the best substitute; the dish may also be made with radicchio, Swiss chard or spinach. Toast the pine nuts in a 350°F oven or dry frying pan. In either case, pine nuts burn easily and must be watched carefully as they cook. Onions cook more evenly when lightly salted before sautéing, however, anchovies are salty so be sure not to over-salt the onions.

1/2 pound dried
orecchiette or any other pasta
2 cups diced onion, 1/2” dice
2 Tbsp. extra virgin olive oil
Salt
Freshly ground black pepper
16 anchovy fillets (2 ounces)
1 Tbsp. minced garlic
1 tsp. Aleppo pepper or 1/2 tsp. red pepper flakes
1/2 pound cleaned and roughly chopped arugula or other strong-flavored greens
2 cups diced fresh tomato, 3/4” dice
1/3 cup water
1 cup chopped green onions
3/4 - 1 cup freshly grated parmesan cheese
1/4 cup toasted pine nuts

Cook the pasta in boiling, salted water and cook until it is al dente. Drain the pasta and toss with a little olive oil.

Sauté the onions, lightly seasoned with salt and freshly ground black pepper, in olive oil until they soften and start to turn golden. Add the anchovies, garlic, and Aleppo pepper and cook for one minute. Stir in the arugula, tomatoes, and water, and cook for 3 minutes. Add the cooked pasta and green onions, and cook just until the pasta is warmed through. Toss with 1/2 cup cheese and half the pine nuts. Sprinkle with the remaining cheese and pine nuts and serve immediately.

~~~~~~~~~~~~~~~~~~~~~~~~~~~~~~
This is my entry for Weekend Herb Blogging, hosted this week by Kelly from Sounding My Barbaric Gulp.

Wednesday, July 23, 2008

Recipe for Red Pepper and Tapenade Tart (Πιπερόπιτα με Πάστα Ελιάς)

Workmen have been at the house for a week replacing our ancient furnaces with a new boiler. For the last five hours they’ve been struggling to run long lengths of pipe through a narrow opening in the basement ceiling's sheetrock. The sound made by repeatedly pounding and banging on metal ductwork is impressively loud.

It’s odd to have so much racket during the day; I’m used to a silent house. Mind you, I’m not complaining and am glad we’re having the work done. It’s just interesting how sustained noise interferes with my ability to hold a coherent thought.

When the men left for lunch, blissful silence briefly returned. I took the opportunity to eat in peace, and enjoyed the last of the Red Pepper and Tapenade Tart for lunch. Three days in the refrigerator and it still tasted terrific; this recipe’s a keeper.

Red Pepper and Tapenade TartRed Pepper and Tapenade Tart (Πιπερόπιτα με Πάστα Ελιάς)
Serves 4-6 (one 9” tart)


Mediterranean Cooking in Alaska has moved as of March 2011. To read this post please go to


http://www.laurieconstantino.com/red-pepper-and-tapenade-tart/


Please click on over and visit my new site. Thank you!


Saturday, November 10, 2007

Love, Italian Style (with Recipe for Anchovy-stuffed Peppers Basilicata) (WHB #108)

My Dad My Dad has had a long love affair with Italy.

It started with Giovanni, an Italian who lives in the Ligurian town of La Spezia and who worked in the same field as my Dad. When they met, the two hit it off immediately and, eventually, became fast friends. For many years, my Dad and Giovanni have enjoyed a mutual admiration society. Some of my Dad’s best stories are of his travels with Giovanni.

Giovanni has equally great stories about my Dad. Years ago my husband and I went to Italy and visited Giovanni, who gave us an impressive tour of Liguria and Piemonte. Everywhere we went was a place that Giovanni and my Dad had gone together. Every place triggered an entertaining story about my Dad.

We dubbed the trip, Following in the Footsteps of Santo Earlo (my Dad being Earl). If my Dad had gone a place with Giovanni, so did we. And if we thought about deviating from the route previously taken by Santo Earlo, Giovanni convinced us we would live in error if we strayed from the path. We had a great time; Giovanni was the consummate host.

One of Giovanni’s greatest coups was convincing the management of Fontanafredda winery into giving us a tour even though the winery was not open that day.
God knows who Giovanni said we were, but we were given the executive tour, and treated to an amazing tasting of Fontanafredda’s excellent Barolos.

Although my Dad’s health no longer allows him to physically travel, he remains in close contact with Giovanni, and spends time in Italy by reading about his favorite country. My Dad sends many of these books to Giovanni. The two enjoy their own private book club by letter and email.


Christ Stopped at EboliCarlo Levi’s book Christ Stopped at Eboli: The Story of a Year, is one my Dad and Giovanni both loved. In the 1930s, Levi was banished to Southern Italy, and held under house arrest for opposing Mussolini and the Fascists. In Christ Stopped at Eboli, Levi describes the land to which he was banished: its people, its poverty, and the horrible conditions that led many Italians to leave their homeland for life in America. Italians say "Christ stopped at Eboli" meaning that once you travel south of Eboli, the people are uncivilized, forgotten, and deprived.


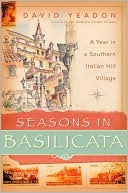
Seasons in BasilicataMy Dad is currently reading Seasons in Basilicata: A Year in a Southern Italian Hill Village by David Yeadon. Yeadon describes his life in the village where Levi was held, and his experiences there.

Yesterday my Dad sent me a passage from Seasons in Basilicata in which the author describes a memorable meal: "
And so we had a kind of pre-dinner around a large kitchen table in a toasty warm kitchen with a platter of bruschetta spread with tomato sauce (home made of course), fat slices of pecorino (ditto), and beautiful red peppers stuffed with a mixture of minced crumbled bread, anchovies, garlic, cheese, and egg and roasted in the oven with home made olive oil."

My Dad
was intrigued by the use of anchovies in the pepper stuffing, and thought the idea would appeal to me. It did. So here, in honor of Carlo Levi, my Dad, and dear Giovanni, is my version of the stuffed peppers described by Yeardon.

Anchovy-stuffed PeppersAnchovy-stuffed Peppers Basilicata (Peperoni Ripieni Basilicata)
Serves 4 as a main dish or 8 as a side dish
Anchovy-stuffed Peppers Basilicata takes mere minutes to prepare. The anchovies melt into the stuffing as the peppers cook; their flavor doesn't stand out, but enhances the other flavors in the dish. Although this tastes fine made with green peppers, I prefer using red or yellow peppers because they are sweeter and have better flavor.
For a more refined version, roast the peppers and remove the charred skin before stuffing them, bake the stuffed peppers at 400°F for 30 – 35 minutes, until the stuffing is golden brown.

4 red or yellow bell peppers
3 cups fresh bread crumbs, preferably from artisan-style bread
12 – 16 anchovy fillets, minced
2 – 3 Tbsp. minced garlic
1 cup freshly grated Parmesan cheese
1/2 cup minced parsley
2 eggs
Freshly ground black pepper
1/4 cup olive oil, plus 2 Tbsp. for drizzling

Preheat the oven to 375°F.

Stuffing for PeppersMake the bread crumbs in the food processor, and put them in a bowl large enough to hold all the stuffing. Add the anchovies, garlic, Parmesan, parsley, eggs, freshly ground black pepper, and 1/4 cup olive oil, and mix thoroughly, making sure the anchovies are evenly distributed in the stuffing.

Cut the peppers in half and discard the seeds. Oil a baking pan large enough to hold all the peppers. Stuff each pepper half and put it in the oiled pan. Drizzle peppers with the remaining olive oil. Bake for 40 – 50 minutes, until the peppers are soft and the stuffing is golden brown.

Serve with thin slices of pecorino or Parmigiano reggiano cheese, and toasted bread rubbed with garlic and fresh tomato.

Stuffing for Peppers

This is my entry for Weekend Herb Blogging #108, hosted this week by The Expatriot's Kitchen.