Greeks are famously hospitable. Visitors to Greek homes are warmly welcomed and showered with treats of all kinds. Coffee with sweet pastries, ouzo with savory delicacies, water with preserved fruits; no matter your beverage, a Greek hostess quickly puts together a tasty accompaniment.
For some of us, enjoying Greek hospitality comes with a cost: overeating. Before I spoke Greek, this was more of a problem. Because we couldn’t converse, people communicated love and affection by giving me double portions. Since everything was delicious, and I didn’t know how to decline, I ate it all. Unfortunately, I was gaining 5-10 pounds for every month we spent in Greece, and dieting for 2 months afterwards so my clothes would fit again.
I finally learned how to say no. This is more difficult than it sounds. It’s nearly impossible for a Greek hostess to accept “no” for an answer. The more you decline, the more you’re offered. It’s also slightly rude on my part; if I were a more polite guest, I’d graciously accept some of the tasty tidbits.
After ten years of declining all snacks (and apologizing for being such a difficult guest), our friends and family have grudgingly accepted this peculiarity of mine – at least when it comes to sweets. Diabetes is rampant in the village and, in the last few years, turning down sweets has become a medical necessity for many. Since so many can’t eat sweets, village hostesses now keep a supply of “salty” (almyro-αλμυρό) snacks on hand.
In the village, salty snacks aren’t things like potato chips, pretzels, and peanuts. Salty, in this context, just means not sweet. Salty cookies (koulourakia) look identical to sweet cookies but, without the sugar, taste like thick crackers. Salty cakes include ingredients like cheese, olives, or ham; in the US, they’re called quick breads.
Lately, when I decline something sweet, a hostess may triumphantly declare that she has something salty instead. Surely, I can try a few bites of a salty treat, something with absolutely no sugar? No, I sadly say, I can’t manage anything salty either, even though I’m sure it’s absolutely delicious.
Although I’m a difficult guest, I happily fulfill my duties as a hostess. In our village house, where visitors constantly stop by, the refrigerator is stocked with beverages, pastries are in the cupboard, and there’s even a salty little something for those who don’t eat sweets.
Treasured Recipes: A Collection of Personal Recipes from the Women Members of the Hellenic Athletic Club of Khartoum and Their Friends (Khartoum 1983), the Sudanese-Greek cookbook I recently wrote about, has an interesting recipe for Salty Cake. This recipe is quite simple, but produces a rich, cheesy quick bread with wonderful flavor and a hint of mint. It’s tasty served to visitors as a snack or for brunch, but it also makes a nice accompaniment to soup or chili.
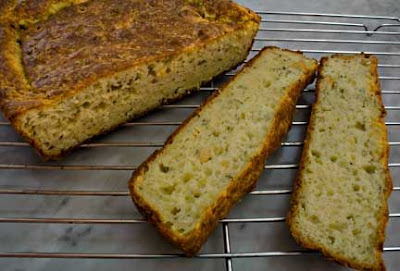
Salty Cake (Easy Cheese Bread) (Kέικ Αλμυρό)
Makes 1 9”x9” square bread or 1 9”x5” loaf
Adapted from Lefko Tsanakas and Lucy Vassiliou’s recipe for “Cake Almiro” in Treasured Recipes: A Collection of Personal Recipes from the Women Members of the Hellenic Athletic Club of Khartoum and Their Friends (Khartoum 1983)
3/4 cup softened butter
3 large eggs
1 egg yolk
2 cups crumbled feta or 1 cup crumbled feta and 1 cup grated graviera, asiago, or other cheese
2 Tbsp. dried mint, crushed
1 3/4 cup flour
1 1/2 Tbsp. baking powder
3/4 cup milk
Preheat the oven to 350°F.
Butter a 9” square pan or 9”x5” loaf pan, dust bottom and sides with flour, tap out and discard any excess flour.
Beat the butter until creamy. Beat in the eggs and yolk, one at a time. Add the cheese and mint and mix to combine. Stir together the flour and baking powder. Add flour to the cheese mixture one third at a time, alternating with additions of milk (one third at a time), until all is combined. Pour batter into the prepared pan. Smooth out the top to evenly distribute the batter.
Bake for 45-60 minutes, or until the bread has a nice brown crust on top. Let cool for 30 minutes and remove from pan. Serve warm or at room temperature.
For some of us, enjoying Greek hospitality comes with a cost: overeating. Before I spoke Greek, this was more of a problem. Because we couldn’t converse, people communicated love and affection by giving me double portions. Since everything was delicious, and I didn’t know how to decline, I ate it all. Unfortunately, I was gaining 5-10 pounds for every month we spent in Greece, and dieting for 2 months afterwards so my clothes would fit again.
I finally learned how to say no. This is more difficult than it sounds. It’s nearly impossible for a Greek hostess to accept “no” for an answer. The more you decline, the more you’re offered. It’s also slightly rude on my part; if I were a more polite guest, I’d graciously accept some of the tasty tidbits.
After ten years of declining all snacks (and apologizing for being such a difficult guest), our friends and family have grudgingly accepted this peculiarity of mine – at least when it comes to sweets. Diabetes is rampant in the village and, in the last few years, turning down sweets has become a medical necessity for many. Since so many can’t eat sweets, village hostesses now keep a supply of “salty” (almyro-αλμυρό) snacks on hand.
In the village, salty snacks aren’t things like potato chips, pretzels, and peanuts. Salty, in this context, just means not sweet. Salty cookies (koulourakia) look identical to sweet cookies but, without the sugar, taste like thick crackers. Salty cakes include ingredients like cheese, olives, or ham; in the US, they’re called quick breads.
Lately, when I decline something sweet, a hostess may triumphantly declare that she has something salty instead. Surely, I can try a few bites of a salty treat, something with absolutely no sugar? No, I sadly say, I can’t manage anything salty either, even though I’m sure it’s absolutely delicious.
Although I’m a difficult guest, I happily fulfill my duties as a hostess. In our village house, where visitors constantly stop by, the refrigerator is stocked with beverages, pastries are in the cupboard, and there’s even a salty little something for those who don’t eat sweets.
Treasured Recipes: A Collection of Personal Recipes from the Women Members of the Hellenic Athletic Club of Khartoum and Their Friends (Khartoum 1983), the Sudanese-Greek cookbook I recently wrote about, has an interesting recipe for Salty Cake. This recipe is quite simple, but produces a rich, cheesy quick bread with wonderful flavor and a hint of mint. It’s tasty served to visitors as a snack or for brunch, but it also makes a nice accompaniment to soup or chili.
Makes 1 9”x9” square bread or 1 9”x5” loaf
Adapted from Lefko Tsanakas and Lucy Vassiliou’s recipe for “Cake Almiro” in Treasured Recipes: A Collection of Personal Recipes from the Women Members of the Hellenic Athletic Club of Khartoum and Their Friends (Khartoum 1983)
Lefko and Lucy call for either feta or a combination of various cheeses, but emphasize using some “feta cheese is essential.” The recipe may be doubled and baked in a Bundt pan for an attractive brunch offering (when doubling the recipe, use 7 whole eggs and no egg yolks). This bread is best served warm. If you bake it ahead, wrap it in foil and refrigerate; to serve, warm in a 350°F oven for 20 minutes.
3/4 cup softened butter
3 large eggs
1 egg yolk
2 cups crumbled feta or 1 cup crumbled feta and 1 cup grated graviera, asiago, or other cheese
2 Tbsp. dried mint, crushed
1 3/4 cup flour
1 1/2 Tbsp. baking powder
3/4 cup milk
Preheat the oven to 350°F.
Butter a 9” square pan or 9”x5” loaf pan, dust bottom and sides with flour, tap out and discard any excess flour.
Beat the butter until creamy. Beat in the eggs and yolk, one at a time. Add the cheese and mint and mix to combine. Stir together the flour and baking powder. Add flour to the cheese mixture one third at a time, alternating with additions of milk (one third at a time), until all is combined. Pour batter into the prepared pan. Smooth out the top to evenly distribute the batter.
Bake for 45-60 minutes, or until the bread has a nice brown crust on top. Let cool for 30 minutes and remove from pan. Serve warm or at room temperature.


 Za’atar with Labneh (Yogurt Cheese)


 Crostini with Gorgonzola and Spiced Figs
") Alaskan Tsoureki
Alaskan Tsoureki I fell in love with food writer and teacher
 Fennel and Saffron Bread (Ψωμί με Μάραθο και Ζαφορά)
 Red Pepper Soup (Σούπα με Κόκκινες Πιπεριές)


 Celery Root Waffles with Smoked Salmon and Horseradish Cream
 White Bean “Hummus”
 Piadine (Italian Flatbread)
 The recipe has a similar flaw when it comes to the second time you roll out the dough. Gourmet tells you to roll a flatbread, cook it, roll the next flatbread, cook it - 12 separate times. Fully cooking one bread before rolling the next virtually doubles the time it takes to make the flatbreads. It’s far easier to roll them all out at one time and cook them one after the other as fast as you can.
 Algerian Flatbread - Msemmen [Αλγερινή Πίτα (Ψωμί)]


