Showing posts with label feta. Show all posts

Monday, October 4, 2010

Recipe: Kale Galette with Yogurt Crust (Χορτόπιτα με Φύλλο Γιαουρτιού)

A few days ago we left Athens on a sunny 80°F day, warm enough to welcome airport air-conditioning. Thirty-six hours later, back in Anchorage, the sun still shone, but the temperature was only 40°F. A chill north wind cut through the lightweight clothing I’d donned on another continent.

When we arrived home, the first order of business was inspecting the garden. We’d heard there’d been a killing frost in Anchorage, so expected the worst. Zucchini, peas, Swiss chard, and most lettuce had been taken out by the cold. Broccoli and cauliflower had gone to seed. Cabbages were perfect and ready to harvest, as were arugula, garlic, onion, herbs, and a small second planting of Lau’s pointed leaf lettuce that inexplicably was unaffected by frost.

The garden’s best producer this year was Tuscan/Lacinato/dinosaur kale. The blue-green strappy kale leaves are lush and healthy despite nighttime temperatures well below freezing. Its perfect condition is remarkable; nearly every other garden plant was plagued by a horde of slugs brought forth by this year’s record-breaking rainy summer.

Having a kale glut seemed like the perfect opportunity to try Ayse Gilbert’s sour cream crust recipe. I used Greek yogurt, an ingredient I always have on hand, rather than sour cream. The dough mixed up easily and was a pleasure to roll out. This is a good crust recipe for beginners; it’s much easier to work with than standard pie crust dough.


With the tangy crust, I wanted a little sweetness to complement kale’s earthy flavor, so included dried currants and lightly sautéed onions in the filling mix. Feta always goes well with greens and I’d just brought some back from Greece that’d been mauled by a customs agent (don’t get me started) and needed to be used right away. So feta went in the mix, along with some garlic and Aleppo pepper.

The filling was well-balanced and its flavors worked well with the deliciously crunchy, flaky crust. Best of all, my friends liked it, the true measure of a recipe’s success.


Mediterranean Cooking in Alaska has moved as of March 2011. To read this post please go to


http://www.laurieconstantino.com/easy-kale-tart-with-yogurt-crust/


Please click on over and visit my new site. Thank you!


Wednesday, July 14, 2010

Recipes for Swiss Chard Braised with Olives and Feta (Σέσκουλο με Ελιές και Φέτα) & Pancakes with Leftover Greens, Olives and Feta

Greens season is here. Gardens and farmers’ markets in Anchorage are filled with every type of cool weather green. Swiss chard, spinach, and kale are in their prime.


It’s also the season during which many Alaskans are doing hard duty out on the salmon grounds, making sure freezers are filled with fish for the upcoming winter.


The best reason to eat greens and salmon is they just plain taste good. Luckily, both are good for your health: greens because they’re high in vitamins, minerals, and fiber and salmon because it’s loaded with omega-3 fatty acids


Freshly caught salmon has so much flavor it doesn’t need anything more than salt, pepper, and a little time on the grill or cast-iron pan.  Swiss Chard Braised with Olives and Feta is a good accompaniment. The greens’ earthiness, when paired with salty olives and feta, balances fresh salmon’s richness.


Swiss Chard Braised with Olives and Feta (Σέσκουλο με Ελιές και Φέτα)
Serves 4
Any greens, wild or domesticated or, better yet, a mixture of greens, can be substituted for Swiss chard.  This is delicious made with plain Kalamata olives, but I prefer using Roasted Kalamata Olives. Dry-cured or salt-cured olives (such as those from Thassos) may be substituted, but be sure to taste them and use less than 1/2 cup if they’re strong flavored. Most Greeks squeeze a lemon wedge over braised greens; I like them better plain. Serve lemon wedges on the side so each eater can choose their own amount of lemon. Swiss Chard Braised with Olives and Feta goes well with grilled or pan-fried salmon and other simply cooked seafood.


2 large or 3 medium bunches Swiss chard (about 10-12 cups cleaned, chopped leaves)
2 Tbsp. olive oil
2 Tbsp. minced garlic
1/2 cup pitted Kalamata olives, roughly chopped
Freshly ground black pepper
Salt
1/2 cup feta cheese, crumbled
Lemon wedges


Strip Swiss chard leaves from stems; reserve stems for another use.  Wash and roughly chop the leaves (don’t dry leaves; the clinging water helps cook them).


In a Dutch oven or deep sauté pan, sauté garlic in olive oil over medium heat for 30 seconds, being very careful not to burn the garlic. Stir in Swiss chard, olives, a liberal seasoning of black pepper, and a light seasoning of salt (olives and feta also add salt). Cover, turn heat down to low, and cook until chard is tender, but not falling apart. (The dish may be made ahead to this point and reheated just before serving.)


Remove chard and olives from pan with slotted spoon. Put in serving bowl along with the feta. Toss well.  Serve with lemon wedges on the side.

Bonus Recipe

Pancakes with Leftover Greens, Olives and Feta
Makes 4-6 pancakes
Too lazy to make crepes, I mixed leftover Swiss Chard Braised with Olives and Feta into a simple batter and cooked it into pancakes. These cakes contain the same flavors as crepes, but can be mixed and cooked in less than 1/2 hour with a lot less hassle.  I served the savory pancakes with soft goat cheese, basil shreds, and thinly sliced prosciutto; they made a lovely lunch.


3/4 - 1 cup leftover greens, olives, and feta
3/4 – 1 cup milk
3/4 cup flour
1 egg
Salt
Freshly ground black pepper
Oil for griddle


Put leftover greens in a strainer set over a bowl, press down to squeeze out as much liquid as possible. Measure the liquid and add enough milk to make one cup.  Whisk egg and half the milk mixture into flour. Whisk in remaining milk mixture. Whisk in greens and season with salt and freshly ground black pepper.


Heat small amount of oil in a griddle or cast iron frying pan over medium heat.  When pan is hot, ladle in 1/2 cup batter, spreading it out to form a 7” circle. Cook it on one side until it’s dry around the edges and the underside is nicely browned when lifted. Flip and cook on the second side.  Repeat until all the batter is used.


Serve plain, with cheese, or with thinly sliced prosciutto or salami.

Saturday, June 19, 2010

Recipe: Spinach Saganaki (Σπανάκι Σαγανάκι)

Fresh garden greens started trickling into Anchorage farmers’ markets this morning. In two weeks, the trickle will turn into a flood. Greens of all kinds thrive in our cool maritime climate.

Though cultivated greens are only now appearing, we’ve been eating wild greens for the past month. As soon as the snow melted, dandelion greens insistently pushed their way through the saturated earth and were ready to be harvested.  Fireweed shoots, devil’s club, and nettles; chickweed, dock, lamb’s quarters, and shepherd’s purse; all end up in the pot. (For tips on harvesting wild plants, go here.)

Until my husband and I first lived in Greece (1987), eating wild plants never once crossed my mind. I grew up in a family where picky eating was an art form. My father didn’t eat cheese, yogurt, or sour cream. My mother didn’t eat lamb, broccoli, cauliflower, cucumbers, squash, green pepper, and so many other foods I could never keep track.  If my parents didn’t eat it, neither did we.  Plus I had my own food quirks; raw tomatoes didn’t pass my lips until I was 24.

So wild greens? Not likely. It wasn’t just my family; the concept of eating wild greens didn’t remotely exist in the small Pacific Northwest town in which we were raised.  In our world, food came from the grocery store. Food could also come from the garden, but only from seeds that were planted and carefully tended. For wild food, we only knew berries, seafood, and dead animals. 

When  the first rains came the autumn of our arrival in Greece, there was a palpable sense of excitement in the village.  Once the rain stopped, half the village took to the fields, quickly gathering the emerging flush of snails. Over the next week, the dirt roads surrounding the village became peppered with the bent-over backsides of black-clad women, systematically working their way through the fields, gathering an abundance of fresh wild greens.

Though my Greek was limited in those days, I learned by example which greens were tastiest, how to harvest them, and how to clean them. I learned a mixture of different greens cooked together tastes better than a single variety cooked on its own.  I learned to love and crave greens of all kinds, wild and domesticated.  Most importantly, foraging became a permanent, enriching part of our lives.

These days, we eat greens several times a week, and I regularly post recipes using them.

For the past year, my favorite greens recipe has been Spinach Saganaki, based on a dish we had at Tzitzikas and Mermigas (Τζίτζικας και Μέρμηγκας), a restaurant on Mitropoleos Street, just off Syntagma Square, in downtown Athens. (A tasty place to eat on a shady street, particularly if you’re carrying a heavy load of way too many cookbooks; but that’s another story.) I’ve made the dish with a wide range of different greens, alone and combined, including spinach, Swiss chard, kale, amaranth, nettles, and dandelions; every version has been a success.

Two notes about the name:

1) I like calling it Spinach Saganaki only because it translates in Greek to the perfectly alliterative “Spanaki Saganaki.” Ignore the name and don’t limit yourself to making it with spinach; the dish is delicious with all kinds of greens. 

2) I recently described this dish to someone who asked why it had “saganaki” in the name since it didn’t include flaming cheese.  In Greek, “saganaki” is a small two-handled frying-pan, and gives its name to a range of dishes that are traditionally served in the pan, including shrimp saganaki, mussels saganaki, and cheese saganaki. As for setting cheese saganaki on fire, I’ve seen it done in Greece rarely, though it’s common in the US. I can’t explain the difference.

Spinach Saganaki (Σπανάκι Σαγανάκι)
Serves 4 as vegetable or 8 as part of appetizer spread (mezedes/μεζέδες)
Inspired by Βλητοκορφές Σαγανάκι at Tzitzikas and Mermigas/Τζίτζικας και Μέρμηγκας in Athens, Greece
Any wild or domesticated greens, alone or in combination, may be used for Saganaki. Because they cook fastest, it's easiest with greens like spinach, Swiss chard, domesticated dandelions, nettles, vlita (amaranth greens), or poppies. The recipe may be assembled hours in advance and refrigerated; bring to room temperature before baking.)

1/4 cup chopped fresh dill
1/4 cup chopped Italian parsley
3/4 cup chopped green onions, both white and green parts
3/4 cup diced fresh tomatoes, 3/4” dice
1/2 - 3/4 cup roughly crumbled feta cheese
3 -4 Tbsp. olive oil
Salt
Freshly ground black pepper
1/2 pound spinach, or any roughly chopped, cleaned greens (6 packed cups raw, 1 1/2 cups cooked)

Preheat the oven to 400°F.

Mix together all the ingredients except the spinach.

Bring a large pot of salted water to the boil. Add the spinach and cook just until it wilts (NOTE: The length of cooking time depends on the greens used. Spinach is done after 10 seconds; tougher greens will take longer.) Drain the spinach, quickly squeeze out any excess liquid, and mix it with the other ingredients. (The recipe may be made ahead to this point.)

Put the greens mixture in a 9” glass pie pan or other shallow baking dish.  Bake for 10 minutes.  Serve immediately with crusty bread and olives.

Variation: Substitute Peppadew peppers, or roasted red peppers, for the tomatoes. I’ve done this when I’ve been out of tomatoes and it changes the dish entirely, but in a very delicious way.  With tomatoes, the flavor of the dish is lighter and fresher; with peppers the flavor is deeper and heartier.

Variation: Substitute wild sea lovage or purslane for the parsley. (I’ll write about wild sea lovage and purslane tomorrow or the next day.)

~~~~~~~~~~~~~~~~~~~~~~~~~~~~~
This post is included in Weekend Herb Blogging hosted by Rachel from The Crispy Cook.

Friday, November 6, 2009

Salty Cake (Easy Cheese Bread) (Kέικ Αλμυρό)

Greeks are famously hospitable.  Visitors to Greek homes are warmly welcomed and showered with treats of all kinds.  Coffee with sweet pastries, ouzo with savory delicacies, water with preserved fruits; no matter your beverage, a Greek hostess quickly puts together a tasty accompaniment.

For some of us, enjoying Greek hospitality comes with a cost: overeating.  Before I spoke Greek, this was more of a problem. Because we couldn’t converse, people communicated love and affection by giving me double portions. Since everything was delicious, and I didn’t know how to decline, I ate it all.  Unfortunately, I was gaining 5-10 pounds for every month we spent in Greece, and dieting for 2 months afterwards so my clothes would fit again.

I finally learned how to say no. This is more difficult than it sounds.  It’s nearly impossible for a Greek hostess to accept “no” for an answer. The more you decline, the more you’re offered.  It’s also slightly rude on my part; if I were a more polite guest, I’d graciously accept some of the tasty tidbits.

After ten years of declining all snacks (and apologizing for being such a difficult guest), our friends and family have grudgingly accepted this peculiarity of mine – at least when it comes to sweets. Diabetes is rampant in the village and, in the last few years, turning down sweets has become a medical necessity for many.  Since so many can’t eat sweets, village hostesses now keep a supply of “salty” (almyro-αλμυρό) snacks on hand.

In the village, salty snacks aren’t things like potato chips, pretzels, and peanuts. Salty, in this context, just means not sweet.  Salty cookies (koulourakia) look identical to sweet cookies but, without the sugar, taste like thick crackers. Salty cakes include ingredients like cheese, olives, or ham; in the US, they’re called quick breads.

Lately, when I decline something sweet, a hostess may triumphantly declare that she has something salty instead.  Surely, I can try a few bites of a salty treat, something with absolutely no sugar? No, I sadly say, I can’t manage anything salty either, even though I’m sure it’s absolutely delicious.

Although I’m a difficult guest, I happily fulfill my duties as a hostess. In our village house, where visitors constantly stop by, the refrigerator is stocked with beverages, pastries are in the cupboard, and there’s even a salty little something for those who don’t eat sweets.

Treasured Recipes: A Collection of Personal Recipes from the Women Members of the Hellenic Athletic Club of Khartoum and Their Friends (Khartoum 1983), the Sudanese-Greek cookbook I recently wrote about, has an interesting recipe for Salty Cake.  This recipe is quite simple, but produces a rich, cheesy quick bread with wonderful flavor and a hint of mint. It’s tasty served to visitors as a snack or for brunch, but it also makes a nice accompaniment to soup or chili.


Salty Cake (Easy Cheese Bread) (Kέικ Αλμυρό)
Makes 1 9”x9” square bread or 1 9”x5” loaf
Adapted from Lefko Tsanakas and Lucy Vassiliou’s recipe for “Cake Almiro” in Treasured Recipes: A Collection of Personal Recipes from the Women Members of the Hellenic Athletic Club of Khartoum and Their Friends (Khartoum 1983)
Lefko and Lucy call for either feta or a combination of various cheeses, but emphasize using some “feta cheese is essential.” The recipe may be doubled and baked in a Bundt pan for an attractive brunch offering (when doubling the recipe, use 7 whole eggs and no egg yolks). This bread is best served warm. If you bake it ahead, wrap it in foil and refrigerate; to serve, warm in a 350°F oven for 20 minutes.

3/4 cup softened butter
3 large eggs
1 egg yolk
2 cups crumbled feta or 1 cup crumbled feta and 1 cup grated graviera, asiago, or other cheese
2 Tbsp. dried mint, crushed
1 3/4 cup flour
1 1/2 Tbsp. baking powder
3/4 cup milk

Preheat the oven to 350°F.

Butter a 9” square pan or 9”x5” loaf pan, dust bottom and sides with flour, tap out and discard any excess flour.

Beat the butter until creamy. Beat in the eggs and yolk, one at a time.  Add the cheese and mint and mix to combine.  Stir together the flour and baking powder.  Add flour to the cheese mixture one third at a time, alternating with additions of milk (one third at a time), until all is combined. Pour batter into the prepared pan. Smooth out the top to evenly distribute the batter.

Bake for 45-60 minutes, or until the bread has a nice brown crust on top.  Let cool for 30 minutes and remove from pan. Serve warm or at room temperature.

Thursday, October 29, 2009

Recipe: Chickpea Stew with Mint and Feta (Ρεβύθια με Φέτα και Δυόσμος)

I’m just back from Seattle, where my sister lives and my mom has resettled. After her crazy awful 2009 (husband of 65 years died, sold her home of 50 years, moved to a small apartment in a new city), my mom is positively engaged in her new life. Her motto: “Choose Happiness.” My mom, always quirky but never boring, is an inspiration.

Regular readers know nothing makes me happier than cooking with my sister. A couple days into the visit, we dished up a delicious dinner of salmon and lentils with red wine sauce. The food was beautiful; my sister suggested I take a picture and blog the meal (another day, I promise). I was too hungry for photography.

Over dinner, my sister claimed it was traditional for me to blog about one meal cooked in her kitchen each visit. Who knew? It’s funny how traditions sneak into your life without warning. And ignoring tradition, even one newly adopted, is bad juju. So that night, I found myself lying in bed dreaming up recipes.

At the store, we’d just bought chickpeas and gorgeous lamb steaks. My sister was out of coriander, so we'd bought some of that too. I decided to pair the chickpeas and coriander in a stew with plenty of fresh mint. The next day we went to Big John’s PFI, a Seattle store with a great cheese selection, and bought Greek sheep feta (and, of course, much more), the perfect finishing ingredient for chickpea stew.

Sadly, the Seattle stew pictures didn’t turn out (bad lighting, no tripod), so I “forced” myself to remake the stew when I returned to Alaska. Since I’d been craving leftover chickpeas during the foodless flight home, I was quite happy to make them again, especially because the stew goes together so quickly. It was as tasty the second time as it was in Seattle. This time, I ate the leftovers, and the flavor, already great, was even better the next day.

With generous quantities of mint, my chickpea stew goes particularly well with lamb. It also makes a deliciously filling meal on its own. The recipe has definitely been added to my permanent rotating repertoire.

Chickpea Stew with Mint and Feta (Ρεβύθια με Φέτα και Δυόσμος)
Serves 4

Serve as a side dish with grilled lamb or chicken, or as a main course with steamed rice or couscous. A crisp green salad nicely completes the meal.

3 cups diced yellow onions, 1/4” dice
Salt
Freshly ground black pepper
1/4 cup olive oil
1 cup diced carrots, 1/4” dice
1 cup diced celery, 1/4” dice
1 Tbsp. minced garlic
2 tsp. ground coriander
1 tsp. crushed red pepper flakes (optional)
2 14.5-oz. cans diced tomatoes
3 1/2 cups cooked chickpeas or 2 15-oz. cans, rinsed and drained
1/2 cup minced fresh parsley
1/2 cup minced fresh mint
1 1/2 cups crumbled feta

Sauté the onions, lightly seasoned with salt and freshly ground black pepper, in olive oil until they soften and start to turn golden. Stir in the carrots and celery and sauté for 5 minutes. Stir in the garlic, ground coriander, and crushed red pepper flakes and cook for 1 minute. Stir in the tomatoes and chickpeas and bring to a boil. Cover, turn down the heat, and simmer for 45 minutes, or until the sauce thickens and the flavors meld. Stir in the parsley and mint and cook for 5 minutes. Stir in the feta and serve immediately.
~~~~~~~~~~~~~~~~~~~~~~~~~~
This is my entry for Weekend Herb Blogging hosted this week Katie from Eat This.

Sunday, April 19, 2009

Ingredient: Tepary Beans with Recipe for Tepary Bean and Vegetable Stew

The snow in our front yard is nearly gone, the ice in the pond has melted, and spring is quickening. After our difficult winter, I’m looking forward to seasonal change even more eagerly than usual.

Speaking of winter, the overwhelming support from the blogging community during my father’s long illness and ultimate death was much appreciated. It’s not easy to lose a parent, but the kindness and concern shown by so many helped. Thank you all so much.

Because I spent so much of the winter in Washington near my parents, I was able to see my sister regularly, to my great joy. Though we’re two years apart and have the closeness that comes from childhood bedroom-sharing, as adults we’ve always lived far away from each other. It was indescribably soul-satisfying to have her (and her husband and dogs) be part of daily life the last few months.

Shopping for food and cooking dinner with my sister brought new life to what too often are routine activities. Despite our years apart, we’ve developed similar cooking styles and work together smoothly and easily in the kitchen.

One of the projects we undertook was finding and cooking tepary beans for My Legume Love Affair Ninth Helping. Despite searching in numerous Seattle area stores, we were unable to find tepary beans and resorted to ordering them
online. When they arrived, we made Tepary Bean and Vegetable Stew and loved it. I’ll definitely be cooking with tepary beans again.

Tepary Beans

Tepary beans (Phaseolus acutifolius) are a bush bean originating in the desert areas of Mexico and the American Southwest. They grow best in extreme heat and under very dry conditions. Tepary beans’ taproot is twice as long as common beans’ (Phaseolus vulgaris), which allows teparies to efficiently take advantage of even small amounts of soil moisture.

Nutritionally, tiny tepary beans (1/4” long, the size of large lentils) are higher in protein, iron, calcium, and fiber than most beans. Their nutritional benefits, sweet, nutty flavor, and relatively quick cooking time make teparies well worth searching out.

Jay Bost, in the
June 2006 Seeds of Change newsletter, wrote a fascinating article about tepary beans. His discussion of the growing conditions under which teparies thrive makes me interested in trying them in Greece, which has the necessary hot dry summers:

“Due to its native habitat in the Sonoran Desert, domesticated tepary beans … are considered by many to be the most drought-tolerant annual legume in the world. They are capable of producing a harvest of beans with a single rain in the harshest conditions; when irrigated, they produce higher yields only up to a certain point, after which excess moisture becomes a detriment and leads to overproduction of foliage and low bean production. In fact, it appears that moisture stress is necessary to trigger fruiting. Part of the tepary bean's secret to success in dry areas is to grow quickly when water is available. While pinto beans take 90 to 120 days to maturity, teparies take only 75 to 85. As water shortages become a reality in many parts of the U.S. and around the world, teparies will undoubtedly play an important role in dryland agriculture. In fact, tepary cultivation is now taking place in dry areas of Africa and is being revived in southern Arizona.”


Bost details teparies’ nutritional benefits:

“Part of the tepary bean's appeal, in addition to its drought tolerance, is its superior nutritional content. It has a higher protein content (23–30%) than common beans such as pinto, kidney, and navy, as well as higher levels of oil, calcium, iron, magnesium, zinc, phosphorus, and potassium. While higher in all of these desired nutrients, tepary beans are lower in polyunsaturated fat and in the anti-enzymatic compounds which make common beans hard to digest (Hamama and Bhardwaj 2002). … Tepary beans are proving to be an ideal food for people prone to diabetes or suffering from diabetes owing to the beans' high fiber level, which make them a "slow-release food"; that is, tepary beans' sugars are released slowly and steadily, rather than in a spike as in many high carbohydrate, low fiber foods common in our diets.”


The
Ark of Taste is a list of endangered food plants and animals that the Slow Food Foundation for Biodiversity seeks to protect and defend. Tepary Beans are now on the Ark of Taste list for the United States.

I can’t wait to start playing around in the kitchen with tepary beans, and hope to soon convince a local store to carry them!


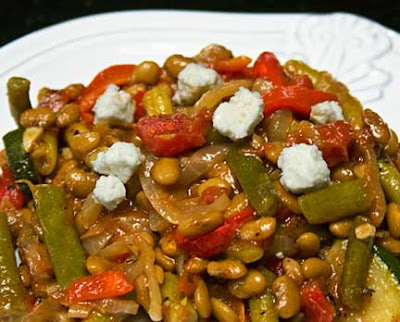
Tepary Bean and Vegetable StewTepary Bean and Vegetable Stew
Serves 4
Adapted from Heirloom Beans by Steve Sando and Vanessa Barrington (Chronicle Books 2008)
Tepary beans’ firm texture and sweet flavor pair well with most vegetables. This stew includes peppers, green beans, zucchini, and tomatoes, all of which, like tepary beans, originate in the Americas. I roast red peppers directly over a gas burner while the beans are cooking, put them in a closed paper bag until cool (which makes them easier to peel), remove the charred skin with my fingers (don’t use water; it’ll take away too much flavor), and cut them into thin strips. The sweet bean and vegetable stew is perfectly set off by best-quality, sharp, salty feta cheese from Greece.

1/2 pound dried tepary beans
Water
3 cups diced onions, 1/2” dice (1 large onion)
1/4 cup olive oil, divided
Salt
Freshly ground black pepper
2 Tbsp. minced garlic
1 14.5-ounce can diced tomatoes, preferably fire-roasted
1/2 pound green beans, trimmed and cut into 1” lengths (4-5 cups)
1 large zucchini, cut in half lengthwise and then diagonally into 1/4” slices (4 cups)
2 tsp. minced fresh thyme
2 red bell peppers, roasted, cut into strips and then in half
4-6 ounces best quality feta cheese, crumbled, for garnish

Spread out the tepary beans in a flat pan and inspect carefully, removing any pebbles or debris. Rinse well with cold water. Put the beans in a large pot with enough water to cover them by 3 inches. Bring to a boil, and cook for 5 minutes. Cover and turn off the heat. Let sit for at least one hour. (NOTE: Next time I cook tepary beans, I’ll try eliminating this step; I suspect tiny teparies don’t need pre-soaking or pre-cooking.)

Bring the tepary beans and their liquid back to the boil (do not discard the original water). Turn down the heat, and simmer for 1 – 2 hours, or until the beans are just tender and not at all mushy.

In a separate pan, sauté the onions, lightly seasoned with salt and freshly ground black pepper, in 2 Tbsp. olive oil until the onions soften and start to turn golden. Stir in the garlic and cook for 1 minute. When the tepary beans are done simmering, scrape the onions, garlic, and oil into the bean pot. Stir in the tomatoes and green beans. Bring to a boil, cover, turn down the heat, and simmer for 15-20 minutes or until the green beans are tender.

While the green beans are cooking, using the same pan in which the onions were cooked, sauté the zucchini, lightly seasoned with salt and freshly ground black pepper, in olive oil. Cook until the zucchini browns lightly and begins to soften. Turn off the heat and stir in the thyme.

When the green beans are tender, scrape the zucchini, thyme, and their oil into the bean pot. Stir in the roasted red pepper pieces. Simmer for 5 minutes.

Serve hot, garnished with crumbled feta.
~~~~~~~~~~~~~~~~~~~~~~~~~~~~~
This is an entry for
My Legume Love Affair – 9th Helping (MLLA9), created by Susan of The Well-Seasoned Cook, which I hosted in March 2009. My Legume Love Affair - 10th Helping for April 2009 is being hosted by Courtney of Coco Cooks.

Friday, February 27, 2009

All About Za'atar with Recipe for Za'atar Herb Blend and 5 Recipes for Using Za'atar

Za'atar Bread and LabnehIf za’atar is within reach, anyone can make delicious food at the drop of a hat. The possibilities are endless: Za’atar Olives, Za’atar and Labneh, Za’atar Tomato Sauce with Grilled Meat, Za’atar Bread, and Za’atar Pizza are only a few ways to use this versatile ingredient. I almost have my Za'atar Chicken recipe ready to post.

Za’atar is
valued for more than great taste. “Who for forty days eats powdered dried leaves of za'tar fasting can be harmed by no serpent.” If the worst happens and you’re bitten by an asp or stung by a scorpion, za’atar cures “the bitings and the stings of venomous beasts." A Bethlehem proverb teaches, “Thyme and oil lead to the prosperity of the home.” Even more importantly, “eating za'atar improves your memory and makes you more intelligent.”

So what is za’atar?
A. An herb blend
B. Savory
C. Thyme
D. Oregano
E. Biblical hyssop
F. All of the above

The answer is “(F) All of the above.”

Za’atar (ZAHT-ar) is a class of herbs, and includes members of the thyme, oregano, and savory families. Za’atar is also a Middle Eastern herb blend, containing one or more of the za’atar herbs. As with many centuries-old dishes, za’atar blend has many regional and familial variations.

Disparity in za’atar’s spelling is pervasive; za’atar, za’tar, zatar, zahtar, satar, zahatar, and za’ater are all used. The spelling confusion is easy to explain. Za’atar is an Arabic word (الزعتر). Like Greek and other languages that don’t use the Roman alphabet, Arabic is inconsistently transliterated into English.

Some experts claim the herb za’atar is only one specific type of savory; others claim with equal vehemence it’s one specific type of oregano. Both may be right, but only for the region or family they’re writing about.

No matter its local or historical usage, “za’atar” has come to be a generic term used in the Middle East for a group of similarly-flavored members of the herb genus
Lamiaceae. Za’atar herbs grow in the same habitat and have similar appearances. These practical factors may have led Middle Easterners to use one word for all the plants.

Linguistic confusion over “za’atar” is not unique to Arabic.
In Turkish, the plant groups Origanum, Thymbra, Coridothymus, Satureja, and Thymus, generically called za’atar in Arabic, are all referred to as “kekik.”

Scientific analysis supports the pragmatic use of one word to refer to a plant group rather than a single plant. Gas chromatography and mass spectrometry show “the chemical profiles of the specific chemotypes of Satureja thymbra L. and Thymbra spicata L [a]re very similar. They are also very similar to those of the chemotypes of Coridothymus capitatus and Origanum syriacum.” [These four herb species are all called za’atar.]

Adding to the confusion, each za’atar herb is known by more than one name:

· Coridothymus capitatus aka Thymus capitatus aka Satureia/Satureja capitata (conehead thyme, headed savory, Persian hyssop, za’atar parsi, Spanish oregano)
· Origanum maru aka Origanum syriacum/cyriacum aka Marjorana syriaca (Biblical hyssop, Lebanese oregano, Syrian oregano, Egyptian marjoram)
· Satureja/Satureia thymbra (Roman za’atar, za’atar rumi, pink savory, barrel sweetener; in Greek, Θρούμπι, Τραγορίγανη)
· Thymbra spicata (spiked thyme, donkey hyssop, desert hyssop)

There are also several varieties of commercially available za’atar blends. For example,
according to Paula Wolfert, “The taste of a za’atar mixture can be herbal, nutty, or toasty. …’Israeli’ is a pale green blend of pungent herbs that includes the biblical hyssop, along with toasted sesame seeds and sumac. The ‘Syrian’ blend, the color of sand, has a decidedly toasty flavor. The ‘Jordanian’ blend is dark green and very herbal, with some turmeric.” These aren’t the only za’atar blends; each spice merchant and family has a unique formula.

Before creating my own za’atar blend, I bought and tasted several commercially available varieties. I experimented with diverse combinations of herbs trying to best approximate the flavor of my favorite commercial brand. I also read as many English-language za’atar recipes as I could find.

For the herbal flavor in za'atar blend, many North American recipes use only dried domestic thyme, or a mixture of domestic thyme and domestic marjoram. These recipes, when tasted side by side with imported za’atar blends, tasted bland to me. I discovered that Greek oregano (preferably, but not necessarily, wild-harvested and sold on the stem) is key to creating flavorful za’atar in Alaska. Greek oregano’s spicy flavor, when tempered by combining it with dried wild or domestic thyme, approximates the flavor of authentic za’atar blend.

For anyone interested in growing their own, the various plants referred to as za’atar can be purchased from
Well Sweep Herb Farm or Mountain Valley Growers. Although they’re tasty, keep in mind that most domestically grown herbs don’t have the flavor of their wild progenitors. There’s nothing like scarce water, poor soil, and hot sun for developing flavor.

For those who live where there are Middle Eastern markets or specialty stores, by all means buy ready-made, preferably imported, za’atar. You can also
order za’atar blends online.

In Anchorage, you can buy sumac, a key ingredient in my za’atar blend, at
Sagaya, City Market, and Summit Spice. Summit Spice sells its own Anchorage-made za’atar blend in tiny packets using marjoram, thyme, sumac, and sesame seeds. Summit also has a product labeled “Greek oregano,” which they tell me may be grown on farms in Greece or Turkey, depending on the shipment.
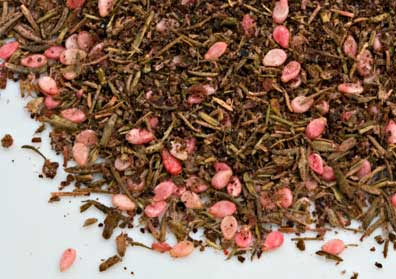
Za'atarZa’atar Herb Blend
Because za’atar has so many uses, I make a lot at one time: 1/2 cup oregano, thyme, and sumac, 1/4 cup sesame seeds, and 1 Tbsp. salt. The sumac, which has a sour taste akin to lemon, is what gives za'atar its red color.

1 part dried Greek oregano, preferably wild-harvested
1 part dried thyme
1 part ground sumac
1/2 part white sesame seeds
Salt to taste

Grind the oregano and thyme in a spice grinder or blender, making sure it’s free of sticks and stems. Put the herbs in a glass jar with a tight sealing lid. Add the sumac, sesame seeds, and salt and shake well to thoroughly combine. Put on the lid and close it tightly. Store away from heat and light.

Za'atar OlivesZa’atar Olives
Made entirely with pantry staples, Za’atar Olives are easy to prepare and make a great last-minute appetizer. Especially when warm, Za’atar Olives are an addictive treat.

2 cups Kalamata olives
1/2 cup olive oil
3 Tbsp. Za’atar Herb Blend (see recipe above)

Rinse the olives and dry them well. Put the olives and olive oil in a small saucepan, bring the olive oil to a simmer, and simmer the olives for 15 minutes. Stir in the Za’atar Herb Blend and simmer for 5 minutes. Serve warm or at room temperature.

Za'atar Bread - Mana'eeshZa’atar Flatbread (Mana’eesh bi Za’atar)
Makes 12 6” flatbreads
When I have breakfast with Marie, an Armenian friend who was born and raised in Beirut, she always serves Mana’eesh, olives, tomatoes, cucumbers, and cheese. Breakfast at Marie’s was my first introduction to za’atar; it's been a part of my repertoire. To make it from scratch, I use my Palestinian friend Salwa’s recipe for pita bread, and top it with Za’atar Herb Blend and olive oil. Although Marie serves this for breakfast, we eat it for a snack, for lunch, or as part of an appetizer spread. If you’re cooking for a small family, like I do, use half the dough for Mana’eesh and the second half for Za’atar pizza (see recipe below).

Dough:
2 1/2 cups lukewarm water
1 Tbsp. yeast (1 packet)
1 tsp. sugar
1 Tbsp. salt
6 – 7 cups all-purpose or bread flour

Topping:
1/2 cup olive oil
1/2 cup Za’atar Herb Blend (see recipe above)

Make the Dough: Place the water in a large bowl. Sprinkle the yeast over the water, sprinkle the sugar on top and let sit for 10 minutes, or until the yeast begins to foam. Mix in the salt and half the flour. Add the rest of the flour one cup at a time, just until the dough holds together. Knead the dough well (either by hand or in a standing mixer), adding flour as necessary until the dough is smooth and shiny. You may need more or less flour than called for in the recipe.

Put the kneaded dough in an oiled bowl to rise, cover the bowl with plastic wrap and a dish towel, and put it in a warm spot. Let the dough rise for 1 hour, or until it has doubled in size.


Preheat the oven to 500°F.

Divide the dough into 12 pieces and pat each piece into a 6” round flatbread. Place the flatbreads on baking sheets with rims; 6 dough rounds fit on a half-sheet pan. Use your fingers to dimple the tops of each flatbread. Let the flatbreads rest for 20 minutes.

Make the Topping: Mix together the olive oil and Za’atar Herb Blend.

Assemble and Bake the Flatbreads: Dimple the flatbreads one more time. Divide the topping between the flatbreads, about 1 Tbsp. each, and spread it evenly over the flatbreads’ tops. Bake the flatbreads, one baking sheet at a time, for 8-10 minutes, or until the flatbreads are golden. Serve immediately.

Note: Mana’eesh can be made ahead and rewarmed just before serving. To rewarm, stack the Mana’eesh, topping side to topping side, and wrap in aluminum foil. Put in a 300°F oven for 5-10 minutes, or until they are warmed through.

Za'atar with LabnehZa’atar with Labneh (Yogurt Cheese)
Makes 3/4 cup

Plain Labneh goes really well with Za’atar Flatbreads. For garlic fans, mix 1-2 cloves puréed garlic into the cheese (an easy way to purée the garlic is with a
standard Microplane rasp grater). Usually, I let the yogurt drain into the sink. If I’m feeling ambitious, I let it drain into a bowl and use the liquid to replace some of the water when I’m making bread dough.

2 cups plain yogurt, preferably whole milk
Pinch of salt
Za’atar Herb Blend (see recipe above)
Olive oil (optional)

Line a strainer with a paper towel. Mix a little salt into the yogurt and dump the salted yogurt into the paper-towel-lined strainer. Let the yogurt drain for 4 hours or overnight.

Spread the yogurt on a plate, sprinkle with Za’atar Herb Blend to taste, and drizzle with olive oil (if using). Serve with crackers, pita chips, or triangles of pita bread.

Za'atar PizzaZa’atar Pizza
Makes 12”-15” pizza
Extra Za’atar Tomato Sauce is a great way to dress up grilled chicken, lamb, or pork (see recipe below); it also may be frozen for future pizzas. The amount of Aleppo or red pepper depends on how spicy you like your food. Pick either Topping#1 or Topping #2 or, if you want to try them both, make the full amount of Za’atar Flatbread dough.

1/2 recipe Za’atar Flatbread dough (see recipe above)

Za’atar Onion Topping (Topping #1):
1/2 cup thinly sliced onions
1/4 cup chopped parsley
2 Tbsp. olive oil
2 Tbsp. Za’atar Herb Blend (see recipe above)
2 tsp. minced garlic
1/4 – 1/2 tsp. Aleppo pepper or 1/8 – 1/4 tsp. crushed red pepper (optional)
1/2 cup crumbled feta cheese

Za’atar Tomato Sauce (Topping #2) (makes enough sauce for 2 pizzas):
1 14.5 ounce can diced tomatoes, preferably fire-roasted
2 tsp. finely minced or puréed garlic
2 Tbsp. Za’atar Herb Blend (see recipe above)
1/2 – 1 tsp. Aleppo pepper or 1/4 – 1/2 crushed red pepper (optional)
1 Tbsp. olive oil
1/2 cup water or white wine
Salt
Freshly ground black pepper
1/2 cup thinly sliced onions
1/2 cup crumbled feta cheese

Shape the Pizzas: Shape the dough into a 12-15” round; the exact size depends on how thick you like your pizza crust. Place the dough on a pizza pan or baking sheet with rims. Use your fingers to dimple the top of the pizza, and let it rest for 20-30 minutes.

Preheat the oven to 500°F.

To Make Topping #1: Mix together all the topping ingredients except the crumbled feta.

To Assemble Pizza with Topping #1: Spread the topping mix over the pizza. Sprinkle the crumbled feta over the topping.

To Make Topping #2: In a saucepan, mix together the tomatoes, garlic, Za’atar Herb Blend, Aleppo pepper, olive oil, and water or wine. Bring to a boil, turn down the heat, and simmer for 15 – 20 minutes, or until the sauce is very thick. Taste and add salt or freshly ground black pepper, as needed.

To Assemble Pizza with Topping #2: Spread half the tomato sauce over the pizza to cover it (use more if you like saucy pizzas). Save any extra tomato sauce for another purpose. Evenly distribute the onions over the tomato sauce and sprinkle with crumbled feta.

Bake the Pizza: Turn the oven down to 450°F. Bake the pizza for 25-30 minutes or until the crust is nicely golden. Serve immediately.
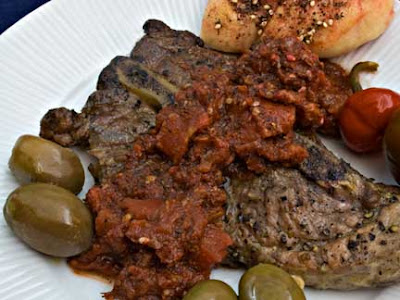
Za'atar Tomato Sauce and Grilled PorkGrilled Pork Steak with Za’atar Tomato Sauce
Serves 4

Za’atar Tomato Sauce goes equally well with grilled lamb or chicken. The sauce is identical to the one used for Za’atar Pizza (see recipe above). For the same reason that brining improves the flavor of pork chops, salting meats well in advance of grilling makes them taste much better. If you can only find large pork steaks, buy 2 and cut them in half.

Meat:
4 pork steaks
Salt
Freshly ground black pepper

Za’atar Tomato Sauce:
1 14.5 ounce can diced tomatoes, preferably fire-roasted
2 tsp. finely minced or puréed garlic
2 Tbsp. Za’atar Herb Blend (see recipe above)
1/2 – 1 tsp. Aleppo pepper or 1/4 – 1/2 crushed red pepper (optional)
1 Tbsp. olive oil
1/2 cup water or white wine
Salt
Freshly ground black pepper

Prepare the Meat: Rinse the steaks and dry well. Season both sides with salt and plenty of freshly ground black pepper. Let sit at room temperature while you make the sauce.

Make the Tomato Sauce: In a saucepan, mix together the tomatoes, garlic, Za’atar Herb Blend, Aleppo pepper, olive oil, and water or wine. Bring to a boil, turn down the heat, and simmer for 15 – 20 minutes or until the sauce is the thickness you prefer. Taste and add salt or freshly ground black pepper, as needed.

Cook the Meat: Grill the pork steak over a medium hot fire or in a grill pan on top of the stove. Turn the meat regularly until it is just done; be careful not to overcook it. Serve immediately with Za’atar Tomato Sauce spooned over.
~~~~~~~~~~~~~~~~~~~~~
This is my entry for
Weekend Herb Blogging, which I am hosting this week at Mediterranean Cooking in Alaska.

Tuesday, September 9, 2008

Greek Cookbooks: Summer Tomatoes in Greece with Historical Information and Recipe for Strapatsada (Greek Scrambled Eggs and Tomatoes) (Στραπατσάδα)

(From Greece)

Summer tomatoes are a glory of Greece. Red and juicy, warmed by the sun and simply seasoned with salt, Greek tomatoes explode with flavor, bathing taste buds in their sweet-yet-tart goodness.

We arrived in Greece this (and every) year during tomato season. Our relatives, friends, and neighbors greet us with food, which always includes lots of luscious fresh tomatoes. Right now, there are at least ten pounds of gorgeous tomatoes sitting on the counter, and the refrigerator is packed with grapes, okra, peppers, and other seasonal vegetables. It’s the best possible welcome home gift. We happily use the bounty.


Horiatiki Salata and KebabOne of the best ways to eat summer tomatoes is in Horiatiki Salata (Village Salad), a mix of tomatoes, cucumbers, onions, green pepper, and feta cheese, dressed only with olive oil and salt. This most beloved of Greek salads appears on taverna menus throughout the country. During tomato season in Greece, we eat a variation of Horiatiki Salata every day.

Many Greeks like salad tomatoes when they’re still slightly green. I prefer them at their peak of ripeness. When I’m eating salad with Greek relatives, this balances out perfectly. I snag the reddest tomato bits. They go for the greener parts.

It’s hot on the island during tomato days. I’m not a hot weather aficionado, but appreciate that heat helps give Greek tomatoes their superior flavor.

At this time of year, light, flavorful, quick-cooked foods are welcome. They help avoid spending too much time in hot kitchens. One favorite such Greek dish is Scrambled Eggs and Tomatoes. In some places it’s called Strapatsada, in others Kayianas, Menemeni or Sfoungato Politiko, and in many it’s simply Eggs and Tomatoes (Avga me Domates/Αυγά με Ντομάτες).

Sliced TomatoesThe Greek name “Strapatsada” derives from the Italian for “scrambled eggs” (“uova strapazzate”).
Some say the dish was originally brought to Greece by Sephardic Jews. If true, given the Italian name, a plausible route is via the Venetian Jews to the Jews in Corfu and the significant Jewish population that used to exist in Thessaloniki. (Most Greek Jews died in German concentration camps during World War II; today the entire Jewish population of Greece is about 5000.) Certainly, Strapatsada is consistent with Jewish dietary restrictions.

Although
some debate the Jewish connection, it’s commonly accepted that Strapatsada as a Greek name for Scrambled Eggs and Tomatoes originated in the Ionian Islands (including Corfu) during their years of Venetian rule (1401 – 1797). See also Voice of Corfu: “… tomatoes … were brought to Corfu by the Venetians.” It’s documented that after the Venetian conquest, Corfiot Jews developed close relations with the Venetian Jewish community and its many international merchants and traders. Cookbook of the Jews of Greece, Nicholas Stavroulakis (Lycabettus Press 1986).

According to food historian
Claudia Roden, the 16th and 17th century Jewish merchants of Venice “traded with their relatives and co-religionists around the Mediterranean … [and others] in South America.” Roden says the Jewish merchants “introduced New World food products such as tomatoes…” throughout the entire Mediterranean Jewish community.

Roden points out “a tomato sauce in Venice is called ‘alia giudia’” (Jewish Style). In her history of Italian Jewish cooking, The Classic Cuisine of the Italian Jews: Traditional Recipes and Menus and a Memoir of a Vanished Way of Life (Giro Press 1993), Edda Servi Machlin says: “In the 18th century, the first people who used tomatoes in their cooking were Jews.”

See also, “[S]ome of the [Sephardim] … traveled as merchants to the New World, bringing back a whole new range of vegetables which were quickly adopted into the Sephardic kitchen. These were adopted, in turn, by the others among whom they lived, especially as the Sephardim were dispersed through the Mediterranean basin, into the Balkans, and parts of Western Europe.”

The Jews were also among the first to bring tomatoes to England and America. In his 1753 supplement to A History of Plantes (Thomas Osborne 1751), John Hill documented the use of tomatoes “eaten stewed or raw” by Jewish families in England. The tomato-eating 18th century English Jews “were of Portuguese or Spanish descent and … maintained contact with Jewish communities in the New World who consumed tomatoes.” The Tomato in America, Andrew F. Smith (University of South Carolina Press 1994). Smith says “at least one English-born Jewish physician introduced tomatoes into Virginia during the mid-18th century.”

If the conventional wisdom is correct that Strapatsada came to Corfu during the Venetian years, and we accept the historical record that Jews adopted tomatoes into their diets by at least the mid-18th century (and probably earlier), it isn’t too far-fetched to believe that Strapatsada was originally a Jewish creation. Indeed,
Cookbook of the Jews of Greece and Γεύση από Σεφαραδιτική Θεσσαλονίκη: Συνταγές των Εβραίων της Θεσσαλονίκης (Tastes of Sephardic Thessaloniki: Recipes of the Jews of Thessaloniki), Νίνα Μπενρουμπή (Φυτράκη 2002), which document the traditional foods of Greek Jews, both have recipes for Strapatsada.

It could be that tomatoes weren’t used anywhere in Greece
until the 19th century. And, as with all simple food combinations, it’s entirely possible that each version of Scrambled Eggs and Tomatoes was created independently and spontaneously by creative cooks making use of seasonally fresh foods.

No matter its origin or name, Scrambled Eggs and Tomatoes is easy to make and very flavorful. It’s especially good when made with sun-ripened summer tomatoes.

StrapatsadaScrambled Eggs and Tomatoes (Strapatsada – Στραπατσάδα)
Serves 2
When I make Strapatsada with fresh sweet summer tomatoes, I use mint to season it. Mint’s flavor enhances the tomatoes’ sweetness and goes well with eggs. Made with canned tomatoes, dried oregano makes a better seasoning for Strapatsada. In our house, three eggs are plenty for two people, but eaters with hearty appetites may prefer four eggs. I like the finished egg curds to be smooth-textured so skin the tomatoes. Skinning is not necessary; the Strapatsada will taste great if you leave on the skins. To make the simplest version of Strapatsada, cook tomatoes in olive oil until their water evaporates, then scramble in the eggs, seasoning only with salt and pepper.

2 cups diced tomatoes (1 pound tomatoes) or 14.5-ounce can diced tomatoes
1/2 cup diced yellow onion, 1/8” dice (optional)
1/4 cup olive oil
Salt
Freshly ground black pepper
2 cloves garlic, grated or minced (optional)
1 tsp. sugar (use only if needed)
3 - 4 eggs
1/2 cup crumbled feta (optional)
1 Tbsp. minced fresh mint (or oregano, dill, basil, or parsley) (optional)

If starting with fresh tomatoes and you want to skin them, cut a shallow “X” on the bottom of the tomato. Drop the tomatoes in boiling water for 20 seconds. Remove the tomatoes and drop them in cold water. Drain and slip off the peels. Cut the tomatoes in 1/2” dice.

Peeling TomatoesSauté the onions, lightly seasoned with salt and freshly ground black pepper, in olive oil until they soften and start to turn golden. Stir in the diced tomatoes, bring to a boil, turn down the heat to medium, and cook for 15 minutes or until most of the water in the tomatoes has evaporated, stirring regularly to prevent scorching and to break up the tomatoes. Stir in the garlic and cook for 5 minutes. Taste; if the tomatoes are too acidic, add 1 teaspoon sugar.

Whisk together the eggs. Stir eggs, cheese, and mint into the cooked tomatoes, and continue to cook over medium-low heat, stirring regularly, until the eggs are cooked and form small curds; the eggs should be served when they’re still a little juicy. Eggs cook faster at a higher temperature, but taste better if cooked over lower heat for a longer time.

Variations:
- Use grated kefalotyri, kasseri, or parmesan instead of feta.
- Add chopped sausage, smoked pork, or ham.
- Add diced green peppers.
- Substitute puréed roasted red peppers for half the tomatoes.
- Substitute green onions for the yellow onion.
- Add Aleppo or crushed red pepper flakes.
- Add cinnamon stick to the sauce and omit the herbs.
- Add cumin or allspice to the sauce and omit the herbs.
- After mixing in the eggs and tomatoes, quit stirring and let the eggs set, then flip and cook on the second side (as for a frittata).
- When the tomatoes are cooked and saucy, turn the heat to low, make indentations in the sauce, crack an egg into each indentation, cover, and cook just until the egg whites set and the yolks are still juicy.
~~~~~~~~~~~~~~~~~~~~~~~~~
This is my entry for
Weekend Herb Blogging, hosted this week by Gretchen from Canela & Comino.

Monday, June 30, 2008

The Golden Hills of Greece with Recipe for Bouyiourdi (Spicy Baked Feta and Tomatoes) (Μπουγιουρντί)

By summer’s end, the hills of the Greek island we call home are painted in golds and browns. Patches of green appear only in the island’s narrow valleys, its vineyards, and the ubiquitous fig trees.

Until we remodeled my husband’s grandmother’s house in Greece, I’d spent my life in the maritime regions of the Pacific Northwest and Alaska. For me, natural beauty meant lush foliage, evergreen-lined shores, and snow-topped mountains.

It took me years to appreciate the subtle beauty of dry Mediterranean hillsides. And appreciate I do. Joy fills my heart when we begin our approach to the island’s tiny airport and I get my first glimpse of its golden hills.

Without trees to obscure the view, the deep blue Aegean sky and sea are constant companions. Their brilliant blues combine with the burnished gold landscape and lazy cries of circling birds to induce an overwhelming sense of peace and calm.

We walk in the morning, before the sun’s heat makes outside forays intolerable for my fair Alaskan skin. In September, a month we are always in Greece, prickly, inhospitable plants dominate the hillsides, so we walk on the farm roads surrounding the village.

Spiky plants abound in late summer because they're the only ones that survive the constantly grazing sheep and goats which scour the fields of more forgiving flora. It’s difficult to begrudge the grazing, knowing it’s responsible for the full-flavored sheep and goats milk that villagers turn into excellent cheeses.

Cheese is ever-present on village tables. Each meal is accompanied by chunks of white cheeses like kalathaki or feta, or harder cheeses like melixloro, ladotyri, or graviera. Saganaki, fried cheese served with a squeeze of lemon, has long been a favorite island appetizer.

In recent years, a new-to-the-island appetizer called Bouyiourdi (boo-your-DEE / Μπουγιουρντί) has conquered the hearts of island taverna patrons. Although Bouyiourdi is now popular on the island, I first learned to make it in Alaska from my friend Maria Baskous, who learned it from her friend Lily Koukourikou of Thessaloniki.

Bouyiourdi is feta baked until hot and creamy with slices of tomatoes and spicy hot pepper flakes. Last year, at our final island dinner before returning to Alaska, our table of 12 downed three orders of Bouyiourdi in quick succession before even looking at the many other appetizers gracing the table.

Back in Alaska, I often bring Bouyiourdi to potlucks. It’s one of my most requested recipes. As I tell my friends, Bouyiourdi may be dead simple to make, but it’s dangerously addictive. Consider yourself warned.

Bouyiourdi (Μπουγιουρντί)
Measurements are provided as a rough guide but, in truth, I never measure anything when I make Bouyiourdi. I layer 1/2” slices of feta in whatever baking dish I grab, sprinkle it with oregano and red pepper flakes, layer it with tomatoes and peppers (or green garlic as shown in the picture), sprinkle it with more oregano, drizzle it with olive oil, cover and bake. You can also bake Bouyiourdi in aluminum foil packets.

1/2 pound feta cheese cut in 1/2” slices (see NOTE below)
1 Tbsp. dried oregano, crushed
1 tsp. crushed red pepper flakes
2 medium tomatoes cut in 1/2” slices
1 cubanelle or Anaheim pepper (or 1-2 stalks green garlic), sliced
2 Tbsp. olive oil
Thin slices of crusty bread, fresh or toasted

Preheat the oven to 400°F.

Cover the bottom of a baking dish with slices of feta. Sprinkle with half the oregano and all the crushed red pepper flakes. Cover with slices of tomato and peppers (or green garlic). Sprinkle with the remaining oregano and drizzle with olive oil. Cover with foil and bake for 20 minutes. Remove the foil and bake for 5 – 10 minutes, or until the cheese and oil are bubbling. Serve immediately with slices of bread.

NOTE on Feta: In the US, my favorite fetas all come from Greece and are made from a mixture of sheep and goats milk. Dodonis is the brand I prefer. No matter where it’s from, the best feta is kept in brine until it sold and is available in specialty cheese stores, ethnic markets, and groceries like Whole Foods.

If you can’t find feta in brine, buy firm feta in vacuum packed bags. Never buy pre-crumbled feta; too often it is made from the bits and pieces that fall off larger pieces of cheese. Feta takes two seconds to crumble in your hand, so you don’t even save any time when you buy the pre-crumbled stuff. As for “lite” feta, don’t even think about it.