Showing posts with label garlic. Show all posts

Sunday, August 15, 2010

Gathering Wild Mushrooms in Alaska, Drying Wild Mushrooms, and 5 Recipes for Wild Mushrooms


Perfect 1 pound 10 ounce Boletus edulis

Steve arrived home from work last Friday, a briefcase in one hand and a massive Boletus edulis in the other. A smile of pure joy lit his face. “It’s time to go mushrooming.”

He handed me the mushroom, a king bolete, also known as porcino in Italy and cep in France. I weighed it: 1 pound 10 ounces. When I cut into it, the flesh was firm and pure white, untouched by worm, fly, slug, squirrel, or rot. I’d never seen anything like it. Normally, porcini this big have been heavily predated upon and are chock full of worms.

“Where’d you get this?” “Right in front of the house.” “Whataya mean, right in front of the house?” “Let me show you.” Steve brought me to a spot twenty feet from our front door.

“It’s definitely time to go mushrooming,” I said, thoughts of dinner already a distant memory. “Let’s get changed.”


Leccinum subglabripes

It’s been raining for weeks, so on went rain coats, rain pants, and waterproof hiking boots. Going mushrooming involves tromping through woods, pushing through understory, going up and down hillsides, seeking out terrain where desirable mushrooms thrive. Staying dry is key to maintaining proper enthusiasm.

Mediterranean Cooking in Alaska has moved as of March 2011. To read this post please go to


http://www.laurieconstantino.com/gathering-wild-mushrooms-in-alaska-drying-wild-mushrooms-and-5-recipes-for-wild-mushrooms/


Please click on over and visit my new site. Thank you!


Rules for Gathering and Handling Wild Mushrooms
The first and most important rule for mushroom foragers is: “When in doubt, throw it out.” Do not gather mushrooms that you can’t absolutely, positively identify.
Leave all unknown or questioned mushrooms alone, even if it means walking past many mushrooms of every color and shape before finding one you recognize.

1. The best way to learn about mushrooms is to have someone show you the edible species; spending time studying field guides also helps. The perfect field guide for Alaska doesn’t exist.


The books I like best are...

Mediterranean Cooking in Alaska has moved as of March 2011. To read this post please go to


http://www.laurieconstantino.com/gathering-wild-mushrooms-in-alaska-drying-wild-mushrooms-and-5-recipes-for-wild-mushrooms/


Please click on over and visit my new site. Thank you!


Wild Mushroom Pasta Sauce


Fresh Porcini Salad with Shaved Fennel and Parmesan Cheese


Pasta with Wild Mushroom and Clam Sauce


Wild Mushroom Ragu (Pasta Sauce)


Port Duxelles

Mediterranean Cooking in Alaska has moved as of March 2011. To read this post please go to


http://www.laurieconstantino.com/gathering-wild-mushrooms-in-alaska-drying-wild-mushrooms-and-5-recipes-for-wild-mushrooms/


Please click on over and visit my new site. Thank you!


Wednesday, August 11, 2010

Recipes for Grilled Salmon with Ancho Honey Porter Glaze and Bear Tooth Grill's "Recado" Chile Sauce

In June, four of Alaska’s best chefs met at a salmon cook-off. The winning dish? Grilled Salmon with Ancho Honey Porter Glaze created by Clayton Jones, Executive Chef of Anchorage’s Bear Tooth Grill.

Chef Clayton paired rich sockeye salmon with a glaze made of sweet honey, spicy chiles, and bitter Porter beer. The combination is inspired. Honey balances the heat and bitterness, but is used sparingly, leaving the glaze with plenty of lip-smacking spice. During the June cook-off, I watched tasters finish their portions and immediately get back in line for seconds and thirds. It wasn’t a surprise when Chef Clayton won.

This Saturday’s tasting and the June salmon cook-off are part of Trout Unlimited Alaska’s ongoing campaign to protect Bristol Bay wild salmon from large-scale mining. Bristol Bay, home to the world’s largest sockeye salmon run, employs thousands and provides a healthy, sustainable food source. To learn more about saving Bristol Bay salmon, go here.

Chef Clayton graciously shared his winning recipe.

Grilled Salmon with Ancho Honey Porter Glaze
Serves 4-6
Adapted from recipe by Clayton Jones, Executive Chef, Bear Tooth Grill, 1230 W. 27th Avenue, Anchorage, Alaska
Cook-Off Winner, Savor Bristol Bay, Trout Unlimited, www.savebristolbay.org


Mediterranean Cooking in Alaska has moved as of March 2011. To read this post please go to


http://www.laurieconstantino.com/recipes-for-grilled-salmon-with-ancho-honey-porter-glaze-and-bear-tooth-grills-recado-chile-sauce/


Please click on over and visit my new site. Thank you!


Friday, April 23, 2010

Recipes: Asian Salmon Burgers with Lime, Cilantro and Edamame Spread

A couple nights ago I made Asian Salmon Burgers with Lime, Cilantro and Edamame Spread. It’s difficult to overstate how good this was. The burgers had wonderful flavor, despite having been made with fish that was frozen last July. The spread was nothing short of amazing. I know I’m laying it on thick, but this combination was really really good.

I also liked the tasty leftovers. I had two extra salmon burgers that I shaped into patties and refrigerated raw. I cooked them for lunch: one yesterday and one today. Admittedly, I wrapped the leftovers well and refrigerated them immediately, but what I ate today was just as good as what I ate the first day. In other words, these are recipes that will be reliably good even if you make them ahead.


Asian Salmon Burgers
Serves 4


Lime, Cilantro and Edamame Spread
Serves 4


Mediterranean Cooking in Alaska has moved as of March 2011. To read this post please go to


http://www.laurieconstantino.com/easy-great-tasting-burger-using-frozen-salmon/


Please click on over and visit my new site. Thank you!


Sunday, November 15, 2009

Recipe for Kale Puttanesca (Μακαρονάδα Πουτανέσκα με Κατσαρό Λάχανο)

Kale added to spicy puttanesca sauce makes a surprisingly delicious topping for chewy pasta. We recently enjoyed Kale Puttanesca for dinner and spent the whole meal alternating sounds of satisfaction with “this is really good” and “mmmmm -- I want this again.”

My recipe calls for more capers, garlic, and anchovies than are often used in puttanesca recipes; kale and chewy pasta balance the strong flavors.  Even so, Kale Puttanesca is best served to those, like us, who like assertively seasoned food.


To complement Kale Puttanesca sauce, I used Maccheroni al Ferratto, rustic artisanal pasta, originally from Calabria, that was traditionally shaped around iron umbrella spokes.

Lately, I’ve been comparing regular dried pasta from the supermarket with more expensive “artisanal” pastas found in specialty stores and upscale markets.  All dried pasta is made using extrusion dies, metal patterns that create unique pasta shapes.  However, the dies used to make regular and artisanal pastas differ: regular pasta is made using dies with a Teflon insert and artisanal pasta is made with bronze dies.

Regular pasta has a hard, slick finish, while artisan pasta is rough and uneven: “Traditional dies made entirely of bronze make the pasta surface rough [and more porous], which helps to capture the sauce, whereas the Teflon insert gives the product an even surface and a smoother texture,” according to food scientists. On the other hand, makers of Teflon-die pasta claim “the rougher surface [of bronze-die pasta] allows cooking water to penetrate too quickly, making for less-than-ideal quality.”

The two types of pasta also differ in how they’re dried. Regular pasta is dried in ovens “the size of a football field” for 2-4 hours over high heat.  Artisanal pasta is dried for 24 to 50-plus hours “in very warm (but never hot), humid environments in which moisture can be reduced slowly, without damaging the texture of the finished product.”

I prefer artisanal pasta with very simple pasta sauces, such as oil and garlic, where the texture of the pasta makes a significant difference. I also prefer artisanal pasta in dishes, like Kale Puttanesca, that call for thicker, chewier pastas.  For all other purposes (and when I don’t want to spend the money on artisanal pasta) I happily use regular dried pasta from the supermarket.

No matter what type of pasta you use, be sure to cook it al dente; soft, overdone pasta is the bane of even the best pasta sauce.


Kale Puttanesca  (Μακαρονάδα Πουτανέσκα με Κατσαρό Λάχανο)
Serves 4
Any sturdy green, wild or domesticated, can be substituted for kale. The amount of crushed red pepper depends on how spicy you like your food.

Sauce:
1 bunch kale
3 Tbsp. capers, preferably salt-cured
3 Tbsp. olive oil
2 Tbsp. minced garlic
10 anchovy fillets, minced
1/2-1 tsp. crushed red pepper flakes
2 14.5 ounce cans diced tomatoes, with juice
1/2 cup oil-cured black olives or throumbes, pitted and roughly chopped
Freshly ground black pepper

12-16 ounces Machheroni al Ferratto or other chewy-style pasta

Wash the kale to remove any dirt.  Strip the greens from the tough center kale stems. Shred the kale greens and discard the stems (or save them for another use).

Rinse the capers well. If using salt-cured capers, soak them in a bowl of cold water for at least 10 minutes.

Fill a large pot with enough water to cook the pasta, salt it well, and put on a burner over high heat.

Heat the olive oil until it's just warmed though, using a pan large enough to hold all the ingredients. (If oil is too hot, garlic will burn; it’s best to warm the oil over medium heat.) Stir in the garlic, anchovies, and red pepper flakes and cook, stirring, for 1 minute. Stir in the tomatoes, olives, freshly ground black pepper, shredded kale, and drained capers. Bring to a boil, cover, turn down the heat, and simmer for 20-30 minutes, or until the kale is tender.

While the sauce is cooking, and when the salted water reaches a full boil, cook the pasta until it’s al dente (exact cooking time depends on the type of pasta).  Reserve 1 cup of pasta cooking water. Drain the pasta.

When the kale is tender, stir in the cooked pasta, making sure all of it is coated with sauce. Taste and add freshly ground black pepper, as needed. If the sauce is too thick for your taste, thin it with a little pasta cooking water. 

Serve immediately with plenty of crusty bread and a crisp green salad.
~~~~~~~~~~~~~~~~~~~~~~~~~~~~~~~
This is my entry for Weekend Herb Blogging, sponsored by Haalo and hosted this week by Winnie from Healthy Green Kitchen.

Saturday, October 10, 2009

Recipe: Romanesco Broccoli, Cauliflower, and Brussels Sprouts with Mustard-Caper Butter

Assuming the weather holds, there are two more Saturday Farmers’ Markets this year in Anchorage: October 10 and October 17. Last week the tables were well-stocked with a wide array of vegetables; our purchases included lime-green Romanesco broccoli, yellow cauliflower, and a fresh-cut stalk of Brussels sprouts.

These vegetables, combined with a simple Mustard-Caper Butter, are absolutely delicious on their own, or served with grilled meat, poultry, or sausages. I rarely cook with butter, but do so here because it just tastes so damn good. Quick - head to your nearest farmers’ market for the ingredients!

Romanesco Broccoli, Cauliflower, and Brussels Sprouts with Mustard-Caper Butter
Serves 6-8
Adapted from Local Flavors, Deborah Madison (New York 2002)
Roasting the vegetables concentrates and sweetens their flavor. However, you can simplify the dish even further by steaming the vegetables instead. Whether you steam or roast, make sure not to overcook the vegetables; they are best when they retain a little crunch. If you don't have access to beautiful Romanesco broccoli, regular broccoli can be substituted.

Mustard Caper Butter:
2 garlic cloves
1/4-1/2 tsp. salt
3 Tbsp. chopped thyme
1/4 cup drained small capers, rinsed
1 Tbsp. finely grated lemon peel
Freshly ground black pepper
6 Tbsp. butter, softened
1 Tbsp. Dijon mustard

Vegetables:
1 stalk (or 1 pound) Brussels sprouts
1 small head Romanesco or regular broccoli
1 small head white cauliflower
2 Tbsp. olive oil
Salt
Freshly ground black pepper

Preheat the oven to 450°F.

Make the Mustard-Caper Butter: Pound the garlic with 1/4 tsp. salt in a mortar until smooth. Pound the thyme, capers, lemon peel, and freshly ground black pepper into the garlic. Pound in the butter and mustard, making sure the other ingredients are evenly distributed in the butter. You can also mix the butter in a food processor. If you do, add the capers only after the other ingredients are thoroughly combined and pulse in the capers so they stay a little chunky. (The butter can be made ahead, refrigerated, and brought to room temperature before serving.)

Cook the Vegetables: Snap the Brussels sprouts off the stalk, trim off their tough base, and slice them in half. Bring a large pot of salted water to a boil. Add the Brussels sprouts and cook for 3 minutes. Drain and rinse with very cold water. Cut the cauliflower and Romanesco broccoli into florets. Put the vegetables, including the drained Brussels sprouts, on a rimmed baking sheet and toss with olive oil and a light sprinkling of salt and freshly ground black pepper. Bake for 10 minutes.

Finish the Dish: Put the roasted vegetables in a bowl and toss with the Mustard-Caper Butter until it melts and coats the vegetables. Taste and add salt or freshly ground black pepper, as needed.
~~~~~~~~~~~~~~~~~~~~~~~~~~~~~~~~~~~~
This is my entry for Weekend Herb Blogging, hosted this week by lovely Susan from The Well-Seasoned Cook.

Monday, March 23, 2009

Recipes: Split Pea Soup with Ham Hocks & Garlic Yogurt

As many of you know, my 88-year-old father is nearing the end of his happy and fortunate life. For the past couple months, as his health has gone downhill, I’ve been spending lots of time with my parents in the Pacific Northwest, hence my lack of blog posting.

I’m heading back down to Washington again on Wednesday. At home in Alaska, I’ve been making lots of freezer food so my husband can have quick and easy meals while I’m gone. This weekend, I spent a lazy Saturday afternoon making a giant pot of Split Pea Soup, comfort food at its most basic.

I started making Split Pea Soup 35 years ago as a college student living on work study wages. In those days, I ate it because it was cheap, filling, and very tasty. Now, I eat Split Pea Soup just because it tastes good. As it has evolved over the years, my Split Pea Soup recipe is one of my favorites.

Ham HocksThere are two keys to making wonderful split pea soup: the soup must cook at low temperature for a long time and the ham hock (or leftover ham-bone) must be meaty and of best quality. Low and slow cooking allows the flavors to meld seamlessly into one another, and the cartilage in the hock to dissolve and give the soup a silky mouth feel.

In Anchorage, Mr. Prime Beef on the Old Seward Highway sells beautifully meaty smoked ham hocks; make sure to have the butcher cut them into thirds for ease of cooking and better tasting soup. The other day, I also say nice-looking whole ham hocks at Natural Pantry; sadly, this store doesn't have an in-store butcher to cut them up.

Split Pea Soup with Ham HocksSplit Pea Soup with Ham Hocks
Serves 12
Finish Split Pea Soup with a dollop of Garlic Yogurt (see recipe below) or a drizzle of extra virgin olive oil. Whether to purée split pea soup is a personal decision, and isn’t necessary. I’ve served and enjoyed the soup both ways. Lately, I’m liking the more refined puréed version; its flavors seem to be better balanced. Split Pea Soup freezes really well and a quart freezer bag easily holds enough Split Pea Soup for two. Of course, you can always cut the recipe in half if you aren’t serving a crowd or stocking your freezer or don’t have a large enough pot (a Dutch oven is only big enough to make half a recipe). I use a mortar and pestle for crushing the peppercorns, but you can also crush them with the bottom of a saucepan.

2 pounds dried green split peas
4 cups diced onion, 1/4” dice (about 2 large)
2 cups diced garnet yams (sweet potatoes), 1/4” dice (about 3 medium)
1 1/2 cups diced celery, 1/4” dice (about 3 stalks)
1 cup diced carrots, 1/4” dice (about 3 medium)
1 Tbsp. freshly crushed black peppercorns
1 Tbsp. freshly crushed dried thyme
2 cups white wine
5 bay leaves
2 - 2 1/2 pounds smoked ham hock, cut in thirds
Water
1 Tbsp. Worcestershire sauce

Spread out the split peas on a tray or flat pan and inspect carefully, removing any pebbles or debris. Rinse and drain the split peas.

Put the split peas, onions, garnet yams, celery, carrots, crushed peppercorns, crushed thyme, white wine, bay leaves, and ham hocks in a very large stock pot. Add water to cover the ingredients by 6 inches (3 inches if you cut the recipe in half). Bring the mixture to a boil, cover, turn the heat down to low, and simmer for 2 hours. Remove the cover and simmer for 1-3 more hours until the split peas are very soft, the meat is falling off the bone, and the liquid is reduced to your liking.

Using a slotted spoon or tongs, remove the bay leaves and the ham hocks, including all the bones and chunks of fat. If you are puréeing the soup, process it with a
stick blender (or in a blender or food processor) until it is very smooth.

Remove and discard all the fat and bones from the ham hocks. Dice the meat into bite sized pieces and add it back to the soup. If the soup is too thin, simmer it longer. If it is too thick, thin it with water and simmer for 15 minutes before serving.

Garlic Yogurt
When I’m in a hurry,
or have strained Greek yogurt on hand, I don’t bother with straining the yogurt. It tastes fine if you just mix all the ingredients and serve immediately, though the texture is better if you strain the yogurt. This recipe makes enough for about 6 servings of soup, so double the recipe if you’re serving Split Pea Soup to a crowd.

1 cup whole-milk yogurt

1-2 cloves garlic
1/2 tsp. Kosher or coarse-grained salt
Freshly ground black pepper

Line a colander with paper towels. Dump the yogurt into the lined colander and let the liquid drain out of the yogurt for 30 – 60 minutes. Puree the garlic by mashing it into the salt. Mix together the drained yogurt, mashed salted garlic, and freshly ground black pepper. Taste and adjust the seasoning by adding garlic, salt, or pepper, as needed.

~~~~~~~~~~~~~~~~~~~~~~~~~~~~~~~~~

This is my entry for My Legume Love Affair – 9th Edition (MLLA9) which I am hosting this month and which was created by Susan of The Well-Seasoned Cook.

Tuesday, February 17, 2009

Recipe for Edamame Pesto Spread (Ενταμάμε Πέστο Σαλάτα)

I always keep a bag of shelled edamame beans in the freezer. They’re colorful, taste great, and very versatile.

Edamames are green soybeans, harvested while the pod is still soft and bright green. In Japanese, “eda” means branches and “mame” means beans; thus, edamames grow in clusters on the soybean plant’s many branches. Edamames are rich in fiber and protein and, like all soybeans, may have significant health benefits.

Last weekend I used them to make Edamame Pesto Spread, a garlicky bean spread loaded with fresh basil, fresh mint, and parmesan cheese. The recipe was inspired by, but quite different from, Marcella Hazan’s Ligurian Raw Fava Bean Spread in
Marcella Cucina.

I often use edamames as a substitute for fresh fava beans in Greek recipes, such as braised favas with dill and onions or favas and potatoes baked in grape leaves (recipes for both are in
Tastes Like Home: Mediterranean Cooking in Alaska). Recently, I used edamames in Seafood and Vegetable Stew with Rouille.

Except for the fresh herbs, which are readily available at most grocery stores, Edamame Pesto Spread is made with pantry staples. It goes together in minutes and can be served right away. As a result it’s a handy recipe to keep in mind for last minute entertaining, especially in summer when herb gardens flourish.

Edamame Pesto SpreadEdamame Pesto Spread (Ενταμάμε Πέστο Σαλάτα)
Makes about 2 cups

Serve as an appetizer with pita chips or thin slices of bread. Edamame Pesto Spread is also good in sandwiches or on pasta.

1/2 cup freshly grated (or finely ground in a food processor) parmesan cheese
2 cups shelled edamame beans (frozen), thawed
2-3 garlic cloves
1/4 cup whole mint leaves
1/4 cup whole basil leaves
1/4 cup fresh lemon juice
1/2 cup olive oil
Salt
Freshly ground black pepper

Put all the ingredients in a food processor and process until smooth, being sure to scrape down the sides of the processor bowl. Taste and add salt, freshly ground black pepper, or lemon juice, as needed.
~~~~~~~~~~~~~~~~~~~~~~~~
This is my entry for
My Legume Love Affair, created and hosted by Susan from The Well-Seasoned Cook.

Grilled Cheese and Edamame Pesto SandwichesGrilled Cheese and Edamame Pesto Spread Sandwich

Monday, February 16, 2009

The Language of Baklava by Diana Abu-Jaber with Recipe for Jordanian Kofta and Yogurt Sauce (Ιορδανικό Γιαουρτλού Kεμπάπ)

Diana Abu-Jaber grew up in the environs of Syracuse, New York during the 1960s and 1970s. She shares the dominant cultural references of all Americans her age. Her mother and influential maternal grandmother are Americans, their distant heritage “Irish, German, maybe Swiss?”

Abu-Jaber’s father is from Jordan; his heritage Bedouin and Palestinian. His large, loud, exuberant family, many of whom lived in or near Syracuse, was a constant in Abu-Jaber’s life. At home and in her lunchbox, Abu-Jaber ate Middle Eastern food. This food and her Arabic name, so unlike her pale skin and murky green eyes, set her apart from her schoolmates.

When Abu-Jaber was in grade school, her family moved to Jordan. In Jordan, it was her pale skin that set her apart. The smells and sounds and experiences of life in a crowded Middle Eastern city woke up senses Abu-Jaber hadn’t known in America. Just as her heart began to beat with the rhythm of Jordanian life, Abu-Jaber’s family moved back to America.

“America is a cold breeze that snaps us awake … We’ve left Jordan, with its lush winds, dust, and sun-stained air. When I wake in a hotel bed on the first morning back in America, I’m dazed by a blankness around me: the sleekly painted walls, the air slack without the scents of mint, olive, and jasmine, and an immobilizing silence. I close my eyes and conjure the songbirds Mrs. Haddadin kept in a gold cage hanging from a tree branch; the wobble of Munira’s singing as she dashed a broom through the courtyard. … We’ve returned to Syracuse, to a split-level house that does not have another family living in the upstairs apartment or a communal courtyard or thick hedges of mint.”

In her 2005 memoir, The Language of Baklava, Abu-Jaber describes her rootless journey to adulthood. She struggles to connect with her American and Jordanian cultures, often standing as an outsider to both.

Abu-Jaber
grew up in a family of storytellers: “To me, the truth of stories lies not in their factual precision, but in their emotional core. Most of the events in this book are honed and altered in some fashion, to give them the curve of stories. Lives don’t usually correspond to narrative arcs, but all these stories spring out of real people, memories, and joyously gathered and prepared meals.”

The essential truths and complexities of Abu-Jaber’s relationships to her family and twin cultures, as revealed through her stories
, are captivatingly real. By book's end, we understand Abu-Jaber’s American and Jordanian heritages are inseparably bound in her heart and soul.

In telling her family's stories, Abu-Jaber reveals universal truths about the immigrant experience in America. Like millions upon millions of immigrants who've given strength and diversity to their adopted homeland, Abu-Jaber’s family, many of whom are Arab and some of whom are Muslim, is inextricably woven into the fabric that makes up America. None of these immigrants, or their descendants, can be categorically ejected or rejected without leaving an irreparable hole.

In other words, there is no “us” and there is no “them.” As Abu-Jaber wrote in the Washington Post, “
The world is a place of nuance, flux, hardship and complexity: We all live together in it. The real safety will come from learning how to live together better, not from trying to push others out.”

For me, Abu-Jaber’s book had special resonance.
The Language of Baklava is, in many ways, a love letter to Abu-Jaber’s father. I began reading it in a nursing home, by the bedside of my ill father who, briefly and terrifyingly, didn’t recognize me. The veil of sadness through which I read The Language of Baklava made its message of paternal love particularly poignant.

I returned home from visiting my father emotionally drained. That night, I cooked some of Abu-Jaber’s recipes for my husband. As we greedily piled our plates with Jordanian Kofta and garlicky Yogurt Sauce, I experienced anew the relationship between food and love that inspired The Language of Baklava.

Jordanian Kebab and Yogurt SauceJordanian Kofta and Yogurt Sauce (Ιορδανικό Γιαουρτλού Kεμπάπ)
Serves 4 as a meal or more as an appetizer
Adapted from The Language of Baklava by Diana Abu-Jaber
These taste best when cooked over a grill (in winter, we grill in our fireplace), but can also be made on a stovetop grill pan. To serve as an appetizer, make smaller kebabs by dividing the meat into 16 equal pieces rather than 8. Serve with Tomato, Cucumber, and Onion Salad, feta cheese, Kalamata olives, and warm pita bread.

Sausage:
1 pound ground lamb or beef
1 egg
1 cup finely diced onion, 1/8”dice
2 Tbsp. minced fresh parsley
2 tsp. ground turmeric
1 tsp. freshly crushed cumin
1 tsp. chile powder, preferably Ancho
1/2 tsp. ground cinnamon
1/2 tsp. ground allspice
Salt
Freshly ground black pepper
Bamboo skewers

Yogurt Sauce:
3 cloves garlic
1/2 tsp. salt
1 1/2 cups plain yogurt, preferably whole milk
1/4 – 1/3 cup fresh lemon juice

Make the Sausage: Put all the sausage ingredients in a bowl, and knead everything together with your hands. Divide the seasoned meat into 8 equal pieces. Roll each piece of meat around a bamboo skewer into a long sausage shape. Refrigerate until you’re ready to cook the Kofta. (The recipe may be made ahead to this point.)

Make the Yogurt Sauce: Purée the garlic and salt with the flat of a chef's knife or using a mortar and pestle. Mix the garlic purée with the yogurt and 1/4 cup lemon juice. Taste and add salt or the remaining lemon juice, as needed.

Cook the Sausages: Grill over a hot fire, turning regularly, and being careful not to overcook. Serve immediately, the hotter the better, with a generous dollop of Yogurt Sauce on the side.

To cook on the stove, heat a cast iron grill pan until it’s very hot, cook the sausages until they are well-browned on one side, turn them over, immediately turn down the heat, and cook until they are done on the other side. Serve immediately.
~~~~~~~~~~~~~~~~~~~~~~~~~~
This is my entry for Cook the Books Club, founded by Rachel at
The Crispy Cook, Ioanna from Food Junkie, Not Junk Food, and Deb from Kahakai Kitchen. Cook the Books is an online book club; this month’s selection is The Language of Baklava by Diana Abu-Jaber.

Saturday, February 7, 2009

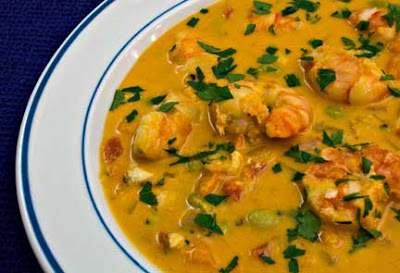
Recipe for Seafood and Vegetable Stew with Rouille (Red Pepper Sauce)

Fish Stew with Vegetables and RouilleFish and Vegetable Stew with Rouille

The discovery of a new dish does more for human happiness than the discovery of a new star.
John Anthelme Brillat-Savarin, Physiologie du Gout (Physiology of Taste) (1825)

Where do recipes come from? Family, community, tradition, and serendipitous accident are easy but incomplete answers.

The primary source of recipes has always been an individual cook’s imagination and palate. Over time, original recipes are modified by other cooks’ imaginations and adjusted by yet more cooks’ palates, to infinity and without limitation.

The food articles I enjoy most are ones that explain how a dish was developed or why a cook chose to combine certain flavors. Although its authors’ cooking styles and skills are quite different from my own, Ideas in Food is one of my favorite blogs. It focuses on the techniques and thought processes that go into creating unique flavor combinations.

I recently made Seafood and Vegetable Stew with Rouille. Here's how it came into being:

My kitchen counter was overflowing with
garnet yams, bounty from more than one Full Circle Farms CSA box. I wanted to do something other than oven-roasting the yams or making oven fries. Looking for inspiration, I randomly pulled cookbooks off the shelves.

Barbara Kafka’s book
Soup: A Way of Life had an interesting recipe for Fall Fish Stew that included sweet potatoes. I decided to try it.

My first version of the stew was similar to Kafka’s, though I substituted sautéed sweet potatoes for boiled and edamame beans for limas. After tasting the broth, I wanted more flavor.

In my next version, I added sautéed onions and red bell peppers, and used a different Rouille recipe than Kafka’s. I seasoned the Rouille with dried, ground red Moroccan pepper (poivron rouge). This version was tasty, but I thought it could be better.

In my final version, I added crushed fennel seeds and shelled shrimp. This combination was exactly what I wanted. Although inspired by Kafka, the final stew is uniquely my own.

Map of High Atlas MountainsI internet-ordered poivron rouge from World Spice Merchants in Seattle, one of my favorite herb and spice purveyors. World Spice describes poivron rouge as “sweet red pepper … produced from sweet round red niora peppers grown in the lush valleys at the foot of the High Atlas Mountains to the northeast of Marrakech.“

Poivron Rouge and PaprikaPoivron Rouge and Sweet Hungarian Paprika
Although Moroccan recipes often call for paprika, niora peppers are what Moroccans use for “paprika.” The flavor of ground niora differs significantly from sweet Hungarian paprika. Niora is spicier and has a fruitier flavor than its Hungarian counterpart, which has a slightly bitter aftertaste.

Moroccan niora peppers are likely the same as the ñora peppers used in
Romesco sauce and other Spanish and Catalonian dishes. In addition to having similar names, nioras and ñoras look the same. Most texts refer to nioras and ñoras only as members of the Capsicum annuum family; in other words, as domesticated peppers. However, in Catalan Cuisine, Colman Andrews says pepper scholar Charles Perry “thinks the nyora [ñora] pepper is the variety scientifically called Capsicum annuum grossum/provar. Pomiforme/sub-var. Conc. Humilirotundum Haz."

No matter what its scientific designation might be, poivron rouge has wonderful flavor and a permanent place in my spice cupboard. Its mildly spicy and fruity tastes make distinctively delicious Rouille and a mouth-wateringly good Seafood and Vegetable Stew.

Seafood Stew with Vegetables and RouilleSeafood and Vegetable Stew with Rouille (Red Pepper Sauce)
Serves 4
The stew may also be made with just fish or just shrimp; if so, use 1 pound of either ingredient. Although not necessary, steamed rice is a nice complement to the spicy, aromatic broth. Serve the rice on the side so eaters can stir the amount they desire into the stew.

1 cup peeled, diced garnet yams or sweet potatoes, 1/2” dice (1 garnet yam)
2 Tbsp. olive oil
Salt
Freshly ground black pepper
1 cup diced red bell pepper, 1/2” dice (1-2 peppers)
1 cup diced yellow onion, 1/2” dice
1 tsp. freshly crushed fennel seed
4 cups fish stock or clam broth (nectar)
1 recipe Rouille (see below)
1 cup shelled edamame beans (thawed) or fresh fava beans
1/2 pound skinless fillets of halibut, rockfish, cod, or other white-fleshed fish, cut in 3/4” pieces
1/2 pound shelled and cleaned shrimp,
16-20 count, halved crosswise
1/4 cup fresh lemon juice (1 lemon)

Minced parsley for garnish

Sauté the garnet yams in olive oil, lightly seasoned with salt and freshly ground black pepper, until they start to brown around the edges. Stir in the red bell peppers and onions, and continue to sauté until the onions soften. Add the crushed fennel seed and sauté for 1 minute. Stir in the fish stock, bring to a boil, turn down the heat and simmer for 15 minutes. (The recipe may be made ahead to this point.)

In a small bowl, whisk one cup of the hot broth into the Rouille. Stir this mixture into the simmering stew pot, along with the edamame beans, fish, and shrimp. Do not let boil or the Rouille may curdle. Simmer for 3-4 minutes, or until the seafood is cooked through. Stir in the lemon juice. Taste and add salt or lemon juice, as needed.

Sprinkle with minced parsley and serve immediately with steamed rice and wedges of lemon.

Rouille
Recipe adapted from
In the Hands of a Chef by Jody Adams
Rouille goes well with all fish, and is a tasty addition to fish salads. The recipe may be doubled or tripled and keeps for a week in the refrigerator.

1 egg yolk
1/2 tsp. Dijon mustard
1 Tbsp. fresh lemon juice
1/4 cup vegetable oil
1/4 cup best quality extra virgin olive oil
2 tsp. chopped garlic
1/2 tsp. salt
4 tsp.
poivron rouge or sweet Hungarian paprika
1/4 tsp. cayenne pepper

Put the egg yolk, mustard, and lemon juice in a blender and mix well. While the blender is running, add the vegetable oil drop by drop so that it emulsifies with the other ingredients. While the blender is running, pour in the olive oil in a steady stream. Add the remaining ingredients and blend until the Rouille is very smooth, scraping down the sides of the blender to ensure all ingredients are thoroughly incorporated.
~~~~~~~~~~~~~~~~~~~~~~
This is my recipe for
Weekend Herb Blogging, hosted this week by Dee from The Daily Tiffin.

Sunday, January 18, 2009

Two Recipes for Bagna Càuda (Δύο Συνταγές για Μπάνια Καούντα)

Last night, we had a hot olive oil bath and went to bed happy. We didn’t dive into olive oil; our dinner did.

Bagna Càuda, a specialty of Italy’s
Piedmont Region, combines oil with anchovies and garlic to make a hot dip for vegetables and bread. Cooked over low heat, anchovies melt into oil and garlic’s strength turns smooth and mild.

I was first introduced to Bagna Càuda by the proprietors of
Genoa Restaurant in Portland, Oregon (now closed). It was love at first taste. Genoa’s Bagna Càuda was rich and luxurious, creamy and indefinably delicious. I wanted more.

After I discovered Genoa’s recipe in a cookware store handout, its Bagna Càuda regularly showed up on the tables of me and my friends. Unlike the Bagna Càuda I make now, Genoa’s recipe doesn’t contain a speck of olive oil; its richness comes exclusively from butter and cream.

In the Portland years, I was young and undeterred by buckets of cream and butter. As time passed, I lost my enthusiasm for both. I used to cook with butter, using olive oil mostly for salad dressings. Now, I rarely use butter; olive oil has replaced it in my kitchens. I stopped making Bagna Càuda.

Even so, when my husband and I travelled to Italy’s Piedmont Region in 1997, I was eager to try Bagna Càuda in its homeland. We found it in a tiny lakeside restaurant in
La Morra, where we were the only customers. The television was blaring, the florescent lights blazing, and our expectations for the food low.

When the Bagna Càuda arrived at our table, it was a revelation. It didn’t contain cream or butter. Instead, garlic and anchovies were melted in olive oil and served in a roasted red pepper half. Every bite was a pleasure.

As with Genoa’s Bagna Càuda so many years ago, the taste and aroma of this new-to-me version lingered in my memory. Back in Alaska, I developed a simple recipe incorporating its flavors, using only olive oil, garlic, and anchovies.
.
Last Thursday, my regular
CSA box of vegetables arrived from Full Circle Farm. The refrigerator was overflowing; I couldn’t find space for an extra-large bunch of broccoli. Bagna Càuda (my version) was the solution. While the anchovy and garlic sauce simmered, I steamed broccoli and roasted a couple red peppers over a gas burner.

When the Bagna Càuda was done, we dipped our vegetables and bread in the hot savory bath, ate our fill, and licked our fingers clean.


Bagna CaudaLaurie's Bagna Càuda (Μπάνια Καούντα)
Makes about 1 1/2 cups
Though the recipe contains a lot of garlic and anchovies, their pungency disappears after simmering in hot oil. For a group, serve Bagna Càuda in a fondue dish or other pot which keeps the sauce hot. For quick weekday meals, serve the sauce in individual unheated dishes for dipping, or even just spooned, straight from the stove, over the vegetables.

Sauce:
1/4 cup chopped anchovy fillets (2 ounces/24 cleaned fillets)
(see Note below)
1/3 cup chopped fresh garlic
1 1/4 cups olive oil

Selection of Vegetables: Raw or roasted red peppers, raw or lightly steamed broccoli or cauliflower, celery, carrots, zucchini, cardoons, radishes, green onions, radicchio, fennel, cherry tomatoes, boiled potatoes


Selection of Bread: artisan-style bread, foccacia, breadsticks

Put the anchovy fillets, garlic, and olive oil in a saucepan over medium-low heat. Cook, stirring from time to time, until the oil starts to bubble. Cook for 20 – 30 minutes, until the anchovies melt into the oil and the garlic is very soft. Don’t let the garlic brown; if the oil is cooking hard enough to brown the garlic, immediately turn down the heat.

While the sauce is cooking, cut the vegetables and bread into shapes appropriate for dipping. When the sauce is done, dip the cold vegetables in the hot sauce.

NOTE:
Anchovies preserved in salt have much more flavor than anchovies canned in olive oil. In dishes like Bagna Càuda, where anchovies are a central ingredient, I prefer the salt-cured variety (the dish is delicious even when made with oil-canned anchovies). Some places, you can buy salted anchovies by the ounce from the deli counter; in Alaska, this isn’t possible. Instead, I buy large cans of salt-preserved anchovies in Greece or when I travel outside the state (Big John’s PFI in Seattle carries them, as does Amazon.com). Anchovies packed in salt keep in the refrigerator for up to a year. To clean salt-cured anchovies, carefully rinse off all the salt. Starting from the head end, peel each fillet off the backbone, and then remove as many of the fine bones from the fillet as possible. Dry the cleaned fillets on paper towels before using in recipes.


Genoa's Bagna Càuda (Μπάνια Καούντα)
Makes about 1 1/2 cups
Adapted from Genoa Restaurant recipe, Portland, Oregon
Genoa’s Bagna Càuda must be kept warm over a burner at all times; the reduced cream stiffens up when it cools. The anonymous author of Genoa’s recipe explains how to eat it: “[This] is a dish to be enjoyed without ceremony – pick up vegetable or bread stick with fingers, dip it in the sauce until well covered, and consume. If butter and cream separate, pour in a bit of cold cream and whisk hard. The sauce will return to its former velvet-like texture.”

Sauce:
2 cups heavy cream
8 cloves garlic, roughly chopped
1 2-ounce can anchovy fillets, drained of oil
Dash of cayenne
1/4 cup unsalted butter

Selection of Vegetables: Raw or roasted red peppers, raw or lightly steamed broccoli or cauliflower, celery, carrots, zucchini, cardoons, radishes, green onions, radicchio, fennel, cherry tomatoes, boiled potatoes

Selection of Bread: artisan-style bread, foccacia, breadsticks

In a heavy saucepan, simmer cream with garlic until the cream is thick and reduced to 1 cup. Watch the cream carefully as it cooks; don't let it boil over. Put the reduced cream, anchovies, and cayenne into a blender and purée until the mixture is very smooth. (The recipe may be made ahead to this point.)

Return the mixture to the pan and bring to a very slow simmer. Stir in the butter until it melts. While the dip simmers, cut the vegetables and bread into shapes appropriate for dipping.

Serve in a fondue dish or other pot which can keep the dip hot. Dip the cold vegetables in the hot sauce.

~~~~~~~~~~~~~~~~~~~~~~
This is my entry for Foodie Films: Big Night - Italian! created and hosted by Joelen's Culinary Adventures.

Thursday, January 15, 2009

Recipes for Spinach Skordalia & Crispy Salmon Fingers (Σκορδαλιά με Σπανάκι & Σολομός Τηγανητός)

Skordalia, a classic Greek garlic spread, is often served with fried fish. Here I’ve enhanced traditional skordalia with earthy spinach to create a luscious, garlicky, colorful partner for crispy, pan-fried salmon fingers.

Spinach Skordalia and Crispy Salmon Fingers are quick and easy recipes that are also healthy and full-flavored. For dinner tonight I paired them with
Sweet Potato Oven Fries and Tomato Salad.

Spinach SkordaliaSpinach Skordalia (Greek Garlic Spread) (Σκορδαλιά με Σπανάκι)
Serves 4 with fried fish or a group as an appetizer

Air-dried heels of homemade or artisan-style bread are just right for skordalia. When we have leftover heels or chunks of bread, I leave them out on the counter to air-dry. After the bread is completely dried out, I store it in an airtight container to use when it’s time to make skordalia (or breadcrumbs).

3 cups chopped and tightly packed fresh spinach leaves
1 Tbsp. olive oil
3 - 5 cloves garlic
1 tsp. salt
1 cup soggy bread (see Note below)
1/4 tsp. freshly ground black pepper
2 Tbsp. fresh lemon juice
1/3 cup best quality olive oil

Sauté the spinach in olive oil just until it wilts, about 30 seconds. Purée 3 cloves garlic by mashing them into the salt (a mortar and pestle works great for this task). Put the spinach, garlic purée, soggy bread, freshly ground black pepper, and lemon juice in a food processor (or blender). Purée the ingredients, making sure to scrape down the sides of the processor bowl, until the mixture is smooth. While the machine is running, slowly pour in the olive oil. You should end up with a mixture that has the consistency of thick mayonnaise. If it is too thick, mix in more olive oil until it reaches the proper consistency. Taste and add the remaining garlic (puréed in salt), lemon juice, or salt, as needed.

Serve with fried fish or as an appetizer with fresh raw vegetables.

Note: To make soggy bread, immerse dry, stale bread in cold water. When the bread has soaked up the water and is soft all the way through, drain the bread and, using your hands, squeeze out all the water until you have a solid ball of bread. The bread is then ready to measure and use in the recipe.

Spinach Skordalia with Salmon FingersCrispy Salmon Fingers (Σολομός Τηγανητός)
Serves 4

Salmon tastes better if you salt and pepper it at least 1/2 hour before flouring and cooking. Season the salmon and then make Spinach Skordalia; the salmon will be ready to cook as soon as the skordalia is done. Semolina flour makes a crispier coating than white flour, although white flour may also be used in this recipe.

1 1/2 pounds boneless, skinless salmon fillets
Salt
Freshly ground black pepper
1/2 cup semolina flour
1/4 cup olive oil

Wash the salmon and dry it well. Using needle-nosed pliers, remove as many pin-bones from the salmon as possible. Cut the salmon into long, narrow, lengthwise strips. Cut each strip into fingers approximately 3” long. Season the fingers with salt and freshly ground black pepper.

Put the semolina flour in a bag; shake the salmon fingers in the bag until they are thoroughly coated with flour. Heat 2 Tbsp. olive oil in each of 2 frying pans until the oil is hot, but not smoking. Divide the salmon fingers between the 2 pans and cook for 2 minutes, or until the pan side of the salmon is lightly browned. Turn over and cook for 1 – 2 minutes, or until the salmon is cooked through. The exact cooking time depends on the salmon’s thickness; keep in mind that salmon tastes better slightly underdone than overdone.

Serve immediately with Spinach Skordalia.
~~~~~~~~~~~~~~~~~~~~~~~~~~~
This is my entry for
Weekend Herb Blogging hosted this week by Rachel from The Crispy Cook.

Ice Art in Anchorage AlaskaMasque at sunset, part of the FREEZE frozen-ice art installations in Anchorage, Alaska.

Sunday, January 11, 2009

About Pancetta with Recipes for Pasta with Squash, Arugula, and Pancetta & Pasta with Pork in Garlic-Wine Sauce (Ιταλική Πανσέτα με Ζυμαρικά)

Alaska has been having a cold snap.

I imagine many of you thinking, “So what else is new?” Even though Alaskans expect and are used to cold weather, the last couple weeks really have been colder than usual. To see what cold weather looks like, check out Marc Lester's
lovely photo-essay showing Southcentral Alaska’s chilly wonderland.

Hearty food, including pasta, is a good antidote for cold weather blues. One of my favorite ways to boost the flavor of winter pasta sauces is adding pancetta (cured Italian pork belly). Only a small amount of pancetta is needed improve the taste of savory sauces (a corollary to the principle that everything tastes better with bacon).

Salumi's hand-crafted pancetta

Pancetta is often sold in packages of very thinly cut pre-sliced meat. Although I use pre-sliced pancetta in a pinch, I mostly buy pancetta direct from the deli counter. I ask for either a chunk of pancetta, which I hand slice and dice at home, or have the deli staff cut the pancetta into slices the thickness of regular bacon. With thicker slices, eaters enjoy bursts of pancetta flavor when devouring the sauce; thinner slices tend to melt into the other flavors.

I was recently at Seattle’s
Metropolitan Market where I bought several pounds of hand-crafted pancetta from Salumi Artisan-Cured Meats. This is far and away the best pancetta I’ve ever eaten; Salumi’s hand-rolled pancetta is meaty, with superior texture and flavor. Although more expensive than pre-sliced pancetta, Salumi’s product is well worth the price, and may be ordered online.

Two delicious pasta sauces that benefit from pancetta are Pasta with Squash, Arugula, and Pancetta and Pasta with Pork in Garlic-Wine Sauce. Either is just right for even the coldest winter day.

Pasta with Squash, Arugula, and Pancetta
Serves 4

Inspired by Cookthink
If using artisan-cured pancetta, it may be quite salty, so be careful not to over-salt the other components of the dish.

Squash:
1 small Kabocha, butternut, or other winter squash, peeled and cut into 3/4” chunks (4 cups)
1/4 cup olive oil
Salt
Freshly ground black pepper

Pancetta and Onions:
3 thick slices pancetta, cut in 1/2” dice (1/2 cup)
2 Tbsp. olive oil
3 cups diced onion, 1/2” dice
Freshly ground black pepper
1 Tbsp. minced fresh garlic
2 Tbsp. minced fresh sage

Pasta:
1/2 pound casarecci or similarly shaped pasta
4 cups arugula, cleaned and roughly chopped
1 cup freshly grated parmesan cheese

Make the Squash: Preheat the oven to 515°F. On a baking sheet with rims, toss the squash cubes with olive oil, salt, and freshly ground black pepper. Put the squash in the oven and immediately turn the heat down to 475°F. Bake for 20 to 25 minutes, turning the squash cubes halfway though, until the squash is cooked through and lightly browned.

Put a large pot of salted water on a burner over high heat.

Make the Onions and Pancetta: Sauté the pancetta in olive oil until it begins to brown. Stir in the onions and freshly ground black pepper, scraping up any browned bits on the bottom of the pan, and sauté until the onions soften. If the onions start sticking to the bottom of the pan, add 1/4 – 1/2 cup water. When the onions are lightly browned, stir in the garlic and sage and keep warm over very low heat.

Make the Pasta: Add the pasta to the boiling salted water and cook until it is al dente. While the pasta is cooking, put the arugula in a large bowl. When the pasta is done, remove 1 cup of pasta cooking water, drain the pasta well, and put the drained pasta on top of the arugula in the bowl. Add the roasted squash and cooked onions to the bowl and toss all the ingredients well. If the dish is too dry, add as much of the pasta cooking water as necessary (usually 1/4 - 1/2 cup). Taste and add freshly ground black pepper or salt, as needed.

Serve sprinkled with freshly grated parmesan cheese.

Pasta with Pork in Garlic-Wine Sauce
Serves 4
Spruce vinegar and salt-cured spruce buds add interesting highlights to the sauce, but aren’t necessary to the success of the dish. If you’re among the 99.99% of people who don’t have either ingredient, red wine vinegar and capers work equally well. For capers, I prefer the taste of salt-cured; when I can’t find salt-cured, I use capers in brine. If using artisan-cured pancetta or salt-cured capers, they may be quite salty, so be careful not to over-salt. Bacon may be substituted for pancetta; it adds a pleasant smoky flavor.

Sauce:
1 pork tenderloin (about 1 pound), cut in 3/4” dice
1 Tbsp. minced garlic
1/2 tsp. black peppercorns, crushed
1 Tbsp. spruce vinegar or red wine vinegar
3 thick slices pancetta, cut in 1/4” dice (1/2 cup)
2 Tbsp. olive oil
1 cup finely diced onion, 1/8” dice
1/4 cup sun-dried or regular tomato paste
1 Tbsp. salt-cured spruce buds or capers, well-rinsed and minced
3/4 cup dry red wine
2 cups chicken stock

Pasta:
1/2 pound
gemelli or similarly shaped pasta
1/2 cup freshly grated parmesan cheese

Mix the pork, garlic, peppercorns, and vinegar and let marinate at least 1 hour (overnight is fine).

Sauté the pancetta in olive oil until it begins to brown. Add the pork mixture and cook until the pork is browned on all sides. Stir in the onion, using the moisture in the onions to scrape up any browned bits on the bottom of the pan. Continue cooking until the onions soften and begin to turn golden. Stir in the tomato paste until it is thoroughly combined. Mix in the wine and cook until it is reduced by half. Stir in the chicken stock and bring to a boil. Turn down the heat and simmer for 40 - 45 minutes, until the sauce slightly thickens. Taste and add salt or freshly ground black pepper, as needed.

Cook the pasta in boiling salted water until it is al dente. Drain the pasta and toss it with the pork sauce. Serve sprinkled with freshly grated parmesan cheese.

The road we live on