Showing posts with label onions. Show all posts

Friday, September 24, 2010

Rabbit Recipes: Litsa's Rabbit and Onions & Froso's Wine-Marinated Rabbit with Onions and Potatoes (Κουνέλι της Λίτσας & Κουνέλι της Φρόσω)

In Greece, our village’s economy depends on wheat and barley farming. In the last 10 years, rabbit populations have spun out of control, ravaging newly sprouted fields, and destroying entire seasons worth of crops. As a result, local hunters work diligently to keep the rabbit population in check, sharing their bounty with fellow villagers.

In September, rabbit is common village fare. Last week, two of my friends, excellent village cooks, served braised rabbit for dinner, but cooked it different ways. I decided to try both their recipes. Both were delicious; I’ll make each recipe again.


Litsa’s Rabbit and Onions (Κουνέλι με Κρεμμύδια της Λίτσας)
Serves 4
The sweetness of onions and Litsa’s light spicing combine with wine and meat juices to form a wonderfully flavorful sauce for rabbit. Our guests were sucking bones, licking fingers, and cleaning plates with bread to capture every bit of the delicious sauce. Chicken may be substituted for rabbit.


Froso’s Wine-Marinated Rabbit with Onions and Potatoes (Κουνέλι Μαριναρισμένο σε Κρασί με Κρεμμύδια και Πατάτες της Φρόσω)
Serves 4
Froso’s deeper, richer spicing gives a more sophisticated, slightly Middle Eastern edge to rabbit’s simple clean taste. Taking bites of meltingly soft onions and rabbit together elicited sighs of pleasure from diners, who smashed the potatoes into sauce to maximize flavor. By using only a small piece of cinnamon, Froso prevents its flavor from dominating the rabbit. Froso says marinating rabbit for 2 days is best, however, 24 hours is sufficient. Use slightly waxy potatoes like Yukon golds or red potatoes, not Russets or baking potatoes which tend to fall apart when braised with meat. The small onions used in this recipe should be about 1 1/2” in diameter, nor pearl onions. Chicken may be substituted for the rabbit, in which case, marinate the chicken for 12-24 hours.


Mediterranean Cooking in Alaska has moved as of March 2011. To read this post please go to


http://www.laurieconstantino.com/two-simple-recipes-for-cooking-rabbit/


Please click on over and visit my new site. Thank you!


Sunday, August 1, 2010

Recipe for Braised Romanesco Broccoli with Onions and Olives

Vibrantly lime-green, with florets shaped like spiky Balinese temples whirling around a central core, Romanesco broccoli is an attention-grabber.

When I picked out a head at Saturday’s South Anchorage Farmer’s Market, the queries started immediately: “What’s that?” “What’ll you do with it?” “Is that any good?” Despite my enthusiastic assurances, some questioners remained dubious about Romanesco broccoli’s edibility. An engineer decided to buy one only after I told him Romanesco broccoli is used by mathematicians to illustrate
logarithmic spirals and fractals.

A relative of both broccoli and cauliflower, the flavor of Romanesco broccoli is milder than either of its better known cousins. When well-cooked, the flavor is creamy and nutty, without the bitter edge some family members have.

Braised Romanesco Broccoli with Onions and Olives
Serves 4

Cauliflower, of any color, may be substituted for Romanesco broccoli. Plain Kalamata olives are delicious, though I prefer using
Roasted Kalamata Olives in recipes like this. Dry-cured or salt-cured olives (such as those from Thassos) may also be used, but be sure to taste them and use less than 1/2 cup if they’re strong flavored. The broccoli will cook more quickly and evenly with the right sized pan; ideally, you need a covered pan 2” wider in diameter than the whole broccoli.


Mediterranean Cooking in Alaska has moved as of March 2011. To read this post please go to


http://www.laurieconstantino.com/braised-romanesco-broccoli/


Please click on over and visit my new site. Thank you!


Sunday, January 11, 2009

About Pancetta with Recipes for Pasta with Squash, Arugula, and Pancetta & Pasta with Pork in Garlic-Wine Sauce (Ιταλική Πανσέτα με Ζυμαρικά)

Alaska has been having a cold snap.

I imagine many of you thinking, “So what else is new?” Even though Alaskans expect and are used to cold weather, the last couple weeks really have been colder than usual. To see what cold weather looks like, check out Marc Lester's
lovely photo-essay showing Southcentral Alaska’s chilly wonderland.

Hearty food, including pasta, is a good antidote for cold weather blues. One of my favorite ways to boost the flavor of winter pasta sauces is adding pancetta (cured Italian pork belly). Only a small amount of pancetta is needed improve the taste of savory sauces (a corollary to the principle that everything tastes better with bacon).

Salumi's hand-crafted pancetta

Pancetta is often sold in packages of very thinly cut pre-sliced meat. Although I use pre-sliced pancetta in a pinch, I mostly buy pancetta direct from the deli counter. I ask for either a chunk of pancetta, which I hand slice and dice at home, or have the deli staff cut the pancetta into slices the thickness of regular bacon. With thicker slices, eaters enjoy bursts of pancetta flavor when devouring the sauce; thinner slices tend to melt into the other flavors.

I was recently at Seattle’s
Metropolitan Market where I bought several pounds of hand-crafted pancetta from Salumi Artisan-Cured Meats. This is far and away the best pancetta I’ve ever eaten; Salumi’s hand-rolled pancetta is meaty, with superior texture and flavor. Although more expensive than pre-sliced pancetta, Salumi’s product is well worth the price, and may be ordered online.

Two delicious pasta sauces that benefit from pancetta are Pasta with Squash, Arugula, and Pancetta and Pasta with Pork in Garlic-Wine Sauce. Either is just right for even the coldest winter day.

Pasta with Squash, Arugula, and Pancetta
Serves 4

Inspired by Cookthink
If using artisan-cured pancetta, it may be quite salty, so be careful not to over-salt the other components of the dish.

Squash:
1 small Kabocha, butternut, or other winter squash, peeled and cut into 3/4” chunks (4 cups)
1/4 cup olive oil
Salt
Freshly ground black pepper

Pancetta and Onions:
3 thick slices pancetta, cut in 1/2” dice (1/2 cup)
2 Tbsp. olive oil
3 cups diced onion, 1/2” dice
Freshly ground black pepper
1 Tbsp. minced fresh garlic
2 Tbsp. minced fresh sage

Pasta:
1/2 pound casarecci or similarly shaped pasta
4 cups arugula, cleaned and roughly chopped
1 cup freshly grated parmesan cheese

Make the Squash: Preheat the oven to 515°F. On a baking sheet with rims, toss the squash cubes with olive oil, salt, and freshly ground black pepper. Put the squash in the oven and immediately turn the heat down to 475°F. Bake for 20 to 25 minutes, turning the squash cubes halfway though, until the squash is cooked through and lightly browned.

Put a large pot of salted water on a burner over high heat.

Make the Onions and Pancetta: Sauté the pancetta in olive oil until it begins to brown. Stir in the onions and freshly ground black pepper, scraping up any browned bits on the bottom of the pan, and sauté until the onions soften. If the onions start sticking to the bottom of the pan, add 1/4 – 1/2 cup water. When the onions are lightly browned, stir in the garlic and sage and keep warm over very low heat.

Make the Pasta: Add the pasta to the boiling salted water and cook until it is al dente. While the pasta is cooking, put the arugula in a large bowl. When the pasta is done, remove 1 cup of pasta cooking water, drain the pasta well, and put the drained pasta on top of the arugula in the bowl. Add the roasted squash and cooked onions to the bowl and toss all the ingredients well. If the dish is too dry, add as much of the pasta cooking water as necessary (usually 1/4 - 1/2 cup). Taste and add freshly ground black pepper or salt, as needed.

Serve sprinkled with freshly grated parmesan cheese.

Pasta with Pork in Garlic-Wine Sauce
Serves 4
Spruce vinegar and salt-cured spruce buds add interesting highlights to the sauce, but aren’t necessary to the success of the dish. If you’re among the 99.99% of people who don’t have either ingredient, red wine vinegar and capers work equally well. For capers, I prefer the taste of salt-cured; when I can’t find salt-cured, I use capers in brine. If using artisan-cured pancetta or salt-cured capers, they may be quite salty, so be careful not to over-salt. Bacon may be substituted for pancetta; it adds a pleasant smoky flavor.

Sauce:
1 pork tenderloin (about 1 pound), cut in 3/4” dice
1 Tbsp. minced garlic
1/2 tsp. black peppercorns, crushed
1 Tbsp. spruce vinegar or red wine vinegar
3 thick slices pancetta, cut in 1/4” dice (1/2 cup)
2 Tbsp. olive oil
1 cup finely diced onion, 1/8” dice
1/4 cup sun-dried or regular tomato paste
1 Tbsp. salt-cured spruce buds or capers, well-rinsed and minced
3/4 cup dry red wine
2 cups chicken stock

Pasta:
1/2 pound
gemelli or similarly shaped pasta
1/2 cup freshly grated parmesan cheese

Mix the pork, garlic, peppercorns, and vinegar and let marinate at least 1 hour (overnight is fine).

Sauté the pancetta in olive oil until it begins to brown. Add the pork mixture and cook until the pork is browned on all sides. Stir in the onion, using the moisture in the onions to scrape up any browned bits on the bottom of the pan. Continue cooking until the onions soften and begin to turn golden. Stir in the tomato paste until it is thoroughly combined. Mix in the wine and cook until it is reduced by half. Stir in the chicken stock and bring to a boil. Turn down the heat and simmer for 40 - 45 minutes, until the sauce slightly thickens. Taste and add salt or freshly ground black pepper, as needed.

Cook the pasta in boiling salted water until it is al dente. Drain the pasta and toss it with the pork sauce. Serve sprinkled with freshly grated parmesan cheese.

The road we live on

Wednesday, September 24, 2008

Gardens and Kittens with Recipe for Eggplant Kebab on Rosemary Skewers (Κεμπάμπ με Μελιτζάνες και Δενδρολίβανο)

Eggplant Kebabs Ready for the GrillCompleting an eggplant trifecta, yesterday we had Eggplant Kebab on Rosemary Skewers. (Eggplant Clafoutis and Spaghetti with Eggplant and Tomato Sauce make up the other legs of the trifecta.)

Eggplant Kebab came about through sheer serendipity. I was washing eggplant, idly thinking about how to prepare it, when I noticed the vase of rosemary branches on the windowsill over the sink.

Rosemary and JasmineRosemary Bushes and Garden with Blue Jasmine (top left)

Two years ago at Easter we planted two tiny rosemary plants that are now large bushes. The bushes are growing all akimbo, having outgrown the small amount of soil in which they’re planted. The windowsill vase of rosemary contained the trimmings from a branch broken off by the kittens.

Three years ago we began feeding a mother cat with kittens. She’s been back every year since then, each time with a new brood. Over the years, the cat feeding has progressed from once in a while to twice a day, from leftovers in the back yard to cat food on the veranda.

Kittens in the GardenKittens in the Garden

Effie and Nikos, cousins who live nearby, use our yard when we’re not here for their kitchen garden, which they generously turn over to us when we're in the village. In our absence, they’re at our house most every day to weed, water, or harvest. They say the mother cat and kittens disappeared when we did last year and, endearingly, showed up again only the day before we returned.

The kittens are endlessly entertaining. We’re happy to give them a vacation from scrounging food in dumpsters or catching it when they can. Only a curmudgeon would care that gamboling kittens may damage a few plants.

Rosemary makes splendid souvlaki skewers. When I saw the rosemary while my hands were full of eggplant, a picture of Eggplant Kebab on Rosemary Skewers jumped immediately to mind. I had to have them.

Eggplant Kebabs on the GrillI alternated eggplant on the rosemary skewers with onions and green peppers, and would have used cherry tomatoes if I’d had any. Grilled over a medium hot fire, and brushed with garlic and oil while still hot, Eggplant Kebabs are flavorful and very tasty. Rosemary lightly scents the eggplant, while the fresh garlic oil complements the grill's smoky essence.

In the future, if the kittens aren’t around to break off some rosemary, I’ll just have to do it myself. I’m definitely making Eggplant Kebab again.

Eggplant Kebabs on Rosemary Skewers
Eggplant Kebab on Rosemary Skewers (Κεμπάμπ με Μελιτζάνες και Δενδρολίβανο)
Serves 2
Cherry tomatoes would make an attractive addition to Eggplant Kebab. If the rosemary is starting to form new shoots along its length, break these off to make it easier to push the vegetables up the skewers.

Kebab:
4 rosemary branches, 12 inches long
1 large eggplant (about 1 pound), cut in 1 1/2” chunks
1 – 2 red onions, cut in 1 1/2” chunks
1 – 2 green peppers, cut in 1 1/2” chunks
Olive oil
Salt
Freshly ground black pepper

Garlic and Oil:
2 cloves garlic
1/4 tsp. salt
1/3 cup olive oil

Cut the ends off the rosemary branches at an angle to make sharp points. Alternate chunks of eggplant, onions, and peppers on the skewers, starting and ending with a chunk of eggplant. Brush the vegetables with olive oil and season well with salt and freshly ground black pepper.

Puree the garlic and salt together (a mortar and pestle is the best tool for this job, but it can also be done in a blender). Mix in the olive oil.

Grill the eggplant skewers over a medium hot fire. As soon as they’re done, brush them with the garlic and oil. Serve immediately with a fresh tomato and onion salad, a slice of feta, a handful of olives, and crusty bread.

Kittens and Sea UrchinsKittens with Sea Urchins

Tuesday, May 13, 2008

Recipe: Braised Green Beans (Fasolakia) with Lemon (Φασολάκια Λαδερά με Λεμόνι)

“If there are three Greeks in a room, you’re bound to hear five different opinions about the correct way to cook just about anything.”

Or so goes the self-deprecating joke at Holy Transfiguration Greek Orthodox Church in Anchorage, Alaska. Although it may not be literally true, the joke helps lighten the mood at festival time.

For the annual Greek festival held in August, parishioners join together to make classics of the Greek table. The correct ways to make Moussaka, Fasolakia (braised green beans), and Dolmades (stuffed grape leaves) trigger the most vigorous debates. Everyone knows the “correct” recipe, but none of them are the same.

At Mama’s Taverna, Lulu captured the essence of these debates as she described how Zoe came up with
her wonderful Fasolakia recipe.

The truth is, Greek braised green beans taste great no matter the recipe. As I commented to Lulu, “I’ve sautéed, I’ve not sautéed, I’ve layered, I’ve stirred, I’ve added potatoes, I’ve added zucchini, I’ve cooked the beans plain, I’ve cooked them with meat, I’ve cooked them without and, shockingly, I’ve even made them sans tomatoes. In all their incarnations, I’ve NEVER had a pot of Fasolakia that tastes anything other than absolutely wonderful.”

I no sooner sent the comment than I started obsessing about Fasolakia made without tomatoes (the most common recipe includes them). I used to make tomato-less Fasolakia all the time. In recent years I’ve been stuck on versions with tomato, one of which I wrote about in February:
Greek Beef and Green Bean Stew and two of which are included in Tastes Like Home: Mediterranean Cooking in Alaska (Fasolakia and Fasolakia with Zucchini and Potatoes).

Last night I made the tomato-less version. It was everything I’d been wanting. The braised beans and onions were soft and sweet, rich with oil and herbs, and tangy from the fresh lemon juice finish. This is a dish where bread is a necessary accompaniment; it’s a shame to let the remarkably good juices go to waste.

Fasolakia belongs to a class of Greek dishes called Ladera, which means “oily” (ladi/λάδι is the Greek word for oil). The oil and vegetable juices cook together to make a wonderfully unctuous sauce. However, for many today, traditional Ladera has too much oil. Adjust the amount of oil in the recipe to suit your taste; for the traditional version, use the larger amount.

When considering the amount of oil to use, keep in mind that olive oil is a heart-healthy fat. According to the
Mayo Clinic, “Olive oil contains monounsaturated fat, which can lower your risk of heart disease by reducing the total and low-density lipoprotein (LDL, or "bad") cholesterol levels in your blood.”

The FDA says there is "limited but not conclusive evidence" that 2 tablespoons of olive oil daily can reduce the risk of heart disease. (Olive oil should be substituted for fats already in the diet, and not just added to what you’re already eating.)

This recipe’s dedicated to Lulu and Zoe.

Braised Green Beans (Fasolakia) with Lemon (Φασολάκια Λαδερά με Λεμόνι)
Serves 4 - 6 as a main course
In this easy recipe, the herbs and vegetables are layered in a Dutch oven and cooked without stirring until the beans are soft and tender. The beans shouldn’t be crunchy, and must be cooked through. Adjust the amount of olive oil as desired. Serve with slices of feta cheese, Kalamata olives, bread, and lemon wedges.

1 1/2 pounds green beans (6 cups cleaned)
4 cups thinly sliced onions
1 1/2 cups minced parsley
1/2 cup minced dill
1/2 cup minced mint
3 Tbsp. minced garlic
Salt
Freshly ground black pepper
1/2 – 1 cup olive oil
1/4 - 1/3 cup fresh lemon juice
Lemon wedges

Wash the beans, break off both ends, and break them in half. Mix the herbs and garlic together.

In a Dutch oven, layer 1 cup of onions on the bottom of the pan, top with 1/3 of the beans, then 1/3 of the herb mix, season with salt and freshly ground black pepper, and drizzle with 1/3 of the olive oil. Repeat. Repeat again but finish with the remaining cup of onions before drizzling with the last 1/3 of olive oil.

Cover and cook over medium high heat until the pan lid is hot. As soon as the lid is hot, turn the heat down to low and simmer for 1 hour, or until the beans are very soft and tender. Stir in 1/4 cup lemon juice. Taste and add lemon juice, salt, or freshly ground black pepper, as needed. Serve hot or at room temperature.
~~~~~~~~~~~~~~~~~~~~~~~~~
This is my entry for
Heart of the Matter’s May heart-healthy herb challenge hosted this month by Michelle at The Accidental Scientist.

Sunday, April 20, 2008

Recipes: Morel Stuffed Mushrooms, Marinated Beets with Candied Red Onions, & Horta Salad (Μανιτάρια Γεμιστά, Μαριναρισμένα Παντζάρια, & Χόρτα Σαλάτα)

Dried Morels and Fresh MushroomsSome days, writing is easy. Other days, it’s like shelling pine nuts; in other words, hard and frustrating. Today’s been a pine nut day.

Part of the problem was my notes for three separate recipes were scribbled on one too-small piece of paper. Sorting them out made my head spin. None of the recipes are particularly difficult, but describing them on paper was harder than it should’ve been.


I considered dividing the recipes into two separate posts - one about mushrooms and the other about beets - but they taste so good on a single plate, I had to keep them together. Here’s the breakdown:

Morel Stuffed Mushrooms: The mushrooms have a soft, extremely flavorful filling. Tart lemon juice and tangy sun-dried tomatoes balance the rich, earthy taste of mushrooms. These can be stuffed several days ahead and refrigerated until ready to finish, so make impressive hot appetizers without a lot of last minute work. Paired with two kinds of beets, as I’ve done here, the mushrooms are the foundation for a filling vegetarian meal.

Marinated Beets with Candied Red Onions: Sweet with candied onions (or honey, if you’re pressed for time), and sour with red wine vinegar, these beets fill your mouth with wonderful flavors. Grated lemon peel is the essential ingredient that brings the dish together. It’s terrific on its own, wonderful with Horta Salad, and remarkable when paired with Morel Stuffed Mushrooms.

Horta Salad: Boiled greens, dressed with lemon juice or vinegar, are a classic Greek salad. Any domesticated and wild greens, separately or together, can be used for this simple recipe.

The recipes were inspired by Sarah Stegner’s
Stuffed Mushrooms with Marinated Beets, described in Art Culinaire (Winter 2002). I loved her recipe's name, which immediately triggered my imagination. The details of Chef Stegner’s recipe diverged from what I’d been imagining, so I ended up using it for inspiration, rather than as a guide.

I particularly liked the morel powder Chef Stegner used in her stuffing. Last year we had an abundance of curiously bland morels, which I dried to concentrate, intensify, and improve their flavor. Powdered, our dried morels dramatically boosted the mushroomy earthiness of the stuffing.

Stuffed Mushrooms, Marinated Beets, and Horta SaladMorel Stuffed Mushrooms (Μανιτάρια Γεμιστά)
Makes 16 - 20
I ground the dried morels to a powder in a spice grinder. Without the morel powder the stuffing tasted great; it just wasn't as intensely flavored. On another note, I dread both soggy stuffed mushrooms and those that aren’t fully cooked. To avoid these problems, I use a technique for prebaking the mushrooms recommended by
Cook’s Illustrated.

Mushrooms:
16 - 20 large white mushrooms (or other variety of fresh mushroom)
3 Tbsp. olive oil
3 Tbsp. lemon juice
Salt
Freshly ground black pepper

Stuffing:
Reserved mushroom stems, cut in 1/4” dice
1 1/2 cups diced yellow onion, 1/4” dice
1 Tbsp. olive oil
Salt
Freshly ground black pepper
1 Tbsp. minced garlic
3 tbsp. diced reconstituted or oil-packed sun-dried tomatoes, 1/4” dice
1/4 cup thinly sliced green onions
1/2 cup potato purée (6 ounce potato, cooked and grated)
1/2 cup freshly grated parmesan cheese
1/4 cup mascarpone or cream cheese
1/4 cup dried morel powder (2 ounces dried morels, pulverized) (optional)
1/4 fresh lemon juice

Topping:
1/2 cup Panko or fresh breadcrumbs
1 Tbsp. butter
1 tsp. finely grated lemon peel
1/2 tsp. finely grated garlic

Prebake the Mushrooms: Preheat the oven to 450°F. Wipe the mushrooms with a damp paper towel to clean off any dirt. Remove the mushroom stems and reserve for the stuffing. Put a wire rack on a rimmed baking sheet. Toss the mushrooms with olive oil, lemon juice, salt, and freshly ground black pepper. Place the mushrooms on the rack gill-side-up and bake for 20 minutes. Remove the mushrooms from the oven. Reserve any liquid in the mushrooms for the stuffing. Turn the mushrooms over and bake for 5 minutes. Set the mushrooms aside until you’re ready to stuff them.

Make the Stuffing: Sauté the mushroom stems and onions, lightly seasoned with salt and freshly ground black pepper, in olive oil until they're browned. Stir regularly to prevent the onions from burning. When the mushrooms and onions are done, stir in the garlic and cook for 1 minute. Place the onion mix in a bowl and stir in the sun-dried tomatoes, green onions, potato purée, parmesan, mascarpone, morel powder, lemon juice, salt, freshly ground black pepper, and any liquid reserved from the prebaked mushrooms. Taste and add lemon juice, salt, or pepper, as needed.

Make the Topping: Sauté the Panko in butter until it is nicely toasted, stirring regularly to prevent the breadcrumbs from burning. Stir in the lemon peel and garlic and cook for 1 minute. Let cool and put in a small bowl.

Assemble the Stuffed Mushrooms: Preheat the oven to 450°F. Using a spoon or piping bag, divide the stuffing equally among the mushrooms. Smoothly round off the surface of each stuffed mushroom. (The mushrooms may be made ahead to this point and refrigerated; store the mushrooms in a single layer, on a paper towel, to prevent them from turning soggy.)

Take each stuffed mushroom, turn it upside down, and roll the stuffing around in the topping until it is nicely coated with breadcrumbs. Bake the mushrooms for 10 – 12 minutes, or until they are hot and the topping is lightly browned. Let sit at room temperature 5 minutes before serving.

Serve with Marinated Beets and Horta Salad, or on their own as an appetizer.

Variation - Stuffed Mushrooms with Pancetta

The pancetta works as a savory counterpoint to the Candied Red Onions in the Marinated Beets recipe. To make the mushrooms with pancetta, eliminate the olive oil, and start the recipe by browning 3/4 cup (4 ounces) pancetta, cut in 1/4” dice. When the pancetta is done, drain it on paper towels; use the pancetta fat for sautéing the onions and mushroom stems. Mix the cooked pancetta with the rest of the stuffing ingredients. NOTE: For this recipe, thick-cut, deli pancetta works better than the thin-sliced prepackaged version.

Marinated Beets with Candied Red OnionsMarinated Beets with Candied Red Onions (Μαριναρισμένα Παντζάρια me Κρεμμύδια Γλυκά του Κουταλιού)
Serves 4 - 6
The key to this recipe, as with all sweet and sour dishes, is getting the balance of flavors correct. The only way to get it right is to taste and adjust the flavors for your palate. If you’re serving this with Horta Salad, keep its vinegar dressing in mind as you adjust the seasoning. Candied Red Onions add unique flavor, but honey is a fine substitute for them.

Candied Red Onions:
2 cups diced red onion, 3/4” dice
1/2 cup red wine vinegar
1/2 cup sugar
1 cup water

Marinated Beets:
2 bunches beets, roots only
(greens used for Horta Salad)
2 Tbsp. olive oil
1 cup thinly sliced green onions
1/2 cup red wine vinegar
1 Tbsp. whole grain mustard
1 Tbsp. minced thyme
2 tsp. finely grated lemon peel (1 lemon)
1 tsp. finely grated garlic
Salt
Freshly ground black pepper
1/2 cup Candied Red Onions or 1/4 cup thyme honey

Make the Candied Red Onions: Mix all the ingredients in a saucepan and bring to a boil. Reduce the heat and cook at a slow boil, stirring occasionally, until the liquid is reduced to a thick syrup. Watch it carefully at the end and stir regularly; once most of the liquid is gone, sugar syrup can burn easily. It takes 30 – 45 minutes for the syrup to reduce, and can be done while the beets are roasting. (The candied onions can be made well ahead. There may be slightly more candied onions than needed for this recipe.)

NOTE on Roasting Beets: Preheat the oven to 400°F. Wash the beets, cut off the greens leaving an inch of stem (don't cut into the beet itself), rub the beets with olive oil, and wrap tightly in a foil packet (or place in a tightly covered baking dish). Bake for 40 minutes to 1 1/2 hours, depending on the size of the beets and how fresh they are. The beets are done when they're tender if poked with a knife or skewer. Let the beets cool, and slip off their skins (I wear gloves when I do this to protect my hands from staining). (These can be made ahead and kept in the refrigerator for about a week.)

Make the Marinated Beets: Cut the beets into 1/2” slices; quarter the slices. Put the beets in a bowl and mix with all the other ingredients. Let marinate at room temperature for at least 1 hour. Taste and add salt, freshly ground black pepper, vinegar, or candied red onion, as needed.

Serve with Horta Salad and Morel Stuffed Mushrooms, or on its own (or with Horta Salad) to accompany roast chicken or fish.

Horta Salad (Χόρτα Σαλάτα)

Serves 4 - 6
"Horta" is the generic Greek word for greens. This salad can be cooked ahead and dressed with olive oil, but don’t add vinegar until just before serving. If you buy beets without greens, or the greens aren’t in good enough condition to eat, use Swiss chard or any other greens.

2 bunches of beets, greens only
(roots used for Marinated Beets)
2 Tbsp. red wine vinegar
2 tbsp. olive oil
Salt
Freshly ground black pepper

Wash the greens very carefully and discard any damaged leaves. Remove the stems and cut into 1” pieces. Tear the greens into large pieces.

Bring a large pot of salted water to a boil. Add the stems and cook for 2 minutes. Add the greens and cook for 3 – 5 minutes more, or just until the greens are tender. The cooking time varies depending on the type of greens being used. For example, Swiss chard cooks faster than beet greens. Be careful not to overcook the greens or their texture will suffer. Drain the greens well.

While the greens are still warm, toss with olive oil, and then with vinegar, salt, and freshly ground black pepper. Taste and add vinegar, salt, pepper, or olive oil, as needed.

Serve hot or at room temperature with Marinated Beets and Morel Stuffed Mushrooms. Horta Salad can also be served on its own, or just with the Marinated Beets.

~~~~~~~~~~~~~~~~~~~~~~~~~~
Other Interesting Vegetarian Mushroom Recipes
Parsnip Gnocchi with Pearl Onions, Peas, and Mushrooms
Mushroom Stifado (Μανιτάρια Στιφάδο)
Red Cabbage with Mushrooms and Blueberries – Chou Rouge Forestière (Λάχανο Κόκκινο με Μανιτάρια και βακκίνιο το Μύρτιλλο)

To find more mushroom recipes,
Food Blog Search is a great tool.
~~~~~~~~~~~~~~~~~~~~~~~~~~
This is my entry for
No Croutons Required, hosted this month by Lisa of Lisa’s Kitchen.

Thursday, April 17, 2008

Recipe: Lamb and Leek Meatballs with Onion Egg-Lemon Sauce (Κεφτέδες με Πράσα και Αβγολέμονο)

I redeemed myself tonight. My sad story about an unfortunate lamb tagine has a happy ending.

Two days ago, after deciding the tagine was not worth eating, I’d rinsed off the meat and threw away every bit of the nasty sauce. I was left with tender chunks of leftover lamb.

Tonight I ground the lamb in a food processor, and mixed it with soft, sweet leeks to make luscious little meatballs. Paired with an oniony egg-lemon sauce, the meatballs made a delicious mid-week meal.

The egg-lemon sauce (avgolemono) has an unusual twist. Because the meatballs weren’t cooked in liquid, I didn’t have the broth necessary for making egg-lemon sauce. Rather than using plain chicken stock, I simmered stock with onions to boost the flavor, and used this as the foundation for the sauce. The result was surprisingly good, and paired particularly well with leek meatballs.

Although the meatballs could easily be made with raw ground lamb, they are a great way to use up leftover roast (or the remnants of tragic tagine). Since Easter dinner is just 10 days away, and we’ll no doubt have leftover lamb again soon, I invented the meatballs just in time.

Lamb-Leek Meatballs with Avgolemono SauceLamb and Leek Meatballs with Onion Egg-Lemon Sauce (Κεφτέδες με Πράσα και Αβγολέμονο)
Serves 4 (makes 20 1” meatballs)
The meatballs can be served on their own as an appetizer (without the egg-lemon sauce) or with tomato sauce instead of egg-lemon. They are a wonderful way to use up leftover roast lamb.

Meatballs:
3 cups diced leeks, 1/8” dice
3 Tbsp. olive oil
Salt
Freshly ground black pepper
1 1/2 cups leftover lamb, ground (or raw ground lamb)
1 Tbsp. minced garlic
4 tsp. minced mint
2 tsp. dried oregano, crushed
1 egg
Oil for frying the meatballs

Egg-Lemon Sauce (Avgolemono):
1 cup diced yellow onion, 1/4” dice
1 Tbsp. olive oil
Salt
Freshly ground black pepper
1 cup chicken stock
2 eggs
1/4 cup fresh lemon juice

Minced mint for garnish

Make the meatballs: Sauté the leeks in olive oil, lightly seasoned with salt and freshly ground black pepper, over medium heat until the leeks are soft. Mix the leeks with the lamb, garlic, mint, oregano, and egg. Brown a sample of the meatball mix in olive oil, taste, and add salt, freshly ground black pepper, mint, or oregano to the meatball mix, as needed. Shape the mix into 1” balls, and refrigerate for at least 1 hour.

Heat the oil in a frying pan, and fry half the meatballs until they are nicely browned on all sides. If you put too many meatballs in the pan at one time, they won’t brown properly; if you’re in a hurry, cook the meatballs in two frying pans. Drain on paper towels. (You can hold the meatballs in a 250°F oven for 15 minutes, if needed, while you make the sauce.)

Make the Egg-Lemon Sauce: Start the egg-lemon sauce while the meatballs are chilling in the refrigerator. Sauté the onion in olive oil, lightly seasoned with salt and freshly ground black pepper, over medium heat until the onions are translucent. Add the chicken stock, bring to a boil and simmer for 10 minutes. Purée the onions and stock in a blender. Strain out the solids, pressing out as much liquid as possible.

Using an electric mixer, beat the eggs until they are very thick. Add the lemon juice slowly while continuing to beat the eggs. Slowly beat in the onion-stock, and put the mixture in a saucepan.

When the meatballs are nearly done, or are keeping warm in a 250°F oven, cook the sauce over low heat until it thickens (this takes 3 - 5 minutes). Don’t let the sauce boil, or it will curdle. If the sauce is too thick for your taste, thin it out with a little chicken stock.

To Serve: Spoon a pool of egg-lemon sauce onto a plate, top with five meatballs, sprinkle with minced mint, and serve immediately.
~~~~~~~~~~~~~~~~~~~~~~~~~~
This is my entry for Leftover Tuesdays #13, hosted by Project Foodie.

Monday, April 7, 2008

Recipe: Smoky Tunisian Oven-Roasted Vegetables with Tabil (Τυνησιακό Μπριάμ)

It’s no secret to my regular readers that I favor oven-roasted vegetables.

Roasting vegetables in a hot oven concentrates and develops subtle vegetable flavors that are lost when the same vegetables are boiled, stewed, or fried. Briam (Μπριάμ), a classic Greek medley of roasted vegetables, is one of my favorite ways to serve an abundance of vegetables. (My Briam recipe is in
Tastes Like Home: Mediterranean Cooking in Alaska.)

While Briam is what I make most often, grilled and roasted vegetable combinations are popular throughout the Mediterranean region; I like them all. For example, in Tunisia, tomatoes, onions, and peppers are grilled and mixed with Tabil (pronounced “table”), a spice mix containing coriander seeds, caraway seeds, garlic, and dried red peppers, to make a refreshing cold salad called Mechouia.

This weekend I needed a main course, not a salad, but really had a taste for Mechouia. Inspired by a Paul Gayler recipe in
A Passion for Vegetables, I decided to combine Tunisian Mechouia with Greek Briam. I used a vegetable combination typical of Briam and, as for Briam, oven-roasted the vegetables. However, instead of the herbs used in Briam, I seasoned the vegetables with Tabil and quickly charred them, two essential elements of Mechouia.

The vegetables can be completely cooked on a grill, in which case, the oven-roasting step is unnecessary. However, when I’m cooking on a stovetop grill pan (as I was yesterday due to the snow), it’s much easier to quickly char the vegetables on the grill pan and then finish cooking them in the oven.

A benefit to pre-cooking the vegetables on the grill is this step can be done well ahead. Although you can skip charring them and completely cook the vegetables in the oven, I don’t recommend it because you lose the smokiness, an important flavor element in this dish.


Oven-Roasted Vegetables with TabilSmoky Tunisian Oven-Roasted Vegetables with Tabil (Τυνησιακό Μπριάμ)
Serves 4 as a main course or 6 as a side dish
Adapted from
A Passion for Vegetables by Paul Gayler (Lyons Press 2000)
This dish is a combination of Briam and Mechouia; it has Briam’s oven-roasted vegetable medley, with Mechouia’s smokiness and spicing. We like spicy food, so I use the larger amounts shown in the ingredient list for Tabil. If you prefer less highly seasoned food, use the smaller amounts. If you’re unsure, mix up the dry spices and add half to the vegetables along with all of the garlic; when the vegetables are done, taste and add more dry spice mix, as needed. Tabil tastes great with any kind of vegetable (or fish, meat, or poultry), so consider the list of vegetables as only a suggestion. Leftovers may be roughly chopped and added to vegetable or chicken stock for an easy mid-week soup.


Tabil:
1 – 2 Tbsp. coriander seeds
1 – 2 tsp. caraway seeds
1” – 2” piece of dried red pepper or 1/4 – 1/2 tsp. crushed red pepper
2 tsp. finely minced fresh garlic

Vegetables:
4 medium Yukon Gold or red potatoes
2 medium zucchini
2 red bell peppers
1 large fennel bulb
1 extra large onion
Olive oil
Salt
Freshly ground black pepper

For the Tabil spice mix: Mix all the ingredients together.

For the Vegetables: Preheat the oven to 400°F.

Wash all the vegetables. Peel the potatoes, and cut into large chunks. Parboil the potatoes in salted water for 7 minutes, drain, and put them in a large roasting pan.

Cut the zucchini on the diagonal into 3/4” slices. Discard the peppers’ seeds and stems, and cut each into six lengthwise slices. Cut off the stalks and leaves of the fennel, and cut the bulb in lengthwise quarters. Remove most of the core, leaving enough so the layers of fennel stay together. Cut each quarter in half lengthwise. Peel the onion, leaving the stem end intact so the layers of onion stay together, and cut into 3/4” wide lengthwise sections. Put all the vegetables in the roasting pan, sprinkle with salt and freshly ground black pepper, liberally drizzle with olive oil, and toss the vegetables to coat them with oil.

Heat a grill pan until it's white hot (or fire up the grill). Quickly char the vegetables on both sides, but don’t cook the vegetables through. Char the vegetables in batches; for me, it's easiest to lay them out on the grill pan one at a time. As each vegetable is done, return it to the roasting pan. (I set the peppers aside, and peel them before adding them to the pan; this step is optional.)


When all the vegetables are done, sprinkle the Tabil over, and toss the vegetables to evenly distribute the spices. If the vegetables seem dry, drizzle with a little more olive oil. Spread the vegetables out into a single layer.

Roast the vegetables for 30 minutes. Serve immediately with couscous, green salad, olives, and plenty of bread for soaking up the splendidly spicy oil and vegetable juices.

Variation: For a saucier version, stir in one 14.5 ounce can of diced tomatoes (or 2 cups freshly diced tomatoes) just before putting the roasting pan in the oven.

~~~~~~~~~~~~~~~~~~~~~~~
Oven-Roasted Vegetable Recipes

Roast Cauliflower with Dukkah (Dukkah, a Middle Eastern spice mix, enhances roasted cauliflower).
Oven-Roasted Vegetables (Λαχανικά στο Φούρνο) (How to bring out the flavor of vegetables by oven-roasting them).
Rosemary and Garlic Roasted Sweet Potatoes (Oven roasted vegetables are an ideal accompaniment to holiday meals.)
Roasted Beets with Celery Root Skordalia (Roasted celery root is a low-calorie, high-flavor alternative to bread or potatoes in the wonderful Greek garlic spread called skordalia.)

To find more oven-roasted vegetable recipes, Food Blog Search is a great tool.
~~~~~~~~~~~~~~~~~~~
This is my entry for
Antioxidant Rich Foods/Five-a-Day Tuesdays hosted by Sweetnicks.

Friday, April 4, 2008

Recipe for Potato Pie with Cabbage and Mustard (Πατατόπιτα με Λάχανο και Μουστάρδα)

Whether it’s potatoes and cabbage in the winter, or eggplant and tomatoes in the summer, I love layer upon layer of perfectly seasoned vegetables. I recently dug into my Full Circle Farm CSA box to make one of those wonderful dishes: Potato Pie with Cabbage and Mustard.

Over the years, I’ve separately served each individual layer of the Potato Pie to accompany meat, poultry, or seafood. Oven roasted potatoes, caramelized onions with cumin, and sautéed cabbage with thyme are all are old stand-bys that taste great.

The old stand-bys combined in a single dish make company-ready fare that is better than the sum of its parts. The vegetable juices run together and mingle, forming unexpected and delicious flavor combinations.

Potato Pie with Cabbage and Mustard is warm and filling, and makes a satisfying meal when paired with a crisp green salad, olives, and bread. It is also a charming partner for sausages or roast meat.

Potato Pie with Cabbage and MustardPotato Pie with Cabbage and Mustard (Πατατόπιτα με Λάχανο και Μουστάρδα)
Serves 4 – 6

Inspired by A Passion for Vegetables by Paul Gayler (Lyons Press 2000)
I’ve suggested using a 9” springform pan for this recipe because it makes unmolding the pie easier. However, I’ve made this in a well-oiled large soufflé dish and the pie slid right out, so a springform isn’t absolutely necessary. The vegetables are cooked separately and individually seasoned; keep in mind the finished dish and be careful not to over-salt any single vegetable. For a more decorative presentation, place pitted, dried black olives between the potato slices on the bottom layer. Turnips may be substituted for the potatoes.

1 pound Yukon gold or red potatoes
1/4 cup olive oil, divided
Salt
Freshly ground black pepper
6 cups thinly sliced yellow onions, cut in quarter moons
4 tsp. minced fresh garlic
1 tsp. freshly ground cumin seeds
1 Tbsp. wholegrain Dijon or
Creole mustard
4 cups thinly sliced green cabbage
4 tsp. minced thyme
1 cup grated
graviera or cheddar cheese

Preheat the oven to 450°F.

Wash, peel, and cut the potatoes into 1/4” slices. On a rimmed baking sheet, toss the potatoes with 1 Tbsp. olive oil and season with salt and freshly ground black pepper. Roast for 10 – 15 minutes or until the potatoes soften and start to turn golden.

Sauté the onions, lightly seasoned with salt and freshly ground black pepper, in 2 Tbsp. olive oil until the onions soften and start to brown. Stir in the garlic and cumin and cook for 2 minutes. Using a slotted spoon, remove the onions to a bowl. Stir in the mustard when the onions have partially cooled.

In the pan used for the onions, add the remaining 1 Tbsp. olive oil. Sauté the cabbage, lightly seasoned with salt and freshly ground black pepper, until the cabbage wilts completely. Remove from the heat and stir in the minced thyme.

Thoroughly oil a 9” springform pan; tightly cover the outside of the pan with foil to prevent oil from leaking out into the oven.

Layer the springform pan's bottom with 1/3 of the potatoes, cover the potatoes with 1/2 the cabbage, cover the cabbage with 1/2 the onions, and cover the onions with 1/2 the cheese. Repeat the layers, and finish with a layer of potatoes. (The recipe can be made ahead to this point and refrigerated; bring to room temperature before baking.)

Bake for 30 – 35 minutes, or until the top of the pie is golden and the juices bubbling. Let the pie rest in the pan for 5 – 10 minutes. Invert and unmold on a serving plate; if any potato slices stick to the bottom of the pan, carefully move them back to their place on top of the pie. Carefully cut into wedges and serve.

~~~~~~~~~~~~~~~~~~~~~~~
More Cabbage Recipes:
Greek Cabbage and Rice (Λαχανόρυζο) (My recipe for rice with cabbage, onion, thyme, tomato, and currants)
Red Cabbage with Mushrooms and Blueberries (Chou Rouge Forestière) (My review of Robert Reynolds and Josephine Araldo’s From a Breton Garden, including Araldo’s unique red cabbage recipe.)
Cabbage Rolls (λαχανοντολμαδάκια) (Peter Minakis’ recipe for Greek cabbage rolls stuffed with rice and meat.)
Mama’s Health Soup (Zoe’s Greek mother’s recipe for cabbage soup, written up by Lulu as a service to humanity).

Monday, March 31, 2008

Filo Tips and Recipe for Greek Leek Pie – Prasopita (Πρασόπιτα)

Friday night’s Prasopita (prah-SO-pee-tah, Greek leek pie) tasted great, but producing it was not pretty. I learned, yet again, to embrace kitchen disasters for their educational benefits.

It was one of those evenings where everything went wrong. From dodging falling knives to cleaning up egg-splattered floorboards, the frustrations accumulated. It was typical that I opened the filo and found the sheets of pastry inseparably stuck together. All but six were unusable and went straight into the garbage.

I quickly mixed up dough for an olive oil crust, and switched to making tri-cornered hand pies. Unfortunately, I didn’t make nearly enough pastry dough. It started running out while I still had a bowlful of filling. Too impatient to make more pastry, I rolled up the remaining dough and made an open-face, free-form tart.


Prasopita and Leek Tart
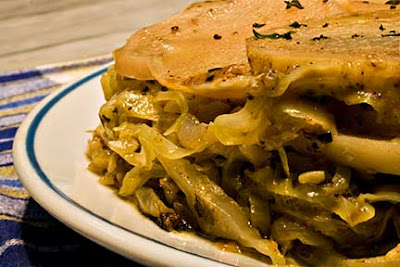
When I was done, I had three filo-wrapped traditional Prasopites, six tri-cornered leek hand pies, and one free-form leek tart. Although I hadn’t planned it, this gave us the opportunity to directly compare filo-wrapped pies with those having a simple olive oil crust. The comparison was enlightening.

As between the filo and hand pies, it wasn’t a close call; the filo pies were far superior. Crisp filo pastry was the perfect counterpoint to the savory leek filling. Although the hand pie crust was flaky, the filling to crust ratio was too low and the crust’s flavor too dominant.

The open-face tart was another story. In this version, the single layer of olive oil crust nicely balanced the flavorful leek filling. Even better, the crust held its integrity and remained crispy even after it had been in the refrigerator for two days. This is not true of filo-wrapped pies; they rapidly lose their crispness after even a short time in the refrigerator.

So what will I do in the future? For a party, or any situation where pites are likely to be eaten quickly, I’ll stick with traditional filo. Nothing beats buttery-rich filo wrapped around leek and herb filling. I’ll also use filo when I’m not planning to bake all the pies at one time – unbaked filo-wrapped pies freeze well and can be popped in the oven direct from the freezer.

On days when I want Greek pie, but am in a hurry and don’t want to mess with filo, or when I want to limit the amount of fat I ingest, I’ll make an open-face tart. It’s an easy, extremely flavorful, savory treat. I’d happily serve it for any occasion, special or not.

Filo Tips – Working with Filo is Easy
First, pronunciation; in English, there are multiple ways to spell filo (fillo, fyllo, phyllo) because Greek to English isn’t transliterated consistently. But no matter the spelling, the pastry is pronounced FEE-low.

As with the ruined mess I faced on Friday, stuck together filo sheets are the bane of a cook’s existence. It is generally caused by improperly storing filo, by thawing and refreezing filo, or by leaving filo for too long at room temperature. To avoid this problem, buy from stores that sell a lot of filo. When you are ready to use it, thaw filo overnight in the refrigerator, bring it to room temperature before you start to work with it, and use the thawed filo within a week.

Finish making the filling, including cooling it, before you open the package of filo.

Filo is a lot more forgiving than it might seem. A few rips and tears don’t make any difference at all, and usually disappear in the many layers of filo or when a pie is shaped or rolled.

Dried out filo breaks apart and makes working with it difficult to impossible. Once filo is removed from the package, you either must work very quickly or must cover the filo sheets with a slightly damp cloth. The first few times you work with filo, the damp cloth is a must. As you gain confidence, you’ll be able to work quickly enough that the damp cloth is unnecessary.

If you want to make your own filo, Peter Minakis explains how
here.

If you want to see how filo is traditionally made in Greece, Maria Verivaki has a video and explanation here.

PrasopitaRecipe for Greek Leek Pie – Prasopita (Πρασόπιτα)
Makes 10 large or 20 small filo-wrapped pastries or 1 10” free-form tart
For vegans or those who are fasting, leave out the feta and eggs, and brush the filo sheets only with olive oil. Freeze extra Prasopites and bake frozen, adding 5 – 10 minutes to the baking time.

Leek Filling:
3 cups diced leeks, white and light green parts only, 1/2” dice (3 medium leeks)
1 1/2 cups diced yellow onions, 1/2” dice
3 Tbsp. olive oil
Salt
Freshly ground black pepper
1 1/2 cups sliced green onions (1 bunch)
1 Tbsp. minced garlic
1/2 cup minced fresh dill
1/2 cup minced fresh parsley
1 cup crumbled feta
2 eggs

Filo:
1 pound box of filo (18” x 14”)
1/2 cup (1 stick) butter
1/4 cup olive oil

Make the Filling: Sauté the leeks and onions, lightly seasoned with salt and freshly ground black pepper, in olive oil until the onions soften and start to turn golden. Put in a bowl and mix with all the remaining filling ingredients, except the eggs. Taste and add salt or freshly ground black pepper, as needed. Stir in the eggs.

Preheat the oven to 400°F.

Clarify the butter (see NOTE below for why and how to clarify butter). Mix the clarified butter and olive oil, and brush a rimmed baking sheet with the mixture.

Rolling Filo for PitaAlternative 1 - Shaping Large Prasopita: Remove the filo from the box, unroll it, and cover any you are not actively using with plastic wrap or a slightly damp cloth. Lay one 18” x 14” sheet of filo out on the counter and brush it lightly with butter-oil. Cover with another sheet of filo and brush it lightly with butter-oil. Spread 1/2 cup of filling along one of filo’s short edges. Fold in the sides and roll up the filo. Place roll on the prepared baking sheet seam side down and brush lightly with butter-oil. Repeat until all the pastries are rolled.

Alternative 2 – Shaping Small Prasopita: Follow the directions for shaping large Prasopita, but use 9” x 14” filo sheets or cut 18” x 14” filo sheets in half and use 1/4 cup filling.

Open-Face Leek TartAlternative 3 – Make Open-Face, Free-Form Tart: In a food processor mix 2 cups flour, 6 Tbsp. olive oil, and 1/2 tsp. salt. Mix in as much water as necessary (4 – 6 Tbsp.) to make dough that sticks together. Form into a ball and let rest at room temperature for 30 minutes. Roll out the dough into a 12” circle, place on a baking sheet, and spread the filling out on the dough, leaving a border of 1 1/2”. Sprinkle a little freshly grated parmesan cheese over the filling. Fold up the edges, sealing with water as necessary for folds in the dough to stick together.

Place the Prasopites (or tart) in the oven and bake for 30 – 40 minutes, or until the filo is brown and crispy (or the tart pastry is set and lightly browned).

Serve immediately.

NOTE: Clarified butter is butter with the milk solids removed. To clarify butter, melt it in a saucepan or microwave and skim off and discard the white foam that rises to the top. Pour the clear yellow butter into a bowl, being careful to keep the milky liquid that sinks to the bottom of the pan out of the clarified butter. Discard the milky liquid. If you don’t clarify butter used for separating layers of filo, the pastry won’t cook correctly, and will be soggy rather than crisp.

UPDATE: Maria Verivaki recently made this Prasopita, and shaped it into one large sprial pie (called Strifti - Στριφτή - in Greek). Here's Maria's post about Prasopita Strifti.
~~~~~~~~~~~~~~~~~~~~~~~~
More Leek Recipes:
Beet, Fennel, and Leek Salad with Lemon-Ginger Dressing (Παντζάρια, Μάραθο και Πράσο Σαλάτα με Πιπερόριζα Σάλτσα) (I make a winter salad and spice it up with ginger salad dressing)
Leek Pilaf (Πρασόρυζο) (I make Greek leeks with rice.)
Leek Soufflé
Leek and Tomato Crumble
The Easiest Grilled Leeks Ever

~~~~~~~~~~~~~~~~~~~~~~~~
This is my entry for
Weekend Herb Blogging, hosted this week by its creator Kalyn of Kalyn’s Kitchen.

Thursday, March 27, 2008

Recipe: Parsnip Gnocchi with Pearl Onions, Peas, and Mushrooms

Last week I was rambling around the internet and came across a picture of “Parsnip Gnocchi and Chanterelles.” The photographer (Kevin) had enjoyed the dish, which also included peas and pearl onions, at Summit Restaurant in Colorado Springs. The concept captured my imagination.

Too bad there wasn’t a recipe. Even so, it looked possible to recreate using the picture as a guide.

Luckily, I had all the ingredients on hand. Parsnips and mushrooms came in my latest Full Circle Farm CSA box. The pantry held a bag of pearl onions; I’d bought too many for
Mushroom Stifado. A bag of peas from last summer’s garden was languishing in the freezer.

I immediately got to work making parsnip gnocchi. When the dish was done, it tasted as good as Kevin's picture looked. I’m already planning to make it again.

Parsnip Gnocchi with Peas, Pearl Onions, and MushroomsRoasted Parsnip Gnocchi with Pearl Onions, Peas, and Mushrooms
Serves 4 - 6
The gnocchi are surprisingly simple to make because, unlike some gnocchi recipes, this dough is easy to handle. Putting ridges in the gnocchi isn't necessary (and they're faster to make if you don’t). The ridges help gnocchi pick up flavors from the other ingredients, so I generally do it. No doubt the finished dish would taste better with wild mushrooms, but it tasted wonderful with the cremini I used. Pearl onions and mushrooms need to be sautéed in batches to ensure they brown properly; if you try to brown too many vegetables in a pot at one time, they’ll steam rather than brown. Because the vegetables are cooked and salted separately, be careful about how much salt you add to any individual vegetable or the finished dish may be too salty.

Parsnip Gnocchi:
2 pounds whole parsnips
2 Tbsp. olive oil
1 cup finely grated parmesan cheese
3/4 - 1 cup flour, plus extra for flouring surfaces

Vegetables:
2 cups pearl onions (1 pound) or 14 ounces frozen pearl onions, thawed
4 – 6 Tbsp. butter
2 cups sliced or quartered mushrooms
2 cups blanched and halved crosswise sugar snap peas
1/2 cup thinly sliced fresh basil or chopped fresh Italian parsley
2 tsp. minced garlic

Make the Gnocchi: Preheat the oven to 400°F. Wash and dry the parsnips. Rub them with olive oil and wrap them in aluminum foil. Roast for 30 – 40 minutes, or until they are easily pierced with a skewer or knife; the exact length of time depends on the parsnips’ size. Let cool, then skin the parsnips.

Purée the parsnips in a food processor. Mix in the parmesan and 3/4 cup flour. Dump the dough on a floured surface. Knead lightly, adding flour as necessary to prevent the dough from being sticky.

Parsnip Gnocchi
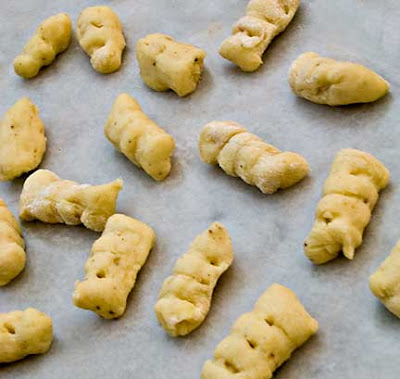
Divide the dough into 2” balls. Using your fingertips, roll out each ball on a floured surface into a long, 3/4” diameter, rope. Cut the rope into 3/4” pieces. To make ridged gnocchi, roll each piece of dough off the back of a fork, pressing lightly down as you roll. Put the finished gnocchi on a floured surface, in a single layer, while you cook the vegetables.

Cook the Vegetables: If starting with dried pearl onions, peel them and cut an X in the root end to help hold the onion layers together. An easy way to peel the onions is to drop them in boiling water for a minute and then slip off the peels.

Melt 2 Tbsp. butter over medium heat in a pan large enough to hold all the ingredients. Sauté half the pearl onions, lightly seasoned with salt and freshly ground black pepper, in the butter until the onions are well browned on all sides and cooked through. Be careful not to burn the butter; turn down the heat if necessary to prevent burning. Remove the browned onions from the pan with a slotted spoon and set aside. Repeat with the remaining pearl onions, adding butter as necessary.

In the same pan, sauté half the mushrooms, lightly seasoned with salt and freshly ground black pepper and adding butter as necessary, until they are well-browned on both sides. Remove the browned mushrooms from the pan with a slotted spoon, add to the onions, and set aside. Repeat with the remaining mushrooms, adding butter as necessary.

In the same pan, sauté the peas, lightly seasoned with salt and freshly ground black pepper, until they are almost, but not quite, done. Remove the peas from the pan with a slotted spoon and add to the other vegetables.

Finish the Gnocchi and Vegetables: Bring a large pot of salted water to a boil. Gently add half the gnocchi to the water and cook until the gnocchi float to the surface. When the gnocchi float, use a slotted spoon to remove them from the water and put them in the pan in which the vegetables cooked. Repeat with the remaining gnocchi.

Over medium heat, gently toss the gnocchi to lightly coat them with butter. Add the vegetables, basil, and garlic, and toss gently to combine. When all the vegetables are heated through, serve immediately.
~~~~~~~~~~~~~~~~~~~~~~~~

This is my entry for Grow Your Own, an event created and hosted by Andrea’s Recipes.

Monday, March 24, 2008

Recipes: Mushroom Stifado & Mushroom, Pancetta, and Feta Stifado (Μανιτάρια Στιφάδο & Μανιτάρια, Ιταλική Πανσέτα, και Φέτα Στιφάδο)

Nature’s seasons and religious fasting periods profoundly influence what our Greek village relatives eat for dinner.

Many are farmers, relying on the fruits (and vegetables) of their labors for sustenance. Most supplement their diets with wild greens and snails, mushrooms and sea urchins, rabbits and octopus. All generously share abundant seasonal harvests with friends and neighbors.


To honor Orthodox teachings, religious Greeks follow a near-vegan diet (certain seafoods are allowed) on most Wednesdays and Fridays throughout the year. Greeks also fast during Great Lent (starting seven weeks before Orthodox Easter), Christmas Lent, and the first 15 days of August. On many fasting days, the truly devout don’t use olive oil or alcoholic beverages.

This year Great Lent began on March 10, and followed a week during which meat was prohibited but dairy, eggs, and fish were allowed. The fasting structure is complex enough that
most people use a church calendar to determine the precise nature of the fast required on any given day.

The first day of Great Lent is called Clean Monday (Καθαρά Δευτέρα in Greek), and marks the end of Carnival indulgence (called Apokreas - Απόκριες in Greek). This year, Clean Monday was on March 10. It's a national holiday; the highways are full of urban Greeks leaving the city for a breath of country air.


Island families celebrate the day with a picnic of what's best and freshest from the fields and sea. Sea urchins, full of delicious roe in spring, are a favorite Clean Monday treat and are hand-gathered by the gunnysackful.

One year on the island, the confluence of perfect rains and temperature brought forth an unexpected bounty, just in time for Clean Monday. My husband returned home from surveying a mountain pasture with a big bag of horse mushrooms. After vetting their edibility with a knowledgeable aunt (the primary rule of wild mushroom gathering is “when in doubt, throw it out”), I constructed a hearty stew using this tasty treasure.


We are now well into Easter Lent for 2008. Mushroom Stifado is ideal Lenten fare: a hearty, vegan main course. For omnivores who aren't fasting, pancetta and feta add wonderful flavor to the stew. Recipes for Mushroom Stifado and the variation, Mushroom, Pancetta, and Feta Stifado, are set out below.

Mushroom StifadoMushroom Stifado (Μανιτάρια Στιφάδο)
Serves 4 - 6
Mushroom Stifado tastes best when made with wild mushrooms or a mixture of cultivated cremini, oyster, and shiitake mushrooms. Even when made with a single type of mushroom, this hearty stew is wonderful. Serve it as an appetizer, over pasta tossed with garlic and olive oil, or with roasted potatoes. Leftovers, chopped and mixed with stock, make a flavorful soup.

2 cups pearl onions (1 pound) or 14-ounces frozen pearl onions, thawed
2 - 6 Tbsp. olive oil
6 cups mushrooms, cleaned, trimmed, and cut in 1” chunks (1 1/2 pounds)
2 cups diced yellow onions, 1/2” dice
2 Tbsp. minced garlic
1 tsp. Aleppo pepper or 1/2 tsp. crushed red pepper (optional)
1 cup red wine
1 15-ounce can diced tomatoes or 2 cups fresh, with juices
1 Tbsp. minced rosemary
2 Tbsp. red wine vinegar
2 tsp. sugar

If starting with dried pearl onions, peel them and cut an X in the root end to help hold the onion layers together. An easy way to peel pearl onions is to drop them in boiling water for a minute and then slip off the peels.

Sauté the peeled (or thawed) pearl onions, lightly seasoned with freshly ground black pepper, in 2 Tbsp. olive oil until the onions are well browned on all sides and cooked through. Remove the browned onions from the pan with a slotted spoon and set aside.

Sauté the mushrooms, lightly seasoned with freshly ground black pepper, in the oil from the onions until they are well browned on all sides, adding olive oil as necessary. Scrape up any browned bits from the bottom of the pan. Remove the browned mushrooms from the pan with a slotted spoon and set aside.

Sauté the diced onions, lightly seasoned with freshly ground black pepper, in the same oil until they soften and begin to turn golden, adding olive oil as necessary. Scrape up any browned bits from the bottom of the pan. Stir in the garlic and Aleppo pepper, and cook for one minute. Stir in the wine and cook until reduced by half. Stir in the tomatoes, rosemary, vinegar, and sugar. Bring to a boil, cover, reduce heat to low, and simmer for 15 minutes. Stir in the browned mushrooms and simmer for 15 minutes. Stir in the browned pearl onions and simmer for 5 minutes. Serve immediately.


Mushroom-Pancetta Stifado with Feta (Μανιτάρια, Ιταλική Πανσέτα, και Φέτα Στιφάδο)
Serves 4 - 6

As with vegan Mushroom Stifado, this tastes best when made with wild mushrooms or a mixture of cultivated cremini, oyster, and shiitake mushrooms. I prefer using pancetta that has been cut in 1/4” slices and then diced, so I buy it directly from the deli counter where I can direct the pancetta's thickness, rather than in pre-cut packages of too-thin slices. The chopped leftovers, with the addition of stock, make a flavorful soup.

2 cups pearl onions (1 pound) or 14-ounces frozen pearl onions, thawed
2 cups diced pancetta or bacon, 1/4” dice (1/2 pound)
6 cups mushrooms, cut in 1” chunks (1 1/2 pounds)
2 cups diced yellow onions, 1/2” dice

2 Tbsp. olive oil (optional)
2 Tbsp. minced garlic
1 tsp. Aleppo pepper or 1/2 tsp. crushed red pepper (optional)
1 cup red wine
1 15-ounce can diced tomatoes or 2 cups fresh, with juices
1 Tbsp. minced rosemary
2 Tbsp. red wine vinegar
2 tsp. sugar
1 cup crumbled feta

If starting with dried pearl onions, peel them and cut an X in the root end to help hold the onion layers together. An easy way to peel pearl onions is to drop them in boiling water for a minute and slip off the peels.

Cook the pancetta over medium heat until the fat has rendered. Remove the cooked pancetta from the pan with a slotted spoon and drain it on paper towels.

Sauté the peeled (or thawed) pearl onions, lightly seasoned with freshly ground black pepper, in the rendered pancetta fat until the onions are well browned on all sides and cooked through. Remove the browned onions from the pan with a slotted spoon and set aside.

Sauté the mushrooms, lightly seasoned with freshly ground black pepper, in the rendered pancetta fat until they are well browned on all sides. Scrape up any browned bits from the bottom of the pan. Remove the browned mushrooms from the pan with a slotted spoon and set aside.

Sauté the diced onions, lightly seasoned with freshly ground black pepper, in the rendered pancetta fat until they soften and begin to turn golden (add olive oil if necessary). Scrape up any browned bits from the bottom of the pan. Stir in the garlic and Aleppo pepper, and cook for one minute. Stir in the wine and cook until reduced by half. Stir in the tomatoes, rosemary, vinegar, sugar, and reserved pancetta. Bring to a boil, cover, reduce heat to low, and simmer for 15 minutes. Stir in the browned mushrooms and simmer for 15 minutes. Stir in the browned pearl onions and simmer for 5 minutes.

Stir in the crumbled feta. Serve immediately with hilopites, pasta, or roasted potatoes that have been tossed with olive oil, minced garlic, salt, and pepper.

~~~~~~~~~~~~~~~~~~~~~~~

This is my entry for Weekend Herb Blogging, hosted this week by Ramona from The Houndstooth Gourmet.