Showing posts with label italian. Show all posts

Sunday, August 1, 2010

Recipe for Braised Romanesco Broccoli with Onions and Olives

Vibrantly lime-green, with florets shaped like spiky Balinese temples whirling around a central core, Romanesco broccoli is an attention-grabber.

When I picked out a head at Saturday’s South Anchorage Farmer’s Market, the queries started immediately: “What’s that?” “What’ll you do with it?” “Is that any good?” Despite my enthusiastic assurances, some questioners remained dubious about Romanesco broccoli’s edibility. An engineer decided to buy one only after I told him Romanesco broccoli is used by mathematicians to illustrate
logarithmic spirals and fractals.

A relative of both broccoli and cauliflower, the flavor of Romanesco broccoli is milder than either of its better known cousins. When well-cooked, the flavor is creamy and nutty, without the bitter edge some family members have.

Braised Romanesco Broccoli with Onions and Olives
Serves 4

Cauliflower, of any color, may be substituted for Romanesco broccoli. Plain Kalamata olives are delicious, though I prefer using
Roasted Kalamata Olives in recipes like this. Dry-cured or salt-cured olives (such as those from Thassos) may also be used, but be sure to taste them and use less than 1/2 cup if they’re strong flavored. The broccoli will cook more quickly and evenly with the right sized pan; ideally, you need a covered pan 2” wider in diameter than the whole broccoli.


Mediterranean Cooking in Alaska has moved as of March 2011. To read this post please go to


http://www.laurieconstantino.com/braised-romanesco-broccoli/


Please click on over and visit my new site. Thank you!


Sunday, April 19, 2009

Recipes: Home-Cured Flat Pancetta & Edamame and Mushroom Risotto with Pancetta

Bacon’s smell wafting through the air is so enticing that even committed vegetarians are sometimes tempted to stray from their virtuous path. These days I mainly use bacon and pancetta as flavor-boosting ingredients; it’s been years since I ate it on its own.

Since I use bacon to boost flavor, I buy the best available. So I was intrigued to read on
Kits Chow, that Christine’s Home-Cured Bacon was so good, her husband asked her not to buy bacon from the store anymore. I had to try it.

Although I’ve visited
Kits Chow more than once over the past year, I was there recently because I was paired with Christine for March’s Taste and Create. Invented by Nicole of For the Love of Food, Taste and Create is one of my favorite food writing events. Every month Nicole pairs participating food writers; each is responsible for trying one recipe from the other’s blog and writing about it.

Some months it can be a challenge to find something I want to write about on my partner’s blog (although I’ve always found something delicious to make). Other months there’s an abundance of recipes I can’t wait to try; this was an abundant month. I haven’t made it yet, but Christine’s simple
Ginger Custard will appear on our table shortly after I next go shopping.

Christine writes from an Asian perspective, while I focus on Mediterranean foods, but there are many similarities in our cooking styles. We both emphasize foods made with fresh, locally available products, and enjoy making ingredients from scratch.

Christine shares my passion for creating variations on a theme. For example, she recently wrote about and photographed a
series of grilled cheese sandwiches; every time I look at this post, I crave an immediate grilled cheese fix. I also appreciate Christine’s creative Asian-Hellenic fusion cooking.

But back to the bacon.

Christine used a
Hugh Fearnley-Whittingstall recipe from the Guardian to make her bacon. The recipe is simple: pork belly is liberally coated with a dry-rub of salt, sugar, and spices, and then cured in the refrigerator for several days.

The result was delicious: meaty, juicy, and mouth-watering. I’m calling it flat pancetta rather than bacon because it isn’t smoked (a hallmark of American bacon). And since I renamed it pancetta, I used the meat to flavor a wonderful risotto made with edamame beans and garlicky sautéed mushrooms. I’m only sorry there isn’t any leftover risotto; writing the recipe has left me wanting more.

Homemade PancettaHome-made Flat Pancetta
Adapted from
Hugh Fearnley-Whittingstall via Kits Chow
The original recipe recommended curing the meat at least 4 days, or as long as 10, draining the juices and applying more cure every 24 hours. I stopped the process on the fourth day because the pancetta was getting too salty for my taste. Since I cured it for shorter than called for in the original recipe, and because the recipe doesn’t include nitrites or nitrates, I froze all the pancetta I didn’t use right away rather than worrying about spoilage. The best place to buy meaty pork belly is in Asian markets (in Anchorage, Sagaya is the best source). Be sure to look the pork over carefully and buy the meatiest piece you can find. Once, in desperation, I bought a frozen piece of pork belly wrapped in freezer paper. The butcher repeatedly assured me the meat was skin-on; it wasn’t, plus the “meat” was 90% fat. The fault was my own for buying meat sight unseen.

Curing mix:
2 Tbsp. black peppercorns
2 Tbsp. coriander seeds
1 tsp. juniper berries
5 bay leaves
1 1/3 cup kosher salt (3/4 pound)
3/4 cup (packed) brown sugar (1/4 pound)

2 pieces meaty pork belly, with skin, 1 1/2 – 2 pounds each

Make the Curing Mix: Grind the peppercorns, coriander seeds, juniper berries, and bay leaves in a spice grinder, or pound them in a mortar and pestle until they are finely crushed. Mix the ground spices with the salt and brown sugar.

Curing Pancetta - Day 1Day 1: Rub each piece of pork belly with the curing mix until the meat is well coated and every nook and cranny is covered with the mix. Put the meat in a glass or other non-metallic container. Cover with plastic wrap and refrigerate.

Curing Pancetta - Day 2Day 2: After 24 hours, pour off all the liquid that has leached out of the pork and rub the meat with more curing mix until it is once again well coated.

Day 3: Repeat Day 2.

Day 4: Rinse off all the cure under cold running water. Dry the meat very thoroughly. Wrap in wax paper, parchment paper, or cheesecloth and refrigerate or freeze until ready to use (before choosing storage method, read the above headnote).

Edamame and Mushroom Risotto with PancettaEdamame and Mushroom Risotto with Pancetta
Serves 4
The mushrooms need to be sautéed in batches to ensure they brown properly; if you try to brown all the mushrooms at one time, they’ll steam rather than brown. Because home-cured pancetta can be salty, be sure to lightly salt the mushrooms or the finished dish may be too salty (the mushrooms need some salt to ensure they cook properly). Pancetta is often sold in packages of very thinly cut pre-sliced meat. Although I use pre-sliced pancetta in a pinch, I mostly buy pancetta direct from the deli counter (if I’m not making my own at home). I ask for either a chunk of pancetta, which I hand slice and dice at home, or have the deli staff cut the pancetta into slices the thickness of thick bacon. With thicker slices, eaters enjoy bursts of pancetta flavor when devouring the risotto; thinner slices tend to melt into the other flavors.

Mushrooms:
1/2 pound fresh cremini mushrooms, cut in 1/4” slices (about 2 cups sliced)
1/2 pound fresh shiitake mushrooms, stems removed and cut in 1/4” slices (about 2 cups sliced)
2 Tbsp. butter, divided
2 Tbsp. olive oil, divided
Salt
Freshly ground black pepper
1 Tbsp. minced garlic, divided

Risotto:
3/4 cup diced home-cured or store-bought pancetta (rind removed), 1/4” dice
2 Tbsp. olive oil
1 1/2 cups diced onions, 1/4” dice
Freshly ground black pepper
1 1/3 cups Arborio rice
1 cup dry white wine
10 ounces shelled edamame beans, blanched if fresh or thawed if frozen
6 Tbsp. minced fresh mint, divided
6 – 7 cups vegetable or chicken stock
1 cup freshly (and finely) grated parmesan cheese

Cook the Mushrooms: Sauté the cremini mushrooms, lightly seasoned with salt and freshly ground black pepper, in 1 Tbsp. butter and 1 Tbsp. olive oil, until the mushrooms are nicely browned. Stir in half the garlic and cook for 1 minute. Remove the browned mushrooms from the pan with a slotted spoon and set aside. Repeat with the shiitake mushrooms, using the remaining olive oil, butter, and garlic.

Make the Risotto: In a sauté pan large enough to hold the finished risotto, sauté the pancetta until the fat renders and the pancetta begins to brown. Stir in the onions, lightly seasoned with freshly ground black pepper, and sauté until the onions soften and begin to turn golden. Stir in the rice to completely coat it with oil and cook, stirring, for 1 minute. Add the wine, bring to a medium boil, and cook, stirring, until the wine is almost all absorbed.

Add 1/2 cup of stock and cook over moderate heat, stirring constantly, until the stock is almost all absorbed. Keep adding stock, 1/2 cup at a time, and stirring until each addition of stock is almost absorbed. When the rice is half done, stir in the edamame beans and 5 Tbsp. mint. (The recipe can be made ahead to this point, and finished right before serving. If you make it ahead, after you take the rice off the burner, stir it until it cools down before adding the edamame and mint.)

Continue adding stock, 1/2 cup at a time, and stirring until the rice is tender, but still firm in the center (this takes 18 – 22 minutes total). There may be stock left over. Stir in the reserved mushrooms, remaining 1 Tbsp. mint, and 1/2 cup grated parmesan. If necessary, add stock until the risotto is the consistency you desire; it should be moist and creamy, not thick and dry. Taste and add salt and freshly ground black pepper, as needed.

Serve immediately with the remaining grated parmesan on the side for sprinkling on top.
~~~~~~~~~~~~~~~~~~~~~~~~~~~~~
This is an entry for My Legume Love Affair – 9th Helping (MLLA9), created by Susan of The Well-Seasoned Cook, which I hosted in March 2009. My Legume Love Affair - 10th Helping for April 2009 is being hosted by Courtney of Coco Cooks.

Sunday, January 18, 2009

Two Recipes for Bagna Càuda (Δύο Συνταγές για Μπάνια Καούντα)

Last night, we had a hot olive oil bath and went to bed happy. We didn’t dive into olive oil; our dinner did.

Bagna Càuda, a specialty of Italy’s
Piedmont Region, combines oil with anchovies and garlic to make a hot dip for vegetables and bread. Cooked over low heat, anchovies melt into oil and garlic’s strength turns smooth and mild.

I was first introduced to Bagna Càuda by the proprietors of
Genoa Restaurant in Portland, Oregon (now closed). It was love at first taste. Genoa’s Bagna Càuda was rich and luxurious, creamy and indefinably delicious. I wanted more.

After I discovered Genoa’s recipe in a cookware store handout, its Bagna Càuda regularly showed up on the tables of me and my friends. Unlike the Bagna Càuda I make now, Genoa’s recipe doesn’t contain a speck of olive oil; its richness comes exclusively from butter and cream.

In the Portland years, I was young and undeterred by buckets of cream and butter. As time passed, I lost my enthusiasm for both. I used to cook with butter, using olive oil mostly for salad dressings. Now, I rarely use butter; olive oil has replaced it in my kitchens. I stopped making Bagna Càuda.

Even so, when my husband and I travelled to Italy’s Piedmont Region in 1997, I was eager to try Bagna Càuda in its homeland. We found it in a tiny lakeside restaurant in
La Morra, where we were the only customers. The television was blaring, the florescent lights blazing, and our expectations for the food low.

When the Bagna Càuda arrived at our table, it was a revelation. It didn’t contain cream or butter. Instead, garlic and anchovies were melted in olive oil and served in a roasted red pepper half. Every bite was a pleasure.

As with Genoa’s Bagna Càuda so many years ago, the taste and aroma of this new-to-me version lingered in my memory. Back in Alaska, I developed a simple recipe incorporating its flavors, using only olive oil, garlic, and anchovies.
.
Last Thursday, my regular
CSA box of vegetables arrived from Full Circle Farm. The refrigerator was overflowing; I couldn’t find space for an extra-large bunch of broccoli. Bagna Càuda (my version) was the solution. While the anchovy and garlic sauce simmered, I steamed broccoli and roasted a couple red peppers over a gas burner.

When the Bagna Càuda was done, we dipped our vegetables and bread in the hot savory bath, ate our fill, and licked our fingers clean.


Bagna CaudaLaurie's Bagna Càuda (Μπάνια Καούντα)
Makes about 1 1/2 cups
Though the recipe contains a lot of garlic and anchovies, their pungency disappears after simmering in hot oil. For a group, serve Bagna Càuda in a fondue dish or other pot which keeps the sauce hot. For quick weekday meals, serve the sauce in individual unheated dishes for dipping, or even just spooned, straight from the stove, over the vegetables.

Sauce:
1/4 cup chopped anchovy fillets (2 ounces/24 cleaned fillets)
(see Note below)
1/3 cup chopped fresh garlic
1 1/4 cups olive oil

Selection of Vegetables: Raw or roasted red peppers, raw or lightly steamed broccoli or cauliflower, celery, carrots, zucchini, cardoons, radishes, green onions, radicchio, fennel, cherry tomatoes, boiled potatoes


Selection of Bread: artisan-style bread, foccacia, breadsticks

Put the anchovy fillets, garlic, and olive oil in a saucepan over medium-low heat. Cook, stirring from time to time, until the oil starts to bubble. Cook for 20 – 30 minutes, until the anchovies melt into the oil and the garlic is very soft. Don’t let the garlic brown; if the oil is cooking hard enough to brown the garlic, immediately turn down the heat.

While the sauce is cooking, cut the vegetables and bread into shapes appropriate for dipping. When the sauce is done, dip the cold vegetables in the hot sauce.

NOTE:
Anchovies preserved in salt have much more flavor than anchovies canned in olive oil. In dishes like Bagna Càuda, where anchovies are a central ingredient, I prefer the salt-cured variety (the dish is delicious even when made with oil-canned anchovies). Some places, you can buy salted anchovies by the ounce from the deli counter; in Alaska, this isn’t possible. Instead, I buy large cans of salt-preserved anchovies in Greece or when I travel outside the state (Big John’s PFI in Seattle carries them, as does Amazon.com). Anchovies packed in salt keep in the refrigerator for up to a year. To clean salt-cured anchovies, carefully rinse off all the salt. Starting from the head end, peel each fillet off the backbone, and then remove as many of the fine bones from the fillet as possible. Dry the cleaned fillets on paper towels before using in recipes.


Genoa's Bagna Càuda (Μπάνια Καούντα)
Makes about 1 1/2 cups
Adapted from Genoa Restaurant recipe, Portland, Oregon
Genoa’s Bagna Càuda must be kept warm over a burner at all times; the reduced cream stiffens up when it cools. The anonymous author of Genoa’s recipe explains how to eat it: “[This] is a dish to be enjoyed without ceremony – pick up vegetable or bread stick with fingers, dip it in the sauce until well covered, and consume. If butter and cream separate, pour in a bit of cold cream and whisk hard. The sauce will return to its former velvet-like texture.”

Sauce:
2 cups heavy cream
8 cloves garlic, roughly chopped
1 2-ounce can anchovy fillets, drained of oil
Dash of cayenne
1/4 cup unsalted butter

Selection of Vegetables: Raw or roasted red peppers, raw or lightly steamed broccoli or cauliflower, celery, carrots, zucchini, cardoons, radishes, green onions, radicchio, fennel, cherry tomatoes, boiled potatoes

Selection of Bread: artisan-style bread, foccacia, breadsticks

In a heavy saucepan, simmer cream with garlic until the cream is thick and reduced to 1 cup. Watch the cream carefully as it cooks; don't let it boil over. Put the reduced cream, anchovies, and cayenne into a blender and purée until the mixture is very smooth. (The recipe may be made ahead to this point.)

Return the mixture to the pan and bring to a very slow simmer. Stir in the butter until it melts. While the dip simmers, cut the vegetables and bread into shapes appropriate for dipping.

Serve in a fondue dish or other pot which can keep the dip hot. Dip the cold vegetables in the hot sauce.

~~~~~~~~~~~~~~~~~~~~~~
This is my entry for Foodie Films: Big Night - Italian! created and hosted by Joelen's Culinary Adventures.

Monday, November 24, 2008

Recipes for Tuscan-style Grilled Steak with Roquefort-Rosemary Butter & Oven-Roasted Potatoes

Tuscan Steak on the FireIt’s been snowing off and on for the last few days. In self-defense, we’ve kept a roaring fire going, a not-insignificant accomplishment since we’ve been burning green wood.

By Saturday afternoon, we had an impressive bank of coals in the fireplace, just right for grilling thick Tuscan-style steak. We headed out to the store to buy the best steaks we could find.

We rarely eat big chunks of meat, so in honor of the decadent occasion, we decided to throw dietary caution to the wind. I mixed up a compound butter seasoned with Roquefort, rosemary, and garlic to top the steak.

For fireplace grilling, we use a simple folding grate and set it up directly over very hot coals. If the fire is flaming, all the better; just be sure to turn the meat often so it doesn’t burn (long tongs are perfect for this task).

The final result was amazing. Seared brown on the outside and rare on the inside, the steak was everything we could’ve hoped. The rich flavor of Roquefort-Rosemary Butter was a lovely finishing touch for our perfectly grilled steaks.

To accompany the steaks, I made simple Oven-Roasted Potatoes. These are the potatoes I turn to when I need to cook potatoes at the last minute and want something fast and reliably delicious. The potatoes are great for mopping up the melted Roquefort-Rosemary Butter and meat juices left on the plate when you've had your fill of steak (don't feel obligated to eat the whole steak; it makes terrific left-overs).

Tuscan Steak and Oven Roasted PotatoesTuscan-style Grilled Steak with Roquefort-Rosemary Butter
Serves 2

The key to this dish is cooking the meat over a very hot fire, and regularly turning the meat. Instead of Roquefort butter, Tuscan-Style Grilled Steaks are also excellent with a little fresh lemon juice squeezed over them at the table. Tomato salad, made with juicy fresh tomatoes, is a nice balance for steak and potatoes.


Steak:
2 rib-eye, porterhouse, T-bone, New York, or other high-quality cut of steak, at least 1” thick
Salt
Freshly ground black pepper

Roquefort-Rosemary Butter:
3 Tbsp. Roquefort
3 Tbsp. butter
2 tsp. minced rosemary
1 tsp. minced garlic
1 Tbsp. fresh lemon juice

Liberally season both sides of the steaks with salt and freshly ground black pepper. Let the steaks sit at room temperature for at least 30 minutes.

Using a fork, mash the Roquefort and butter together. Add rosemary, garlic, and lemon juice and continue mashing until the mixture is smooth. Divide the mixture into sixths and shape into small balls.

Let the grate heat up over the fire for five minutes, or until it is very hot. Put the steaks on the grate and cook, turning regularly, until the steaks are done to your liking. For rare steaks, cook them 3 – 5 minutes on each side.

Plate the steaks, top with the Roquefort-Rosemary Butter (or lemon wedges), and serve.

Oven Roasted Potatoes
When I’m using potatoes with unblemished skin, I don’t bother peeling them. If you want to make more potatoes than will fit as a single layer in the frying pan, brown them in batches on the stove, and then put the browned potatoes in a larger pan for oven-roasting.

Yukon Gold or red potatoes
Olive oil
Salt

Preheat the oven to 450°F.

Peel the potatoes and cut into 2” chunks. In an oven-proof frying pan (cast iron works best), pour in enough olive oil to lightly coat the bottom of the pan. Brown the potato chunks in the olive oil. Put the pan and potatoes in the oven, and roast until the potatoes are cooked through (easily pierced by a skewer), about 10 – 15 minutes. Serve immediately.

Sunday, September 21, 2008

Andrea Camilleri's Montalbano with Recipe for Spaghetti with Eggplant and Tomato Sauce (Pasta alla Norma) (Μακαρόνια με Μελιτζάνες και Ντομάτες)

Andrea Camilleri, photograph by Pensiero

(From Greece)

English language books are hard to find on the island.

I carefully select those to bring with us, focusing on books we’ll both enjoy and want to reread. After several years, most books recede far enough into memory that rediscovering them is a pleasure. Since airlines have cracked down on weight limits, prudent book selection is more important than ever.

Two years ago my parents sent us the first six volumes of
Andrea Camilleri’s wondrously good Inspector Montalbano series, set in Sicily and skillfully translated by poet Stephen Sartarelli. A few pages into the first book, I realized the series was perfect for the island. I quit reading and put the Camilleri books in my “bring to the island” corner.

Then my head
exploded and I was off reading for longer than I’d planned. Shortly before we left for Greece this year, to my great joy, I finally was able to read books again. I dug out the Montalbano series and packed them for the trip.

I began getting to know Inspector Montalbano our first day on the island. One week later, thoroughly captivated by the cantankerous, world-weary, enigmatic inspector, I finished the last of the six books. I’m already looking forward to rereading them, but first I’ll track down and devour the rest of the series.

Here’s Camilleri/Sartarelli describing the inspector in the opening scene of
The Terra-Cotta Dog (book 2):

To judge from the entrance the dawn was making, it promised to be a very iffy day – that is, blasts of angry sunlight one minute, fits of freezing rain the next, all of it seasoned with sudden gusts of wind – one of those days when someone who is sensitive to abrupt shifts in weather and suffers them in his blood and brain is likely to change opinion and direction continuously, like those sheets of tin, cut in the shape of banners and roosters, that spin every which way on rooftops with each new puff of wind. Inspector Salvo Montalbano had always belonged to this unhappy category of humanity.

Camilleri’s prose brings Sicily’s people, and its highways and byways, vividly to life. In the original Italian, Camilleri uses Sicilian dialect to create colorful characterizations and bring humor to stories that might otherwise be overly dark. Sartarelli effectively captures the dialect’s essence in his creative translation.

Inspector Montalbano loves to eat, and insists on doing so silently, the better to appreciate every nuance in the dishes set before him. He thinks poorly of those who cook badly, and when forced to eat bad food (“… shamefully overcooked pasta, a beef stew conceived by an obviously deranged mind, and dishwater coffee of a sort that even airline crews wouldn’t foist on anyone…”), he heads out for a meal good enough to lift him out of the gloom into which bad food plunges him.

In the course of investigating a disappearance in
The Snack Thief (Book 3), Inspector Montalbano interviews a “well-dressed seventy-year-old lady … in a wheelchair.” When the interview is over, the woman invites the inspector to lunch:

“Well, signora, thank you so much …,” the inspector began, standing up.
“Why don’t you stay and eat with me?”
Montalbano felt his stomach blanch. Signora Clementina was sweet and nice, but she probably lived on semolina and boiled potatoes.
“Actually, I have so much to –“
“Pina, the housekeeper, is an excellent cook, believe me. For today she’s made pasta alla Norma, you know, with fried eggplant and ricotta Salata.”
“Jesus!” said Montalbano, sitting back down.
“And braised beef for the second course.”
“Jesus!” repeated Montalbano.
“Why are you so surprised?”
“Aren’t those dishes a little heavy for you?”
“Why? I’ve got a stronger stomach than any of these twenty-year-old girls who can happily go a whole day on half an apple and some carrot juice. Or perhaps you’re of the same opinion as my son Giulio?”
“I don’t have the pleasure of knowing what that is.”
“He says it’s undignified to eat such things at my age. He considers me a bit shameless. He thinks I should live on porridges. So what will it be? Are you staying?”
“I’m staying,” the inspector replied decisively.

Although food plays only a supporting role in the Montalbano books, Camilleri’s descriptions of traditional Sicilian dishes are inspirational. I read the above passage just before lunch and, coincidentally, had the ingredients on hand to make Pasta alla Norma. So I did.

Montalbano was right to stay for lunch with Signora Clementina. Eggplant and Tomato Sauce with Spaghetti is absolutely delicious.

Spaghetti with Eggplant and Tomato Sauce (Pasta alla Norma) (Μακαρόνια με Μελιτζάνες και Ντομάτες)
Serves 4 - 6

Pasta all Norma comes from Catania, a city in eastern Sicily, and is named after Catania native Vincenzo Bellini's famous opera, Norma. Traditionally, eggplant for Pasta all Norma is fried, as described by Signora Clementina. Because fried eggplant absorbs a lot of oil, I oven-roast it instead. If you want to fry the eggplant, sprinkle the eggplant slices with a lot of salt and let drain for an hour or so (salt collapses eggplant’s cell structure and helps reduce its oil absorption). Rinse off the salt, pat the eggplant dry, fry in olive oil until the slices are golden brown, and drain on paper towels.

Tomato Sauce:
2 pounds ripe tomatoes or 2 15-ounce cans whole tomatoes, roughly chopped
1 cup roughly chopped onion
1/4 cup chopped fresh basil or mint
Salt
1/4 olive oil
1 tsp. sugar
1 tsp. Aleppo pepper or 1/2 tsp. crushed red pepper flakes (optional)

Eggplant:
2 globe eggplants
Olive oil
Salt
Freshly ground black pepper

Pasta:
1 pound spaghetti
2 Tbsp. olive oil
1 - 2 garlic cloves, grated or finely minced (optional)
Freshly ground black pepper
1/2 – 1 cup grated or crumbled
ricotta salata or myzithra

Make the Tomato Sauce: Put the tomatoes, onions, basil and salt in a large pot and cook over medium heat for 15 minutes, stirring regularly. Put the tomato mixture through a food mill to remove the skins and seeds. Return the tomato mixture to the pot with the olive oil and sugar. Bring to a boil, turn down the heat, and simmer for 30 minutes, stirring regularly. Taste and add salt, as needed.

Make the Eggplant: Preheat the oven to 450°F. Slice the eggplant into 1/2” cross-wise slices. Brush the slices on both sides with olive oil and season with salt and freshly ground black pepper. Bake the eggplant for 15 minutes or until the eggplant slices are golden brown, remove from the oven, and let cool. Cut into 1” wide slices. Add the eggplant to the tomato sauce and stir gently, being careful not to break up the eggplant slices.

Make Pasta alla Norma: Cook the pasta in boiling, salted water until it is al dente. Drain the pasta, reserving 1/2 cup of the pasta water. Return the pasta to the pot and stir in the reserved pasta water, olive oil, garlic, and freshly ground black pepper. Add all but 1 cup of the Tomato and Eggplant Sauce and toss with the pasta. Pour the sauced pasta into a large bowl and top with the remaining sauce and crumbled cheese. Serve immediately.
~~~~~~~~~~~~~~~~~~~~~~
This is my entry for
Novel Food #5, hosted and created by Simona of Briciole and Lisa of Champaign Taste, both of whom love Inspector Montalbano. You can find the Novel Food #5 round-ups here and here.

Tuesday, July 29, 2008

Garden Treasure with 4 Recipes for Arugula: with Eggs, in Salads, and in Pasta Sauce (4 Συνταγές για Ρόκα)

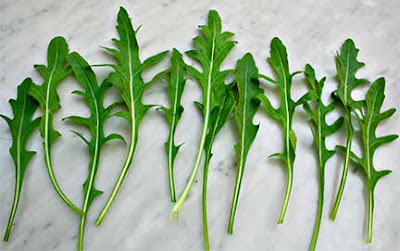
Arugula SelveticaArugula (also known as Roka, Roquette, and Rocket) wins my garden’s miracle plant of the year award.

We’ve grown arugula often over the years. We usually get a salad or two before it bolts; a common problem in Alaska. With our long days, nearly 20 hours of daylight at the solstice, many herbs and green vegetables go to seed prematurely.

Despite its tendency to bolt, we grow arugula because we enjoy its bite in salads. Last year, the arugula followed its typical pattern: two salads at the beginning of summer and it bolted. I assumed that was it. I was wrong.

This spring, after the snow melted, we noticed radicchio we’d harvested last year, but hadn’t pulled up, coming back. In the same bed, mystery plants were emerging; they had tiny green leaves growing around slender dead stalks.

We had no idea what they were (I guessed domesticated Italian dandelions we grew last year in the same bed), but let them grow so we could find out. As the plants grew larger, I realized last year’s arugula had wintered over.

I was initially confused, as I’d thought arugula was an annual (Eruca vesicaria subspecies sativa). Although I'd only grown annual arugula, it turns out “arugula,” actually refers to three separate plants: E. vesicaria ssp. sativa, Diplotaxis tenuifolia, and Diplotaxis muralis.

Last year we planted arugula seeds brought back from Greece. When I dug out the seed packet, I discovered it was Diplotaxis tenuifola, also known as wild arugula or Selvetica, an extremely cold hardy perennial (as plants must be to survive Alaskan winters). I’m thrilled to have stumbled upon it, and will give it a permanent place in my garden.

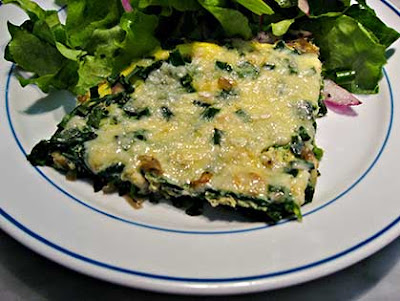
Arugula in the GardenMost commonly I use arugula in mixed green salads, or on its own with blue cheese and best quality balsamic vinegar. This year the arugula was so prolific I branched out. Arugula, briefly sautéed with shallots, adds a nice bite to omelets and frittatas. Mixed with tomatoes and anchovies, it makes a delicious pasta sauce.

My mother, upon hearing of my arugula glut, recommended the wonderful Arugula and Tomato Salad from Carol Field’s
In Nonna’s Kitchen: Recipes and Traditions from Italy’s Grandmothers. Mother was right; arugula goes really well with tomatoes.

Anchovies are the secret ingredient that makes both the salad and pasta sauce special. When minced and incorporated into other ingredients, anchovies add flavor without overwhelming the taste buds.

More Arugula Recipes:
Grilled Radicchio and Arugula Salad with Parmesan Shavings
Watermelon, Feta, and Arugula Salad

Arugula and Eggs
Arugula and Eggs
Serves 2 – 4


4 large eggs
1 cup diced shallots, 1/4” dice
Salt
Freshly ground black pepper
1 Tbsp. olive oil
4 packed cups cleaned arugula
3/4 grated kasseri or fontina cheese
1/4 cup minced chives

Crack the eggs in a bowl, season lightly with salt and freshly ground black pepper, and whisk to combine.

Sauté the shallots, lightly seasoned with salt and freshly ground black pepper, in olive oil until they soften and start to turn golden. Add the arugula, in batches if necessary, and cook just until all the arugula has wilted.

Evenly distribute the arugula in the pan and pour the eggs over. Cover and turn the heat down to low. Keep checking the eggs and when they’re almost-but-not-quite set, sprinkle the cheese and minced chives over, cover, and cook until the cheese melts.

Sprinkle with freshly ground black pepper, cut into wedges, and serve.

Arugula and Tomato Salad
Serves 4

Adapted from In Nonna’s Kitchen: Recipes and Traditions from Italy’s Grandmothers by Carol Field (HarperCollins 1997)
Lightly salting the tomatoes helps bring out their flavor, but be careful not to overdo as anchovies can be quite salty. I made this with the smaller amount of anchovies, but we both thought it would benefit from more; next time I’ll use the larger amount. I originally made this with whole anchovies, as shown in the picture, but we prefer the salad when the anchovies are minced in the dressing. Either way, it's tasty.

8 medium tomatoes, sliced 1/2” thick
Salt
1/4 cup olive oil
2 Tbsp. red wine vinegar
Freshly ground black pepper
8 - 16 anchovy fillets (1 - 2 ounces)
2 cups thinly cut shreds of arugula

Divide the tomato slices between 4 salad plates and salt lightly. Whisk the olive oil into the red wine vinegar and season with freshly ground black pepper. Mince the anchovy fillets and mix them into the dressing. Taste and add freshly ground black pepper or salt as needed. Toss the dressing and arugula (there may be leftover dressing), and mound on the tomatoes. Serve immediately.

Arugula, Blue Cheese, and Balsamic Salad
Serves 4

I never tire of this tasty salad. Because there are so few ingredients, it’s important to use best quality balsamic vinegar.

4 packed cups arugula
1/2 cup thinly sliced red onion
1/4 crumbled Roquefort or other blue cheese
2 Tbsp. extra virgin olive oil
1 Tbsp. best quality balsamic vinegar
Salt
Freshly ground black pepper

Wash and dry the arugula and tear large leaves into pieces. Add the arugula, red onion, and half the blue cheese to a salad bowl. Whisk together the olive oil, balsamic vinegar, salt, and freshly ground black pepper. Toss the dressing with the salad ingredients. Taste and add more balsamic vinegar, if needed. Sprinkle with the remaining blue cheese, grate freshly ground black pepper over the salad, and serve.

Arugula, Anchovy, and Tomato with OrecchietteArugula, Anchovy, and Tomato Sauce with Orecchiette
Serves 4
This recipe calls for a large quantity of arugula, which I measured after it had been cleaned and roughly chopped. If you don’t have arugula, dandelions or other wild greens are the best substitute; the dish may also be made with radicchio, Swiss chard or spinach. Toast the pine nuts in a 350°F oven or dry frying pan. In either case, pine nuts burn easily and must be watched carefully as they cook. Onions cook more evenly when lightly salted before sautéing, however, anchovies are salty so be sure not to over-salt the onions.

1/2 pound dried
orecchiette or any other pasta
2 cups diced onion, 1/2” dice
2 Tbsp. extra virgin olive oil
Salt
Freshly ground black pepper
16 anchovy fillets (2 ounces)
1 Tbsp. minced garlic
1 tsp. Aleppo pepper or 1/2 tsp. red pepper flakes
1/2 pound cleaned and roughly chopped arugula or other strong-flavored greens
2 cups diced fresh tomato, 3/4” dice
1/3 cup water
1 cup chopped green onions
3/4 - 1 cup freshly grated parmesan cheese
1/4 cup toasted pine nuts

Cook the pasta in boiling, salted water and cook until it is al dente. Drain the pasta and toss with a little olive oil.

Sauté the onions, lightly seasoned with salt and freshly ground black pepper, in olive oil until they soften and start to turn golden. Add the anchovies, garlic, and Aleppo pepper and cook for one minute. Stir in the arugula, tomatoes, and water, and cook for 3 minutes. Add the cooked pasta and green onions, and cook just until the pasta is warmed through. Toss with 1/2 cup cheese and half the pine nuts. Sprinkle with the remaining cheese and pine nuts and serve immediately.

~~~~~~~~~~~~~~~~~~~~~~~~~~~~~~
This is my entry for Weekend Herb Blogging, hosted this week by Kelly from Sounding My Barbaric Gulp.

Sunday, May 11, 2008

Recipe: Carrots with Capers (Kαρότα με Kάπαρης)

When I want an easy, reliable, colorful vegetable side, I make Carrots with Capers adapted from Marcella Hazan's More Classic Italian Cooking. It goes particularly well with roast meat or chicken.

I’ve made it for 2 and I’ve made it for 100. Over the last 30 years, I’ve made this dish hundreds of times. It’s never been anything other than wonderful.

Marcella explains why: “The tart corrective of the capers is just what the carrots need to add a little zip to their otherwise passive sweetness. And their gentleness, in turn, tempers the tonic bite of the capers.”

I've changed Marcella's original recipe by upping the parsley, garlic, and capers. Because the garlic is cooked in water, its flavor in the finished dish is quite mild.

Try it. You won’t be sorry.

Carrots with Capers (Kαρότα με Kάπαρης)
Serves 4
Adapted from More Classic Italian Cooking by Marcella Hazan (Alfred A. Knopf 1978)
Adding the water a little at a time keeps the carrots from getting waterlogged; it's the same principle as adding broth to risotto in stages. The carrots may be cooked ahead, reheated, and the capers added at the last minute, but the carrots taste better if cooked right before serving. Since capers are salted, be careful not to oversalt at the beginning.

1 pound carrots
1/4 cup capers, preferably salt-cured
1/4 cup olive oil
Salt
Freshly ground black pepper
1 Tbsp. minced garlic
1/4 cup minced parsley
1 – 1 1/2 cups water

Wash the carrots, peel them, and cut off the tops and bottoms. Cut into lengths the size and width of a woman’s little finger.

If using salt-preserved capers, rinse off the salt and let them soak in cold water for 10 – 15 minutes, and rinse them again. If using brined capers, rinse off the brine. Dry the capers and reserve.

Sauté the carrots, lightly seasoned with salt and freshly ground black pepper, in olive oil for 2 minutes. Stir in the garlic and parsley and cook for 1 minute. Stir in 1/4 cup water and cook until the water completely evaporates. Continue adding 1/4 cups of water and evaporating it until the carrots are done. This takes 10 – 20 minutes; cook until the carrots are tender but firm.


When the carrots are done, brown them lightly in the oil remaining in the pan after the water is gone. Stir in the capers and cook for 1 minute. Taste and add salt or freshly ground black pepper, as needed. Serve immediately.
~~~~~~~~~~~~~~~~~~~~~
This is my entry for Antioxidant Rich Foods/Five-a-Day Tuesdays hosted by Sweetnicks.

Thursday, May 8, 2008

How to Harvest and Use Wild Dandelion Greens

DandelionsThe dandelions are coming! The dandelions are coming!

Actually, the first dandelions of the season have arrived. They’re still few and far between, but I was able to find enough to make a salad.

In honor of the occasion, I bought a piece of the best beef tenderloin I could find and made
Carpaccio. I cut the tenderloin into thin slices, pounded it even thinner, seasoned it, drizzled it with white truffle oil, and topped it with fresh dandelion salad dressed with lemon and olive oil. Thin slices of Parmigiano Reggiano cheese crowned the salad.

It was glorious.


                  Mediterranean Cooking in Alaska has moved as of March 2011. 
                  To read this post please go to


http://www.laurieconstantino.com/how-to-harvest-and-use-dandelion-greens/


                  Please click on over and visit my new site. Thank you!


Carpaccio with Dandelion Salad and White Truffle OilCarpaccio with Dandelion Greens Salad and Truffle Oil (Καρπάτσιο με Ραδίκια και Λάδι Τρούφας)Serves 2
........


~~~~~~~~~~~~~~~~~~~~~~~~~~~~~~
This is my entry for Weekend Herb Blogging, hosted this week by me - I'm looking forward to receiving a zillion entries by Sunday afternoon (May 11).

Saturday, April 26, 2008

Recipe: Cannelloni with Spinach Filling (Κανελόνια με Σπανάκι)

Last week I found a bag of cookbooks in my basement that I’d never read.

I’d bought the books last year at a thrift store two days before my head exploded. By the time I was up and cooking, I’d completely forgotten about the thrift store cookbook score. My recent discovery was a lovely Easter present. A new cookbook always puts me in a good mood, and here were five of them. A bonanza!

The first book I picked up was Michael Field’s
Culinary Classics and Improvisations: Creative Leftovers Made from Main Course Masterpieces.

Michael Field was a successful concert pianist in the fifties and early sixties who had a passion for cooking. By 1964, that passion had become Field’s career. He got started by holding “
socialite cooking classes in his Manhattan apartment.” Ultimately, he started a culinary school in New York City, wrote cookbooks and magazine articles, and was a consulting editor for the Time-Life Foods of the World series.

Field
died in 1971 at age 56. Among the accomplishments cited in his Time magazine obituary are debunking “such myths as the need to wash mushrooms, devein shrimp and press garlic” and preaching the “imaginative use of leftovers.”

Field’s primary rule for using leftovers is the source of leftovers must be “of the highest quality.” To this end, Field provides classic recipes for roasted and braised meat, fish, and fowl. He uses the leftovers from these dishes for the remaining recipes.

For example, Field gives a recipe for Yankee Pot Roast, the leftovers of which can be used in his recipes for Pot Roast Pie with Braised White Onions and Mushrooms, Pirog of Beef, Bigos, Cannelloni with Beef and Spinach Filling, Pâté of Pot Roast, or Cold Braised Beef Vinaigrette.

Here’s my take on Field's Cannelloni:

Cannelloni with Spinach Filling (Κανελόνια με Σπανάκι)
Serves 4 (makes 8 cannelloni)
Adapted from
Culinary Classics and Improvisations by Michael Field (Alfred A. Knopf 1967)
Cannelloni is a very flexible dish, and is a terrific way to use up leftovers. For stuffing, combine the spinach with sautéed mushrooms or leftover chicken, beef, pork, lamb, or roasted vegetables. It’s great with homemade pasta, but can also be made with plain crêpes or store-bought manicotti tubes. The tomato sauce may be made special for Cannelloni, but the dish tastes great with leftover or jarred sauce. I made my own pasta, hand-cutting noodles with the extra dough. The noodles are terrific in homemade chicken soup. Although Cannelloni may be made in one large pan, I like using individual gratin dishes for ease of serving and because it allows me to freeze assembled but unbaked cannelloni for future use.


Pasta (or substitute crêpes or purchased manicotti shells):
2 eggs
1 1/2 cups all purpose flour
1 tsp. salt
2 Tbsp. olive oil
2 Tbsp. water

Cream Sauce:
3 Tbsp. butter
3 Tbsp. all purpose flour
1 1/2 cups half and half
1/8 tsp. cayenne pepper
Salt

Filling:
1/2 pound cleaned, fresh spinach or 10 ounces frozen spinach, thawed
1 cup diced onion, 1/8” dice
2 Tbsp. olive oil
Salt
Freshly ground black pepper
1 Tbsp. minced garlic
1 cup finely chopped leftover roast meat or leftover roast vegetables (see vegetarian variation below)
1 Tbsp. dried oregano, crushed
1/2 cup finely grated parmesan cheese
1 egg

1 cup tomato pasta sauce, puréed (use your favorite tomato sauce recipe or a good quality jarred pasta sauce)
1/4 cup freshly grated parmesan cheese

Make the Pasta: Mix all the ingredients in a food processor and process until the dough clumps together, adding water if necessary. The finished dough should be very stiff. Dump the dough out on a floured surface and knead for 2 – 3 minutes, or until the dough is smooth, shiny, and elastic. Wrap in plastic wrap and let rest for 30 minutes.

Following the manufacturer’s instructions, use a pasta machine to roll out the dough, half at a time, until the pasta has gone through the second to the last setting on the pasta machine. Let the pasta sheets dry for 10 minutes. Trim the edges and cut the pasta sheets into 5” lengths. You need 8 pasta rectangles. (NOTE: Cut the rest of the pasta into noodles, let them dry, and store in an air-tight container until ready to use.)

Cook the pasta rectangles in boiling, salted water until they are al dente. With a slotted spoon, lift out the pasta sheets and put them in a bowl of cold water. Dry the pasta rectangles by laying them out on paper towels.

Make the Cream Sauce: Melt the butter in a small saucepan. Whisk in the flour and cook, stirring, for 2 minutes. Add the cream in a slow stream, whisking rapidly and cook, stirring constantly, until the sauce thickens. Stir in the cayenne and salt, remove from the heat, and set aside until ready to use.

Make the Filling: Blanch the spinach in boiling, salted water for 1 minute. Drain and rinse with cold water. Squeeze as much liquid as possible out of the blanched (or thawed) spinach, and finely chop it. Put in a bowl.

Sauté the onion, lightly seasoned with salt and freshly ground black pepper, in olive oil until the onions soften and start to turn golden. Stir in the garlic and cook for 1 minute. Add the onion mix, meat, oregano, and parmesan to the filling and mix together thoroughly. Taste and add salt or freshly ground black pepper, as needed. Mix in the egg.

Assemble the Cannelloni: Preheat the oven to 375°F

Lay out 8 rectangles of pasta, evenly divide the filling between them, and roll them up. Spread a little white sauce in the bottom of a baking dish large enough to hold all the cannelloni or 4 individual gratin dishes. Place the cannelloni in the pan seam side down and side by side. Cover the cannelloni with tomato sauce and then cover the tomato sauce with the remaining cream sauce. Sprinkle with parmesan cheese. (The recipe may be made ahead to this point and refrigerated or frozen.)

Bake for 20 minutes, or until the sauce is bubbling. Put under the broiler until the tops are nicely browned; watch carefully, it is easy to burn the cheese.

Vegetarian Cannelloni
For meat in the filling, substitute 2 1/2 cups diced mushrooms (1/4” dice). Sauté the mushrooms, lightly seasoned with salt and freshly ground black pepper, in 1 Tbsp. butter and 1 Tbsp. olive oil until the mushrooms are nicely browned.
~~~~~~~~~~~~~~~~~~~~~~~
This is my entry for
Weekend Cookbook Challenge: Vintage Cookbooks hosted by Chocolate Moosey.

Sunday, April 6, 2008

Recipes: Grilled Radicchio & Grilled Radicchio and Arugula Salad with Parmesan Shavings (Ψητό Ραδίκιο & Σαλάτα με Ψητό Ραδίκιο, Ρόκα, και Παρμεζάνα)

Treviso Radicchio and Knife
Treviso Radicchio and Knife (Click entry)

Radicchio drizzled with olive oil and grilled has lots of flavor and takes very little work. Grilling tames radicchio’s natural bitterness, and changes it into an ingredient that enhances everything with which it is paired.

Radicchio PastaThe outer leaves of grilled radicchio are charred, soft, and slightly smoky; the inner leaves warm yet crunchy. Mixed with garlic, olive oil, parmesan cheese, and sometimes a little good quality balsamic vinegar, grilled radicchio makes a wonderful topping for egg-yolk rich, Piemontese tajarin (or any other pasta).

The form of radicchio most commonly found in US supermarkets looks like a small red cabbage. Occasionally, the market has
Treviso Radicchio, which is elongated and, when the outer leaves are stripped away, looks like a large red Belgian endive. For most purposes, the two radicchios can be used interchangeably.

Backyard Shed 4-6-08Friday night we had no snow near the back shed; this is Sunday morning (April 6, 2008).

We planted radicchio in our Alaskan garden last summer and harvested it on our return from Greece in October. Today we ignored the 12” of snow that fell yesterday and started this year’s radicchio seeds in the garage.

Radicchio Ready to GrillGrilled Radicchio (Ψητό Ραδίκιο)
Serves 4
If you don’t have the time, weather, or inclination to start a fire, it’s easy to grill radicchio on a cast iron grill pan.

2 heads radicchio, round or elongated (Treviso)
Olive oil
Salt

Rinse off the radicchio and discard any damaged portions. Cut round radicchio in quarters, and elongated radicchio in lengthwise halves. Drizzle with olive oil and season with salt.

Preheat a cast iron grill pan until it is very hot (if you're grilling over fire, you need
moderately hot coals), and grill the radicchio on all sides until the outer leaves are nicely browned. Remove from the grill.

Serve immediately drizzled with a little best quality balsamic vinegar. For use in another recipe, cut out any tough center core, and roughly slice or chop into pieces.


Grilled Radicchio and Arugula Salad with Parmesan ShavingsGrilled Radicchio and Arugula Salad with Parmesan Shavings (Σαλάτα με Ψητό Ραδίκιο, Ρόκα, και Παρμεζάνα)
Serves 4
Save leftover salad
and wrap it, with a few parmesan shavings, in a warm flour tortilla for one of the most delicious vegetarian sandwiches you’ll ever eat. To make parmesan shavings, you need to start with a chunk of fresh parmesan cheese, preferably Parmigiano-Reggiano.

Dressing:
2 Tbsp. sherry vinegar
1/2 tsp. Dijon mustard
Salt
Freshly ground black pepper
4 Tbsp. extra virgin olive oil

Salad:
4 cups roughly chopped grilled radicchio
4 cups loosely packed torn pieces of arugula
1/4 cup chopped parsley
1/4 cup thinly sliced red onion or shallot
Parmesan shavings

Whisk together the sherry vinegar, mustard, salt, and freshly ground black pepper. Slowly whisk in the extra virgin olive oil. Taste the dressing and add salt or pepper as needed. Mix all the remaining ingredients together in a bowl. Toss with the appropriate amount of dressing just before serving (there may be dressing left over).

Using a vegetable peeler, or very sharp knife, shave off very thin pieces of parmesan and arrange over each serving of salad.

Serve immediately.

~~~~~~~~~~~~~~~~~~~~~~~
Radicchio Recipes

Lentil Salad with Radicchio, Celery, and Capers (Ilva makes an easy salad with marinated lentils and fresh radicchio and celery.)
Radicchio Stuffed with Cheese and Sun-Dried Tomato Vinaigrette (Cris gives directions for a beautifully composed fresh radicchio salad.)
Roasted Radicchio di Treviso (Susan tells how to simply roast radicchio with grated cheese.)
Bruschetta with Burrata and Radicchio Marmalade (Luisa tests Russ Parsons’ recipe for Radicchio Marmalade and finds it “delicious beyond words.”)
Radicchio Soup – Minestra di Radicchio (Susan makes radicchio soup, flavored with vegetables, pancetta, and ham.)

To find more radicchio recipes,
Food Blog Search is a great tool.

~~~~~~~~~~~~~~~~~~~
This is my entry for
Weekend Herb Blogging, hosted this week by Jai and Bee from Jugalbandi.

The first picture, of the Treviso Radicchio and Knife, is my entry for Click, a food photography event hosted and created by Jai and Bee from Jugalbandi. This month’s theme is Au Naturel: food photographed in its natural state.

Tuesday, March 25, 2008

Recipes: Tajarin (Fresh Egg Yolk Tagliarini), Tajarin with White Truffles, Olive Oil, and Parmesan, & Tajarin with Sage Butter

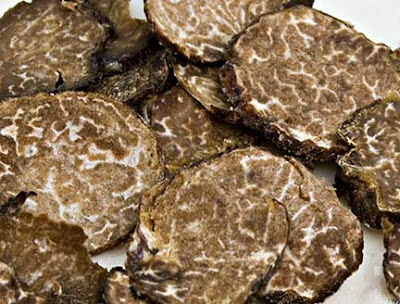
Oregon White Truffle slicesThinly sliced Oregon white truffles

I'm celebrating my 100th article on Mediterranean Cooking in Alaska with white truffles, a food worthy of any special occasion.

The first time I had white truffles was in La Morra, a small town in the heart of Piemonte’s Barolo wine country. Their flavor was seductively good, amazingly good, good like nothing I’d savored before.

Ever since, I’ve had white truffles as often as possible; in other words, rarely. Fresh white truffles are few and far between.

We arrived at an agriturismo on the outskirts of La Morra on a sunny fall afternoon. To check into
Agriturismo Il Gelso, we sat at an outdoor stone table with then owner, Egidio Oberto. He welcomed us with glasses of excellent wine he’d made on-site. Basking in the autumn sun, our tired shoulders relaxed; the day of travelling already forgotten.

The wine whetted our appetites. Despite the early hour, we drove into La Morra looking for the Belvedere, a restaurant my father highly recommended. We parked, intending to roam the streets until we saw a Belvedere sign. When we got out of the car, we noticed the restaurant was directly across the street. That was a very good omen.

We opened the restaurant's door and discovered it was more formal than we’d thought. Despite the white tablecloths and old-world atmosphere, the staff couldn’t have been more welcoming. No reservation? Not a problem. Casually dressed? Come right in. We were comforably seated at a window table with a vineyard view.

The menu that evening featured white truffles (
Tuber magnatum) and porcini (Boletus edulis), two local delicacies that had just come into season. We ordered one or the other or both for every course.

One of my favorite dishes was tajarin tossed in butter and parmesan, over which our waitress showered a flurry of white truffle shavings. Tajarin is a thinly cut fresh pasta unique to Piemonte and made with large amounts of egg yolks.

By the end of the evening, we were intoxicated with white truffles. I remember vividly how happy we were on leaving the Belvedere for a post-dinner stroll around La Morra.

I also remember the truffles’ better-than-expected flavor. I doubt it's possible to eat my fill of fresh Piemontese white truffles, but we spent the rest of our time in the environs of La Morra trying.

Recently, we arrived at our friends' house for dinner and were excited to find Bill making risotto with Oregon white truffles. Cindy brought the truffles home from a trip to Portland.

I’d read about
Oregon white truffles, but this was the first time I’d tried them. They were smaller and much milder than their Italian cousins, but tasted distinctively and unmistakably of truffles. The risotto was a treat.

After dinner, as we bundled up to leave, Cindy generously gave us a handful of pungent Oregon truffles, carefully packed in dry Arborio rice. I lay in bed that night happily thinking about truffles.

Truffles, like mushrooms, are the annual fruit of underground fungi. The perennial part of truffles and mushrooms exists as a web of thread-like filaments in the soil called a mycelium.

In France and Italy, truffles have long been a gourmet treat. It’s only in recent years that commercial harvesters discovered
two varieties of white truffles (Tuber oregonense and Tuber gibbosum) growing in the Douglas fir forests that run up the Pacific coast from Northern California to British Columbia.

We learned at La Morra’s Belvedere that the heady, earthy taste of truffles shines when paired with simple pasta, rice, or egg dishes. Because their flavor dissipates under heat, truffles shouldn’t be cooked. They are best when shaved over food at the time of serving.

I decided to pair the Oregon truffles with tajarin, the Piemontese pasta we ate in La Morra. Luckily, there was a new carton of organic eggs in the refrigerator, so I could make the egg-rich dough.

While making dinner, I thought about the best way to cut the truffles thin enough to release their maximum flavor. I'd settled on a mandoline when I suddenly remembered we owned a
truffle shaver, unused since we’d received it for Christmas several years ago.

Truffles and Truffle ShaverI laughed at myself for owning a truffle shaver, but it was the precise tool needed. The truffle shaver worked perfectly on its inaugural appearance; I hope to put it to good use many times in the future.

Or so I’m dreaming.

NOTE: The Belvedere closed this year. Its owners, the Bovio family, will soon open a new restaurant just outside La Morra called
Bovio Ristorante.
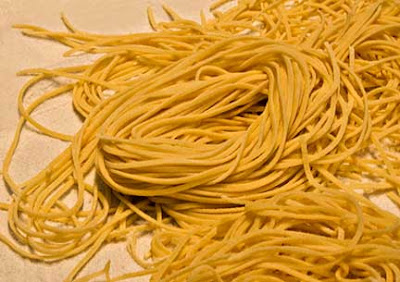
Tajarin, Piemontese Pasta
Tajarin (Fresh Egg Yolk Tagliarini)
Makes enough pasta for 4 servings
Tajarin made with a food processor and pasta machine is quite easy. If you use farm fresh eggs, with their deep yellow yolks, the tajarin will have better flavor and more pronounced color. Use the extra egg whites to make Pistachio Biscotti.

2 cups all purpose flour
1/2 tsp. salt
2 whole eggs
6 egg yolks

Put all the ingredients in a food processor. Process until the ingredients are thoroughly mixed and the dough starts forming clumps. Dump the dough out onto a floured surface and knead for 1 minute, adding a small amount of flour if the dough is sticky. When you’re done, the dough should be smooth and firm. Divide the dough into three portions, cover with plastic wrap, and let sit at room temperature for one hour. (Dough can be made ahead to this point.)

Run each portion of dough through the rollers of a pasta machine, starting with the thickest setting. Lightly dust the pasta dough with flour so it runs smoothly through the rollers. Fold the dough in thirds as if folding a letter, turn it 45 degrees, and again run it through the thickest setting. Repeat the folding, turning, and rolling at least three more times, or until the dough is smooth and shiny.

Set the pasta machine at the next thinnest setting. Run the sheet of pasta through, dusting with flour as necessary. Continue reducing the setting of the pasta machine and running the pasta through until you reach the machine’s second lowest setting. When the sheets of pasta become too long to comfortably handle, cut them into manageable lengths. When each sheet is done, lay it out to rest on a floured surface for 30 minutes.

Using the small (2mm) cutter on the pasta machine, cut the pasta into long lengths. Lay out the cut pasta on a floured cloth, or shape it into loose nests. Let dry for 30 – 60 minutes.

The tajarin is now ready to use.

Tajarin and TrufflesTajarin with White Truffles, Olive Oil, and Parmesan
Serves 4
If you don’t have access to fresh truffles, use white truffle oil instead. Be careful not to overdo; a little truffle oil goes a long ways.

Pasta:
1 recipe Tajarin (see above)
2 Tbsp. coarse salt

Sauce:
2 – 4 Tbsp. extra virgin olive oil
Salt
Freshly ground black pepper
6 Tbsp. freshly grated Parmigiano-Reggiano cheese
Freshly shaved white truffles or white truffle oil

Fill a large pot with water, bring it to a boil, add the salt, and stir in the pasta. Cook for 1 minute. Drain.

Return the pasta to the pan, toss with 2 Tbsp. olive oil, salt, freshly ground black pepper, and 2 Tbsp. parmesan. If the pasta is too dry, add the remaining olive oil. Divide the pasta between four serving plates; top each plate with 1 Tbsp. parmesan. Shave truffles over the pasta (or drizzle with a small amount of truffle oil) and serve immediately.

Tajarin with Sage Butter
Serves 4
To perfect the tajarin recipe, I had to make it several times. This is the simplest and most recent version. Be sure to use good butter and fresh sage leaves; in a dish with so few ingredients, their quality matters.

Pasta:
1 recipe Tajarin (see above)
2 Tbsp. coarse salt

Sauce:
4 Tbsp. butter
2 Tbsp. minced sage
Salt
Freshly ground black pepper
6 Tbsp. freshly grated Parmigiano-Reggiano cheese

Melt the butter over low heat, stir in the sage, and season lightly with salt and freshly ground black pepper.

Fill a large pot with water, bring it to a boil, add the salt, and stir in the pasta. Cook for 1 minute. Drain.

Return the pasta to the pan, toss with the sage butter and 2 Tbsp. parmesan. Divide the pasta between four serving plates; top each plate with 1 Tbsp. parmesan. Serve immediately.

~~~~~~~~~~~~~~~~~~~~~~~~~~
Thie is my entry for the Second Annual Pullet Surprise: Eggs hosted by Peanut Butter Etoufee.