Showing posts with label peppers. Show all posts

Tuesday, October 13, 2009

Eggplant Recipes: Melitzanosalata & Hünkar Beğendi with Tomato-Lamb Stew (Μελιτζανοσαλάτα με Πιπεριές & Χιουνκιάρ Μπεγiεντί με Αρνί Κατσαρόλας)

Two simple and delicious ways to use eggplant are Eggplant-Red Pepper Dip (Melitzanosalata) and Hünkar Beğendi, a smoky eggplant purée that pairs perfectly with Tomato-Lamb Stew.

Even though we recently returned from Greece, I’m still craving Greek food. Luckily, when I went to Costco to restock our supplies, they had fresh eggplant and figs. Combined with the lamb, crusty bread, and cheese Costco always has on hand (and a quick trip to the farmers’ market for a pile of vegetables), we had everything necessary for a Greek feast. Or two. Or ten.

I was particularly happy about the eggplant. They were in perfect condition: firm flesh and shiny, unmarred skin. Unlike many eggplant sold in Anchorage, these were picked small, and hadn’t developed a large mass of seeds inside.

The Costco eggplant came 4 to the 1.75-pound bag. To be efficient and save energy, I oven-roasted them all at one time. (If you want to store eggplant raw,
here’s how.) Half the roasted eggplant went immediately into Melitzanosalata; the other two I refrigerated to save for Hünkar Beğendi.

Fire-grilled eggplant tastes better in recipes than oven-roasted but, the day I cooked eggplant, we were too damn tired from the trip home to start a fire. To add smokiness to my Melitzanosalata, I added a grilled-over-a-gas-burner red pepper. It’s lucky there were only two of us; the pepper-laden Melitzanosalata disappeared quickly.

I used a different technique to add smokiness to Hünkar Beğendi. I had roasted 2 eggplants whole, and stored them without breaking the skins (if you break the skins, the eggplant juices leak out). I took the eggplant directly out of the refrigerator and charred their skins over a gas burner. Because the eggplants were cold when I started charring them, they didn’t leak juices over the stove, as I 'd feared they might. This “smoking” technique was quick, easy, worked well, and added lots of flavor. I’ll do it again.

Hünkar Beğendi is a famous Turkish eggplant dish that’s also made in Greece, particularly in areas where
many people have roots in Constantinople (Istanbul), Smyrna (Izmir), or other parts of Anatolia (Asia Minor). Translations for “Hünkar Beğendi” abound: Sultan’s Delight, Sultan’s Pleasure, The Sultan Liked It, Her Majesty’s Delight, Her Majesty’s Favorite, and The Sultan Approved.

The origins of Hünkar Beğendi are murky.
Some say the dish was created in the early-17th century for Sultan Murad IV (who was half-Greek). Others say it was created for a French empress in the late 19th century. My favorite version of this story is in The Art of Turkish Cooking by Neset Eren (New York 1969):

When the Empress Eugénie, the wife of Napoleon III, was in Istanbul as the guest of Sultan Abdulaziz, the Ottoman emperor, she fell in love with eggplant purée, at that time a specialty of the Topkapi Palace. She asked her host if he would allow his chef to teach her cook how to prepare it. The sultan obliged. The next day the French chef requested an audience with the empress and begged to be excused from this impossible task. “I took my book and my scales to the Turkish chef,” he said, “and he threw them out. ‘An imperial chef,’ he told me, ‘cooks with his feelings, his eyes, his nose.’” The empress returned to France without the recipe for her favorite dish.
In
Lords of the Horizons: A History of the Ottoman Empire (London 1998), historian Jason Goodwin repeats the Empress Eugénie story. However, in Η Οθωμανική Μαγειρική: 99 Παλατιανές Συνταγές (Ottoman Cooking: 99 Recipes from the Palace) (Athens 2004), an extremely interesting and well-researched book, author Marianna Gerasimos says:

I searched hard to find how and when the famous eggplant puree, called Hünkar Beğendi, entered Ottoman cuisine. … There are many rumors and allegations about [it being made for Empress Eugénie] but, for now, there is no written historical evidence of this.
Although Empress Eugénie may not have feasted on Hünkar Beğendi, I certainly have. In the same way that mashed potatoes are exactly right with turkey and gravy, Hünkar Beğendi and Lamb Stew are wonderful together.

Eggplant-Red Pepper Dip (Melitzanosalata) (Μελιτζανοσαλάτα με Πιπεριές)
Makes 1 cup
The smoky flavor of eggplant grilled over an open fire makes the best Melitzanosalata, although it’s not absolutely necessary to success. When I don’t want to start a fire, I oven-roast the eggplant and add a grilled red pepper for smokiness. Although you can make Melitzanosalata in a food processor, I far prefer the more rustic texture that results from knife-chopping the eggplant. Serve with crusty bread and olives for a tasty appetizer, or as a flavorful accompaniment to grilled meat.


1 1-pound eggplant, or 2 1/2-pound eggplants
Olive oil
1 red bell pepper
2 cloves garlic
1/2 tsp. salt
Freshly ground black pepper
4-6 tsp. white wine vinegar
1/3 cup extra virgin olive oil

Preheat the oven to 400°F.

Rub the whole, uncut eggplant with olive oil, and place on a rimmed baking sheet. Bake for 45 – 70 minutes, depending on the size of the eggplant, or until the eggplant collapses and is cooked all the way through. (Better yet, grill the eggplant over fire until it’s cooked through.) Peel the eggplant, cut it into large chunks, and place the chunks in a colander for 15 minutes to let some of the juices drain off. When the eggplant is cool enough to handle, use your hands to squeeze out as much liquid as you can.

Roast and clean the pepper (see Note below).

Place the eggplant flesh on a cutting board, finely chop, and put in a bowl. Finely chop the roasted red pepper and add to the bowl. Purée the garlic by mashing it into the salt, and add to the bowl. Add freshly ground black pepper, 4 tsp. vinegar, and extra virgin olive oil, and mix well. Taste and add vinegar or salt, as needed.

To serve, spread the Melitzanosalata evenly over a plate and drizzle with a small amount of extra virgin olive oil.

Note on Roasting and Cleaning Peppers: The traditional method of roasting peppers is over a hot wood fire, but you can also roast them on a gas grill, directly on a gas burner (without a pan), under the broiler, or by baking in a 450° oven for 30 minutes. Unless you are baking them in the oven, turn the peppers frequently as they roast to ensure the skins char evenly and the flesh doesn’t overcook. When the skin is completely blackened, place the peppers in a paper bag and close it up for 5 minutes. Hot pepper flesh releases steam in the closed bag, loosening the charred skin and making it easier to peel.

Once the peppers are cool enough to handle, remove the burned skin from the softened flesh with your fingers or a paper towel, gently scraping away any stuck bits with a knife. Resist the temptation to rinse the peppers in water, as doing so washes away too much flavor. If necessary, dip your fingers in a bowl of water to release clinging charred pepper skins. Remove the seeds and any white pulp from the inside of the pepper.


Smoky Eggplant Purée with Tomato-Lamb Stew (Hünkar Beğendi) (Χιουνκιάρ Μπεγiεντί με Αρνί Κατσαρόλας)
Serves 4
Beef can be substituted for lamb in the stew; meatballs and grilled meats also go well with Hünkar Beğendi. In Anchorage, the best price for lamb is often on boneless leg roasts at Costco. I cut out and grill a couple “steaks” from the center of the roast, and then make stew out of each end. If you use lamb with bones, cook them in the stew for extra flavor. Unlike Melitzanosalata, smokiness is an essential flavor in Hünkar Beğendi. If you don’t have access to a grill, oven-roast the eggplant as described in the Melitzanosalata recipe, refrigerate them without puncturing the skin, and thoroughly char the skins directly over a gas burner.

Tomato-Lamb Stew:
1 1/2 – 1 3/4 lb. boneless lamb, excess fat removed
Salt
Freshly ground black pepper
2 Tbsp. olive oil
2 cups diced yellow onion, 1/4” dice
1 Tbsp. minced garlic
1 tsp. Aleppo pepper or 1/2 tsp. crushed red pepper flakes (optional)
1 14.5 ounce can (or 2 cups fresh) diced tomatoes
1 Tbsp. dried oregano, crushed
2 Tbsp. tomato paste
2 cups water

Smoky Eggplant Purée:
1 1-pound eggplant, or 2 1/2-pound eggplants
2 Tbsp. lemon juice
1 cup whole milk
2 Tbsp. butter
3 Tbsp. all-purpose flour
1/2 cup grated kasseri or Romano cheese
Pinch of nutmeg

Make the Tomato-Lamb Stew: Wash and dry the meat, cut it into 1” cubes, and season on both sides with salt and freshly ground black pepper. In a large pot, cook the lamb in olive oil until it is browned all over. Stir in the onions, lightly season with salt and freshly ground black pepper, and sauté until the onions begin to turn golden. Stir in the garlic and Aleppo pepper and cook for 1 minute. Stir in the tomatoes, oregano, tomato paste, and water, bring to a boil, cover, turn down the heat as low as possible, and simmer for 1 hour. Remove the cover and simmer for 30-60 minutes, or until the lamb is very tender and the sauce the thickness you prefer. Stir the sauce from time to time and, if it starts sticking, add a little bit more water. Taste and add salt and freshly ground black pepper, as needed. (The stew can be made ahead, refrigerated, and reheated just before serving.)

Make the Smoky Eggplant Purée: Grill the eggplant whole until it softens, collapses, and is slightly charred on all sides (or oven-roast and char as described in note above). Peel the eggplant, cut it into large chunks, and place the chunks in a colander for 15 minutes to let some of the juices drain off. When the eggplant is cool enough to handle, use your hands to squeeze out as much liquid as you can. Place the eggplant flesh on a cutting board, finely chop, and sprinkle with the lemon juice.

Warm the milk over low heat or in the microwave. Melt the butter in a saucepan, mix in the flour and cook for two minutes, stirring constantly; be careful not to brown this mixture. Slowly stir in the warm milk and cook, stirring, until the sauce is thick and smooth. Add the eggplant, cheese, and nutmeg and cook, stirring constantly, until the ingredients are thoroughly combined. Taste and add salt, as needed.

To serve, spoon some Smoky Eggplant Purée onto a plate and top with the Tomato-Lamb Stew.
~~~~~~~~~~~~~~~~~~~~~~~~~~~~~~~
This is my entry for
Weekend Herb Blogging, hosted this week by Cinzia from Cindystar.
~~~~~~~~~~~~~~~~~~~~~~~~~~~~~~~

Bob, in a rabbit stupor

Sunday, April 19, 2009

Ingredient: Tepary Beans with Recipe for Tepary Bean and Vegetable Stew

The snow in our front yard is nearly gone, the ice in the pond has melted, and spring is quickening. After our difficult winter, I’m looking forward to seasonal change even more eagerly than usual.

Speaking of winter, the overwhelming support from the blogging community during my father’s long illness and ultimate death was much appreciated. It’s not easy to lose a parent, but the kindness and concern shown by so many helped. Thank you all so much.

Because I spent so much of the winter in Washington near my parents, I was able to see my sister regularly, to my great joy. Though we’re two years apart and have the closeness that comes from childhood bedroom-sharing, as adults we’ve always lived far away from each other. It was indescribably soul-satisfying to have her (and her husband and dogs) be part of daily life the last few months.

Shopping for food and cooking dinner with my sister brought new life to what too often are routine activities. Despite our years apart, we’ve developed similar cooking styles and work together smoothly and easily in the kitchen.

One of the projects we undertook was finding and cooking tepary beans for My Legume Love Affair Ninth Helping. Despite searching in numerous Seattle area stores, we were unable to find tepary beans and resorted to ordering them
online. When they arrived, we made Tepary Bean and Vegetable Stew and loved it. I’ll definitely be cooking with tepary beans again.

Tepary Beans

Tepary beans (Phaseolus acutifolius) are a bush bean originating in the desert areas of Mexico and the American Southwest. They grow best in extreme heat and under very dry conditions. Tepary beans’ taproot is twice as long as common beans’ (Phaseolus vulgaris), which allows teparies to efficiently take advantage of even small amounts of soil moisture.

Nutritionally, tiny tepary beans (1/4” long, the size of large lentils) are higher in protein, iron, calcium, and fiber than most beans. Their nutritional benefits, sweet, nutty flavor, and relatively quick cooking time make teparies well worth searching out.

Jay Bost, in the
June 2006 Seeds of Change newsletter, wrote a fascinating article about tepary beans. His discussion of the growing conditions under which teparies thrive makes me interested in trying them in Greece, which has the necessary hot dry summers:

“Due to its native habitat in the Sonoran Desert, domesticated tepary beans … are considered by many to be the most drought-tolerant annual legume in the world. They are capable of producing a harvest of beans with a single rain in the harshest conditions; when irrigated, they produce higher yields only up to a certain point, after which excess moisture becomes a detriment and leads to overproduction of foliage and low bean production. In fact, it appears that moisture stress is necessary to trigger fruiting. Part of the tepary bean's secret to success in dry areas is to grow quickly when water is available. While pinto beans take 90 to 120 days to maturity, teparies take only 75 to 85. As water shortages become a reality in many parts of the U.S. and around the world, teparies will undoubtedly play an important role in dryland agriculture. In fact, tepary cultivation is now taking place in dry areas of Africa and is being revived in southern Arizona.”


Bost details teparies’ nutritional benefits:

“Part of the tepary bean's appeal, in addition to its drought tolerance, is its superior nutritional content. It has a higher protein content (23–30%) than common beans such as pinto, kidney, and navy, as well as higher levels of oil, calcium, iron, magnesium, zinc, phosphorus, and potassium. While higher in all of these desired nutrients, tepary beans are lower in polyunsaturated fat and in the anti-enzymatic compounds which make common beans hard to digest (Hamama and Bhardwaj 2002). … Tepary beans are proving to be an ideal food for people prone to diabetes or suffering from diabetes owing to the beans' high fiber level, which make them a "slow-release food"; that is, tepary beans' sugars are released slowly and steadily, rather than in a spike as in many high carbohydrate, low fiber foods common in our diets.”


The
Ark of Taste is a list of endangered food plants and animals that the Slow Food Foundation for Biodiversity seeks to protect and defend. Tepary Beans are now on the Ark of Taste list for the United States.

I can’t wait to start playing around in the kitchen with tepary beans, and hope to soon convince a local store to carry them!


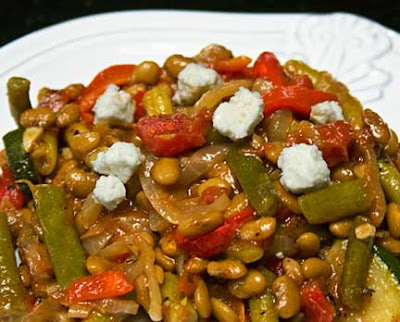
Tepary Bean and Vegetable StewTepary Bean and Vegetable Stew
Serves 4
Adapted from Heirloom Beans by Steve Sando and Vanessa Barrington (Chronicle Books 2008)
Tepary beans’ firm texture and sweet flavor pair well with most vegetables. This stew includes peppers, green beans, zucchini, and tomatoes, all of which, like tepary beans, originate in the Americas. I roast red peppers directly over a gas burner while the beans are cooking, put them in a closed paper bag until cool (which makes them easier to peel), remove the charred skin with my fingers (don’t use water; it’ll take away too much flavor), and cut them into thin strips. The sweet bean and vegetable stew is perfectly set off by best-quality, sharp, salty feta cheese from Greece.

1/2 pound dried tepary beans
Water
3 cups diced onions, 1/2” dice (1 large onion)
1/4 cup olive oil, divided
Salt
Freshly ground black pepper
2 Tbsp. minced garlic
1 14.5-ounce can diced tomatoes, preferably fire-roasted
1/2 pound green beans, trimmed and cut into 1” lengths (4-5 cups)
1 large zucchini, cut in half lengthwise and then diagonally into 1/4” slices (4 cups)
2 tsp. minced fresh thyme
2 red bell peppers, roasted, cut into strips and then in half
4-6 ounces best quality feta cheese, crumbled, for garnish

Spread out the tepary beans in a flat pan and inspect carefully, removing any pebbles or debris. Rinse well with cold water. Put the beans in a large pot with enough water to cover them by 3 inches. Bring to a boil, and cook for 5 minutes. Cover and turn off the heat. Let sit for at least one hour. (NOTE: Next time I cook tepary beans, I’ll try eliminating this step; I suspect tiny teparies don’t need pre-soaking or pre-cooking.)

Bring the tepary beans and their liquid back to the boil (do not discard the original water). Turn down the heat, and simmer for 1 – 2 hours, or until the beans are just tender and not at all mushy.

In a separate pan, sauté the onions, lightly seasoned with salt and freshly ground black pepper, in 2 Tbsp. olive oil until the onions soften and start to turn golden. Stir in the garlic and cook for 1 minute. When the tepary beans are done simmering, scrape the onions, garlic, and oil into the bean pot. Stir in the tomatoes and green beans. Bring to a boil, cover, turn down the heat, and simmer for 15-20 minutes or until the green beans are tender.

While the green beans are cooking, using the same pan in which the onions were cooked, sauté the zucchini, lightly seasoned with salt and freshly ground black pepper, in olive oil. Cook until the zucchini browns lightly and begins to soften. Turn off the heat and stir in the thyme.

When the green beans are tender, scrape the zucchini, thyme, and their oil into the bean pot. Stir in the roasted red pepper pieces. Simmer for 5 minutes.

Serve hot, garnished with crumbled feta.
~~~~~~~~~~~~~~~~~~~~~~~~~~~~~
This is an entry for
My Legume Love Affair – 9th Helping (MLLA9), created by Susan of The Well-Seasoned Cook, which I hosted in March 2009. My Legume Love Affair - 10th Helping for April 2009 is being hosted by Courtney of Coco Cooks.

Saturday, February 7, 2009

Recipe for Seafood and Vegetable Stew with Rouille (Red Pepper Sauce)

Fish Stew with Vegetables and RouilleFish and Vegetable Stew with Rouille

The discovery of a new dish does more for human happiness than the discovery of a new star.
John Anthelme Brillat-Savarin, Physiologie du Gout (Physiology of Taste) (1825)

Where do recipes come from? Family, community, tradition, and serendipitous accident are easy but incomplete answers.

The primary source of recipes has always been an individual cook’s imagination and palate. Over time, original recipes are modified by other cooks’ imaginations and adjusted by yet more cooks’ palates, to infinity and without limitation.

The food articles I enjoy most are ones that explain how a dish was developed or why a cook chose to combine certain flavors. Although its authors’ cooking styles and skills are quite different from my own, Ideas in Food is one of my favorite blogs. It focuses on the techniques and thought processes that go into creating unique flavor combinations.

I recently made Seafood and Vegetable Stew with Rouille. Here's how it came into being:

My kitchen counter was overflowing with
garnet yams, bounty from more than one Full Circle Farms CSA box. I wanted to do something other than oven-roasting the yams or making oven fries. Looking for inspiration, I randomly pulled cookbooks off the shelves.

Barbara Kafka’s book
Soup: A Way of Life had an interesting recipe for Fall Fish Stew that included sweet potatoes. I decided to try it.

My first version of the stew was similar to Kafka’s, though I substituted sautéed sweet potatoes for boiled and edamame beans for limas. After tasting the broth, I wanted more flavor.

In my next version, I added sautéed onions and red bell peppers, and used a different Rouille recipe than Kafka’s. I seasoned the Rouille with dried, ground red Moroccan pepper (poivron rouge). This version was tasty, but I thought it could be better.

In my final version, I added crushed fennel seeds and shelled shrimp. This combination was exactly what I wanted. Although inspired by Kafka, the final stew is uniquely my own.

Map of High Atlas MountainsI internet-ordered poivron rouge from World Spice Merchants in Seattle, one of my favorite herb and spice purveyors. World Spice describes poivron rouge as “sweet red pepper … produced from sweet round red niora peppers grown in the lush valleys at the foot of the High Atlas Mountains to the northeast of Marrakech.“

Poivron Rouge and PaprikaPoivron Rouge and Sweet Hungarian Paprika
Although Moroccan recipes often call for paprika, niora peppers are what Moroccans use for “paprika.” The flavor of ground niora differs significantly from sweet Hungarian paprika. Niora is spicier and has a fruitier flavor than its Hungarian counterpart, which has a slightly bitter aftertaste.

Moroccan niora peppers are likely the same as the ñora peppers used in
Romesco sauce and other Spanish and Catalonian dishes. In addition to having similar names, nioras and ñoras look the same. Most texts refer to nioras and ñoras only as members of the Capsicum annuum family; in other words, as domesticated peppers. However, in Catalan Cuisine, Colman Andrews says pepper scholar Charles Perry “thinks the nyora [ñora] pepper is the variety scientifically called Capsicum annuum grossum/provar. Pomiforme/sub-var. Conc. Humilirotundum Haz."

No matter what its scientific designation might be, poivron rouge has wonderful flavor and a permanent place in my spice cupboard. Its mildly spicy and fruity tastes make distinctively delicious Rouille and a mouth-wateringly good Seafood and Vegetable Stew.

Seafood Stew with Vegetables and RouilleSeafood and Vegetable Stew with Rouille (Red Pepper Sauce)
Serves 4
The stew may also be made with just fish or just shrimp; if so, use 1 pound of either ingredient. Although not necessary, steamed rice is a nice complement to the spicy, aromatic broth. Serve the rice on the side so eaters can stir the amount they desire into the stew.

1 cup peeled, diced garnet yams or sweet potatoes, 1/2” dice (1 garnet yam)
2 Tbsp. olive oil
Salt
Freshly ground black pepper
1 cup diced red bell pepper, 1/2” dice (1-2 peppers)
1 cup diced yellow onion, 1/2” dice
1 tsp. freshly crushed fennel seed
4 cups fish stock or clam broth (nectar)
1 recipe Rouille (see below)
1 cup shelled edamame beans (thawed) or fresh fava beans
1/2 pound skinless fillets of halibut, rockfish, cod, or other white-fleshed fish, cut in 3/4” pieces
1/2 pound shelled and cleaned shrimp,
16-20 count, halved crosswise
1/4 cup fresh lemon juice (1 lemon)

Minced parsley for garnish

Sauté the garnet yams in olive oil, lightly seasoned with salt and freshly ground black pepper, until they start to brown around the edges. Stir in the red bell peppers and onions, and continue to sauté until the onions soften. Add the crushed fennel seed and sauté for 1 minute. Stir in the fish stock, bring to a boil, turn down the heat and simmer for 15 minutes. (The recipe may be made ahead to this point.)

In a small bowl, whisk one cup of the hot broth into the Rouille. Stir this mixture into the simmering stew pot, along with the edamame beans, fish, and shrimp. Do not let boil or the Rouille may curdle. Simmer for 3-4 minutes, or until the seafood is cooked through. Stir in the lemon juice. Taste and add salt or lemon juice, as needed.

Sprinkle with minced parsley and serve immediately with steamed rice and wedges of lemon.

Rouille
Recipe adapted from
In the Hands of a Chef by Jody Adams
Rouille goes well with all fish, and is a tasty addition to fish salads. The recipe may be doubled or tripled and keeps for a week in the refrigerator.

1 egg yolk
1/2 tsp. Dijon mustard
1 Tbsp. fresh lemon juice
1/4 cup vegetable oil
1/4 cup best quality extra virgin olive oil
2 tsp. chopped garlic
1/2 tsp. salt
4 tsp.
poivron rouge or sweet Hungarian paprika
1/4 tsp. cayenne pepper

Put the egg yolk, mustard, and lemon juice in a blender and mix well. While the blender is running, add the vegetable oil drop by drop so that it emulsifies with the other ingredients. While the blender is running, pour in the olive oil in a steady stream. Add the remaining ingredients and blend until the Rouille is very smooth, scraping down the sides of the blender to ensure all ingredients are thoroughly incorporated.
~~~~~~~~~~~~~~~~~~~~~~
This is my recipe for
Weekend Herb Blogging, hosted this week by Dee from The Daily Tiffin.

Wednesday, September 24, 2008

Gardens and Kittens with Recipe for Eggplant Kebab on Rosemary Skewers (Κεμπάμπ με Μελιτζάνες και Δενδρολίβανο)

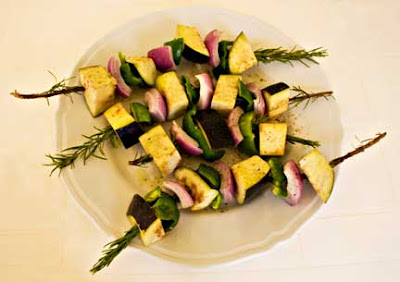
Eggplant Kebabs Ready for the GrillCompleting an eggplant trifecta, yesterday we had Eggplant Kebab on Rosemary Skewers. (Eggplant Clafoutis and Spaghetti with Eggplant and Tomato Sauce make up the other legs of the trifecta.)

Eggplant Kebab came about through sheer serendipity. I was washing eggplant, idly thinking about how to prepare it, when I noticed the vase of rosemary branches on the windowsill over the sink.

Rosemary and JasmineRosemary Bushes and Garden with Blue Jasmine (top left)

Two years ago at Easter we planted two tiny rosemary plants that are now large bushes. The bushes are growing all akimbo, having outgrown the small amount of soil in which they’re planted. The windowsill vase of rosemary contained the trimmings from a branch broken off by the kittens.

Three years ago we began feeding a mother cat with kittens. She’s been back every year since then, each time with a new brood. Over the years, the cat feeding has progressed from once in a while to twice a day, from leftovers in the back yard to cat food on the veranda.

Kittens in the GardenKittens in the Garden

Effie and Nikos, cousins who live nearby, use our yard when we’re not here for their kitchen garden, which they generously turn over to us when we're in the village. In our absence, they’re at our house most every day to weed, water, or harvest. They say the mother cat and kittens disappeared when we did last year and, endearingly, showed up again only the day before we returned.

The kittens are endlessly entertaining. We’re happy to give them a vacation from scrounging food in dumpsters or catching it when they can. Only a curmudgeon would care that gamboling kittens may damage a few plants.

Rosemary makes splendid souvlaki skewers. When I saw the rosemary while my hands were full of eggplant, a picture of Eggplant Kebab on Rosemary Skewers jumped immediately to mind. I had to have them.

Eggplant Kebabs on the GrillI alternated eggplant on the rosemary skewers with onions and green peppers, and would have used cherry tomatoes if I’d had any. Grilled over a medium hot fire, and brushed with garlic and oil while still hot, Eggplant Kebabs are flavorful and very tasty. Rosemary lightly scents the eggplant, while the fresh garlic oil complements the grill's smoky essence.
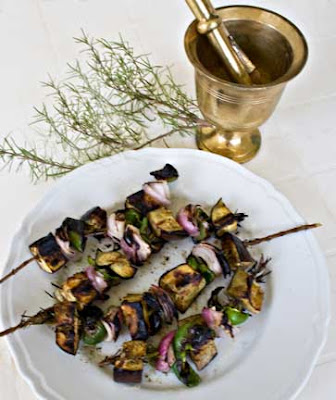
In the future, if the kittens aren’t around to break off some rosemary, I’ll just have to do it myself. I’m definitely making Eggplant Kebab again.

Eggplant Kebabs on Rosemary Skewers
Eggplant Kebab on Rosemary Skewers (Κεμπάμπ με Μελιτζάνες και Δενδρολίβανο)
Serves 2
Cherry tomatoes would make an attractive addition to Eggplant Kebab. If the rosemary is starting to form new shoots along its length, break these off to make it easier to push the vegetables up the skewers.

Kebab:
4 rosemary branches, 12 inches long
1 large eggplant (about 1 pound), cut in 1 1/2” chunks
1 – 2 red onions, cut in 1 1/2” chunks
1 – 2 green peppers, cut in 1 1/2” chunks
Olive oil
Salt
Freshly ground black pepper

Garlic and Oil:
2 cloves garlic
1/4 tsp. salt
1/3 cup olive oil

Cut the ends off the rosemary branches at an angle to make sharp points. Alternate chunks of eggplant, onions, and peppers on the skewers, starting and ending with a chunk of eggplant. Brush the vegetables with olive oil and season well with salt and freshly ground black pepper.

Puree the garlic and salt together (a mortar and pestle is the best tool for this job, but it can also be done in a blender). Mix in the olive oil.

Grill the eggplant skewers over a medium hot fire. As soon as they’re done, brush them with the garlic and oil. Serve immediately with a fresh tomato and onion salad, a slice of feta, a handful of olives, and crusty bread.

Kittens and Sea UrchinsKittens with Sea Urchins

Wednesday, July 23, 2008

Recipe for Red Pepper and Tapenade Tart (Πιπερόπιτα με Πάστα Ελιάς)

Workmen have been at the house for a week replacing our ancient furnaces with a new boiler. For the last five hours they’ve been struggling to run long lengths of pipe through a narrow opening in the basement ceiling's sheetrock. The sound made by repeatedly pounding and banging on metal ductwork is impressively loud.

It’s odd to have so much racket during the day; I’m used to a silent house. Mind you, I’m not complaining and am glad we’re having the work done. It’s just interesting how sustained noise interferes with my ability to hold a coherent thought.

When the men left for lunch, blissful silence briefly returned. I took the opportunity to eat in peace, and enjoyed the last of the Red Pepper and Tapenade Tart for lunch. Three days in the refrigerator and it still tasted terrific; this recipe’s a keeper.

Red Pepper and Tapenade TartRed Pepper and Tapenade Tart (Πιπερόπιτα με Πάστα Ελιάς)
Serves 4-6 (one 9” tart)


Mediterranean Cooking in Alaska has moved as of March 2011. To read this post please go to


http://www.laurieconstantino.com/red-pepper-and-tapenade-tart/


Please click on over and visit my new site. Thank you!


Monday, June 30, 2008

The Golden Hills of Greece with Recipe for Bouyiourdi (Spicy Baked Feta and Tomatoes) (Μπουγιουρντί)

By summer’s end, the hills of the Greek island we call home are painted in golds and browns. Patches of green appear only in the island’s narrow valleys, its vineyards, and the ubiquitous fig trees.

Until we remodeled my husband’s grandmother’s house in Greece, I’d spent my life in the maritime regions of the Pacific Northwest and Alaska. For me, natural beauty meant lush foliage, evergreen-lined shores, and snow-topped mountains.

It took me years to appreciate the subtle beauty of dry Mediterranean hillsides. And appreciate I do. Joy fills my heart when we begin our approach to the island’s tiny airport and I get my first glimpse of its golden hills.

Without trees to obscure the view, the deep blue Aegean sky and sea are constant companions. Their brilliant blues combine with the burnished gold landscape and lazy cries of circling birds to induce an overwhelming sense of peace and calm.

We walk in the morning, before the sun’s heat makes outside forays intolerable for my fair Alaskan skin. In September, a month we are always in Greece, prickly, inhospitable plants dominate the hillsides, so we walk on the farm roads surrounding the village.

Spiky plants abound in late summer because they're the only ones that survive the constantly grazing sheep and goats which scour the fields of more forgiving flora. It’s difficult to begrudge the grazing, knowing it’s responsible for the full-flavored sheep and goats milk that villagers turn into excellent cheeses.

Cheese is ever-present on village tables. Each meal is accompanied by chunks of white cheeses like kalathaki or feta, or harder cheeses like melixloro, ladotyri, or graviera. Saganaki, fried cheese served with a squeeze of lemon, has long been a favorite island appetizer.

In recent years, a new-to-the-island appetizer called Bouyiourdi (boo-your-DEE / Μπουγιουρντί) has conquered the hearts of island taverna patrons. Although Bouyiourdi is now popular on the island, I first learned to make it in Alaska from my friend Maria Baskous, who learned it from her friend Lily Koukourikou of Thessaloniki.

Bouyiourdi is feta baked until hot and creamy with slices of tomatoes and spicy hot pepper flakes. Last year, at our final island dinner before returning to Alaska, our table of 12 downed three orders of Bouyiourdi in quick succession before even looking at the many other appetizers gracing the table.

Back in Alaska, I often bring Bouyiourdi to potlucks. It’s one of my most requested recipes. As I tell my friends, Bouyiourdi may be dead simple to make, but it’s dangerously addictive. Consider yourself warned.

Bouyiourdi (Μπουγιουρντί)
Measurements are provided as a rough guide but, in truth, I never measure anything when I make Bouyiourdi. I layer 1/2” slices of feta in whatever baking dish I grab, sprinkle it with oregano and red pepper flakes, layer it with tomatoes and peppers (or green garlic as shown in the picture), sprinkle it with more oregano, drizzle it with olive oil, cover and bake. You can also bake Bouyiourdi in aluminum foil packets.

1/2 pound feta cheese cut in 1/2” slices (see NOTE below)
1 Tbsp. dried oregano, crushed
1 tsp. crushed red pepper flakes
2 medium tomatoes cut in 1/2” slices
1 cubanelle or Anaheim pepper (or 1-2 stalks green garlic), sliced
2 Tbsp. olive oil
Thin slices of crusty bread, fresh or toasted

Preheat the oven to 400°F.

Cover the bottom of a baking dish with slices of feta. Sprinkle with half the oregano and all the crushed red pepper flakes. Cover with slices of tomato and peppers (or green garlic). Sprinkle with the remaining oregano and drizzle with olive oil. Cover with foil and bake for 20 minutes. Remove the foil and bake for 5 – 10 minutes, or until the cheese and oil are bubbling. Serve immediately with slices of bread.

NOTE on Feta: In the US, my favorite fetas all come from Greece and are made from a mixture of sheep and goats milk. Dodonis is the brand I prefer. No matter where it’s from, the best feta is kept in brine until it sold and is available in specialty cheese stores, ethnic markets, and groceries like Whole Foods.

If you can’t find feta in brine, buy firm feta in vacuum packed bags. Never buy pre-crumbled feta; too often it is made from the bits and pieces that fall off larger pieces of cheese. Feta takes two seconds to crumble in your hand, so you don’t even save any time when you buy the pre-crumbled stuff. As for “lite” feta, don’t even think about it.

Friday, April 25, 2008

Recipe: Red Cabbage and Spicy Peppers (Λάχανο Κόκκινο με Καυτερές Πιπεριές)

Spring in Alaska keeps you on your toes. For the past week, it’s been sunny and warm. Nearly all the snow was gone. At our house it was 60°F yesterday. We broke out the grill for the first time all year. Mosquitoes were out and active.

This morning it started hailing, followed shortly by snow. It’s been snowing all day now, at least 12” so far and rising. The new predicts another foot of snow.


I went out today and there were accidents everywhere; no doubt partially caused by people taking their snow tires off too early. In my area, several major roads are closed. The power just blinked off and on.

I know it won’t last long, but still. Snow at the end of April is wrong. I shouldn’t complain; my friend Sheila says the record last snowfall in Anchorage occurred on a May 22.

With all the snow, I wanted something warm and comforting to eat, but didn’t want to work very hard to get it. I settled on quickly sautéed Red Cabbage and Spicy Peppers, a full-flavored dish that goes together quickly.

The cabbage recipe comes from
Tangerine’s Kitchen, an interesting blog specializing in Indian foods, with many recipes, including the cabbage, from the Kerala region.

I found the recipe because I was paired with Tangerine’s Kitchen for this month’s Taste and Create organized by For the Love of Food. In this event, food writers are paired with a randomly assigned partner, and asked to cook and review one recipe from their partner’s blog.

One of my challenges in cooking from
Tangerine’s Kitchen was that many of the ingredients she uses aren’t available in Alaska. Tangerine had the same problem with finding ingredients for my recipes. Our difficulties are understandable; there are few places more different than India and Alaska.

Red Cabbage and Spicy Peppers is a beautifully purple dish, and would make a terrific accompaniment to fish of any kind. While I was eating it, I realized how well it’d go with salmon; not only are the flavors complimentary, but the standout colors of salmon and red cabbage would make a gorgeous plate.

Red Cabbage and Spicy Peppers (Λάχανο Κόκκινο με Καυτερές Πιπεριές)
Serves 4 – 6
Adapted from
Tangerine’s Kitchen
This recipe goes together very quickly and has a lot of flavor. Both Tangerine and I prefer the cabbage when it's a little crunchy; if you prefer softer cabbage, cook it longer. The peppers may either be chopped, as Tangerine recommends, or thinly sliced, as I did. With Tangerine’s method, the peppers melt into the overall flavor of the dish; with mine, there are bites in which the pepper flavor boldly stands out. Next time I make this, I’ll add a tablespoon of minced garlic and lots of freshly ground black pepper.


1 1/2 pound red cabbage
3 cups thinly sliced onions
7 jalapeño or other hot peppers, chopped or thinly sliced
2 Tbsp. olive oil
Salt

Cut the cabbage in half and discard the core. Thinly slice the cabbage.

In a Dutch oven, sauté the onions and jalapeños, lightly seasoned with salt, in olive oil until they soften and the onions are translucent. Add the cabbage and stir well to evenly distribute the onions and peppers. Turn down the heat to medium and cover the pan. Cook for 10 minutes. Taste and add salt, as needed. Serve immediately.

Monday, April 7, 2008

Recipe: Smoky Tunisian Oven-Roasted Vegetables with Tabil (Τυνησιακό Μπριάμ)

It’s no secret to my regular readers that I favor oven-roasted vegetables.

Roasting vegetables in a hot oven concentrates and develops subtle vegetable flavors that are lost when the same vegetables are boiled, stewed, or fried. Briam (Μπριάμ), a classic Greek medley of roasted vegetables, is one of my favorite ways to serve an abundance of vegetables. (My Briam recipe is in
Tastes Like Home: Mediterranean Cooking in Alaska.)

While Briam is what I make most often, grilled and roasted vegetable combinations are popular throughout the Mediterranean region; I like them all. For example, in Tunisia, tomatoes, onions, and peppers are grilled and mixed with Tabil (pronounced “table”), a spice mix containing coriander seeds, caraway seeds, garlic, and dried red peppers, to make a refreshing cold salad called Mechouia.

This weekend I needed a main course, not a salad, but really had a taste for Mechouia. Inspired by a Paul Gayler recipe in
A Passion for Vegetables, I decided to combine Tunisian Mechouia with Greek Briam. I used a vegetable combination typical of Briam and, as for Briam, oven-roasted the vegetables. However, instead of the herbs used in Briam, I seasoned the vegetables with Tabil and quickly charred them, two essential elements of Mechouia.

The vegetables can be completely cooked on a grill, in which case, the oven-roasting step is unnecessary. However, when I’m cooking on a stovetop grill pan (as I was yesterday due to the snow), it’s much easier to quickly char the vegetables on the grill pan and then finish cooking them in the oven.

A benefit to pre-cooking the vegetables on the grill is this step can be done well ahead. Although you can skip charring them and completely cook the vegetables in the oven, I don’t recommend it because you lose the smokiness, an important flavor element in this dish.


Oven-Roasted Vegetables with TabilSmoky Tunisian Oven-Roasted Vegetables with Tabil (Τυνησιακό Μπριάμ)
Serves 4 as a main course or 6 as a side dish
Adapted from
A Passion for Vegetables by Paul Gayler (Lyons Press 2000)
This dish is a combination of Briam and Mechouia; it has Briam’s oven-roasted vegetable medley, with Mechouia’s smokiness and spicing. We like spicy food, so I use the larger amounts shown in the ingredient list for Tabil. If you prefer less highly seasoned food, use the smaller amounts. If you’re unsure, mix up the dry spices and add half to the vegetables along with all of the garlic; when the vegetables are done, taste and add more dry spice mix, as needed. Tabil tastes great with any kind of vegetable (or fish, meat, or poultry), so consider the list of vegetables as only a suggestion. Leftovers may be roughly chopped and added to vegetable or chicken stock for an easy mid-week soup.


Tabil:
1 – 2 Tbsp. coriander seeds
1 – 2 tsp. caraway seeds
1” – 2” piece of dried red pepper or 1/4 – 1/2 tsp. crushed red pepper
2 tsp. finely minced fresh garlic

Vegetables:
4 medium Yukon Gold or red potatoes
2 medium zucchini
2 red bell peppers
1 large fennel bulb
1 extra large onion
Olive oil
Salt
Freshly ground black pepper

For the Tabil spice mix: Mix all the ingredients together.

For the Vegetables: Preheat the oven to 400°F.

Wash all the vegetables. Peel the potatoes, and cut into large chunks. Parboil the potatoes in salted water for 7 minutes, drain, and put them in a large roasting pan.

Cut the zucchini on the diagonal into 3/4” slices. Discard the peppers’ seeds and stems, and cut each into six lengthwise slices. Cut off the stalks and leaves of the fennel, and cut the bulb in lengthwise quarters. Remove most of the core, leaving enough so the layers of fennel stay together. Cut each quarter in half lengthwise. Peel the onion, leaving the stem end intact so the layers of onion stay together, and cut into 3/4” wide lengthwise sections. Put all the vegetables in the roasting pan, sprinkle with salt and freshly ground black pepper, liberally drizzle with olive oil, and toss the vegetables to coat them with oil.

Heat a grill pan until it's white hot (or fire up the grill). Quickly char the vegetables on both sides, but don’t cook the vegetables through. Char the vegetables in batches; for me, it's easiest to lay them out on the grill pan one at a time. As each vegetable is done, return it to the roasting pan. (I set the peppers aside, and peel them before adding them to the pan; this step is optional.)


When all the vegetables are done, sprinkle the Tabil over, and toss the vegetables to evenly distribute the spices. If the vegetables seem dry, drizzle with a little more olive oil. Spread the vegetables out into a single layer.

Roast the vegetables for 30 minutes. Serve immediately with couscous, green salad, olives, and plenty of bread for soaking up the splendidly spicy oil and vegetable juices.

Variation: For a saucier version, stir in one 14.5 ounce can of diced tomatoes (or 2 cups freshly diced tomatoes) just before putting the roasting pan in the oven.

~~~~~~~~~~~~~~~~~~~~~~~
Oven-Roasted Vegetable Recipes

Roast Cauliflower with Dukkah (Dukkah, a Middle Eastern spice mix, enhances roasted cauliflower).
Oven-Roasted Vegetables (Λαχανικά στο Φούρνο) (How to bring out the flavor of vegetables by oven-roasting them).
Rosemary and Garlic Roasted Sweet Potatoes (Oven roasted vegetables are an ideal accompaniment to holiday meals.)
Roasted Beets with Celery Root Skordalia (Roasted celery root is a low-calorie, high-flavor alternative to bread or potatoes in the wonderful Greek garlic spread called skordalia.)

To find more oven-roasted vegetable recipes, Food Blog Search is a great tool.
~~~~~~~~~~~~~~~~~~~
This is my entry for
Antioxidant Rich Foods/Five-a-Day Tuesdays hosted by Sweetnicks.

Tuesday, April 1, 2008

Moroccan Salmon, Fennel-Preserved Lemon Salad, & Sweet Potato Oven Fries (Μαροκινός Σολομός, Σαλάτα με Μάραθο και Λεμόνια, & Γλυκοπατάτα στο Φούρνο)

I have an irrational aversion to the texture of boiled or braised sweet potatoes. Until I discovered oven roasting, sweet potatoes were emphatically not part of my diet.

Even so, I'd been hankering for Moroccan sweet potato tagine. A cookbook with the recipe had been sitting open on the couch for over a week. A bag of sweet potatoes from my Full Circle Farm CSA box languished on the counter. I needed to try the tagine.

At least that’s how it seemed. Every time I went to make it, however, I thought about mushy sweet potatoes, and stopped in my tracks. Like I said, my reaction is irrational. Intellectually, I want to try it; emotionally, I can’t get beyond no, no, no.

I finally gave up on the tagine, at least for now. Someday I’ll power through my aversion, and discover what I’ve been missing all these years. In the meantime, I constructed a menu around the tagine’s flavors and ingredients, and stuck with oven-roasting the sweet potatoes.

The tagine’s dominant spices – cumin, coriander, papika, and hot pepper – I used as a rub for salmon fillets. I made oven-fries with the sweet potatoes, and salad from fennel, red peppers, and preserved lemons, three more of the tagine’s ingredients. (For how to make preserved lemons, here is an easy recipe.)

The result was truly wonderful. It put us both in a good mood for the rest of the evening.


I wish all my meals tasted this good. Of course, it’s possible the tagine would’ve been even better. I’m still trying to think my way into it.

Moroccan-Spiced Salmon (Μαροκινός Σολομός)
Serves 4


1 pound salmon fillets
1 1/2 tsp. freshly ground cumin seed
1 1/2 tsp. freshly ground coriander seed
1 1/2 tsp. paprika
1/2 tsp. crushed red pepper flakes
1/2 tsp. salt
1 Tbsp. olive oil

Wash the salmon and dry it well. Using needle-nosed pliers, remove as many pin-bones from the fillet as possible. Skin the fish, if necessary, and cut it into 4 even pieces.

Mix the cumin, coriander, paprika, pepper flakes, and salt. Rub the spices over both sides of the salmon fillets.

Heat the olive oil in a pan until it is hot, but not smoking. Turn the heat to medium high, and add the salmon. Cook for 3 – 5 minutes, or until the pan side of the salmon is lightly browned. Turn over and cook for 1 - 3 minutes, or until the salmon is done to your taste. The exact cooking time depends on the fillets’ thickness; keep in mind that salmon tastes better slightly underdone than it does when it's overdone.

Serve immediately on a bed of Fennel and Preserved Lemon Salad.


Fennel and Preserved Lemon Salad (Σαλάτα με Μάραθο και Λεμόνια στην Άρμη)
Serves 4

When I served this, both of us wanted more salad than I’d made and thought the salmon should be served on a bed of it. I’ve adjusted the salad recipe accordingly. Adding the capers depends on how much you like them; one of us preferred capers, the other liked it better without. Taste the salad without the capers, then try it with capers and add them if you think they’re an improvement.

2 cups diced fennel, 1/4” dice
1 cup diced red bell pepper, 1/4” dice
2/3 cup finely sliced green onions
3 Tbsp. minced preserved lemon peel
2 tsp. minced garlic
1/2 tsp. freshly ground fennel seed
Freshly ground black pepper
1/3 cup Preserved Lemon Aioli (see recipe below)
1/2 cup capers (optional)

Mix all the ingredients. Taste and adjust seasoning, if necessary. Serve.

Preserved Lemon Aioli
Makes 1 1/2 cups

Preserved lemons are quite salty, the flesh more so than the peel. Preserved Lemon Aioli gets all the salt it needs from the lemons. I like making this with the peel from half of a preserved lemon, but the flesh from only a quarter of a preserved lemon. To prevent the aioli from being too salty, it’s best to start with a smaller amount of preserved lemon flesh and add more to taste. If you substitute lemon juice and peel for the preserved lemon, be sure to salt the aioli. I prefer making this in a blender because it grinds the ingredients more evenly, but I use the feed tube from my Cuisinart to add olive oil. Put the feed tube into the hole in the blender’s top, pour olive oil into the feed tube, and the hole in the bottom of the feed tube will effortlessly add oil at exactly the right rate for a perfect emulsion.

1/2 preserved lemon or the zest and juice of 1 lemon
3 large cloves chopped garlic
1 egg
1 cup olive oil

Rinse the preserved lemon under running water. Remove the flesh and reserve. Roughly chop the preserved lemon peel and put it in a blender with 1/4 of the reserved lemon flesh. Purée and taste to determine the degree of saltiness before adding the egg and oil. If it needs salt, add more of the lemon flesh. Mix in the egg and purée; scrape down the sides of the blender. Add the oil drop by drop while the blender is running. (The aioli will break and separate if you add the oil too fast, see NOTE below.) When all the oil is incorporated, taste and adjust the seasoning, as needed. Refrigerate for up to two weeks.

NOTE: If the aioli breaks, pour it out of the blender. Add an egg and purée, scraping down the sides of the blender. Add the broken aioli drop by drop while the blender is running.

Sweet Potato Oven Fries (Γλυκοπατάτα στο Φούρνο)
Serves 4


6 garnet yams (sweet potatoes)
6 Tbsp. olive oil
Salt

Preheat the oven to 325°F.

Peel the garnet yams and cut them in 1/4” slices. Cut the slices into 1/4” sticks. Divide between 2 rimmed baking sheets, toss the contents of each sheet with 3 Tbsp. olive oil and plenty of salt. Bake for 30 minutes, rotating the pans halfway through the cooking time. Remove the pans from the oven. (Recipe can be made ahead to this point.)

Turn the oven heat up to 450°F; when the oven reaches temperature, return the pans to the oven and bake for 10-15 minutes, or until the sweet potatoes start browning. Remove from the oven and prop up one end of the baking sheet so the oil quickly runs off the potatoes to the lower end of the baking sheet (you may need to align the potatoes so they don't block the oil from running off). Serve immediately.

~~~~~~~~~~~~~~~~~~~~~~
More Preserved Lemon Recipes
Preserved Lemons, Candied Lemon Peels, and Sparkling Mint-Lemonade (I show you how to make preserved lemons, how to candy the extra lemon peels, and how to use leftover syrup for sparkling lemonade.)
Moroccan Beef Stew (Mike makes a slow cooked beef tagine with sweet potatoes, chickpeas, preserved lemons, and lots of spices.)
Olives, Chicken with Preserved Lemon (Lydia makes a quick-cooking tagine with boneless chicken thighs, olives, and preserved lemons.)
~~~~~~~~~~~~~~~~~~~~~~

This is my entry for Antioxidant Rich Foods/Five-a-Day Tuesdays hosted by Sweetnicks.

Sunday, March 23, 2008

Recipe: Beet and Red Pepper Salad (Παντζάρια Σαλάτα με Κόκκινες Πιπεριές)


Beet and Red Pepper Salad tastes really good. It’s easy to make and looks beautiful on the plate. Try it with feta cheese and olives for a light lunch or savory appetizer.


Beet and Red Pepper SaladBeet and Red Pepper Salad (Παντζάρια Σαλάτα με Κόκκινες Πιπεριές)
Serves 4


Mediterranean Cooking in Alaska has moved as of March 2011. To read this post please go to


http://www.laurieconstantino.com/beet-red-pepper-salad/


Please click on over and visit my new site. Thank you!


Thursday, March 20, 2008

Recipes: Red Pepper Soup & Pizzettes (Σούπα με Κόκκινες Πιπεριές & Πιτσάκια)

My first cookbooks were homemade, full of hand-written recipes and clippings from newspapers and magazines. Because I lived on next to nothing, I glued the recipes on old pages of notes I’d taken in classes that had ended.

In those days, before the internet, interesting food writing was hard to find. Now it’s easy. It seems as if new food blogs pop up every day. The challenge is sorting the wheat from the chaff in the abundance of online recipes.

Jenn of
The Leftover Queen has made it easier to investigate the multitude of food blogs by maintaining a comprehensive listing of them. In addition, Jenn writes an article on The Leftover Queen every Friday highlighting some of her favorite blogs.

Another way to learn about new blogs is an event called
Taste and Create organized by For the Love of Food. In this event, food writers are paired with a randomly assigned partner, and asked to cook and review one recipe from their partner’s blog.

This month I was paired with
Tart Reform, a blog written by a smart woman who is thrilled about starting law school in the fall. The name of her blog is a clever play on the phrase “tort reform,” a political effort undertaken by insurance companies and major corporations to deny full compensation to those who are injured by another’s negligence.

Tart Reform includes many dessert recipes; the author is a dedicated baker. I rarely make desserts anymore, the result of marrying a man who doesn’t like sweets. Since I inherited a sweet tooth from my father, when I make desserts they end up in my belly or, more accurately, on my belly. Sadly, it’s better for me to admire Tart Reform’s lovely desserts than to make them.

Instead, I made
Red Pepper Soup, a recipe posted on Tart Reform’s blog last July. I’d originally thought of following Tart Reform’s lead and making the soup with green peppers for a festive St. Patrick’s Day soup. However, Tart Reform warned strongly against doing so, and said the soup “looks just like the goo from Ghostbusters” when made with green peppers. Not interested in having a Ghostbusters’ prop for dinner, I stuck with red peppers.

Red Pepper Soup, originally published in a
New York Times article by Marian Burros, was quick and easy because it doesn’t require pre-roasting or peeling the peppers. With a bag of Costco red peppers (in Alaska, $6.50 for 6 peppers), the recipe made a reasonably priced dinner for 4.

The soup is delicious and beautiful. A small amount of crushed red pepper flakes and minced thyme highlight its sweet red pepper flavor.

The peppers aren’t peeled, so bits of pepper skin remain in the soup after it is puréed. The original recipe left in the skins, but I didn’t like the soup's texture with them in it. It took 2 minutes to strain them out, leaving the soup with a pleasingly silky texture.

The original recipe suggests serving the soup with a dollop of crème fraiche and sprigs of thyme. Although we tried this suggestion and it tasted fine, we preferred the soup with a drizzle of best quality olive oil and a sprinkling of minced thyme.

I served the soup with
Pizzettes, another recipe from Tart Reform’s site. Pizzettes are nothing more than mini-pizzas; the original recipe came from Giada’s Family Dinners by Giada De Laurentiis.

I made the Pizzettes twice; once with gorgonzola as Giada called for and the second time with mozzarella, which was Tart Reform’s recommendation. We preferred mozzarella Pizzettes, although the ones with gorgonzola were also tasty.

Pizzettes are easy to make, even with putting together my own pizza dough (the original recipe used store bought). The concept is one I will use again; pizzettes make a terrific appetizer. They tasted great hot, and retained their flavor at room temperature, so could easily be made ahead for entertaining.


Red Pepper Soup (Σούπα με Κόκκινες Πιπεριές)
Serves 4
Adapted from Marion Burros,
New York Times (September 21, 2005) via Tart Reform
The amount of red pepper depends on how spicy you like your soup and the heat of your dried red peppers. When I first read the recipe, I was concerned 1 cup of liquid wouldn’t be enough, but I shouldn’t have worried. There is plenty of liquid because peppers are full of moisture and the soup is cooked covered. If you don’t mind pepper skins, there’s no need to strain the soup. Red Pepper Soup may be served hot or cold, and may be frozen for later use.


2 cups sliced onions
2 tablespoons olive oil
Salt
Freshly ground black pepper
1 Tbsp. chopped garlic
1/4 - 1/2 tsp. crushed red pepper flakes
1/4 cup dry white wine
6 large red bell peppers, stemmed, seeded and cut in 1” chunks
1 cup vegetable or chicken stock
4 tsp. minced fresh thyme, plus extra for garnish
Crème fraîche or sour cream, for garnish (optional) OR
Best quality extra virgin olive oil, for drizzling (optional)

Sauté the onion, lightly seasoned with salt and freshly ground black pepper, in olive oil until the onions soften and start to turn golden. Stir in the garlic and red pepper flakes and cook for 1 minute. Add the wine and boil until only 1 Tbsp. liquid remains.

Stir in the peppers, stock, and thyme, and lightly season with salt and freshly ground black pepper. Bring the liquid to a boil, cover, turn down the heat and simmer for 30 – 40 minutes, or until the peppers are tender

Using a stick blender, blender, or food processor, purée the soup until it's smooth. Strain the soup with a Foley food mill or strainer to remove the tough pieces of pepper skin. Taste and add salt or freshly ground black pepper, as needed.

Ladle the soup into bowls and garnish with extra virgin olive oil, crème fraiche, or sour cream. Sprinkle with minced thyme and serve immediately.

Variation: Drizzle with a blender pesto of 2 Tbsp. fresh thyme, 2 large cloves garlic, 1/4 tsp. salt, and 1/4 cup olive oil. This is good drizzled directly into the soup, and is particularly attractive (and tasty) when used in combination with crème fraîche.

PizzettesPizzettes (Πιτσάκια)
Makes 40 2 1/4” mini-pizzas
Adapted from Giada’s Family Dinners (Crown Publishing Group 2006) via
Tart Reform
Pizzettes are pizza dough cut into small circles and baked with a topping. I indented the dough before adding the toppings so they would stay on the pizzettes when the dough expands during baking. The oil is necessary at the end to bring out the full flavor of fresh basil. When I tried a basil topping without oil, the basil lost much of its flavor (the volatile oils dissipated when the cut basil hit the hot pizzettes). As with pizza, the topping for pizzettes is limited only by one’s imagination.

Dough:
1 cup warm water
1/2 tsp. sugar
1 tsp. yeast
2 – 2 1/2 cups all purpose flour
1 tsp. salt

Topping:
1/4 tsp. crushed red pepper flakes
1 1/2 cups shredded mozzarella
1 1/2 cups seeded and diced tomatoes, 1/2” dice
1/4 cup shredded fresh basil (basil chiffonade)
2 – 3 Tbsp. extra virgin olive oil
Salt

Make the Dough: Mix the water, sugar, and yeast in the bowl of a stand mixer. Let sit for 10 minutes. Using the mixer’s paddle attachment (or by hand), stir in the salt and enough flour to form a soft dough. Switch to the dough hook attachment. Knead on low speed for 5 minutes (or by hand), adding flour as necessary to prevent the dough from sticking to the bowl. Put the dough in an oiled bowl, cover with plastic wrap fixed to the bowl with a rubber band, cover with a dish towel, and let rise until doubled in size.

Make the Pizzettes: Preheat the oven to 425°F.

Roll out the dough until it is 1/4” thick. Using a 2” – 2 1/2” round cutter, cut out as many circles as you can and place 3/4” apart on parchment paper-lined baking sheets. Gather the remaining dough together, roll it out, and cut into circles. Use a glass (or other circular object) slightly smaller than the dough circles to indent their centers.

Sprinkle the dough rounds with crushed red pepper flakes, top with shredded mozzarella, and then with diced tomatoes. Bake for 10 – 12 minutes or until the cheese melts and starts to turn golden. If baking two sheets of pizzettes at one time, rotate the baking sheets after they've been in the oven 5 minutes.

While the pizzettes are baking, mix the basil and olive oil. As soon as the pizzettes come out of the oven, top each one with a little basil and olive oil. Sprinkle lightly with salt, and serve immediately.

Wednesday, February 20, 2008

Recipe: Roasted Red Pepper, Fennel, and Lentil Soup (Κόκκινες Πιπεριές, Μάραθο, και Φακές)
Roasted red peppers are a staple in my kitchen.

When simply dressed with olive oil and a splash of good quality balsamic vinegar, roasted peppers make an easy, flavorful appetizer. As a side dish, they perk up even the most pedestrian meal.

My favorite way to roast peppers is over a wood fire. In summer, we often cook over an outdoor grill. The best time to roast peppers is shortly after starting the fire, when the flames are still too high for grilling. With an active flame, pepper skins char quickly, leaving the flesh perfectly cooked.


In summer, peppers are in season and I buy them in quantity. We roast and peel all the peppers at one time, and freeze them in individual plastic sandwich bags. I use frozen roasted red peppers all winter to add an extra layer of flavor to soups and sauces.

When it’s too cold to cook outside, the easiest way to roast one or two peppers is directly over a gas burner. This is what I did last week when I wanted to enhance lentil soup with roasted red peppers, but had used up my entire frozen supply.

The rich, smoky taste of peppers dramatically improves an otherwise straightforward lentil soup. Because I pureed the peppers, their flavor permeated every bite without overpowering the fennel and lentils.

Since only two of us were eating, I had enough soup to freeze for another day. I’m looking forward to it.

Roasted Red Pepper, Fennel, and Lentil SoupRoasted Red Pepper, Fennel, and Lentil Soup (Κόκκινες Πιπεριές, Μάραθο, και Φακές)
Serves 4 - 6
Some jalapeño peppers are spicy, while others are quite mild. Taste the jalapeños before adding them to the soup, and adjust the amount accordingly.

3 cups diced onions, 1/2” dice
1 cup diced carrots, 1/2” dice
1 cup diced celery, 1/2” dice
1 cup diced fennel bulb, 1/2” dice
1/4 cup olive oil
Salt
Freshly ground black pepper
1 Tbsp. minced garlic
1 tsp. Aleppo pepper or 1/2 tsp. crushed red pepper
1 Tbsp. fennel seeds, crushed
1 cup lentils, any kind (picked over to remove detritus and rinsed)
8 cups vegetable or chicken stock
2 red bell peppers, roasted and peeled (see NOTE below)
1 – 2 jalapeño or other spicy pepper, roasted and peeled (optional) (see NOTE below)

Sauté the onions, carrots, celery, and fennel bulb, lightly seasoned with salt and freshly ground black pepper, in olive oil until the onions soften and begin to turn golden. Stir in the garlic, Aleppo pepper, and fennel seeds and cook for 1 minute. Add the lentils and stir until they are coated with oil. Stir in the stock and bring to a boil. Reduce the heat and simmer for 20 – 30 minutes, or until the lentils are tender, but not mushy.

While the soup is simmering, puree the roasted peppers and jalapeños in a blender or food processor. When the lentils are tender, stir the pureed peppers into the soup. Serve immediately.

NOTE on Roasting Peppers: The traditional method of roasting peppers is over a hot wood fire, but you can also roast them on a gas grill, directly on a gas burner, under the broiler, or by baking in a 450° oven for 30 minutes. Unless you are baking them, turn the peppers frequently to ensure the skins char evenly and the flesh beneath doesn’t overcook. When the skin is completely blackened, place the peppers in a brown paper bag or plastic wrap covered bowl. When the peppers are cool enough to handle, poke a hole in each pepper’s bottom and reserve any liquid inside for adding to the soup. Peel away the peppers’ burnt skin, gently scraping away any stuck bits with a knife. Don’t rinse the peppers in water, as doing so washes away too much flavor. Remove and discard the stem, seeds, and any white pulp inside the pepper.

NOTE on Storing Roasted Peppers: Roasted peppers can be refrigerated and stored in a glass jar, topped with olive oil, for about a week. They also freeze well sealed in portion-sized sandwich bags.

~~~~~~~~~~~~~~~~~~~~~
This is my entry for No Croutons Required hosted by Lisa's Kitchen and Tinned Tomatoes.