I’m sick and tired of my refrigerator being filled to the gunnels. Something must be done; the situation is dire.
Condiments and ingredients with a permanent spot in the refrigerator are a big cause of the problem. Preserved lemons, sourdough starter, 3 kinds of olives, 10 kinds of hot sauce, mayonnaise, mustard, pickles, Asian sauces, capers, anchovies, jam, milk, cream, orange juice, eggs, and who knows what else; it all adds up.
Cheese and salumi are always available at our house. And since I buy them at Costco, the single best source of cheese in Anchorage, they come in big packages and take up too much space. There are also the cheeses we bring back from Greece; we freeze what we can, but some can’t be frozen. They’re squatting on valuable real estate in the back of the refrigerator.
Produce completes the trifecta of refrigerator hogs. We eat a lot of vegetables and they take up space. Make that lots of space. When our Full Circle Farm CSA box arrives every other week, I struggle to cram in everything that needs to be refrigerated. I don’t always succeed.
Don’t get me started on the leftovers. They live perpetually on the verge of hurling themselves on anyone who is so bold as to open the refrigerator door. It’s quite a thrill when a yogurt container full of soup jumps out, drenching you and spreading its liquid goodness far and wide on the kitchen floor.
I can’t take it anymore. I’m done. I’ve reached my limit. I need a second refrigerator and I need it soon. I’m officially in the market for a used refrigerator. If you know of anyone in Anchorage who wants to get rid of one, or anyone who knows of anyone who knows of anyone, please let me know. In the meantime, I’m working my way through the produce.
Next up, three bunches of carrots; it’s soup time. Although I make a great Moroccan Carrot and Chermoula Soup, I decided on Carrot Ginger Soup, a recipe from the website of Beth, my partner this month in Taste and Create. Taste and Create is an event created by Nicole from For the Love of Food in which food writers are paired with a randomly assigned partner, and asked to cook and review one recipe from their partner’s blog.
Although I loved the concept of Beth’s recipe, it included orange juice, a flavor I don’t care for in savory dishes. Instead, I used lemon peel and juice. It was a fortuitous substitution; lemon’s tartness pleasingly balanced the sweet carrots and cinnamon. I added sautéed onions to bring out the soup’s savory notes, and crystallized ginger for its multi-dimensional sweet heat.
Sweet-yet-tangy Carrot Ginger Soup was a delicious treat on a snowy winter evening, even though it made only the tiniest dent in my refrigerator problem. We enjoyed the soup with Celery and Olive Salad, and were impressed by how much flavor we found in a simple dinner of carrots and celery. Lemony Carrot Ginger Soup (Σούπα με Καρότα, Λεμόνι και Τζίντζερ)
Serves 2 as a main course or 4 as a starter
The yogurt or cream stirred in at the end helps smooth out lemon’s sharp edges, but isn’t at all necessary. The soup tastes great without the dairy.
2 cups diced onions, 1/2” dice
2 Tbsp. olive oil
Salt
Freshly ground black pepper
1 pound carrots, peeled and roughly chopped
4 cups vegetable or chicken stock
1 Tbsp. finely grated lemon peel
2 Tbsp. minced crystallized ginger
1 tsp. ground cinnamon
1/4 cup fresh lemon juice
1/4 cup plain yogurt or cream (optional)
In a Dutch oven, sauté the onions, lightly seasoned with salt and freshly ground black pepper, in olive oil until they soften and begin to turn golden. Stir in the carrots and cook for 2 minutes. Stir in the stock, lemon peel, ginger, and cinnamon and bring to a boil. Turn down the heat and simmer, uncovered, for 40 minutes or until the carrots are soft.
Purée the soup with a stick blender (or in a blender or food processor) until it is very smooth. Return the soup to the pot, stir in the lemon juice, and cook for five minutes. Taste and add salt, freshly ground black pepper, or lemon juice, as needed. If using yogurt or cream, stir it into the soup. Serve immediately.
Friday, February 20, 2009
Recipe for Lemony Carrot Ginger Soup (Σούπα με Καρότα, Λεμόνι και Τζίντζερ)
Saturday, February 7, 2009
Recipe for Seafood and Vegetable Stew with Rouille (Red Pepper Sauce)
 Fish and Vegetable Stew with Rouille
The discovery of a new dish does more for human happiness than the discovery of a new star. John Anthelme Brillat-Savarin, Physiologie du Gout (Physiology of Taste) (1825)
Where do recipes come from? Family, community, tradition, and serendipitous accident are easy but incomplete answers.
The primary source of recipes has always been an individual cook’s imagination and palate. Over time, original recipes are modified by other cooks’ imaginations and adjusted by yet more cooks’ palates, to infinity and without limitation.
The food articles I enjoy most are ones that explain how a dish was developed or why a cook chose to combine certain flavors. Although its authors’ cooking styles and skills are quite different from my own, Ideas in Food is one of my favorite blogs. It focuses on the techniques and thought processes that go into creating unique flavor combinations.
I recently made Seafood and Vegetable Stew with Rouille. Here's how it came into being:
My kitchen counter was overflowing with garnet yams, bounty from more than one Full Circle Farms CSA box. I wanted to do something other than oven-roasting the yams or making oven fries. Looking for inspiration, I randomly pulled cookbooks off the shelves.
Barbara Kafka’s book Soup: A Way of Life had an interesting recipe for Fall Fish Stew that included sweet potatoes. I decided to try it.
My first version of the stew was similar to Kafka’s, though I substituted sautéed sweet potatoes for boiled and edamame beans for limas. After tasting the broth, I wanted more flavor.
In my next version, I added sautéed onions and red bell peppers, and used a different Rouille recipe than Kafka’s. I seasoned the Rouille with dried, ground red Moroccan pepper (poivron rouge). This version was tasty, but I thought it could be better.
In my final version, I added crushed fennel seeds and shelled shrimp. This combination was exactly what I wanted. Although inspired by Kafka, the final stew is uniquely my own.
 I internet-ordered
 Poivron Rouge and Sweet Hungarian Paprika
Although Moroccan recipes often call for paprika, niora peppers are what Moroccans use for “paprika.” The flavor of ground niora differs significantly from sweet Hungarian paprika. Niora is spicier and has a fruitier flavor than its Hungarian counterpart, which has a slightly bitter aftertaste.
Moroccan niora peppers are likely the same as the ñora peppers used in Romesco sauce and other Spanish and Catalonian dishes. In addition to having similar names, nioras and ñoras look the same. Most texts refer to nioras and ñoras only as members of the Capsicum annuum family; in other words, as domesticated peppers. However, in Catalan Cuisine, Colman Andrews says pepper scholar Charles Perry “thinks the nyora [ñora] pepper is the variety scientifically called Capsicum annuum grossum/provar. Pomiforme/sub-var. Conc. Humilirotundum Haz."
No matter what its scientific designation might be, poivron rouge has wonderful flavor and a permanent place in my spice cupboard. Its mildly spicy and fruity tastes make distinctively delicious Rouille and a mouth-wateringly good Seafood and Vegetable Stew.
 Seafood and Vegetable Stew with Rouille (Red Pepper Sauce)
Serves 4
The stew may also be made with just fish or just shrimp; if so, use 1 pound of either ingredient. Although not necessary, steamed rice is a nice complement to the spicy, aromatic broth. Serve the rice on the side so eaters can stir the amount they desire into the stew.
1 cup peeled, diced garnet yams or sweet potatoes, 1/2” dice (1 garnet yam)
2 Tbsp. olive oil
Salt
Freshly ground black pepper
1 cup diced red bell pepper, 1/2” dice (1-2 peppers)
1 cup diced yellow onion, 1/2” dice
1 tsp. freshly crushed fennel seed
4 cups fish stock or clam broth (nectar)
1 recipe Rouille (see below)
1 cup shelled edamame beans (thawed) or fresh fava beans
1/2 pound skinless fillets of halibut, rockfish, cod, or other white-fleshed fish, cut in 3/4” pieces
1/2 pound shelled and cleaned shrimp, 16-20 count, halved crosswise
1/4 cup fresh lemon juice (1 lemon)
Minced parsley for garnish
Sauté the garnet yams in olive oil, lightly seasoned with salt and freshly ground black pepper, until they start to brown around the edges. Stir in the red bell peppers and onions, and continue to sauté until the onions soften. Add the crushed fennel seed and sauté for 1 minute. Stir in the fish stock, bring to a boil, turn down the heat and simmer for 15 minutes. (The recipe may be made ahead to this point.)
In a small bowl, whisk one cup of the hot broth into the Rouille. Stir this mixture into the simmering stew pot, along with the edamame beans, fish, and shrimp. Do not let boil or the Rouille may curdle. Simmer for 3-4 minutes, or until the seafood is cooked through. Stir in the lemon juice. Taste and add salt or lemon juice, as needed.
Sprinkle with minced parsley and serve immediately with steamed rice and wedges of lemon.
Rouille
Recipe adapted from In the Hands of a Chef by Jody Adams
Rouille goes well with all fish, and is a tasty addition to fish salads. The recipe may be doubled or tripled and keeps for a week in the refrigerator.
1 egg yolk
1/2 tsp. Dijon mustard
1 Tbsp. fresh lemon juice
1/4 cup vegetable oil
1/4 cup best quality extra virgin olive oil
2 tsp. chopped garlic
1/2 tsp. salt
4 tsp. poivron rouge or sweet Hungarian paprika
1/4 tsp. cayenne pepper
Put the egg yolk, mustard, and lemon juice in a blender and mix well. While the blender is running, add the vegetable oil drop by drop so that it emulsifies with the other ingredients. While the blender is running, pour in the olive oil in a steady stream. Add the remaining ingredients and blend until the Rouille is very smooth, scraping down the sides of the blender to ensure all ingredients are thoroughly incorporated.
~~~~~~~~~~~~~~~~~~~~~~
This is my recipe for Weekend Herb Blogging, hosted this week by Dee from The Daily Tiffin.
Sunday, January 18, 2009
Two Recipes for Bagna Càuda (Δύο Συνταγές για Μπάνια Καούντα)
Last night, we had a hot olive oil bath and went to bed happy. We didn’t dive into olive oil; our dinner did.
Bagna Càuda, a specialty of Italy’s Piedmont Region, combines oil with anchovies and garlic to make a hot dip for vegetables and bread. Cooked over low heat, anchovies melt into oil and garlic’s strength turns smooth and mild.
I was first introduced to Bagna Càuda by the proprietors of Genoa Restaurant in Portland, Oregon (now closed). It was love at first taste. Genoa’s Bagna Càuda was rich and luxurious, creamy and indefinably delicious. I wanted more.
After I discovered Genoa’s recipe in a cookware store handout, its Bagna Càuda regularly showed up on the tables of me and my friends. Unlike the Bagna Càuda I make now, Genoa’s recipe doesn’t contain a speck of olive oil; its richness comes exclusively from butter and cream.
In the Portland years, I was young and undeterred by buckets of cream and butter. As time passed, I lost my enthusiasm for both. I used to cook with butter, using olive oil mostly for salad dressings. Now, I rarely use butter; olive oil has replaced it in my kitchens. I stopped making Bagna Càuda.
Even so, when my husband and I travelled to Italy’s Piedmont Region in 1997, I was eager to try Bagna Càuda in its homeland. We found it in a tiny lakeside restaurant in La Morra, where we were the only customers. The television was blaring, the florescent lights blazing, and our expectations for the food low.
When the Bagna Càuda arrived at our table, it was a revelation. It didn’t contain cream or butter. Instead, garlic and anchovies were melted in olive oil and served in a roasted red pepper half. Every bite was a pleasure.
As with Genoa’s Bagna Càuda so many years ago, the taste and aroma of this new-to-me version lingered in my memory. Back in Alaska, I developed a simple recipe incorporating its flavors, using only olive oil, garlic, and anchovies.
.
Last Thursday, my regular CSA box of vegetables arrived from Full Circle Farm. The refrigerator was overflowing; I couldn’t find space for an extra-large bunch of broccoli. Bagna Càuda (my version) was the solution. While the anchovy and garlic sauce simmered, I steamed broccoli and roasted a couple red peppers over a gas burner.
When the Bagna Càuda was done, we dipped our vegetables and bread in the hot savory bath, ate our fill, and licked our fingers clean.  Laurie's Bagna Càuda (Μπάνια Καούντα)
Makes about 1 1/2 cups
Though the recipe contains a lot of garlic and anchovies, their pungency disappears after simmering in hot oil. For a group, serve Bagna Càuda in a fondue dish or other pot which keeps the sauce hot. For quick weekday meals, serve the sauce in individual unheated dishes for dipping, or even just spooned, straight from the stove, over the vegetables.
Sauce:
1/4 cup chopped anchovy fillets (2 ounces/24 cleaned fillets) (see Note below)
1/3 cup chopped fresh garlic
1 1/4 cups olive oil
Selection of Vegetables: Raw or roasted red peppers, raw or lightly steamed broccoli or cauliflower, celery, carrots, zucchini, cardoons, radishes, green onions, radicchio, fennel, cherry tomatoes, boiled potatoes
Selection of Bread: artisan-style bread, foccacia, breadsticks
Put the anchovy fillets, garlic, and olive oil in a saucepan over medium-low heat. Cook, stirring from time to time, until the oil starts to bubble. Cook for 20 – 30 minutes, until the anchovies melt into the oil and the garlic is very soft. Don’t let the garlic brown; if the oil is cooking hard enough to brown the garlic, immediately turn down the heat.
While the sauce is cooking, cut the vegetables and bread into shapes appropriate for dipping. When the sauce is done, dip the cold vegetables in the hot sauce.
NOTE: Anchovies preserved in salt have much more flavor than anchovies canned in olive oil. In dishes like Bagna Càuda, where anchovies are a central ingredient, I prefer the salt-cured variety (the dish is delicious even when made with oil-canned anchovies). Some places, you can buy salted anchovies by the ounce from the deli counter; in Alaska, this isn’t possible. Instead, I buy large cans of salt-preserved anchovies in Greece or when I travel outside the state (Big John’s PFI in Seattle carries them, as does Amazon.com). Anchovies packed in salt keep in the refrigerator for up to a year. To clean salt-cured anchovies, carefully rinse off all the salt. Starting from the head end, peel each fillet off the backbone, and then remove as many of the fine bones from the fillet as possible. Dry the cleaned fillets on paper towels before using in recipes.
 Genoa's Bagna Càuda (Μπάνια Καούντα)
Makes about 1 1/2 cups
Adapted from Genoa Restaurant recipe, Portland, Oregon
Genoa’s Bagna Càuda must be kept warm over a burner at all times; the reduced cream stiffens up when it cools. The anonymous author of Genoa’s recipe explains how to eat it: “[This] is a dish to be enjoyed without ceremony – pick up vegetable or bread stick with fingers, dip it in the sauce until well covered, and consume. If butter and cream separate, pour in a bit of cold cream and whisk hard. The sauce will return to its former velvet-like texture.”
Sauce:
2 cups heavy cream
8 cloves garlic, roughly chopped
1 2-ounce can anchovy fillets, drained of oil
Dash of cayenne
1/4 cup unsalted butter
Selection of Vegetables: Raw or roasted red peppers, raw or lightly steamed broccoli or cauliflower, celery, carrots, zucchini, cardoons, radishes, green onions, radicchio, fennel, cherry tomatoes, boiled potatoes
In a heavy saucepan, simmer cream with garlic until the cream is thick and reduced to 1 cup. Watch the cream carefully as it cooks; don't let it boil over. Put the reduced cream, anchovies, and cayenne into a blender and purée until the mixture is very smooth. (The recipe may be made ahead to this point.)
Return the mixture to the pan and bring to a very slow simmer. Stir in the butter until it melts. While the dip simmers, cut the vegetables and bread into shapes appropriate for dipping.
Serve in a fondue dish or other pot which can keep the dip hot. Dip the cold vegetables in the hot sauce.
~~~~~~~~~~~~~~~~~~~~~~
This is my entry for Foodie Films: Big Night - Italian! created and hosted by Joelen's Culinary Adventures.
Tuesday, May 13, 2008
Recipe: Braised Green Beans (Fasolakia) with Lemon (Φασολάκια Λαδερά με Λεμόνι)
“If there are three Greeks in a room, you’re bound to hear five different opinions about the correct way to cook just about anything.”
Or so goes the self-deprecating joke at Holy Transfiguration Greek Orthodox Church in Anchorage, Alaska. Although it may not be literally true, the joke helps lighten the mood at festival time.
For the annual Greek festival held in August, parishioners join together to make classics of the Greek table. The correct ways to make Moussaka, Fasolakia (braised green beans), and Dolmades (stuffed grape leaves) trigger the most vigorous debates. Everyone knows the “correct” recipe, but none of them are the same.
At Mama’s Taverna, Lulu captured the essence of these debates as she described how Zoe came up with her wonderful Fasolakia recipe.
The truth is, Greek braised green beans taste great no matter the recipe. As I commented to Lulu, “I’ve sautéed, I’ve not sautéed, I’ve layered, I’ve stirred, I’ve added potatoes, I’ve added zucchini, I’ve cooked the beans plain, I’ve cooked them with meat, I’ve cooked them without and, shockingly, I’ve even made them sans tomatoes. In all their incarnations, I’ve NEVER had a pot of Fasolakia that tastes anything other than absolutely wonderful.”
I no sooner sent the comment than I started obsessing about Fasolakia made without tomatoes (the most common recipe includes them). I used to make tomato-less Fasolakia all the time. In recent years I’ve been stuck on versions with tomato, one of which I wrote about in February: Greek Beef and Green Bean Stew and two of which are included in Tastes Like Home: Mediterranean Cooking in Alaska (Fasolakia and Fasolakia with Zucchini and Potatoes).
Last night I made the tomato-less version. It was everything I’d been wanting. The braised beans and onions were soft and sweet, rich with oil and herbs, and tangy from the fresh lemon juice finish. This is a dish where bread is a necessary accompaniment; it’s a shame to let the remarkably good juices go to waste.
Fasolakia belongs to a class of Greek dishes called Ladera, which means “oily” (ladi/λάδι is the Greek word for oil). The oil and vegetable juices cook together to make a wonderfully unctuous sauce. However, for many today, traditional Ladera has too much oil. Adjust the amount of oil in the recipe to suit your taste; for the traditional version, use the larger amount.
When considering the amount of oil to use, keep in mind that olive oil is a heart-healthy fat. According to the Mayo Clinic, “Olive oil contains monounsaturated fat, which can lower your risk of heart disease by reducing the total and low-density lipoprotein (LDL, or "bad") cholesterol levels in your blood.”
The FDA says there is "limited but not conclusive evidence" that 2 tablespoons of olive oil daily can reduce the risk of heart disease. (Olive oil should be substituted for fats already in the diet, and not just added to what you’re already eating.)
This recipe’s dedicated to Lulu and Zoe. Braised Green Beans (Fasolakia) with Lemon (Φασολάκια Λαδερά με Λεμόνι)
Serves 4 - 6 as a main course
In this easy recipe, the herbs and vegetables are layered in a Dutch oven and cooked without stirring until the beans are soft and tender. The beans shouldn’t be crunchy, and must be cooked through. Adjust the amount of olive oil as desired. Serve with slices of feta cheese, Kalamata olives, bread, and lemon wedges.
1 1/2 pounds green beans (6 cups cleaned)
4 cups thinly sliced onions
1 1/2 cups minced parsley
1/2 cup minced dill
1/2 cup minced mint
3 Tbsp. minced garlic
Salt
Freshly ground black pepper
1/2 – 1 cup olive oil
1/4 - 1/3 cup fresh lemon juice
Lemon wedges
Wash the beans, break off both ends, and break them in half. Mix the herbs and garlic together.
In a Dutch oven, layer 1 cup of onions on the bottom of the pan, top with 1/3 of the beans, then 1/3 of the herb mix, season with salt and freshly ground black pepper, and drizzle with 1/3 of the olive oil. Repeat. Repeat again but finish with the remaining cup of onions before drizzling with the last 1/3 of olive oil.
Cover and cook over medium high heat until the pan lid is hot. As soon as the lid is hot, turn the heat down to low and simmer for 1 hour, or until the beans are very soft and tender. Stir in 1/4 cup lemon juice. Taste and add lemon juice, salt, or freshly ground black pepper, as needed. Serve hot or at room temperature.
~~~~~~~~~~~~~~~~~~~~~~~~~
This is my entry for Heart of the Matter’s May heart-healthy herb challenge hosted this month by Michelle at The Accidental Scientist.
Sunday, May 11, 2008
Recipe: Carrots with Capers (Kαρότα με Kάπαρης)
When I want an easy, reliable, colorful vegetable side, I make Carrots with Capers adapted from Marcella Hazan's More Classic Italian Cooking. It goes particularly well with roast meat or chicken.
I’ve made it for 2 and I’ve made it for 100. Over the last 30 years, I’ve made this dish hundreds of times. It’s never been anything other than wonderful.
Marcella explains why: “The tart corrective of the capers is just what the carrots need to add a little zip to their otherwise passive sweetness. And their gentleness, in turn, tempers the tonic bite of the capers.”
I've changed Marcella's original recipe by upping the parsley, garlic, and capers. Because the garlic is cooked in water, its flavor in the finished dish is quite mild.
Try it. You won’t be sorry. Carrots with Capers (Kαρότα με Kάπαρης)
Serves 4
Adapted from More Classic Italian Cooking by Marcella Hazan (Alfred A. Knopf 1978)
Adding the water a little at a time keeps the carrots from getting waterlogged; it's the same principle as adding broth to risotto in stages. The carrots may be cooked ahead, reheated, and the capers added at the last minute, but the carrots taste better if cooked right before serving. Since capers are salted, be careful not to oversalt at the beginning.
1 pound carrots
1/4 cup capers, preferably salt-cured
1/4 cup olive oil
Salt
Freshly ground black pepper
1 Tbsp. minced garlic
1/4 cup minced parsley
1 – 1 1/2 cups water
Wash the carrots, peel them, and cut off the tops and bottoms. Cut into lengths the size and width of a woman’s little finger.
If using salt-preserved capers, rinse off the salt and let them soak in cold water for 10 – 15 minutes, and rinse them again. If using brined capers, rinse off the brine. Dry the capers and reserve.
Sauté the carrots, lightly seasoned with salt and freshly ground black pepper, in olive oil for 2 minutes. Stir in the garlic and parsley and cook for 1 minute. Stir in 1/4 cup water and cook until the water completely evaporates. Continue adding 1/4 cups of water and evaporating it until the carrots are done. This takes 10 – 20 minutes; cook until the carrots are tender but firm.
When the carrots are done, brown them lightly in the oil remaining in the pan after the water is gone. Stir in the capers and cook for 1 minute. Taste and add salt or freshly ground black pepper, as needed. Serve immediately.
~~~~~~~~~~~~~~~~~~~~~
This is my entry for Antioxidant Rich Foods/Five-a-Day Tuesdays hosted by Sweetnicks.
Sunday, May 4, 2008
Recipe: Pastitsio with Greens (Παστίτσιο με Χόρτα)
 The snow is gone, the grass is greening, and the dandelions’ first tiny leaves are poking through the earth. I’ve been walking the yard daily, impatient for enough wild greens to make a salad.
In the meantime, I’m making do with spinach and Swiss chard from my Full Circle Farm CSA box.
Teeny had another Mediterranean potluck last night and several guests made dishes from Tastes Like Home: Mediterranean Cooking in Alaska. From the book, Teeny made Halibut with Onions, Pine Nuts, and Tahini Sauce and Lemon-Marinated Dungeness Crab, Tissy made Oregano Chicken and Potatoes, Moira made Tabbouleh, and I made Hummus and Roasted Kalamata Olives.
Everything was delicious. It’s heartening, and a little magical, to see people using the recipes in Tastes Like Home and succeeding in making delicious food.
In addition to cooking from Tastes Like Home, I brought Pastitsio with Greens to Teeny's potluck. Like Pastitsio with Meat Sauce, a traditional Greek dish sometimes called “Greek lasagna,” Pastitsio with Greens is full of complex flavors.
Because it includes three cheeses (feta, kasseri, and manouri or ricotta), Pastitsio with Greens is rich and creamy. The luxuriant pasta and cheese is balanced by abundant greens and flavored with fresh mint, dill, and parsley. My husband describes it as macaroni and cheese that tastes better and isn’t as heavy as regular mac and cheese.
For potlucks or entertaining, one of the best things about Pastitsio with Greens is it can be assembled ahead of time and baked at the last minute. Its creamy goodness is a hit with adults, children, and everybody in between. Pastitsio with Greens (Παστίτσιο με Χόρτα)
Serves 6 as a main course or 12 as a side dish
Any wild or domesticated greens may be used for Pastitsio with Greens. For better flavor, I prefer using at least two types of greens. I also prefer Pastitsio when most of the greens are sweeter varieties, like spinach, Swiss chard, nettles, vlita (amaranth greens), or poppies, with bitter or stronger flavored greens used only as an accent. In Greece, use fresh manouri, myzithra, or anthotyro instead of ricotta. The Pastitsio can be assembled up to 24 hours ahead and baked just before serving. Because made-ahead Pastitsio has been refrigerated, it takes at least 10 minutes longer to bake.
1/2 pound miniature penne or other hollow pasta
Filling:
1 bunch spinach or other wild or domesticated greens
1 bunch Swiss chard or other wild or domesticated greens
2 cups diced yellow onions, 1/4” dice
2 Tbsp. olive oil
Salt
Freshly ground black pepper
1 Tbsp. minced garlic
1 cup thinly sliced green onions
1/2 cup minced fresh parsley
1/4 cup minced fresh dill
1/4 cup minced fresh mint
1 1/2 cups crumbled feta
1 1/2 cups kasseri or fontina cheese
3/4 cup fresh manouri or ricotta cheese
Béchamel:
1/4 cup butter
1/4 cup flour
2 1/2 cups whole milk
1/4 tsp. nutmeg
Salt
Freshly ground black pepper
2 egg yolks
Topping:
1/3 cup freshly grated parmesan cheese
1/3 cup Panko breadcrumbs
Cook the Pasta: Bring a large pot of salted water to the boil. Add the pasta and cook until it is almost, but not quite, done. Remove the pasta with a slotted spoon to a bowl; reserve the pasta water for blanching the greens. Rinse the pasta with cold water, drain, and reserve.
Make the Filling: Wash the greens very carefully. Discard any tough or damaged stems, leaves, roots, and any flower buds. Bring the pasta water to a boil, and blanch the greens for 1 minute. Drain and immediately rinse the greens with cold water. Using your hands, squeeze as much water as possible from the greens. Chop the greens and put them in bowl.
Sauté the yellow onions, lightly seasoned with salt and freshly ground black pepper, in olive oil until the onions soften and start to turn golden. Stir in the garlic and cook for 1 minute. Add the onions to the bowl with the greens. Add the green onions, parsley, dill, mint, and cheeses to the bowl and toss well to combine thoroughly. Taste and add salt or freshly ground black pepper as needed.
Make the Béchamel: Warm the milk over low heat or in the microwave; don’t bring the milk to a boil. Melt the butter in a large saucepan, mix in the flour to make a smooth paste, and cook for two minutes, stirring constantly. Slowly whisk in the warm milk and cook, stirring, until the sauce is smooth and the thickness of heavy cream. Add the nutmeg, salt, and freshly ground black pepper to taste. Pour 1/2 cup of hot milk sauce into the pasta, and stir to evenly distribute. Put the egg yolks in a small bowl and quickly whisk in 1/2 cup of hot milk sauce. Whisk the egg mixture back into the sauce. Cook over very low heat for two minutes, stirring constantly, and being careful not to let the sauce get hotter than a low simmer. Taste and correct the seasoning.
Make the topping: Mix the parmesan and Panko.
Assemble the Pastitsio: Preheat the oven to 350°F.
For use as a main course: Place half the pasta in the bottom of a well-oiled 9”x9” baking pan. Spread half the filling over the pasta. Top with the remaining pasta, and then with the remaining filling. Spread the béchamel over the filling. Sprinkle the topping over the béchamel. Bake for 35 – 40 minutes, or until the top of the Pastitsio is golden and the juices are bubbling. Let cool for at least 15 minutes before cutting into rectangles and serving. If you cut Pastitsio immediately after removing it from the oven, it will fall apart (but still tastes great).
For use as a side dish: Stir the pasta into the filling. Place the mixture in the bottom of a well-oiled 9”x13” baking pan. Top with the béchamel and then with the topping. Bake for 35 – 40 minutes, or until the top of the Pastitsio is golden and the juices are bubbling. Serve immediately by the spoonful or after 15 minutes if you prefer cutting it into squares.
~~~~~~~~~~~~~~~~~~~~~~~
This is my entry for Weekend Herb Blogging, hosted this week by Anh of Food Lover's Journey. This week, May 5 to May 11, I'm hosting Weekend Herb Blogging. Please send me your entries to tasteslikehome[at]hotmail[dot]com by May 11!
Tuesday, April 22, 2008
Zafiris’ World: Recipe for Zucchini and Eggs (Κολοκυθάκια με Αυγά)
 Zafiris is a man of his island, his village and his times. Except for a brief, much remembered, stint in the Greek Army, he’s spent his entire life in the village.
The Germans occupied the island during World War II and closed the schools, thus ending Zafiris’ formal education. He was in fourth grade. Zafiris’ lack of book learning never held him back; he is a smart, successful farmer and village leader.
A proud self-made man, Zafiris weaves his life into stories. For the last few years, he’s been semi-retired, which gives him more time to share his tales with all who’ll listen.
Like many Greek men, Zafiris holds strong opinions about pretty much everything. His opinions are usually framed by stories that demonstrate how and why his point of view is the only one a reasonable, enlightened person could hold.
If you are bold enough to ask “why” something should be done his way, Zafiris typically responds it’s because his approach is “correct.” No further explanation is necessary or possible.
Despite his semi-retirement, Zafiris’ gardens, pastures, fields and vineyards still supply much of what he and his wife, children, and grandchildren eat every day. He does this because he has always done it, but also to help protect his family’s health. Zafiris explains that store-bought food has limited nutrients when compared to what he grows, which is always picked at its peak of freshness.
Froso, Zafiris’ wife, is a talented cook from whom I have learned much. Since their marriage nearly 50 years ago, Froso has prepared nearly all of Zafiris’ meals. Whether she cooks for the two of them, their large extended family, or their frequent drop-in visitors, Froso consistently serves wonderful food.
Zafiris rarely cooks and enjoys telling funny stories of his abysmal kitchen failures. Of course, Zafiris being Zafiris, he also holds quite definite opinions about the “correct” way to cook pretty much everything.
 Although his practical kitchen talents are limited, Zafiris makes one dish well: Zucchini and Eggs. If you complement Zafiris on his Zucchini and Eggs, he’ll patiently explain the key to success is fresh eggs. He uses eggs from Froso’s backyard chicken coop or, when he can find them, from hidden nests in his fields, where Zafiris lets chickens run wild.
Zafiris is right about the fresh eggs, as he is about many things. The flavor of farm-fresh eggs is incomparable, and they are much healthier than eggs from factory farms. I use farm eggs whenever I can find them. Anyone who hasn’t tried farm eggs should seek them out; they’re a revelation about eggs’ depths of flavor. Farmers’ markets and natural food stores are good places to look for them.
Even if you can’t find farm eggs, Zucchini and Eggs is wonderful fare. Zafiris’ recipe makes a quick, easy, and delicious meal, especially when you follow his lead and top the eggs with a healthy squeeze of fresh lemon juice.
 Zucchini and Eggs (Κολοκυθάκια με Αυγά)
Serves 2 as a main course or 4 as part of an appetizer spread
2 medium zucchini (1 pound)
3 Tbsp. olive oil
Salt
Freshly ground black pepper
1/2 cup diced yellow onion, 1/4” dice
4 eggs
Lemon wedges
Cut the zucchini in 1/2” slices. Season with salt and freshly ground black pepper. Heat the oil in a skillet and add half the zucchini in a single layer. Cook, without disturbing, until the zucchini is browned on the bottom; turn the zucchini over and brown on the second side. Remove to paper towels to absorb excess oil. Repeat with the remaining zucchini.
In the same pan, adding olive oil if necessary, sauté the onions, lightly seasoned with salt and freshly ground black pepper, until they soften and begin to turn golden. Add the cooked zucchini and gently mix the zucchini and onion. Spread the vegetables out evenly over the bottom of the skillet.
Whisk together the eggs, and pour evenly over the zucchini. Sprinkle with a little salt and freshly ground black pepper. Cover, turn down the burner, and cook over low heat until the eggs are set. Slide the Zucchini and Eggs onto a serving platter, cut into quarters, garnish with lemon wedges, and serve immediately.
Zafiris serves Zucchini and Eggs with slices of feta cheese, olives, bread, and a glass or two of ouzo.
~~~~~~~~~~~~~~~~~~~
This is my entry for Antioxidant Rich Foods/Five-a-Day Tuesdays hosted by Sweetnicks. Eggs are a good source of two antioxidants, lutein and zeaxanthin, which help prevent age-related macular degeneration, the leading cause of blindness in people over 65. Lutein and zeaxanthin also decrease the risk of cataracts.
Sunday, April 20, 2008
Recipes: Morel Stuffed Mushrooms, Marinated Beets with Candied Red Onions, & Horta Salad (Μανιτάρια Γεμιστά, Μαριναρισμένα Παντζάρια, & Χόρτα Σαλάτα)
 Some days, writing is easy. Other days, it’s like shelling pine nuts; in other words, hard and frustrating. Today’s been a pine nut day.
Part of the problem was my notes for three separate recipes were scribbled on one too-small piece of paper. Sorting them out made my head spin. None of the recipes are particularly difficult, but describing them on paper was harder than it should’ve been.
I considered dividing the recipes into two separate posts - one about mushrooms and the other about beets - but they taste so good on a single plate, I had to keep them together. Here’s the breakdown:
Morel Stuffed Mushrooms: The mushrooms have a soft, extremely flavorful filling. Tart lemon juice and tangy sun-dried tomatoes balance the rich, earthy taste of mushrooms. These can be stuffed several days ahead and refrigerated until ready to finish, so make impressive hot appetizers without a lot of last minute work. Paired with two kinds of beets, as I’ve done here, the mushrooms are the foundation for a filling vegetarian meal.
Marinated Beets with Candied Red Onions: Sweet with candied onions (or honey, if you’re pressed for time), and sour with red wine vinegar, these beets fill your mouth with wonderful flavors. Grated lemon peel is the essential ingredient that brings the dish together. It’s terrific on its own, wonderful with Horta Salad, and remarkable when paired with Morel Stuffed Mushrooms.
Horta Salad: Boiled greens, dressed with lemon juice or vinegar, are a classic Greek salad. Any domesticated and wild greens, separately or together, can be used for this simple recipe.
The recipes were inspired by Sarah Stegner’s Stuffed Mushrooms with Marinated Beets, described in Art Culinaire (Winter 2002). I loved her recipe's name, which immediately triggered my imagination. The details of Chef Stegner’s recipe diverged from what I’d been imagining, so I ended up using it for inspiration, rather than as a guide.
I particularly liked the morel powder Chef Stegner used in her stuffing. Last year we had an abundance of curiously bland morels, which I dried to concentrate, intensify, and improve their flavor. Powdered, our dried morels dramatically boosted the mushroomy earthiness of the stuffing.
 Morel Stuffed Mushrooms (Μανιτάρια Γεμιστά)
Makes 16 - 20
I ground the dried morels to a powder in a spice grinder. Without the morel powder the stuffing tasted great; it just wasn't as intensely flavored. On another note, I dread both soggy stuffed mushrooms and those that aren’t fully cooked. To avoid these problems, I use a technique for prebaking the mushrooms recommended by Cook’s Illustrated.
Mushrooms:
16 - 20 large white mushrooms (or other variety of fresh mushroom)
3 Tbsp. olive oil
3 Tbsp. lemon juice
Salt
Freshly ground black pepper
Stuffing:
Reserved mushroom stems, cut in 1/4” dice
1 1/2 cups diced yellow onion, 1/4” dice
1 Tbsp. olive oil
Salt
Freshly ground black pepper
1 Tbsp. minced garlic
3 tbsp. diced reconstituted or oil-packed sun-dried tomatoes, 1/4” dice
1/4 cup thinly sliced green onions
1/2 cup potato purée (6 ounce potato, cooked and grated)
1/2 cup freshly grated parmesan cheese
1/4 cup mascarpone or cream cheese
1/4 cup dried morel powder (2 ounces dried morels, pulverized) (optional)
1/4 fresh lemon juice
Topping:
1/2 cup Panko or fresh breadcrumbs
1 Tbsp. butter
1 tsp. finely grated lemon peel
1/2 tsp. finely grated garlic
Prebake the Mushrooms: Preheat the oven to 450°F. Wipe the mushrooms with a damp paper towel to clean off any dirt. Remove the mushroom stems and reserve for the stuffing. Put a wire rack on a rimmed baking sheet. Toss the mushrooms with olive oil, lemon juice, salt, and freshly ground black pepper. Place the mushrooms on the rack gill-side-up and bake for 20 minutes. Remove the mushrooms from the oven. Reserve any liquid in the mushrooms for the stuffing. Turn the mushrooms over and bake for 5 minutes. Set the mushrooms aside until you’re ready to stuff them.
Make the Stuffing: Sauté the mushroom stems and onions, lightly seasoned with salt and freshly ground black pepper, in olive oil until they're browned. Stir regularly to prevent the onions from burning. When the mushrooms and onions are done, stir in the garlic and cook for 1 minute. Place the onion mix in a bowl and stir in the sun-dried tomatoes, green onions, potato purée, parmesan, mascarpone, morel powder, lemon juice, salt, freshly ground black pepper, and any liquid reserved from the prebaked mushrooms. Taste and add lemon juice, salt, or pepper, as needed.
Make the Topping: Sauté the Panko in butter until it is nicely toasted, stirring regularly to prevent the breadcrumbs from burning. Stir in the lemon peel and garlic and cook for 1 minute. Let cool and put in a small bowl.
Assemble the Stuffed Mushrooms: Preheat the oven to 450°F. Using a spoon or piping bag, divide the stuffing equally among the mushrooms. Smoothly round off the surface of each stuffed mushroom. (The mushrooms may be made ahead to this point and refrigerated; store the mushrooms in a single layer, on a paper towel, to prevent them from turning soggy.)
Take each stuffed mushroom, turn it upside down, and roll the stuffing around in the topping until it is nicely coated with breadcrumbs. Bake the mushrooms for 10 – 12 minutes, or until they are hot and the topping is lightly browned. Let sit at room temperature 5 minutes before serving.
Serve with Marinated Beets and Horta Salad, or on their own as an appetizer.
Variation - Stuffed Mushrooms with Pancetta
 Marinated Beets with Candied Red Onions (Μαριναρισμένα Παντζάρια me Κρεμμύδια Γλυκά του Κουταλιού)
Serves 4 - 6
The key to this recipe, as with all sweet and sour dishes, is getting the balance of flavors correct. The only way to get it right is to taste and adjust the flavors for your palate. If you’re serving this with Horta Salad, keep its vinegar dressing in mind as you adjust the seasoning. Candied Red Onions add unique flavor, but honey is a fine substitute for them.
Candied Red Onions:
2 cups diced red onion, 3/4” dice
1/2 cup red wine vinegar
1/2 cup sugar
1 cup water
Marinated Beets:
2 bunches beets, roots only (greens used for Horta Salad)
2 Tbsp. olive oil
1 cup thinly sliced green onions
1/2 cup red wine vinegar
1 Tbsp. whole grain mustard
1 Tbsp. minced thyme
2 tsp. finely grated lemon peel (1 lemon)
1 tsp. finely grated garlic
Salt
Freshly ground black pepper
1/2 cup Candied Red Onions or 1/4 cup thyme honey
Make the Candied Red Onions: Mix all the ingredients in a saucepan and bring to a boil. Reduce the heat and cook at a slow boil, stirring occasionally, until the liquid is reduced to a thick syrup. Watch it carefully at the end and stir regularly; once most of the liquid is gone, sugar syrup can burn easily. It takes 30 – 45 minutes for the syrup to reduce, and can be done while the beets are roasting. (The candied onions can be made well ahead. There may be slightly more candied onions than needed for this recipe.)
NOTE on Roasting Beets: Preheat the oven to 400°F. Wash the beets, cut off the greens leaving an inch of stem (don't cut into the beet itself), rub the beets with olive oil, and wrap tightly in a foil packet (or place in a tightly covered baking dish). Bake for 40 minutes to 1 1/2 hours, depending on the size of the beets and how fresh they are. The beets are done when they're tender if poked with a knife or skewer. Let the beets cool, and slip off their skins (I wear gloves when I do this to protect my hands from staining). (These can be made ahead and kept in the refrigerator for about a week.)
Make the Marinated Beets: Cut the beets into 1/2” slices; quarter the slices. Put the beets in a bowl and mix with all the other ingredients. Let marinate at room temperature for at least 1 hour. Taste and add salt, freshly ground black pepper, vinegar, or candied red onion, as needed.
Serve with Horta Salad and Morel Stuffed Mushrooms, or on its own (or with Horta Salad) to accompany roast chicken or fish.
Horta Salad (Χόρτα Σαλάτα)
Serves 4 - 6
"Horta" is the generic Greek word for greens. This salad can be cooked ahead and dressed with olive oil, but don’t add vinegar until just before serving. If you buy beets without greens, or the greens aren’t in good enough condition to eat, use Swiss chard or any other greens.
2 bunches of beets, greens only (roots used for Marinated Beets)
2 Tbsp. red wine vinegar
2 tbsp. olive oil
Salt
Freshly ground black pepper
Wash the greens very carefully and discard any damaged leaves. Remove the stems and cut into 1” pieces. Tear the greens into large pieces.
Bring a large pot of salted water to a boil. Add the stems and cook for 2 minutes. Add the greens and cook for 3 – 5 minutes more, or just until the greens are tender. The cooking time varies depending on the type of greens being used. For example, Swiss chard cooks faster than beet greens. Be careful not to overcook the greens or their texture will suffer. Drain the greens well.
While the greens are still warm, toss with olive oil, and then with vinegar, salt, and freshly ground black pepper. Taste and add vinegar, salt, pepper, or olive oil, as needed.
Serve hot or at room temperature with Marinated Beets and Morel Stuffed Mushrooms. Horta Salad can also be served on its own, or just with the Marinated Beets.
~~~~~~~~~~~~~~~~~~~~~~~~~~
Other Interesting Vegetarian Mushroom Recipes
Parsnip Gnocchi with Pearl Onions, Peas, and Mushrooms
Mushroom Stifado (Μανιτάρια Στιφάδο)
Red Cabbage with Mushrooms and Blueberries – Chou Rouge Forestière (Λάχανο Κόκκινο με Μανιτάρια και βακκίνιο το Μύρτιλλο)
To find more mushroom recipes, Food Blog Search is a great tool.
~~~~~~~~~~~~~~~~~~~~~~~~~~
This is my entry for No Croutons Required, hosted this month by Lisa of Lisa’s Kitchen.
Thursday, April 17, 2008
Recipe: Lamb and Leek Meatballs with Onion Egg-Lemon Sauce (Κεφτέδες με Πράσα και Αβγολέμονο)
I redeemed myself tonight. My sad story about an unfortunate lamb tagine has a happy ending.
Two days ago, after deciding the tagine was not worth eating, I’d rinsed off the meat and threw away every bit of the nasty sauce. I was left with tender chunks of leftover lamb.
Tonight I ground the lamb in a food processor, and mixed it with soft, sweet leeks to make luscious little meatballs. Paired with an oniony egg-lemon sauce, the meatballs made a delicious mid-week meal.
The egg-lemon sauce (avgolemono) has an unusual twist. Because the meatballs weren’t cooked in liquid, I didn’t have the broth necessary for making egg-lemon sauce. Rather than using plain chicken stock, I simmered stock with onions to boost the flavor, and used this as the foundation for the sauce. The result was surprisingly good, and paired particularly well with leek meatballs.
Although the meatballs could easily be made with raw ground lamb, they are a great way to use up leftover roast (or the remnants of tragic tagine). Since Easter dinner is just 10 days away, and we’ll no doubt have leftover lamb again soon, I invented the meatballs just in time. Lamb and Leek Meatballs with Onion Egg-Lemon Sauce (Κεφτέδες με Πράσα και Αβγολέμονο)
Serves 4 (makes 20 1” meatballs)
The meatballs can be served on their own as an appetizer (without the egg-lemon sauce) or with tomato sauce instead of egg-lemon. They are a wonderful way to use up leftover roast lamb.
Meatballs:
3 cups diced leeks, 1/8” dice
3 Tbsp. olive oil
Salt
Freshly ground black pepper
1 1/2 cups leftover lamb, ground (or raw ground lamb)
1 Tbsp. minced garlic
4 tsp. minced mint
2 tsp. dried oregano, crushed
1 egg
Oil for frying the meatballs
Egg-Lemon Sauce (Avgolemono):
1 cup diced yellow onion, 1/4” dice
1 Tbsp. olive oil
Salt
Freshly ground black pepper
1 cup chicken stock
2 eggs
1/4 cup fresh lemon juice
Minced mint for garnish
Make the meatballs: Sauté the leeks in olive oil, lightly seasoned with salt and freshly ground black pepper, over medium heat until the leeks are soft. Mix the leeks with the lamb, garlic, mint, oregano, and egg. Brown a sample of the meatball mix in olive oil, taste, and add salt, freshly ground black pepper, mint, or oregano to the meatball mix, as needed. Shape the mix into 1” balls, and refrigerate for at least 1 hour.
Heat the oil in a frying pan, and fry half the meatballs until they are nicely browned on all sides. If you put too many meatballs in the pan at one time, they won’t brown properly; if you’re in a hurry, cook the meatballs in two frying pans. Drain on paper towels. (You can hold the meatballs in a 250°F oven for 15 minutes, if needed, while you make the sauce.)
Make the Egg-Lemon Sauce: Start the egg-lemon sauce while the meatballs are chilling in the refrigerator. Sauté the onion in olive oil, lightly seasoned with salt and freshly ground black pepper, over medium heat until the onions are translucent. Add the chicken stock, bring to a boil and simmer for 10 minutes. Purée the onions and stock in a blender. Strain out the solids, pressing out as much liquid as possible.
Using an electric mixer, beat the eggs until they are very thick. Add the lemon juice slowly while continuing to beat the eggs. Slowly beat in the onion-stock, and put the mixture in a saucepan.
When the meatballs are nearly done, or are keeping warm in a 250°F oven, cook the sauce over low heat until it thickens (this takes 3 - 5 minutes). Don’t let the sauce boil, or it will curdle. If the sauce is too thick for your taste, thin it out with a little chicken stock.
To Serve: Spoon a pool of egg-lemon sauce onto a plate, top with five meatballs, sprinkle with minced mint, and serve immediately.
~~~~~~~~~~~~~~~~~~~~~~~~~~
This is my entry for Leftover Tuesdays #13, hosted by Project Foodie.
Monday, April 14, 2008
Recipes: Steamed Alaska King Crab & Spinach with Garlic and Preserved Lemon
For the last five days, I’ve been celebrating my birthday. I’ve indulged myself, and been indulged by my friends and husband. My house looks ravaged (indulgence=no cleaning). My blog’s been neglected (indulgence=no writing).
Now it’s Monday, and time to pick up the pieces. The dishwasher’s humming, and a load of clothes is in the washer. I’ve taken out the crab shell laden garbage. The crab shells are from one of my birthday indulgences: live Alaska king crab.
I’ve only ever seen live king crab in Alaska, which is a pity because it’s the best tasting seafood I’ve ever had in a life of searching out the world’s finest foods from the sea. When fresh, Alaska king crab tastes sweet and salty, with a firm, meaty texture. Frozen king crab legs don’t do justice to the glorious flavor of fresh king crab.
When I was young, we used to buy live king crab off the dock: $5 for small crabs (5-8 pounds) and $10 for large crabs (8-12 pounds). In those days, boiling up a mess of Alaska king crab was one of my favorite company dinners. That was before over-fishing threatened king crab stocks and king crab fishing became a highly regulated industry, as it is today.
Now we’re lucky to find live king crab and rarely pay less than $50 for one small crab. In the old days I used to cook with king crab as an ingredient (and still make crab cakes out of rare leftovers). Now, it’s so expensive that I only serve unadulterated crab, perhaps with a little melted butter on the side.
Steaming crabs is a recent innovation in our house. For years, I followed my mother’s lead and boiled live crab (guts and all, for better flavor). Then I read about a lobster taste test in which steamed lobsters beat out boiled, so decided to try steaming crab. As with the lobster I’d read about, steamed crab has better, more concentrated flavor than when it’s boiled. Call me a steaming convert.
After I cooked and cleaned the crab, I put it in the refrigerator to chill. That meant making space in my woefully overcrowded refrigerator. When I jerked the bag of Full Circle Farm spinach from where it was precariously balanced on the top shelf, a jar of preserved lemons came tumbling down on me.
Inspired by the falling jar of lemons, I added some to the spinach I was serving that night as a side dish. The tart, salty lemons were a wonderful addition to the earthy taste of spinach. This easy recipe is a keeper. Steamed Alaska King Crab
Steaming crab couldn’t be easier. Put an inch or so of water in the bottom of a large stockpot, pop in a steamer, bring the water to a boil, put the live crab on the steamer, and steam it for 15 – 25 minutes, depending on the size of the crab. When the crab is cool, clean it by discarding the gills and innards. Separate the legs and break the body in half, using paper towels if needed to protect your hands from the spiny shells. Refrigerate until ready to serve. Serve with little bowls of melted butter, and nut crackers or kitchen shears.  Spinach with Garlic and Preserved Lemon
Serves 4
2 large bunches of spinach
2 Tbsp. garlic
Salt
Freshly ground black pepper
3 Tbsp. olive oil
1 tsp. harissa or 1 tsp. crushed red pepper
1/4 cup minced preserved lemon peel (peel from 1 preserved lemon) or 1 Tbsp. finely grated lemon peel (see NOTE)
2 Tbsp. lemon juice
Wash the spinach in two changes of water to remove all the grit. Remove and discard the stems and tear any large leaves into pieces.
Sauté the garlic, lightly seasoned with salt and freshly ground black pepper, in olive oil over medium heat until the garlic softens. Do not let the garlic brown. Stir in the harissa.
Add the spinach, and stir until it wilts (you may need to add the spinach a little at a time so it fits in the pan). When all the spinach is wilted, remove it from the heat, taste and add salt, pepper, and harissa, as needed. Stir in the minced preserved lemon peel and lemon juice and serve immediately.
NOTE: Preserved lemons are often used in Moroccan cooking. They are tart, salty, and very easy to make. If you use my recipe for preserved lemons, you’ll have to let the lemons cure for at least a week before you can use them. If you don’t want to bother making them, you may buy preserved lemons at Middle Eastern markets, specialty stores, and online. To use preserved lemon, remove it from the brine in which it is swimming and rinse it well. Remove the flesh, and any stringy bits from the inside of the peel. The peel is now ready to use.
~~~~~~~~~~~~~~~~~~~~~~
Preserved Lemon Recipes
Preserved Lemons, Candied Lemon Peels, and Sparkling Mint-Lemonade (I make preserved lemons, candy the extra lemon peels, and use leftover syrup for sparkling lemonade.)
Moroccan Salmon, Fennel-Preserved Lemon Salad, & Sweet Potato Oven Fries (I deconstruct a Moroccan tagine, and use preserved lemons to make Preserved Lemon Aioli and in a fennel and red pepper salad.)
Moroccan Eggplant Salad with Preserved Lemon (Susan flavors eggplant salad with preserved lemons, and makes a preserved lemon martini).
To find more preserved lemon recipes, Food Blog Search is a great tool.
~~~~~~~~~~~~~~~~~~~~~~
This is my entry for Antioxidant Rich Foods/Five-a-Day Tuesdays hosted by Sweetnicks.
Sunday, April 6, 2008
Recipes: Grilled Radicchio & Grilled Radicchio and Arugula Salad with Parmesan Shavings (Ψητό Ραδίκιο & Σαλάτα με Ψητό Ραδίκιο, Ρόκα, και Παρμεζάνα)

Radicchio drizzled with olive oil and grilled has lots of flavor and takes very little work. Grilling tames radicchio’s natural bitterness, and changes it into an ingredient that enhances everything with which it is paired.
 The outer leaves of grilled radicchio are charred, soft, and slightly smoky; the inner leaves warm yet crunchy. Mixed with garlic, olive oil, parmesan cheese, and sometimes a little good quality balsamic vinegar, grilled radicchio makes a wonderful topping for
The form of radicchio most commonly found in US supermarkets looks like a small red cabbage. Occasionally, the market has Treviso Radicchio, which is elongated and, when the outer leaves are stripped away, looks like a large red Belgian endive. For most purposes, the two radicchios can be used interchangeably.
 Friday night we had no snow near the back shed; this is Sunday morning (April 6, 2008).
We planted radicchio in our Alaskan garden last summer and harvested it on our return from Greece in October. Today we ignored the 12” of snow that fell yesterday and started this year’s radicchio seeds in the garage.
 Grilled Radicchio (Ψητό Ραδίκιο)
Serves 4
If you don’t have the time, weather, or inclination to start a fire, it’s easy to grill radicchio on a cast iron grill pan.
2 heads radicchio, round or elongated (Treviso)
Olive oil
Salt
Rinse off the radicchio and discard any damaged portions. Cut round radicchio in quarters, and elongated radicchio in lengthwise halves. Drizzle with olive oil and season with salt.
Preheat a cast iron grill pan until it is very hot (if you're grilling over fire, you need moderately hot coals), and grill the radicchio on all sides until the outer leaves are nicely browned. Remove from the grill.
Serve immediately drizzled with a little best quality balsamic vinegar. For use in another recipe, cut out any tough center core, and roughly slice or chop into pieces. Grilled Radicchio and Arugula Salad with Parmesan Shavings (Σαλάτα με Ψητό Ραδίκιο, Ρόκα, και Παρμεζάνα)
Serves 4
Save leftover salad and wrap it, with a few parmesan shavings, in a warm flour tortilla for one of the most delicious vegetarian sandwiches you’ll ever eat. To make parmesan shavings, you need to start with a chunk of fresh parmesan cheese, preferably Parmigiano-Reggiano.
Dressing:
2 Tbsp. sherry vinegar
1/2 tsp. Dijon mustard
Salt
Freshly ground black pepper
4 Tbsp. extra virgin olive oil
Salad:
4 cups roughly chopped grilled radicchio
4 cups loosely packed torn pieces of arugula
1/4 cup chopped parsley
1/4 cup thinly sliced red onion or shallot
Parmesan shavings
Whisk together the sherry vinegar, mustard, salt, and freshly ground black pepper. Slowly whisk in the extra virgin olive oil. Taste the dressing and add salt or pepper as needed. Mix all the remaining ingredients together in a bowl. Toss with the appropriate amount of dressing just before serving (there may be dressing left over).
Using a vegetable peeler, or very sharp knife, shave off very thin pieces of parmesan and arrange over each serving of salad.
Serve immediately.
~~~~~~~~~~~~~~~~~~~~~~~
Radicchio Recipes
Lentil Salad with Radicchio, Celery, and Capers (Ilva makes an easy salad with marinated lentils and fresh radicchio and celery.)
Radicchio Stuffed with Cheese and Sun-Dried Tomato Vinaigrette (Cris gives directions for a beautifully composed fresh radicchio salad.)
Roasted Radicchio di Treviso (Susan tells how to simply roast radicchio with grated cheese.)
Bruschetta with Burrata and Radicchio Marmalade (Luisa tests Russ Parsons’ recipe for Radicchio Marmalade and finds it “delicious beyond words.”)
Radicchio Soup – Minestra di Radicchio (Susan makes radicchio soup, flavored with vegetables, pancetta, and ham.)
To find more radicchio recipes, Food Blog Search is a great tool.
~~~~~~~~~~~~~~~~~~~
This is my entry for Weekend Herb Blogging, hosted this week by Jai and Bee from Jugalbandi.
The first picture, of the Treviso Radicchio and Knife, is my entry for Click, a food photography event hosted and created by Jai and Bee from Jugalbandi. This month’s theme is Au Naturel: food photographed in its natural state.
Friday, April 4, 2008
Recipe for Potato Pie with Cabbage and Mustard (Πατατόπιτα με Λάχανο και Μουστάρδα)
Whether it’s potatoes and cabbage in the winter, or eggplant and tomatoes in the summer, I love layer upon layer of perfectly seasoned vegetables. I recently dug into my Full Circle Farm CSA box to make one of those wonderful dishes: Potato Pie with Cabbage and Mustard.
Over the years, I’ve separately served each individual layer of the Potato Pie to accompany meat, poultry, or seafood. Oven roasted potatoes, caramelized onions with cumin, and sautéed cabbage with thyme are all are old stand-bys that taste great.
The old stand-bys combined in a single dish make company-ready fare that is better than the sum of its parts. The vegetable juices run together and mingle, forming unexpected and delicious flavor combinations.
Potato Pie with Cabbage and Mustard is warm and filling, and makes a satisfying meal when paired with a crisp green salad, olives, and bread. It is also a charming partner for sausages or roast meat.
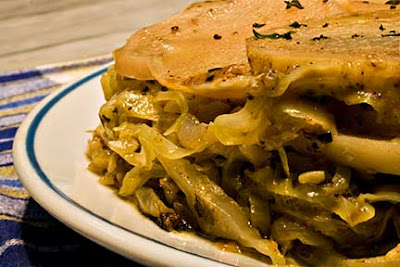 Potato Pie with Cabbage and Mustard (Πατατόπιτα με Λάχανο και Μουστάρδα)
Serves 4 – 6
Inspired by A Passion for Vegetables by Paul Gayler (Lyons Press 2000)
I’ve suggested using a 9” springform pan for this recipe because it makes unmolding the pie easier. However, I’ve made this in a well-oiled large soufflé dish and the pie slid right out, so a springform isn’t absolutely necessary. The vegetables are cooked separately and individually seasoned; keep in mind the finished dish and be careful not to over-salt any single vegetable. For a more decorative presentation, place pitted, dried black olives between the potato slices on the bottom layer. Turnips may be substituted for the potatoes.
1 pound Yukon gold or red potatoes
1/4 cup olive oil, divided
Salt
Freshly ground black pepper
6 cups thinly sliced yellow onions, cut in quarter moons
4 tsp. minced fresh garlic
1 tsp. freshly ground cumin seeds
1 Tbsp. wholegrain Dijon or Creole mustard
4 cups thinly sliced green cabbage
4 tsp. minced thyme
1 cup grated graviera or cheddar cheese
Preheat the oven to 450°F.
Wash, peel, and cut the potatoes into 1/4” slices. On a rimmed baking sheet, toss the potatoes with 1 Tbsp. olive oil and season with salt and freshly ground black pepper. Roast for 10 – 15 minutes or until the potatoes soften and start to turn golden.
Sauté the onions, lightly seasoned with salt and freshly ground black pepper, in 2 Tbsp. olive oil until the onions soften and start to brown. Stir in the garlic and cumin and cook for 2 minutes. Using a slotted spoon, remove the onions to a bowl. Stir in the mustard when the onions have partially cooled.
In the pan used for the onions, add the remaining 1 Tbsp. olive oil. Sauté the cabbage, lightly seasoned with salt and freshly ground black pepper, until the cabbage wilts completely. Remove from the heat and stir in the minced thyme.
Thoroughly oil a 9” springform pan; tightly cover the outside of the pan with foil to prevent oil from leaking out into the oven.
Layer the springform pan's bottom with 1/3 of the potatoes, cover the potatoes with 1/2 the cabbage, cover the cabbage with 1/2 the onions, and cover the onions with 1/2 the cheese. Repeat the layers, and finish with a layer of potatoes. (The recipe can be made ahead to this point and refrigerated; bring to room temperature before baking.)
Bake for 30 – 35 minutes, or until the top of the pie is golden and the juices bubbling. Let the pie rest in the pan for 5 – 10 minutes. Invert and unmold on a serving plate; if any potato slices stick to the bottom of the pan, carefully move them back to their place on top of the pie. Carefully cut into wedges and serve.
~~~~~~~~~~~~~~~~~~~~~~~
More Cabbage Recipes:
Greek Cabbage and Rice (Λαχανόρυζο) (My recipe for rice with cabbage, onion, thyme, tomato, and currants)
Red Cabbage with Mushrooms and Blueberries (Chou Rouge Forestière) (My review of Robert Reynolds and Josephine Araldo’s From a Breton Garden, including Araldo’s unique red cabbage recipe.)
Cabbage Rolls (λαχανοντολμαδάκια) (Peter Minakis’ recipe for Greek cabbage rolls stuffed with rice and meat.)
Mama’s Health Soup (Zoe’s Greek mother’s recipe for cabbage soup, written up by Lulu as a service to humanity).


