Showing posts with label mushrooms. Show all posts

Sunday, August 15, 2010

Gathering Wild Mushrooms in Alaska, Drying Wild Mushrooms, and 5 Recipes for Wild Mushrooms


Perfect 1 pound 10 ounce Boletus edulis

Steve arrived home from work last Friday, a briefcase in one hand and a massive Boletus edulis in the other. A smile of pure joy lit his face. “It’s time to go mushrooming.”

He handed me the mushroom, a king bolete, also known as porcino in Italy and cep in France. I weighed it: 1 pound 10 ounces. When I cut into it, the flesh was firm and pure white, untouched by worm, fly, slug, squirrel, or rot. I’d never seen anything like it. Normally, porcini this big have been heavily predated upon and are chock full of worms.

“Where’d you get this?” “Right in front of the house.” “Whataya mean, right in front of the house?” “Let me show you.” Steve brought me to a spot twenty feet from our front door.

“It’s definitely time to go mushrooming,” I said, thoughts of dinner already a distant memory. “Let’s get changed.”


Leccinum subglabripes

It’s been raining for weeks, so on went rain coats, rain pants, and waterproof hiking boots. Going mushrooming involves tromping through woods, pushing through understory, going up and down hillsides, seeking out terrain where desirable mushrooms thrive. Staying dry is key to maintaining proper enthusiasm.

Mediterranean Cooking in Alaska has moved as of March 2011. To read this post please go to


http://www.laurieconstantino.com/gathering-wild-mushrooms-in-alaska-drying-wild-mushrooms-and-5-recipes-for-wild-mushrooms/


Please click on over and visit my new site. Thank you!


Rules for Gathering and Handling Wild Mushrooms
The first and most important rule for mushroom foragers is: “When in doubt, throw it out.” Do not gather mushrooms that you can’t absolutely, positively identify.
Leave all unknown or questioned mushrooms alone, even if it means walking past many mushrooms of every color and shape before finding one you recognize.

1. The best way to learn about mushrooms is to have someone show you the edible species; spending time studying field guides also helps. The perfect field guide for Alaska doesn’t exist.


The books I like best are...

Mediterranean Cooking in Alaska has moved as of March 2011. To read this post please go to


http://www.laurieconstantino.com/gathering-wild-mushrooms-in-alaska-drying-wild-mushrooms-and-5-recipes-for-wild-mushrooms/


Please click on over and visit my new site. Thank you!


Wild Mushroom Pasta Sauce


Fresh Porcini Salad with Shaved Fennel and Parmesan Cheese


Pasta with Wild Mushroom and Clam Sauce


Wild Mushroom Ragu (Pasta Sauce)


Port Duxelles

Mediterranean Cooking in Alaska has moved as of March 2011. To read this post please go to


http://www.laurieconstantino.com/gathering-wild-mushrooms-in-alaska-drying-wild-mushrooms-and-5-recipes-for-wild-mushrooms/


Please click on over and visit my new site. Thank you!


Sunday, April 19, 2009

Recipes: Home-Cured Flat Pancetta & Edamame and Mushroom Risotto with Pancetta

Bacon’s smell wafting through the air is so enticing that even committed vegetarians are sometimes tempted to stray from their virtuous path. These days I mainly use bacon and pancetta as flavor-boosting ingredients; it’s been years since I ate it on its own.

Since I use bacon to boost flavor, I buy the best available. So I was intrigued to read on
Kits Chow, that Christine’s Home-Cured Bacon was so good, her husband asked her not to buy bacon from the store anymore. I had to try it.

Although I’ve visited
Kits Chow more than once over the past year, I was there recently because I was paired with Christine for March’s Taste and Create. Invented by Nicole of For the Love of Food, Taste and Create is one of my favorite food writing events. Every month Nicole pairs participating food writers; each is responsible for trying one recipe from the other’s blog and writing about it.

Some months it can be a challenge to find something I want to write about on my partner’s blog (although I’ve always found something delicious to make). Other months there’s an abundance of recipes I can’t wait to try; this was an abundant month. I haven’t made it yet, but Christine’s simple
Ginger Custard will appear on our table shortly after I next go shopping.

Christine writes from an Asian perspective, while I focus on Mediterranean foods, but there are many similarities in our cooking styles. We both emphasize foods made with fresh, locally available products, and enjoy making ingredients from scratch.

Christine shares my passion for creating variations on a theme. For example, she recently wrote about and photographed a
series of grilled cheese sandwiches; every time I look at this post, I crave an immediate grilled cheese fix. I also appreciate Christine’s creative Asian-Hellenic fusion cooking.

But back to the bacon.

Christine used a
Hugh Fearnley-Whittingstall recipe from the Guardian to make her bacon. The recipe is simple: pork belly is liberally coated with a dry-rub of salt, sugar, and spices, and then cured in the refrigerator for several days.

The result was delicious: meaty, juicy, and mouth-watering. I’m calling it flat pancetta rather than bacon because it isn’t smoked (a hallmark of American bacon). And since I renamed it pancetta, I used the meat to flavor a wonderful risotto made with edamame beans and garlicky sautéed mushrooms. I’m only sorry there isn’t any leftover risotto; writing the recipe has left me wanting more.

Homemade PancettaHome-made Flat Pancetta
Adapted from
Hugh Fearnley-Whittingstall via Kits Chow
The original recipe recommended curing the meat at least 4 days, or as long as 10, draining the juices and applying more cure every 24 hours. I stopped the process on the fourth day because the pancetta was getting too salty for my taste. Since I cured it for shorter than called for in the original recipe, and because the recipe doesn’t include nitrites or nitrates, I froze all the pancetta I didn’t use right away rather than worrying about spoilage. The best place to buy meaty pork belly is in Asian markets (in Anchorage, Sagaya is the best source). Be sure to look the pork over carefully and buy the meatiest piece you can find. Once, in desperation, I bought a frozen piece of pork belly wrapped in freezer paper. The butcher repeatedly assured me the meat was skin-on; it wasn’t, plus the “meat” was 90% fat. The fault was my own for buying meat sight unseen.

Curing mix:
2 Tbsp. black peppercorns
2 Tbsp. coriander seeds
1 tsp. juniper berries
5 bay leaves
1 1/3 cup kosher salt (3/4 pound)
3/4 cup (packed) brown sugar (1/4 pound)

2 pieces meaty pork belly, with skin, 1 1/2 – 2 pounds each

Make the Curing Mix: Grind the peppercorns, coriander seeds, juniper berries, and bay leaves in a spice grinder, or pound them in a mortar and pestle until they are finely crushed. Mix the ground spices with the salt and brown sugar.

Curing Pancetta - Day 1Day 1: Rub each piece of pork belly with the curing mix until the meat is well coated and every nook and cranny is covered with the mix. Put the meat in a glass or other non-metallic container. Cover with plastic wrap and refrigerate.

Curing Pancetta - Day 2Day 2: After 24 hours, pour off all the liquid that has leached out of the pork and rub the meat with more curing mix until it is once again well coated.

Day 3: Repeat Day 2.

Day 4: Rinse off all the cure under cold running water. Dry the meat very thoroughly. Wrap in wax paper, parchment paper, or cheesecloth and refrigerate or freeze until ready to use (before choosing storage method, read the above headnote).

Edamame and Mushroom Risotto with PancettaEdamame and Mushroom Risotto with Pancetta
Serves 4
The mushrooms need to be sautéed in batches to ensure they brown properly; if you try to brown all the mushrooms at one time, they’ll steam rather than brown. Because home-cured pancetta can be salty, be sure to lightly salt the mushrooms or the finished dish may be too salty (the mushrooms need some salt to ensure they cook properly). Pancetta is often sold in packages of very thinly cut pre-sliced meat. Although I use pre-sliced pancetta in a pinch, I mostly buy pancetta direct from the deli counter (if I’m not making my own at home). I ask for either a chunk of pancetta, which I hand slice and dice at home, or have the deli staff cut the pancetta into slices the thickness of thick bacon. With thicker slices, eaters enjoy bursts of pancetta flavor when devouring the risotto; thinner slices tend to melt into the other flavors.

Mushrooms:
1/2 pound fresh cremini mushrooms, cut in 1/4” slices (about 2 cups sliced)
1/2 pound fresh shiitake mushrooms, stems removed and cut in 1/4” slices (about 2 cups sliced)
2 Tbsp. butter, divided
2 Tbsp. olive oil, divided
Salt
Freshly ground black pepper
1 Tbsp. minced garlic, divided

Risotto:
3/4 cup diced home-cured or store-bought pancetta (rind removed), 1/4” dice
2 Tbsp. olive oil
1 1/2 cups diced onions, 1/4” dice
Freshly ground black pepper
1 1/3 cups Arborio rice
1 cup dry white wine
10 ounces shelled edamame beans, blanched if fresh or thawed if frozen
6 Tbsp. minced fresh mint, divided
6 – 7 cups vegetable or chicken stock
1 cup freshly (and finely) grated parmesan cheese

Cook the Mushrooms: Sauté the cremini mushrooms, lightly seasoned with salt and freshly ground black pepper, in 1 Tbsp. butter and 1 Tbsp. olive oil, until the mushrooms are nicely browned. Stir in half the garlic and cook for 1 minute. Remove the browned mushrooms from the pan with a slotted spoon and set aside. Repeat with the shiitake mushrooms, using the remaining olive oil, butter, and garlic.

Make the Risotto: In a sauté pan large enough to hold the finished risotto, sauté the pancetta until the fat renders and the pancetta begins to brown. Stir in the onions, lightly seasoned with freshly ground black pepper, and sauté until the onions soften and begin to turn golden. Stir in the rice to completely coat it with oil and cook, stirring, for 1 minute. Add the wine, bring to a medium boil, and cook, stirring, until the wine is almost all absorbed.

Add 1/2 cup of stock and cook over moderate heat, stirring constantly, until the stock is almost all absorbed. Keep adding stock, 1/2 cup at a time, and stirring until each addition of stock is almost absorbed. When the rice is half done, stir in the edamame beans and 5 Tbsp. mint. (The recipe can be made ahead to this point, and finished right before serving. If you make it ahead, after you take the rice off the burner, stir it until it cools down before adding the edamame and mint.)

Continue adding stock, 1/2 cup at a time, and stirring until the rice is tender, but still firm in the center (this takes 18 – 22 minutes total). There may be stock left over. Stir in the reserved mushrooms, remaining 1 Tbsp. mint, and 1/2 cup grated parmesan. If necessary, add stock until the risotto is the consistency you desire; it should be moist and creamy, not thick and dry. Taste and add salt and freshly ground black pepper, as needed.

Serve immediately with the remaining grated parmesan on the side for sprinkling on top.
~~~~~~~~~~~~~~~~~~~~~~~~~~~~~
This is an entry for My Legume Love Affair – 9th Helping (MLLA9), created by Susan of The Well-Seasoned Cook, which I hosted in March 2009. My Legume Love Affair - 10th Helping for April 2009 is being hosted by Courtney of Coco Cooks.

Wednesday, February 11, 2009

Recipes for Oxtail Braised in Sherry & Oxtail Ravioli in Leek-Mushroom Broth

Anchorage Pond in WinterYesterday the sun was shining and the temperature a balmy 15°F (-9°C).

I came in from my walk invigorated, but wanting something that would warm me from the inside out. Luckily, I had some leftover Oxtail Ravioli in Leek-Mushroom Broth, a remarkably delicious dish I’d made with leftover Oxtail Braised in Sherry.

As I’ve mentioned before, using leftovers as an ingredient is one of the easiest ways to create full-flavored food. Instead of eating the same dish twice in a row, try using all the flavors you worked hard to put in the original dish to create something new and exciting.

Although no longer the bargain it used to be,
oxtail (actually, beef tail) is ideal for braising in sherry or other wine. The cartilage, marrow, and tendons in the tail dissolve into the braising liquid when oxtails are cooked long and slow. The meat becomes meltingly tender and the sauce rich and unctuous.

On a recent evening, we feasted on Oxtail Braised in Sherry. There were only two pieces of oxtail left over. That night, I lay in bed scheming and planning how best to use the luscious leftovers. I decided to stuff the meat into Oxtail Ravioli and to enrich the already wonderful braising liquid with earthy mushrooms and sweet leeks.

The next day, I hesitated. Making homemade ravioli seemed like too much of a hassle. But I didn’t have any other ideas, so I persevered and discovered, as I do anew each time I make ravioli, they are easy to make and way less trouble than I always anticipate.

The key to making ravioli is having the right equipment. The dough takes 2 minutes to make in a food processor. A
pasta machine quickly rolls out perfect sheets of pasta. Because the machine can roll pasta so thinly, the resulting ravioli are light and tender. If you don’t have the equipment to make your own pasta, store-bought wonton or gyoza wrappers make tasty ravioli.

For another take on ravioli making with leftovers, check out Maria's recipe for Ravioli with Parsley-Pesto.
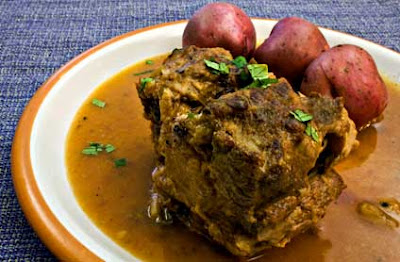
Oxtail Braised in SherryOxtail Braised in Sherry
Serves 6 - 8

Oxtail is sold cut into 1” thick slices; buy the meatiest pieces you can find. You will inevitably have a few slices from the tail’s end that have no meat on them. Be sure and add these pieces to the stew; their cartilage adds richness to the broth. Oxtail is delicious braised in any kind of dry wine; I use sherry because I enjoy its subtle flavor. I like the soupy sauce this recipe makes, in part because it leaves me more sauce for playing with leftovers. However, if you want thicker sauce, remove the lid when the meat is done and cook the stew at a medium boil until the sauce is the thickness you prefer.


Braised Oxtail is a good recipe to make ahead. Refrigerating the cooked oxtail hardens any excess fat and makes it easier to remove. As with most braised meats, Oxtail Braised in Sherry freezes well. I make the full recipe, even though I’m cooking for 2, and freeze the leftovers in serving size containers. Other ways of using the leftovers are in Oxtail Ravioli (see recipe below) or for soup (cut up the meat, add it, diced leftover potatoes, and beef stock to the oxtail broth and vegetables, and simmer for 15 minutes).

6 pounds oxtail slices
1 Tbsp. olive oil
Salt
Freshly ground black pepper
1/4 pound diced
thick-cut pancetta, 1/4” dice
4 cups diced onions, 1/2” dice
1 cup diced carrots, 1/2” dice
1 cup diced celery, 1/2” dice
1 Tbsp. minced fresh garlic
1 750ml. bottle dry Sherry
2 cups beef stock
1 14.5 ounce can diced tomatoes, preferably fire-roasted, juices included
3 bay leaves
Fresh parsley, minced, for garnish

Wash and dry the oxtails. Cut off as much fat as you can. Season the oxtails with salt and freshly ground black pepper on both sides. Heat the olive oil in a Dutch oven and, cooking the oxtails in batches, thoroughly brown them on all sides. Remove the browned oxtails from the pot and set them aside.

Add the pancetta to the same pot and cook until it is nicely browned. Add the onions, carrots, and celery, seasoned lightly with freshly ground black pepper, and cook until the onions are translucent, being sure to scrape up any browned bits from the bottom of the pot as you cook the vegetables. Add the garlic and cook for 1 minute.

Stir the Sherry, beef stock, tomatoes, and bay leaves into the vegetables. Return the browned oxtails to the pot. Bring the liquid to a boil, cover, turn down the heat to low, and simmer for 2 1/2 – 3 1/2 hours, or until the meat is very tender and falling off the bone. (The recipe may be made ahead to this point.)

Remove as much fat as possible from the sauce (a
fat separator works well for this task or, if you have time, separate the meat and sauce and refrigerate to harden the fat, which makes it easier to remove from the liquid). If the oxtails have been refrigerated, cook over low heat until the sauce is liquid and the oxtails warmed through. Taste and add salt or freshly ground black pepper, as needed.

Sprinkle with minced fresh parsley and serve with boiled or roasted potatoes.

Oxtail Ravioli in Leek-Mushroom BrothOxtail Ravioli in Leek-Mushroom Broth
Serves 4 – 6 as a main course (makes 12 ravioli, 3 - 4” diameter)
I make this with leftover oxtail because its unctuousness is well-suited for ravioli. However, any leftover braised beef, such as pot roast or stew, may be used instead. Oxtail broth gels when cold, so you need to warm the leftovers to separate the liquids and solids. Use the oxtail liquids, supplemented with rich beef or chicken stock as needed, to make 4 cups of stock for the Leek-Mushroom Broth. Bone enough oxtails to make 1 cup of chopped meat; one large oxtail slice makes about this amount. You can substitute the vegetable-pancetta mix from the oxtails for up to half the meat. Ravioli freezes well uncooked, so if I’m making ravioli, I usually double the pasta and filling recipes so I can freeze some for another day. As for the truffle cheese and truffle oil, they add satisfying
umami to the dish, but neither is necessary; the dish will be very tasty even without them. If you have access to wild mushrooms, by all means use them. Be sure to carefully rinse off any dirt that is trapped between the leeks' many layers.

Pasta:
3/4 cup plus 2 Tbsp. all purpose flour
1 large egg
1/8 tsp. salt
1/2 - 1 Tbsp. water, if needed


Ravioli Filling:
1 cup chopped oxtail meat
3/4 cup grated
sottocenere al tartufo (truffle cheese) or Italian fontina (about 4 ounces)

Leek-Mushroom Broth:
4 cups sliced cremini or wild mushrooms (about 1/2 pound), 3/8” slices
1 Tbsp. olive oil
3 Tbsp. butter, divided
1 Tbsp. minced garlic
1 Tbsp. minced rosemary
4 cups sliced leeks, white and light green parts only, 3/8” slices (2-3 leeks)
4 cups beef stock (or oxtail broth and beef stock to make 4 cups)
1 tsp. white truffle oil
1/2 cup freshly grated parmesan cheese

Make the Pasta: Put the flour, eggs, and salt in a food processor. Process until the ingredients are thoroughly mixed and the dough starts forming clumps. If the dough is too dry, add water in 1 Tbsp. increments and process again. Dump the dough out onto plastic wrap and knead for 1 minute, adding a small amount of flour if the dough is sticky. When you’re done, the dough should be smooth and firm. Divide the dough into two portions, wrap with plastic wrap, and let sit at room temperature for at least 30 minutes. (The dough can be made ahead to this point.)


Run each portion of dough through the rollers of a pasta machine, starting with the thickest setting. Fold the dough in thirds as if folding a letter, turn it 45 degrees, and again run it through the thickest setting. Repeat the folding, turning, and rolling at least three more times, or until the dough is smooth and shiny. Lay the sheets of dough out on dish cloths while they're waiting their turn to be rolled.

Set the pasta machine at the next thinnest setting. Run the sheets of pasta through, dusting with flour as necessary. Continue reducing the setting of the pasta machine and running the pasta through until you reach the machine’s lowest setting. When the sheets of pasta become too long to comfortably handle, cut them into manageable lengths.

Oxtail RavioliForm the Ravioli: Put 2 tsp. chopped meat on a sheet of pasta in clumps far enough apart so you can cut out 3”- 4” round ravioli. Top each clump with 1 tsp. truffle cheese or fontina. Brush water all around the pasta sheet where there isn’t stuffing (use a pastry brush for this task). Top with a second sheet of pasta. Press down to seal the top pasta sheet onto the bottom sheet, being careful to squeeze all the air out from around the stuffing. Cut out the ravioli and place them on a dishcloth while you boil water.

Cook the Ravioli: Bring a large pot of salted water to a rapid boil, then adjust the burner so the water boils slowly. Gently slide in the ravioli and cook until the pasta is tender, about 4 minutes. Remove the ravioli from the water with a slotted spoon and spread out on parchment paper while you make the Leek-Mushroom Broth.

Make the Leek-Mushroom Broth: Sauté the mushrooms, lightly seasoned with salt and freshly ground black pepper, in the olive oil and 2 Tbsp. butter until they’re well browned on all sides. Add the garlic and rosemary and cook, stirring regularly, for 2 minutes. Remove the mushrooms and seasonings from the pan with a slotted spoon and set aside.

Stir the leeks into the same pan, scraping up any browned bits on the pan’s bottom; add oil or butter, as needed. Sauté the leeks until they’re soft and tender. Stir in the stock, bring to a boil, turn down the heat and simmer for 10 minutes. Stir in the mushrooms and simmer for 10 minutes. Taste and add salt or freshly ground black pepper, as needed.

Stir in the truffle oil, and gently add the cooked ravioli to the broth. Spoon some broth over the ravioli (I use a turkey baster for this task) and simmer until the ravioli are warmed through.

Serve: Divide the ravioli between 4 – 6 warmed pasta bowls. Divide the broth and vegetables between the bowls, sprinkle with freshly grated parmesan cheese, and serve immediately.
~~~~~~~~~~~~~~~~~~~~~~~~~~~
This is my entry for the 100th post celebration of
Presto Pasta Nights, created and hosted by Ruth of Once Upon a Feast.

Bob in a Blanket Bob in a Blanket

Saturday, April 26, 2008

Recipe: Cannelloni with Spinach Filling (Κανελόνια με Σπανάκι)

Last week I found a bag of cookbooks in my basement that I’d never read.

I’d bought the books last year at a thrift store two days before my head exploded. By the time I was up and cooking, I’d completely forgotten about the thrift store cookbook score. My recent discovery was a lovely Easter present. A new cookbook always puts me in a good mood, and here were five of them. A bonanza!

The first book I picked up was Michael Field’s
Culinary Classics and Improvisations: Creative Leftovers Made from Main Course Masterpieces.

Michael Field was a successful concert pianist in the fifties and early sixties who had a passion for cooking. By 1964, that passion had become Field’s career. He got started by holding “
socialite cooking classes in his Manhattan apartment.” Ultimately, he started a culinary school in New York City, wrote cookbooks and magazine articles, and was a consulting editor for the Time-Life Foods of the World series.

Field
died in 1971 at age 56. Among the accomplishments cited in his Time magazine obituary are debunking “such myths as the need to wash mushrooms, devein shrimp and press garlic” and preaching the “imaginative use of leftovers.”

Field’s primary rule for using leftovers is the source of leftovers must be “of the highest quality.” To this end, Field provides classic recipes for roasted and braised meat, fish, and fowl. He uses the leftovers from these dishes for the remaining recipes.

For example, Field gives a recipe for Yankee Pot Roast, the leftovers of which can be used in his recipes for Pot Roast Pie with Braised White Onions and Mushrooms, Pirog of Beef, Bigos, Cannelloni with Beef and Spinach Filling, Pâté of Pot Roast, or Cold Braised Beef Vinaigrette.

Here’s my take on Field's Cannelloni:

Cannelloni with Spinach Filling (Κανελόνια με Σπανάκι)
Serves 4 (makes 8 cannelloni)
Adapted from
Culinary Classics and Improvisations by Michael Field (Alfred A. Knopf 1967)
Cannelloni is a very flexible dish, and is a terrific way to use up leftovers. For stuffing, combine the spinach with sautéed mushrooms or leftover chicken, beef, pork, lamb, or roasted vegetables. It’s great with homemade pasta, but can also be made with plain crêpes or store-bought manicotti tubes. The tomato sauce may be made special for Cannelloni, but the dish tastes great with leftover or jarred sauce. I made my own pasta, hand-cutting noodles with the extra dough. The noodles are terrific in homemade chicken soup. Although Cannelloni may be made in one large pan, I like using individual gratin dishes for ease of serving and because it allows me to freeze assembled but unbaked cannelloni for future use.


Pasta (or substitute crêpes or purchased manicotti shells):
2 eggs
1 1/2 cups all purpose flour
1 tsp. salt
2 Tbsp. olive oil
2 Tbsp. water

Cream Sauce:
3 Tbsp. butter
3 Tbsp. all purpose flour
1 1/2 cups half and half
1/8 tsp. cayenne pepper
Salt

Filling:
1/2 pound cleaned, fresh spinach or 10 ounces frozen spinach, thawed
1 cup diced onion, 1/8” dice
2 Tbsp. olive oil
Salt
Freshly ground black pepper
1 Tbsp. minced garlic
1 cup finely chopped leftover roast meat or leftover roast vegetables (see vegetarian variation below)
1 Tbsp. dried oregano, crushed
1/2 cup finely grated parmesan cheese
1 egg

1 cup tomato pasta sauce, puréed (use your favorite tomato sauce recipe or a good quality jarred pasta sauce)
1/4 cup freshly grated parmesan cheese

Make the Pasta: Mix all the ingredients in a food processor and process until the dough clumps together, adding water if necessary. The finished dough should be very stiff. Dump the dough out on a floured surface and knead for 2 – 3 minutes, or until the dough is smooth, shiny, and elastic. Wrap in plastic wrap and let rest for 30 minutes.

Following the manufacturer’s instructions, use a pasta machine to roll out the dough, half at a time, until the pasta has gone through the second to the last setting on the pasta machine. Let the pasta sheets dry for 10 minutes. Trim the edges and cut the pasta sheets into 5” lengths. You need 8 pasta rectangles. (NOTE: Cut the rest of the pasta into noodles, let them dry, and store in an air-tight container until ready to use.)

Cook the pasta rectangles in boiling, salted water until they are al dente. With a slotted spoon, lift out the pasta sheets and put them in a bowl of cold water. Dry the pasta rectangles by laying them out on paper towels.

Make the Cream Sauce: Melt the butter in a small saucepan. Whisk in the flour and cook, stirring, for 2 minutes. Add the cream in a slow stream, whisking rapidly and cook, stirring constantly, until the sauce thickens. Stir in the cayenne and salt, remove from the heat, and set aside until ready to use.

Make the Filling: Blanch the spinach in boiling, salted water for 1 minute. Drain and rinse with cold water. Squeeze as much liquid as possible out of the blanched (or thawed) spinach, and finely chop it. Put in a bowl.

Sauté the onion, lightly seasoned with salt and freshly ground black pepper, in olive oil until the onions soften and start to turn golden. Stir in the garlic and cook for 1 minute. Add the onion mix, meat, oregano, and parmesan to the filling and mix together thoroughly. Taste and add salt or freshly ground black pepper, as needed. Mix in the egg.

Assemble the Cannelloni: Preheat the oven to 375°F

Lay out 8 rectangles of pasta, evenly divide the filling between them, and roll them up. Spread a little white sauce in the bottom of a baking dish large enough to hold all the cannelloni or 4 individual gratin dishes. Place the cannelloni in the pan seam side down and side by side. Cover the cannelloni with tomato sauce and then cover the tomato sauce with the remaining cream sauce. Sprinkle with parmesan cheese. (The recipe may be made ahead to this point and refrigerated or frozen.)

Bake for 20 minutes, or until the sauce is bubbling. Put under the broiler until the tops are nicely browned; watch carefully, it is easy to burn the cheese.

Vegetarian Cannelloni
For meat in the filling, substitute 2 1/2 cups diced mushrooms (1/4” dice). Sauté the mushrooms, lightly seasoned with salt and freshly ground black pepper, in 1 Tbsp. butter and 1 Tbsp. olive oil until the mushrooms are nicely browned.
~~~~~~~~~~~~~~~~~~~~~~~
This is my entry for
Weekend Cookbook Challenge: Vintage Cookbooks hosted by Chocolate Moosey.

Sunday, April 20, 2008

Recipes: Morel Stuffed Mushrooms, Marinated Beets with Candied Red Onions, & Horta Salad (Μανιτάρια Γεμιστά, Μαριναρισμένα Παντζάρια, & Χόρτα Σαλάτα)

Dried Morels and Fresh MushroomsSome days, writing is easy. Other days, it’s like shelling pine nuts; in other words, hard and frustrating. Today’s been a pine nut day.

Part of the problem was my notes for three separate recipes were scribbled on one too-small piece of paper. Sorting them out made my head spin. None of the recipes are particularly difficult, but describing them on paper was harder than it should’ve been.


I considered dividing the recipes into two separate posts - one about mushrooms and the other about beets - but they taste so good on a single plate, I had to keep them together. Here’s the breakdown:

Morel Stuffed Mushrooms: The mushrooms have a soft, extremely flavorful filling. Tart lemon juice and tangy sun-dried tomatoes balance the rich, earthy taste of mushrooms. These can be stuffed several days ahead and refrigerated until ready to finish, so make impressive hot appetizers without a lot of last minute work. Paired with two kinds of beets, as I’ve done here, the mushrooms are the foundation for a filling vegetarian meal.

Marinated Beets with Candied Red Onions: Sweet with candied onions (or honey, if you’re pressed for time), and sour with red wine vinegar, these beets fill your mouth with wonderful flavors. Grated lemon peel is the essential ingredient that brings the dish together. It’s terrific on its own, wonderful with Horta Salad, and remarkable when paired with Morel Stuffed Mushrooms.

Horta Salad: Boiled greens, dressed with lemon juice or vinegar, are a classic Greek salad. Any domesticated and wild greens, separately or together, can be used for this simple recipe.

The recipes were inspired by Sarah Stegner’s
Stuffed Mushrooms with Marinated Beets, described in Art Culinaire (Winter 2002). I loved her recipe's name, which immediately triggered my imagination. The details of Chef Stegner’s recipe diverged from what I’d been imagining, so I ended up using it for inspiration, rather than as a guide.

I particularly liked the morel powder Chef Stegner used in her stuffing. Last year we had an abundance of curiously bland morels, which I dried to concentrate, intensify, and improve their flavor. Powdered, our dried morels dramatically boosted the mushroomy earthiness of the stuffing.

Stuffed Mushrooms, Marinated Beets, and Horta SaladMorel Stuffed Mushrooms (Μανιτάρια Γεμιστά)
Makes 16 - 20
I ground the dried morels to a powder in a spice grinder. Without the morel powder the stuffing tasted great; it just wasn't as intensely flavored. On another note, I dread both soggy stuffed mushrooms and those that aren’t fully cooked. To avoid these problems, I use a technique for prebaking the mushrooms recommended by
Cook’s Illustrated.

Mushrooms:
16 - 20 large white mushrooms (or other variety of fresh mushroom)
3 Tbsp. olive oil
3 Tbsp. lemon juice
Salt
Freshly ground black pepper

Stuffing:
Reserved mushroom stems, cut in 1/4” dice
1 1/2 cups diced yellow onion, 1/4” dice
1 Tbsp. olive oil
Salt
Freshly ground black pepper
1 Tbsp. minced garlic
3 tbsp. diced reconstituted or oil-packed sun-dried tomatoes, 1/4” dice
1/4 cup thinly sliced green onions
1/2 cup potato purée (6 ounce potato, cooked and grated)
1/2 cup freshly grated parmesan cheese
1/4 cup mascarpone or cream cheese
1/4 cup dried morel powder (2 ounces dried morels, pulverized) (optional)
1/4 fresh lemon juice

Topping:
1/2 cup Panko or fresh breadcrumbs
1 Tbsp. butter
1 tsp. finely grated lemon peel
1/2 tsp. finely grated garlic

Prebake the Mushrooms: Preheat the oven to 450°F. Wipe the mushrooms with a damp paper towel to clean off any dirt. Remove the mushroom stems and reserve for the stuffing. Put a wire rack on a rimmed baking sheet. Toss the mushrooms with olive oil, lemon juice, salt, and freshly ground black pepper. Place the mushrooms on the rack gill-side-up and bake for 20 minutes. Remove the mushrooms from the oven. Reserve any liquid in the mushrooms for the stuffing. Turn the mushrooms over and bake for 5 minutes. Set the mushrooms aside until you’re ready to stuff them.

Make the Stuffing: Sauté the mushroom stems and onions, lightly seasoned with salt and freshly ground black pepper, in olive oil until they're browned. Stir regularly to prevent the onions from burning. When the mushrooms and onions are done, stir in the garlic and cook for 1 minute. Place the onion mix in a bowl and stir in the sun-dried tomatoes, green onions, potato purée, parmesan, mascarpone, morel powder, lemon juice, salt, freshly ground black pepper, and any liquid reserved from the prebaked mushrooms. Taste and add lemon juice, salt, or pepper, as needed.

Make the Topping: Sauté the Panko in butter until it is nicely toasted, stirring regularly to prevent the breadcrumbs from burning. Stir in the lemon peel and garlic and cook for 1 minute. Let cool and put in a small bowl.

Assemble the Stuffed Mushrooms: Preheat the oven to 450°F. Using a spoon or piping bag, divide the stuffing equally among the mushrooms. Smoothly round off the surface of each stuffed mushroom. (The mushrooms may be made ahead to this point and refrigerated; store the mushrooms in a single layer, on a paper towel, to prevent them from turning soggy.)

Take each stuffed mushroom, turn it upside down, and roll the stuffing around in the topping until it is nicely coated with breadcrumbs. Bake the mushrooms for 10 – 12 minutes, or until they are hot and the topping is lightly browned. Let sit at room temperature 5 minutes before serving.

Serve with Marinated Beets and Horta Salad, or on their own as an appetizer.

Variation - Stuffed Mushrooms with Pancetta

The pancetta works as a savory counterpoint to the Candied Red Onions in the Marinated Beets recipe. To make the mushrooms with pancetta, eliminate the olive oil, and start the recipe by browning 3/4 cup (4 ounces) pancetta, cut in 1/4” dice. When the pancetta is done, drain it on paper towels; use the pancetta fat for sautéing the onions and mushroom stems. Mix the cooked pancetta with the rest of the stuffing ingredients. NOTE: For this recipe, thick-cut, deli pancetta works better than the thin-sliced prepackaged version.

Marinated Beets with Candied Red OnionsMarinated Beets with Candied Red Onions (Μαριναρισμένα Παντζάρια me Κρεμμύδια Γλυκά του Κουταλιού)
Serves 4 - 6
The key to this recipe, as with all sweet and sour dishes, is getting the balance of flavors correct. The only way to get it right is to taste and adjust the flavors for your palate. If you’re serving this with Horta Salad, keep its vinegar dressing in mind as you adjust the seasoning. Candied Red Onions add unique flavor, but honey is a fine substitute for them.

Candied Red Onions:
2 cups diced red onion, 3/4” dice
1/2 cup red wine vinegar
1/2 cup sugar
1 cup water

Marinated Beets:
2 bunches beets, roots only
(greens used for Horta Salad)
2 Tbsp. olive oil
1 cup thinly sliced green onions
1/2 cup red wine vinegar
1 Tbsp. whole grain mustard
1 Tbsp. minced thyme
2 tsp. finely grated lemon peel (1 lemon)
1 tsp. finely grated garlic
Salt
Freshly ground black pepper
1/2 cup Candied Red Onions or 1/4 cup thyme honey

Make the Candied Red Onions: Mix all the ingredients in a saucepan and bring to a boil. Reduce the heat and cook at a slow boil, stirring occasionally, until the liquid is reduced to a thick syrup. Watch it carefully at the end and stir regularly; once most of the liquid is gone, sugar syrup can burn easily. It takes 30 – 45 minutes for the syrup to reduce, and can be done while the beets are roasting. (The candied onions can be made well ahead. There may be slightly more candied onions than needed for this recipe.)

NOTE on Roasting Beets: Preheat the oven to 400°F. Wash the beets, cut off the greens leaving an inch of stem (don't cut into the beet itself), rub the beets with olive oil, and wrap tightly in a foil packet (or place in a tightly covered baking dish). Bake for 40 minutes to 1 1/2 hours, depending on the size of the beets and how fresh they are. The beets are done when they're tender if poked with a knife or skewer. Let the beets cool, and slip off their skins (I wear gloves when I do this to protect my hands from staining). (These can be made ahead and kept in the refrigerator for about a week.)

Make the Marinated Beets: Cut the beets into 1/2” slices; quarter the slices. Put the beets in a bowl and mix with all the other ingredients. Let marinate at room temperature for at least 1 hour. Taste and add salt, freshly ground black pepper, vinegar, or candied red onion, as needed.

Serve with Horta Salad and Morel Stuffed Mushrooms, or on its own (or with Horta Salad) to accompany roast chicken or fish.

Horta Salad (Χόρτα Σαλάτα)

Serves 4 - 6
"Horta" is the generic Greek word for greens. This salad can be cooked ahead and dressed with olive oil, but don’t add vinegar until just before serving. If you buy beets without greens, or the greens aren’t in good enough condition to eat, use Swiss chard or any other greens.

2 bunches of beets, greens only
(roots used for Marinated Beets)
2 Tbsp. red wine vinegar
2 tbsp. olive oil
Salt
Freshly ground black pepper

Wash the greens very carefully and discard any damaged leaves. Remove the stems and cut into 1” pieces. Tear the greens into large pieces.

Bring a large pot of salted water to a boil. Add the stems and cook for 2 minutes. Add the greens and cook for 3 – 5 minutes more, or just until the greens are tender. The cooking time varies depending on the type of greens being used. For example, Swiss chard cooks faster than beet greens. Be careful not to overcook the greens or their texture will suffer. Drain the greens well.

While the greens are still warm, toss with olive oil, and then with vinegar, salt, and freshly ground black pepper. Taste and add vinegar, salt, pepper, or olive oil, as needed.

Serve hot or at room temperature with Marinated Beets and Morel Stuffed Mushrooms. Horta Salad can also be served on its own, or just with the Marinated Beets.

~~~~~~~~~~~~~~~~~~~~~~~~~~
Other Interesting Vegetarian Mushroom Recipes
Parsnip Gnocchi with Pearl Onions, Peas, and Mushrooms
Mushroom Stifado (Μανιτάρια Στιφάδο)
Red Cabbage with Mushrooms and Blueberries – Chou Rouge Forestière (Λάχανο Κόκκινο με Μανιτάρια και βακκίνιο το Μύρτιλλο)

To find more mushroom recipes,
Food Blog Search is a great tool.
~~~~~~~~~~~~~~~~~~~~~~~~~~
This is my entry for
No Croutons Required, hosted this month by Lisa of Lisa’s Kitchen.

Thursday, March 27, 2008

Recipe: Parsnip Gnocchi with Pearl Onions, Peas, and Mushrooms

Last week I was rambling around the internet and came across a picture of “Parsnip Gnocchi and Chanterelles.” The photographer (Kevin) had enjoyed the dish, which also included peas and pearl onions, at Summit Restaurant in Colorado Springs. The concept captured my imagination.

Too bad there wasn’t a recipe. Even so, it looked possible to recreate using the picture as a guide.

Luckily, I had all the ingredients on hand. Parsnips and mushrooms came in my latest Full Circle Farm CSA box. The pantry held a bag of pearl onions; I’d bought too many for
Mushroom Stifado. A bag of peas from last summer’s garden was languishing in the freezer.

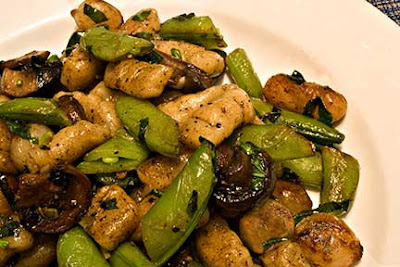
I immediately got to work making parsnip gnocchi. When the dish was done, it tasted as good as Kevin's picture looked. I’m already planning to make it again.

Parsnip Gnocchi with Peas, Pearl Onions, and MushroomsRoasted Parsnip Gnocchi with Pearl Onions, Peas, and Mushrooms
Serves 4 - 6
The gnocchi are surprisingly simple to make because, unlike some gnocchi recipes, this dough is easy to handle. Putting ridges in the gnocchi isn't necessary (and they're faster to make if you don’t). The ridges help gnocchi pick up flavors from the other ingredients, so I generally do it. No doubt the finished dish would taste better with wild mushrooms, but it tasted wonderful with the cremini I used. Pearl onions and mushrooms need to be sautéed in batches to ensure they brown properly; if you try to brown too many vegetables in a pot at one time, they’ll steam rather than brown. Because the vegetables are cooked and salted separately, be careful about how much salt you add to any individual vegetable or the finished dish may be too salty.

Parsnip Gnocchi:
2 pounds whole parsnips
2 Tbsp. olive oil
1 cup finely grated parmesan cheese
3/4 - 1 cup flour, plus extra for flouring surfaces

Vegetables:
2 cups pearl onions (1 pound) or 14 ounces frozen pearl onions, thawed
4 – 6 Tbsp. butter
2 cups sliced or quartered mushrooms
2 cups blanched and halved crosswise sugar snap peas
1/2 cup thinly sliced fresh basil or chopped fresh Italian parsley
2 tsp. minced garlic

Make the Gnocchi: Preheat the oven to 400°F. Wash and dry the parsnips. Rub them with olive oil and wrap them in aluminum foil. Roast for 30 – 40 minutes, or until they are easily pierced with a skewer or knife; the exact length of time depends on the parsnips’ size. Let cool, then skin the parsnips.

Purée the parsnips in a food processor. Mix in the parmesan and 3/4 cup flour. Dump the dough on a floured surface. Knead lightly, adding flour as necessary to prevent the dough from being sticky.

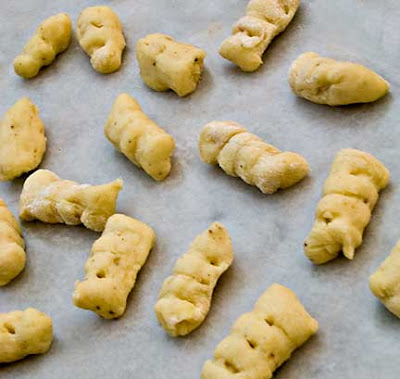
Parsnip GnocchiDivide the dough into 2” balls. Using your fingertips, roll out each ball on a floured surface into a long, 3/4” diameter, rope. Cut the rope into 3/4” pieces. To make ridged gnocchi, roll each piece of dough off the back of a fork, pressing lightly down as you roll. Put the finished gnocchi on a floured surface, in a single layer, while you cook the vegetables.

Cook the Vegetables: If starting with dried pearl onions, peel them and cut an X in the root end to help hold the onion layers together. An easy way to peel the onions is to drop them in boiling water for a minute and then slip off the peels.

Melt 2 Tbsp. butter over medium heat in a pan large enough to hold all the ingredients. Sauté half the pearl onions, lightly seasoned with salt and freshly ground black pepper, in the butter until the onions are well browned on all sides and cooked through. Be careful not to burn the butter; turn down the heat if necessary to prevent burning. Remove the browned onions from the pan with a slotted spoon and set aside. Repeat with the remaining pearl onions, adding butter as necessary.

In the same pan, sauté half the mushrooms, lightly seasoned with salt and freshly ground black pepper and adding butter as necessary, until they are well-browned on both sides. Remove the browned mushrooms from the pan with a slotted spoon, add to the onions, and set aside. Repeat with the remaining mushrooms, adding butter as necessary.

In the same pan, sauté the peas, lightly seasoned with salt and freshly ground black pepper, until they are almost, but not quite, done. Remove the peas from the pan with a slotted spoon and add to the other vegetables.

Finish the Gnocchi and Vegetables: Bring a large pot of salted water to a boil. Gently add half the gnocchi to the water and cook until the gnocchi float to the surface. When the gnocchi float, use a slotted spoon to remove them from the water and put them in the pan in which the vegetables cooked. Repeat with the remaining gnocchi.

Over medium heat, gently toss the gnocchi to lightly coat them with butter. Add the vegetables, basil, and garlic, and toss gently to combine. When all the vegetables are heated through, serve immediately.
~~~~~~~~~~~~~~~~~~~~~~~~

This is my entry for Grow Your Own, an event created and hosted by Andrea’s Recipes.

Monday, March 24, 2008

Recipes: Mushroom Stifado & Mushroom, Pancetta, and Feta Stifado (Μανιτάρια Στιφάδο & Μανιτάρια, Ιταλική Πανσέτα, και Φέτα Στιφάδο)

Nature’s seasons and religious fasting periods profoundly influence what our Greek village relatives eat for dinner.

Many are farmers, relying on the fruits (and vegetables) of their labors for sustenance. Most supplement their diets with wild greens and snails, mushrooms and sea urchins, rabbits and octopus. All generously share abundant seasonal harvests with friends and neighbors.


To honor Orthodox teachings, religious Greeks follow a near-vegan diet (certain seafoods are allowed) on most Wednesdays and Fridays throughout the year. Greeks also fast during Great Lent (starting seven weeks before Orthodox Easter), Christmas Lent, and the first 15 days of August. On many fasting days, the truly devout don’t use olive oil or alcoholic beverages.

This year Great Lent began on March 10, and followed a week during which meat was prohibited but dairy, eggs, and fish were allowed. The fasting structure is complex enough that
most people use a church calendar to determine the precise nature of the fast required on any given day.

The first day of Great Lent is called Clean Monday (Καθαρά Δευτέρα in Greek), and marks the end of Carnival indulgence (called Apokreas - Απόκριες in Greek). This year, Clean Monday was on March 10. It's a national holiday; the highways are full of urban Greeks leaving the city for a breath of country air.


Island families celebrate the day with a picnic of what's best and freshest from the fields and sea. Sea urchins, full of delicious roe in spring, are a favorite Clean Monday treat and are hand-gathered by the gunnysackful.

One year on the island, the confluence of perfect rains and temperature brought forth an unexpected bounty, just in time for Clean Monday. My husband returned home from surveying a mountain pasture with a big bag of horse mushrooms. After vetting their edibility with a knowledgeable aunt (the primary rule of wild mushroom gathering is “when in doubt, throw it out”), I constructed a hearty stew using this tasty treasure.


We are now well into Easter Lent for 2008. Mushroom Stifado is ideal Lenten fare: a hearty, vegan main course. For omnivores who aren't fasting, pancetta and feta add wonderful flavor to the stew. Recipes for Mushroom Stifado and the variation, Mushroom, Pancetta, and Feta Stifado, are set out below.

Mushroom StifadoMushroom Stifado (Μανιτάρια Στιφάδο)
Serves 4 - 6
Mushroom Stifado tastes best when made with wild mushrooms or a mixture of cultivated cremini, oyster, and shiitake mushrooms. Even when made with a single type of mushroom, this hearty stew is wonderful. Serve it as an appetizer, over pasta tossed with garlic and olive oil, or with roasted potatoes. Leftovers, chopped and mixed with stock, make a flavorful soup.

2 cups pearl onions (1 pound) or 14-ounces frozen pearl onions, thawed
2 - 6 Tbsp. olive oil
6 cups mushrooms, cleaned, trimmed, and cut in 1” chunks (1 1/2 pounds)
2 cups diced yellow onions, 1/2” dice
2 Tbsp. minced garlic
1 tsp. Aleppo pepper or 1/2 tsp. crushed red pepper (optional)
1 cup red wine
1 15-ounce can diced tomatoes or 2 cups fresh, with juices
1 Tbsp. minced rosemary
2 Tbsp. red wine vinegar
2 tsp. sugar

If starting with dried pearl onions, peel them and cut an X in the root end to help hold the onion layers together. An easy way to peel pearl onions is to drop them in boiling water for a minute and then slip off the peels.

Sauté the peeled (or thawed) pearl onions, lightly seasoned with freshly ground black pepper, in 2 Tbsp. olive oil until the onions are well browned on all sides and cooked through. Remove the browned onions from the pan with a slotted spoon and set aside.

Sauté the mushrooms, lightly seasoned with freshly ground black pepper, in the oil from the onions until they are well browned on all sides, adding olive oil as necessary. Scrape up any browned bits from the bottom of the pan. Remove the browned mushrooms from the pan with a slotted spoon and set aside.

Sauté the diced onions, lightly seasoned with freshly ground black pepper, in the same oil until they soften and begin to turn golden, adding olive oil as necessary. Scrape up any browned bits from the bottom of the pan. Stir in the garlic and Aleppo pepper, and cook for one minute. Stir in the wine and cook until reduced by half. Stir in the tomatoes, rosemary, vinegar, and sugar. Bring to a boil, cover, reduce heat to low, and simmer for 15 minutes. Stir in the browned mushrooms and simmer for 15 minutes. Stir in the browned pearl onions and simmer for 5 minutes. Serve immediately.


Mushroom-Pancetta Stifado with Feta (Μανιτάρια, Ιταλική Πανσέτα, και Φέτα Στιφάδο)
Serves 4 - 6

As with vegan Mushroom Stifado, this tastes best when made with wild mushrooms or a mixture of cultivated cremini, oyster, and shiitake mushrooms. I prefer using pancetta that has been cut in 1/4” slices and then diced, so I buy it directly from the deli counter where I can direct the pancetta's thickness, rather than in pre-cut packages of too-thin slices. The chopped leftovers, with the addition of stock, make a flavorful soup.

2 cups pearl onions (1 pound) or 14-ounces frozen pearl onions, thawed
2 cups diced pancetta or bacon, 1/4” dice (1/2 pound)
6 cups mushrooms, cut in 1” chunks (1 1/2 pounds)
2 cups diced yellow onions, 1/2” dice

2 Tbsp. olive oil (optional)
2 Tbsp. minced garlic
1 tsp. Aleppo pepper or 1/2 tsp. crushed red pepper (optional)
1 cup red wine
1 15-ounce can diced tomatoes or 2 cups fresh, with juices
1 Tbsp. minced rosemary
2 Tbsp. red wine vinegar
2 tsp. sugar
1 cup crumbled feta

If starting with dried pearl onions, peel them and cut an X in the root end to help hold the onion layers together. An easy way to peel pearl onions is to drop them in boiling water for a minute and slip off the peels.

Cook the pancetta over medium heat until the fat has rendered. Remove the cooked pancetta from the pan with a slotted spoon and drain it on paper towels.

Sauté the peeled (or thawed) pearl onions, lightly seasoned with freshly ground black pepper, in the rendered pancetta fat until the onions are well browned on all sides and cooked through. Remove the browned onions from the pan with a slotted spoon and set aside.

Sauté the mushrooms, lightly seasoned with freshly ground black pepper, in the rendered pancetta fat until they are well browned on all sides. Scrape up any browned bits from the bottom of the pan. Remove the browned mushrooms from the pan with a slotted spoon and set aside.

Sauté the diced onions, lightly seasoned with freshly ground black pepper, in the rendered pancetta fat until they soften and begin to turn golden (add olive oil if necessary). Scrape up any browned bits from the bottom of the pan. Stir in the garlic and Aleppo pepper, and cook for one minute. Stir in the wine and cook until reduced by half. Stir in the tomatoes, rosemary, vinegar, sugar, and reserved pancetta. Bring to a boil, cover, reduce heat to low, and simmer for 15 minutes. Stir in the browned mushrooms and simmer for 15 minutes. Stir in the browned pearl onions and simmer for 5 minutes.

Stir in the crumbled feta. Serve immediately with hilopites, pasta, or roasted potatoes that have been tossed with olive oil, minced garlic, salt, and pepper.

~~~~~~~~~~~~~~~~~~~~~~~

This is my entry for Weekend Herb Blogging, hosted this week by Ramona from The Houndstooth Gourmet.

Sunday, January 20, 2008

Recipe: Red Cabbage with Mushrooms and Blueberries – Chou Rouge Forestière (Λάχανο Κόκκινο με Μανιτάρια και βακκίνιο το Μύρτιλλο)

“Sing,” she said. “It will improve your cooking.” Josephine Araldo

Josephine Araldo inspired a generation of cooks. She was a legend: an elf-like woman who spoke rapid-fire English with a French accent.

Araldo was born in Brittany in 1896. She went to Paris in the early 1920s and was one of the first women to graduate from Cordon Bleu. In 1924, she moved to San Francisco as a cook for a wealthy family and stayed there the rest of her long life.

After World War II, Araldo retired as a cook and began teaching her skills to others. Marion Cunningham (of Fannie Farmer fame) and Alice Waters both studied under Araldo. Fran Bigelow, who started Fran’s Chocolates and popularized grey salt caramels in the US, was also a student of Araldo.

Chef Robert Reynolds, now of Trou Food, started as one of Araldo’s students, but later became a close friend. Reynolds collaborated with Araldo in writing From a Breton Garden: The Vegetable Cookery of Josephine Araldo.

From a Breton Garden is a brilliant book. Araldo taught that “vegetables are the jewel in the crown; they make the plate” and her book reflects that philosophy on every page.

The recipes use common, everyday vegetables. The most exotic is artichokes, a favorite of Araldo’s judging from the thirty-one artichoke recipes in the book. Some recipes in From a Breton Garden are traditional and others creative, but all are delicious. I’ve owned the book for 17 years, and have thoroughly enjoyed every recipe I’ve made from it.

From a Breton Garden was published in 1990, one year after Araldo’s death. The biographical information in it gives readers a glimpse into her interesting life, and leaves one wanting to know more about Araldo. Reynolds is now discussing an Araldo biography with her grandson; I’m looking forward to reading it.

The book opens with country recipes from Brittany, where Josephine was born and raised. The Paris chapter reflects the classical cuisine that Araldo learned in cooking school. The San Francisco section is filled with Reynolds’ recipes, which demonstrate the sensibilities he learned from Araldo as she passed her knowledge on to the next generation.

La Mère Jacquette was Josephine Araldo’s grandmother. According to Reynolds, La Mère Jacquette learned to cook before Napoleon III came to power. Her cuisine, as passed down through Araldo to us via From a Breton Garden, includes many unusual recipes combining fruits and vegetables.

One of my favorite recipes in the book came from La Mère Jacquette: Red Cabbage with Mushrooms and Blueberries. The cabbage is braised in red wine and onions, and then tossed with perfectly cooked mushrooms and fresh blueberries.

In Alaska, this dish is a natural; when it’s time to harvest red cabbage, our woods are filled with wild mushrooms and the blueberries are ready to pick. It’s best made with fresh wild Boletus edulis (aka porcini or cèpes) and wild blueberries, but it still tastes great when made with supermarket ingredients.

Last night I used red cabbage and mushrooms from my Full Circle Farm CSA box with supermarket blueberries. Even my husband, who is dubious on the subject of cooked cabbage, agreed it was wonderful.

Red Cabbage with Mushrooms and Blueberries – Chou Rouge Forestière (Λάχανο Κόκκινο με Μανιτάρια και βακκίνιο το Μύρτιλλο)
Serves 4 - 6

Adapted from From a Breton Garden: The Vegetable Cookery of Josephine Araldo by Josephine Araldo and Robert Reynolds
I’ve always made this recipe with blueberries, but Araldo says La Mère Jacquette would have used whatever berries she found in the woods. Araldo emphasizes that tossing the mushrooms with garlic and parsley is essential: “without these elements, ‘Cela na vaut pas le pet de lapin’ (it’s not worth the fart of a rabbit).” Araldo recommends using bacon fat to flavor the onions and cabbage; I substitute olive oil without a problem. I’ve served Red Cabbage with Mushrooms and Blueberries as an accompaniment to pork, roast chicken, grilled lamb, and sausages, and enjoyed it every time.

2 cups thinly sliced yellow onion
4 Tbsp. butter
2 Tbsp. olive oil (or bacon fat)
Salt
Freshly ground black pepper
1 pound (6 cups) thinly sliced red cabbage (1/2 a medium head)
1/2 cup red wine
1/2 pound mushrooms, sliced
1 tsp. minced garlic
3 Tbsp. minced parsley
1 cup fresh blueberries

Sauté the onions in 2 Tbsp. butter and the olive oil (or bacon fat), lightly seasoned with salt and freshly ground black pepper, until the onions are golden. Stir in the cabbage and red wine, lightly season again with salt and freshly ground black pepper, and toss to evenly distribute the ingredients. Cover and cook over low heat for 20 to 30 minutes, until the cabbage is tender.

While the cabbage is cooking, sauté the mushrooms, lightly seasoned with salt and freshly ground black pepper, in 2 Tbsp. butter in a hot pan. Cook the mushrooms in 2 batches to ensure they brown nicely and retain their liquid (if you put too many mushrooms in the pan at one time, they release their juices and stew rather than brown). When the mushrooms are done, toss them with garlic and parsley.

When the cabbage is done to your liking, stir in the mushrooms and cook for 1 minute. Stir in the blueberries. Taste and add salt or freshly ground black pepper, as needed. Serve.
~~~~~~~~~~~~~~~~~~~~~~~~~~~
This is my entry for Weekend Cookbook Challenge – Veggin’ Out hosted by Sara of I Like to Cook. Red Cabbage with Mushrooms and Blueberries is full of antioxidants, so I am also sending it to Sweetnicks for Antioxidant Rich Foods/5-a-Day Tuesdays.