Showing posts with label mint. Show all posts

Sunday, June 27, 2010

A 2 Part Tale of 2 Plants in 2 Countries with 2 Recipes: Purslane-Tomato Salad (Ντομάτα Σαλάτα με Γλιστρίδα) and Beach Lovage-Tomato Salad/Salsa (Ντομάτα Σαλάτα με «Άγριο Σέλινο»)

Introduction

In Greece, friends and relatives are endlessly curious about Alaska. We’re quizzed about daylight, animal life, cost of living, how many thousand miles we live from family. Every exotic Alaskan detail is examined and catalogued.

Back in Alaska, a vast land peopled largely by recent transplants, we describe life on a Greek island in a small village filled with relatives (family roots on the island go beyond reach of transmitted memory). We divert Alaskans with stories of family intrigues, open-handed generosity, and island bureaucratic snafus.

Greece and Alaska could not be more different. Yet, in both places, I shop for groceries, forage for wild edibles, and cook with abandon.

A friend of mine recently asked whether a dish cooked in a Greek kitchen tastes the same when made in Alaska. The simple answer: no.  The same recipe tastes different in Greece and Alaska because the ingredients aren’t the same in the two places.

For example: Greek tomatoes have more flavor, as do Alaska spinach and lettuce. Wild greens available in Greece don’t grow in Alaska and vice versa. American and Greek flour, butter, and eggs all bake up differently. Similar differences are found with virtually every ingredient. In both countries, I use the same basic recipes, but the results always vary, sometimes slightly, sometimes significantly.

No matter where one cooks, the key to a good result is tasting what you are making as you are make it. No one should ever blindly follow a recipe (even mine), no matter how trusted the source. The flavors of vegetables, herbs, spices, meats, cheese, fruits, you name it, all change subtly from purchase to purchase and day to day. The only way to compensate for these changes, and to generally adjust a recipe to please your palate, is to taste.

Two articles with recipes follow that illustrate this point. Part One was written in Greece last summer. It’s about purslane, Portulaca oleracea, a weed growing rampant in much of the world (including North America, but not Alaska). I combined the purslane with tomato to make a cooling salad.

Part Two is about a recent gathering expedition for beach lovage, Ligusticum scoticum, in Alaska. Using the Greek Purslane-Tomato Salad as the starting point, I tweaked the flavors to accommodate my Alaskan ingredients.  I served Beach Lovage-Tomato Salad with grilled king salmon; loaves’ herby freshness and the salad’s tart dressing nicely complimented king salmon’s richness.


Part One: Purslane-Tomato Salad in Greece

For years, our yard in Greece was a wasteland of weeds.  Every year on arrival we whacked down the tangle and borrowed a truck to haul away several loads of debris.

Our messy yard contrasted sharply with the carefully tended gardens of family, friends, and neighbors. Cousin Effie has an especially green thumb.  Most of her yard is paved over, but her narrow strip garden holds an impressive collection of flowering plants.

A couple years ago, Effie was sighing over her lack of a vegetable garden.  Since she lives only a few blocks away, and we are in Alaska for most of the year, we suggested she use our yard.

Now, when we arrive in Greece, we open the gate to a healthy, green garden, both decorative and edible, instead of a jungle. We planted roses and a bottle brush tree.  Effie and cousin Tzani have surrounded them with smaller, flowering plants. Blue jasmine from Tzani and a sweet-smelling white-flowered vine climbs the neighbor’s wall. What were tiny rosemary starts are now bushes.

This year the vegetable garden includes eggplant, okra, green beans, summer squash, tomatoes, mint, and celery.  The eggplants are heavily laden with fruit.  We pick them only when it’s time to cook (or gift eggplants); their texture and flavor are dramatically better than any supermarket eggplant available in Alaska.

While in the village, we take over weeding and watering the garden.  This year, purslane and crab grass were the most dominant weeds. While crab grass is purely an annoyance, purslane makes a tasty edible green.

Purslane has been used in Greece throughout recorded history.  Hippocrates, Galenus, and Dioscurides documented its many medicinal uses.  In the kitchen, it’s used raw in salads, mixed with yogurt, added to soups, served with meat or fish, and pickled for winter salad.

In Greece, purslane is best harvested by June or July, at which time both stem and leaves can be used. In September, stems are too tough to eat, but leaves still taste great.

This year, our first day back on the island, we drove to the main town to shop for basics. The day was a scorcher; we returned home hot and tired.  I wasn’t in the mood to cook and, after a day spent under the relentless Greek sun (at least to an Alaskan), didn’t want to eat more than a salad.

While I cut vegetables, Steve collected a colander full of purslane from the garden. Its succulent, slightly sour leaves, combined with sweet tomatoes and tart lemon juice, made a refreshing salad, perfect for a hot day.

Purslane-Tomato Salad (Ντομάτα Σαλάτα με Γλιστρίδα)
Serves 2 – 4
If you don’t have fresh purslane, see the recipe below for Beach Lovage Salad and follow the recommended substitutions there for a fresh, cooling summer salad.

Dressing:
1/4 cup extra virgin olive oil
2 Tbsp. fresh lemon juice
Salt
Freshly ground black pepper

Salad:
1 1/2 cups diced tomatoes, 1/2” dice
1 1/2 cups cleaned purslane leaves
3/4 cup diced cucumbers, 1/2” dice
3/4 cup diced red onions, 1/2” dice
1/4 cup minced fresh parsley
1 Tbsp. minced fresh mint

Make the dressing: Whisk the olive oil into the lemon juice. Season with salt and freshly ground black pepper to taste.

Make the salad: Toss all the ingredients together. Drizzle with the dressing and toss again. (You may not need all the dressing.) Taste and add salt or freshly ground black pepper, as needed.

Beach Lovage and Chocolate Lilies

Part Two: Beach Lovage-Tomato Salad in Alaska

Nearing the spring equinox, by June’s second week Anchorage was enjoying almost 20 hours of daylight. Winter doldrums were a distant memory; the whole town was in a good mood.

Sunday we woke early. Sun streamed in the window, warming our faces. The sky was clear bright blue. Staying in bed wasn’t possible. We headed out to find a beach where we could harvest wild plants.

After making the circuit of possible foraging sites, we finally came across a field of beach lovage (Ligusticum scoticum).  Also known as Scotch lovage, sea lovage, wild celery, and petrushki, beach lovage grows on sandy beaches along the coasts of Alaska, Canada, and the Northeastern United States.

Beach lovage is easy to identify with its three-lobed leaflets and smooth, reddish-purple stem.  It’s best harvested before flowering.

One caution: Beach lovage is in the Umbelliferae family and its flowers are similar to those of relatives like carrots, parsley, and dill. However, water hemlock, a poisonous plant is also in the Umbelliferae family, and has similar flowers but very different leaves. As with all wild foraging, be certain you know what you’re gathering and be sure to follow the forager’s primary rule: “when in doubt, throw it out.”

The flavor of fresh beach lovage is unique and wonderful. The closest approximation would be to mix celery, parsley, and a little lemon zest, but there is still a missing flavor, the hint of wild bitterness that makes beach lovage special.

Although the flavors of purslane and beach lovage are not at all the same, both have a tart freshness that can't be purchased in a supermarket. As I tossed about ideas for using the beach lovage, I kept thinking about the Purslane-Tomato Salad we'd had last summer. With that in mind, I started mixing and tasting, adding cucumbers, then more mint, then more lemon juice, a little of each at a time, until the balance of flavors was correct for beach lovage - and for our palates.

In the last two weeks, I’ve used beach lovage in a risotto that was devoured by guests, a lovely topping for pan-fried halibut, and delicious halibut cakes.  The best way I served beach lovage was in the modified version of my Greek Purslane-Tomato Salad.

Beach Lovage-Tomato Salad/Salsa (Ντομάτα Σαλάτα με «Άγριο Σέλινο»)
Serves 4 as a salad, or 8 as salsa for serving with fish
If you don’t have beach lovage, substitute 1/4 cup minced parsley, 1/4 cup minced celery leaves, and 1/2 tsp. finely grated lemon zest (or 3 Tbsp. minced parsley, 1 Tbsp. minced lovage, and 1/2 tsp. finely grated lemon zest).

Dressing:
1/4 cup extra virgin olive oil
3 Tbsp. fresh lemon juice
Salt
Freshly ground black pepper

Salad:
1 1/2 cups diced tomatoes, 1/2” dice
1 1/2 cups diced cucumbers, 1/2” dice
3/4 cup diced red onions, 1/2” dice
1/2 cup minced fresh beach lovage leaves
3 Tbsp. minced fresh mint

Make the dressing: Whisk the olive oil into the lemon juice. Season with salt and freshly ground black pepper to taste.

Make the salad: Toss all the ingredients together. Drizzle with the dressing and toss again. (You may not need all the dressing.) Taste and add salt or freshly ground black pepper, as needed. 
~~~~~~~~~~~~~~~~~~~~~~~~~~~~~

This post is included in Weekend Herb Blogging compiled by Chris from Mele Cotte.

Sunday, May 9, 2010

Recipe: Asparagus Pistachio Pesto

The sun is shining, the sky is blue, wood frogs are singing love songs in the pond, and the last bit of snow on our property melted this afternoon.  Life is good.

Today’s good fortune follows yesterday’s happy evening spent with life-long friends. The food was excellent; the conversation even better (except, perhaps, when I was motor-mouthing). Ali and Tissy made richly delicious Salmon Chowder, using wild Alaska salmon. Moira and Jake oven-roasted vegetables, always a treat.  Teeny made her famous wild blueberry pies with berries she foraged and froze last summer.

I took advantage of asparagus flooding local markets to make seasonally fresh Asparagus Pistachio Pesto sauce for pasta.  I was inspired to create pesto with asparagus by my recent success with Lime, Cilantro & Edamame Spread, one of the tastiest things I’ve made all year. If edamame beans worked for pesto, I thought, why not asparagus?

Asparagus Pistachio Pesto was a resounding success. Lemon balanced the sweetness of asparagus, pistachios enhanced its nutty flavor, parmesan added richness, and garlic and mint downplayed asparagus’s grassiness without overpowering its spring green freshness. Even 2-year-old Maggie was a fan!


Asparagus Pistachio Pesto
Serves 6-8
Asparagus Pistachio Pesto is quite versatile. It’s perfect for pasta, but would also be good with boiled potatoes, sautéed vegetables, grilled/pan-fried seafood, poultry, sandwiches, and countless other partners. Roasting or grilling asparagus adds depth to pesto’s flavor, but you may instead blanch the asparagus for 2-3 minutes in boiling, salted water, and then cool it quickly in cold water. To speed things up, on a day when you’re grilling and have a hot fire, grill asparagus and save it to make Asparagus Pistachio Pesto the next day.  Pesto may also be made ahead; if you do, leave out the lemon juice and mix it in just before serving; this helps preserve pesto’s lovely green color.  To add richness and crunch, pistachios are used in both the pesto and as a garnish, for a total of 1/2 cup plus 2 tablespoons nuts. If you don’t have pistachios, pine nuts make a fine substitute. 

Parmigiano Reggiano is the best quality of “parmesan” cheese available; I like using it (and best quality extra virgin olive oil) in uncooked sauces where the flavors of individual ingredients really make a difference in the finished dish.  However, any cheese suitable for grating may be substituted for Parmigiano Reggiano. (In Anchorage, Costco sells reasonably priced Parmigiano Reggiano.)  I list the amount of cheese in ounces because 1 ounce of cheese can measure 1/4 cup or 3/4 cup depending on the type of grater used.  If you can’t measure cheese by weight, add a little at a time to the processor bowl until there’s enough to richly flavor the pesto, but not enough to overpower the asparagus.

For the asparagus:
1 pound asparagus
2 tsp. olive oil
Salt
Freshly ground black pepper

For the asparagus pesto:
Prepared asparagus stalks (tips reserved for garnish)
1/2 cup raw pistachio nuts, lightly toasted (to toast pistachios, see NOTE below)
2 ounces freshly grated Parmigiano Reggiano cheese
3 Tbsp. best quality extra virgin olive oil
2-3 cloves garlic, chopped
2 Tbsp. fresh mint chiffonade (thinly sliced)
1/2 tsp. salt
1 Tbsp. finely grated lemon peel
2-3 Tbsp. fresh lemon juice

For the pasta:
1 pound dry pasta of any shape or size
1 recipe asparagus pesto
Reserved asparagus tips
2 Tbsp. lightly toasted pistachio nuts, roughly chopped
Freshly grated Parmigiano Reggiano cheese

Precook the Asparagus:  For grilling, heat the grill to high.  For oven-roasting, preheat the oven to 510°F (if your oven doesn’t go that high, preheat it as high as your oven goes); put in a baking sheet to preheat with the oven. 

Snap woody ends off asparagus.  Toss asparagus with olive oil and season with salt and freshly ground black pepper.  Cook asparagus until just barely tender, about 4 minutes on the grill and about 5 minutes on the preheated baking sheet in the oven.  If using oven, when asparagus is done, take it off baking sheet immediately after removing it from oven.  Cut tips off asparagus and reserve for garnish.  Cut asparagus stalks into 1”lengths. 

Make the Pesto:  Put asparagus stalks in food processor bowl.  Add pistachios, cheese, olive oil, garlic, mint, salt, lemon peel, and 2 Tbsp. lemon juice (if making pesto ahead, don’t add lemon juice until final assembly to preserve pesto’s color).  Process until the ingredients are thoroughly combined, being sure to scrape down the bowl’s sides from time to time.  Taste and add lemon juice, as needed.

Cook the Pasta and Assemble:  Put a large pot of well-salted water over high heat until it’s rapidly boiling. Add the pasta and give it a stir to make sure pasta isn’t sticking to the pot’s bottom. Cook just until pasta is al dente.  Reserve 1 cup of pasta cooking water. Drain pasta.

Stir together cooked pasta, prepared pesto, and 1/2 cup of pasta cooking water until ingredients are well combined (add lemon juice if it wasn’t previously added to pesto). If the mixture is too thick, add the remaining pasta cooking water, as needed.  Taste and add salt, freshly ground black pepper, or lemon juice, as needed.  Top with reserved asparagus tips and pistachio nuts; toss lightly. Serve with bowl of freshly grated Parmigiano Reggiano cheese on the side.

NOTE:  To toast raw pistachio nuts, put them on a baking sheet in a preheated 325°F oven for 6-8 minutes, watching carefully to make sure they don’t burn. Take pistachios off baking sheet as soon as you remove it from oven.
~~~~~~~~~~~~~~~~~~~~~~~~~~~~~~~~~~~~~~~~
This is my entry for Weekend Herb Blogging, hosted this week Marija from Palachinka.

Friday, November 6, 2009

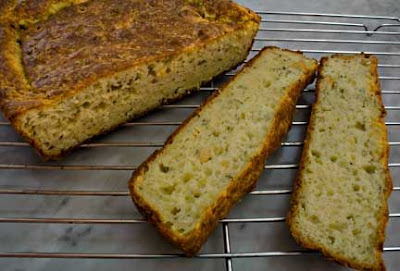
Salty Cake (Easy Cheese Bread) (Kέικ Αλμυρό)

Greeks are famously hospitable.  Visitors to Greek homes are warmly welcomed and showered with treats of all kinds.  Coffee with sweet pastries, ouzo with savory delicacies, water with preserved fruits; no matter your beverage, a Greek hostess quickly puts together a tasty accompaniment.

For some of us, enjoying Greek hospitality comes with a cost: overeating.  Before I spoke Greek, this was more of a problem. Because we couldn’t converse, people communicated love and affection by giving me double portions. Since everything was delicious, and I didn’t know how to decline, I ate it all.  Unfortunately, I was gaining 5-10 pounds for every month we spent in Greece, and dieting for 2 months afterwards so my clothes would fit again.

I finally learned how to say no. This is more difficult than it sounds.  It’s nearly impossible for a Greek hostess to accept “no” for an answer. The more you decline, the more you’re offered.  It’s also slightly rude on my part; if I were a more polite guest, I’d graciously accept some of the tasty tidbits.

After ten years of declining all snacks (and apologizing for being such a difficult guest), our friends and family have grudgingly accepted this peculiarity of mine – at least when it comes to sweets. Diabetes is rampant in the village and, in the last few years, turning down sweets has become a medical necessity for many.  Since so many can’t eat sweets, village hostesses now keep a supply of “salty” (almyro-αλμυρό) snacks on hand.

In the village, salty snacks aren’t things like potato chips, pretzels, and peanuts. Salty, in this context, just means not sweet.  Salty cookies (koulourakia) look identical to sweet cookies but, without the sugar, taste like thick crackers. Salty cakes include ingredients like cheese, olives, or ham; in the US, they’re called quick breads.

Lately, when I decline something sweet, a hostess may triumphantly declare that she has something salty instead.  Surely, I can try a few bites of a salty treat, something with absolutely no sugar? No, I sadly say, I can’t manage anything salty either, even though I’m sure it’s absolutely delicious.

Although I’m a difficult guest, I happily fulfill my duties as a hostess. In our village house, where visitors constantly stop by, the refrigerator is stocked with beverages, pastries are in the cupboard, and there’s even a salty little something for those who don’t eat sweets.

Treasured Recipes: A Collection of Personal Recipes from the Women Members of the Hellenic Athletic Club of Khartoum and Their Friends (Khartoum 1983), the Sudanese-Greek cookbook I recently wrote about, has an interesting recipe for Salty Cake.  This recipe is quite simple, but produces a rich, cheesy quick bread with wonderful flavor and a hint of mint. It’s tasty served to visitors as a snack or for brunch, but it also makes a nice accompaniment to soup or chili.


Salty Cake (Easy Cheese Bread) (Kέικ Αλμυρό)
Makes 1 9”x9” square bread or 1 9”x5” loaf
Adapted from Lefko Tsanakas and Lucy Vassiliou’s recipe for “Cake Almiro” in Treasured Recipes: A Collection of Personal Recipes from the Women Members of the Hellenic Athletic Club of Khartoum and Their Friends (Khartoum 1983)
Lefko and Lucy call for either feta or a combination of various cheeses, but emphasize using some “feta cheese is essential.” The recipe may be doubled and baked in a Bundt pan for an attractive brunch offering (when doubling the recipe, use 7 whole eggs and no egg yolks). This bread is best served warm. If you bake it ahead, wrap it in foil and refrigerate; to serve, warm in a 350°F oven for 20 minutes.

3/4 cup softened butter
3 large eggs
1 egg yolk
2 cups crumbled feta or 1 cup crumbled feta and 1 cup grated graviera, asiago, or other cheese
2 Tbsp. dried mint, crushed
1 3/4 cup flour
1 1/2 Tbsp. baking powder
3/4 cup milk

Preheat the oven to 350°F.

Butter a 9” square pan or 9”x5” loaf pan, dust bottom and sides with flour, tap out and discard any excess flour.

Beat the butter until creamy. Beat in the eggs and yolk, one at a time.  Add the cheese and mint and mix to combine.  Stir together the flour and baking powder.  Add flour to the cheese mixture one third at a time, alternating with additions of milk (one third at a time), until all is combined. Pour batter into the prepared pan. Smooth out the top to evenly distribute the batter.

Bake for 45-60 minutes, or until the bread has a nice brown crust on top.  Let cool for 30 minutes and remove from pan. Serve warm or at room temperature.

Thursday, October 29, 2009

Recipe: Chickpea Stew with Mint and Feta (Ρεβύθια με Φέτα και Δυόσμος)

I’m just back from Seattle, where my sister lives and my mom has resettled. After her crazy awful 2009 (husband of 65 years died, sold her home of 50 years, moved to a small apartment in a new city), my mom is positively engaged in her new life. Her motto: “Choose Happiness.” My mom, always quirky but never boring, is an inspiration.

Regular readers know nothing makes me happier than cooking with my sister. A couple days into the visit, we dished up a delicious dinner of salmon and lentils with red wine sauce. The food was beautiful; my sister suggested I take a picture and blog the meal (another day, I promise). I was too hungry for photography.

Over dinner, my sister claimed it was traditional for me to blog about one meal cooked in her kitchen each visit. Who knew? It’s funny how traditions sneak into your life without warning. And ignoring tradition, even one newly adopted, is bad juju. So that night, I found myself lying in bed dreaming up recipes.

At the store, we’d just bought chickpeas and gorgeous lamb steaks. My sister was out of coriander, so we'd bought some of that too. I decided to pair the chickpeas and coriander in a stew with plenty of fresh mint. The next day we went to Big John’s PFI, a Seattle store with a great cheese selection, and bought Greek sheep feta (and, of course, much more), the perfect finishing ingredient for chickpea stew.

Sadly, the Seattle stew pictures didn’t turn out (bad lighting, no tripod), so I “forced” myself to remake the stew when I returned to Alaska. Since I’d been craving leftover chickpeas during the foodless flight home, I was quite happy to make them again, especially because the stew goes together so quickly. It was as tasty the second time as it was in Seattle. This time, I ate the leftovers, and the flavor, already great, was even better the next day.

With generous quantities of mint, my chickpea stew goes particularly well with lamb. It also makes a deliciously filling meal on its own. The recipe has definitely been added to my permanent rotating repertoire.

Chickpea Stew with Mint and Feta (Ρεβύθια με Φέτα και Δυόσμος)
Serves 4

Serve as a side dish with grilled lamb or chicken, or as a main course with steamed rice or couscous. A crisp green salad nicely completes the meal.

3 cups diced yellow onions, 1/4” dice
Salt
Freshly ground black pepper
1/4 cup olive oil
1 cup diced carrots, 1/4” dice
1 cup diced celery, 1/4” dice
1 Tbsp. minced garlic
2 tsp. ground coriander
1 tsp. crushed red pepper flakes (optional)
2 14.5-oz. cans diced tomatoes
3 1/2 cups cooked chickpeas or 2 15-oz. cans, rinsed and drained
1/2 cup minced fresh parsley
1/2 cup minced fresh mint
1 1/2 cups crumbled feta

Sauté the onions, lightly seasoned with salt and freshly ground black pepper, in olive oil until they soften and start to turn golden. Stir in the carrots and celery and sauté for 5 minutes. Stir in the garlic, ground coriander, and crushed red pepper flakes and cook for 1 minute. Stir in the tomatoes and chickpeas and bring to a boil. Cover, turn down the heat, and simmer for 45 minutes, or until the sauce thickens and the flavors meld. Stir in the parsley and mint and cook for 5 minutes. Stir in the feta and serve immediately.
~~~~~~~~~~~~~~~~~~~~~~~~~~
This is my entry for Weekend Herb Blogging hosted this week Katie from Eat This.

Sunday, April 19, 2009

Recipes: Home-Cured Flat Pancetta & Edamame and Mushroom Risotto with Pancetta

Bacon’s smell wafting through the air is so enticing that even committed vegetarians are sometimes tempted to stray from their virtuous path. These days I mainly use bacon and pancetta as flavor-boosting ingredients; it’s been years since I ate it on its own.

Since I use bacon to boost flavor, I buy the best available. So I was intrigued to read on
Kits Chow, that Christine’s Home-Cured Bacon was so good, her husband asked her not to buy bacon from the store anymore. I had to try it.

Although I’ve visited
Kits Chow more than once over the past year, I was there recently because I was paired with Christine for March’s Taste and Create. Invented by Nicole of For the Love of Food, Taste and Create is one of my favorite food writing events. Every month Nicole pairs participating food writers; each is responsible for trying one recipe from the other’s blog and writing about it.

Some months it can be a challenge to find something I want to write about on my partner’s blog (although I’ve always found something delicious to make). Other months there’s an abundance of recipes I can’t wait to try; this was an abundant month. I haven’t made it yet, but Christine’s simple
Ginger Custard will appear on our table shortly after I next go shopping.

Christine writes from an Asian perspective, while I focus on Mediterranean foods, but there are many similarities in our cooking styles. We both emphasize foods made with fresh, locally available products, and enjoy making ingredients from scratch.

Christine shares my passion for creating variations on a theme. For example, she recently wrote about and photographed a
series of grilled cheese sandwiches; every time I look at this post, I crave an immediate grilled cheese fix. I also appreciate Christine’s creative Asian-Hellenic fusion cooking.

But back to the bacon.

Christine used a
Hugh Fearnley-Whittingstall recipe from the Guardian to make her bacon. The recipe is simple: pork belly is liberally coated with a dry-rub of salt, sugar, and spices, and then cured in the refrigerator for several days.

The result was delicious: meaty, juicy, and mouth-watering. I’m calling it flat pancetta rather than bacon because it isn’t smoked (a hallmark of American bacon). And since I renamed it pancetta, I used the meat to flavor a wonderful risotto made with edamame beans and garlicky sautéed mushrooms. I’m only sorry there isn’t any leftover risotto; writing the recipe has left me wanting more.

Homemade PancettaHome-made Flat Pancetta
Adapted from
Hugh Fearnley-Whittingstall via Kits Chow
The original recipe recommended curing the meat at least 4 days, or as long as 10, draining the juices and applying more cure every 24 hours. I stopped the process on the fourth day because the pancetta was getting too salty for my taste. Since I cured it for shorter than called for in the original recipe, and because the recipe doesn’t include nitrites or nitrates, I froze all the pancetta I didn’t use right away rather than worrying about spoilage. The best place to buy meaty pork belly is in Asian markets (in Anchorage, Sagaya is the best source). Be sure to look the pork over carefully and buy the meatiest piece you can find. Once, in desperation, I bought a frozen piece of pork belly wrapped in freezer paper. The butcher repeatedly assured me the meat was skin-on; it wasn’t, plus the “meat” was 90% fat. The fault was my own for buying meat sight unseen.

Curing mix:
2 Tbsp. black peppercorns
2 Tbsp. coriander seeds
1 tsp. juniper berries
5 bay leaves
1 1/3 cup kosher salt (3/4 pound)
3/4 cup (packed) brown sugar (1/4 pound)

2 pieces meaty pork belly, with skin, 1 1/2 – 2 pounds each

Make the Curing Mix: Grind the peppercorns, coriander seeds, juniper berries, and bay leaves in a spice grinder, or pound them in a mortar and pestle until they are finely crushed. Mix the ground spices with the salt and brown sugar.

Curing Pancetta - Day 1Day 1: Rub each piece of pork belly with the curing mix until the meat is well coated and every nook and cranny is covered with the mix. Put the meat in a glass or other non-metallic container. Cover with plastic wrap and refrigerate.

Curing Pancetta - Day 2Day 2: After 24 hours, pour off all the liquid that has leached out of the pork and rub the meat with more curing mix until it is once again well coated.

Day 3: Repeat Day 2.

Day 4: Rinse off all the cure under cold running water. Dry the meat very thoroughly. Wrap in wax paper, parchment paper, or cheesecloth and refrigerate or freeze until ready to use (before choosing storage method, read the above headnote).

Edamame and Mushroom Risotto with PancettaEdamame and Mushroom Risotto with Pancetta
Serves 4
The mushrooms need to be sautéed in batches to ensure they brown properly; if you try to brown all the mushrooms at one time, they’ll steam rather than brown. Because home-cured pancetta can be salty, be sure to lightly salt the mushrooms or the finished dish may be too salty (the mushrooms need some salt to ensure they cook properly). Pancetta is often sold in packages of very thinly cut pre-sliced meat. Although I use pre-sliced pancetta in a pinch, I mostly buy pancetta direct from the deli counter (if I’m not making my own at home). I ask for either a chunk of pancetta, which I hand slice and dice at home, or have the deli staff cut the pancetta into slices the thickness of thick bacon. With thicker slices, eaters enjoy bursts of pancetta flavor when devouring the risotto; thinner slices tend to melt into the other flavors.

Mushrooms:
1/2 pound fresh cremini mushrooms, cut in 1/4” slices (about 2 cups sliced)
1/2 pound fresh shiitake mushrooms, stems removed and cut in 1/4” slices (about 2 cups sliced)
2 Tbsp. butter, divided
2 Tbsp. olive oil, divided
Salt
Freshly ground black pepper
1 Tbsp. minced garlic, divided

Risotto:
3/4 cup diced home-cured or store-bought pancetta (rind removed), 1/4” dice
2 Tbsp. olive oil
1 1/2 cups diced onions, 1/4” dice
Freshly ground black pepper
1 1/3 cups Arborio rice
1 cup dry white wine
10 ounces shelled edamame beans, blanched if fresh or thawed if frozen
6 Tbsp. minced fresh mint, divided
6 – 7 cups vegetable or chicken stock
1 cup freshly (and finely) grated parmesan cheese

Cook the Mushrooms: Sauté the cremini mushrooms, lightly seasoned with salt and freshly ground black pepper, in 1 Tbsp. butter and 1 Tbsp. olive oil, until the mushrooms are nicely browned. Stir in half the garlic and cook for 1 minute. Remove the browned mushrooms from the pan with a slotted spoon and set aside. Repeat with the shiitake mushrooms, using the remaining olive oil, butter, and garlic.

Make the Risotto: In a sauté pan large enough to hold the finished risotto, sauté the pancetta until the fat renders and the pancetta begins to brown. Stir in the onions, lightly seasoned with freshly ground black pepper, and sauté until the onions soften and begin to turn golden. Stir in the rice to completely coat it with oil and cook, stirring, for 1 minute. Add the wine, bring to a medium boil, and cook, stirring, until the wine is almost all absorbed.

Add 1/2 cup of stock and cook over moderate heat, stirring constantly, until the stock is almost all absorbed. Keep adding stock, 1/2 cup at a time, and stirring until each addition of stock is almost absorbed. When the rice is half done, stir in the edamame beans and 5 Tbsp. mint. (The recipe can be made ahead to this point, and finished right before serving. If you make it ahead, after you take the rice off the burner, stir it until it cools down before adding the edamame and mint.)

Continue adding stock, 1/2 cup at a time, and stirring until the rice is tender, but still firm in the center (this takes 18 – 22 minutes total). There may be stock left over. Stir in the reserved mushrooms, remaining 1 Tbsp. mint, and 1/2 cup grated parmesan. If necessary, add stock until the risotto is the consistency you desire; it should be moist and creamy, not thick and dry. Taste and add salt and freshly ground black pepper, as needed.

Serve immediately with the remaining grated parmesan on the side for sprinkling on top.
~~~~~~~~~~~~~~~~~~~~~~~~~~~~~
This is an entry for My Legume Love Affair – 9th Helping (MLLA9), created by Susan of The Well-Seasoned Cook, which I hosted in March 2009. My Legume Love Affair - 10th Helping for April 2009 is being hosted by Courtney of Coco Cooks.

Tuesday, March 24, 2009

Recipes: Pan-Fried Salmon with Curly Endive and Christmas Lima Beans & Christmas Lima Bean Salad

Christmas lima beans, with their speckled, swirled coats of maroon and cream, are one of the world’s most beautiful dried beans. When properly cooked, their texture is firm and their taste nutty.

Christmas limas are a perfect foil for strong, spicy flavors and are robust enough to serve on their own as a salad, spread, side dish, or main course. They go particularly well with wild mushrooms, bitter greens, and strong-flavored fish like salmon or mackerel.

Christmas Lima BeansThe

Ark of Taste is a list of endangered food plants and animals that the Slow Food Foundation for Biodiversity seeks to protect and defend. Christmas limas (Phaseolus lunatus), also known as chestnut limas, are now on the Ark of Taste list for the United States.

According to the
Ark of Taste website, “gastronomic accounts date the Christmas Lima Bean to the 1840s when it was especially popular in the southwestern region of the US. … It is used in both its mature green state as a shelled Lima for eating fresh, freezing or canning as well as used dried, and cooked into stews and casseroles. The Christmas Lima is very successful in the high desert environments of the southwest. They are hardy, heat tolerant and very productive—a bean known for its yield and versatility.”

A couple days ago, I found myself with time to kill at
Natural Pantry, an Anchorage store that started as a health food/vitamin store. Over the years, without my noticing it, Natural Pantry has added an extensive line of gourmet and specialty food products. Each aisle brought new surprises. I left with two full bags of hard-to-find-in-Anchorage ingredients, including a package of Christmas Lima Beans. I’ll definitely return to Natural Pantry, sooner rather than later.

One final, but important, note: Dried Christmas lima beans are delicious. Other than genes, they have nothing in common with the nasty green limas I remember from childhood.

Pan-Fried Salmon with Curly Endive and Christmas Lima Beans
Serves 4
Christmas Lima Bean Salad may be made well-ahead. If it is, this dish makes a quick weekday meal. Before serving refrigerated bean salad, remove it from the refrigerator at least 1 hour, or put it in the microwave on medium for approximately 2 minutes.

1 pound wild-caught salmon fillets
Salt
Freshly ground black pepper
1 head curly endive
(approximately 8 cups cleaned and chopped)
1/4 cup
chiffonade-cut fresh mint
1 recipe Christmas Lima Bean Salad (see recipe below)

Wash the salmon and dry it well. Using needle-nosed pliers, remove as many pin-bones from the fillet as possible. Skin the fish, if necessary, and cut it into 4 even pieces. Season the fillets on both sides with salt and freshly ground black pepper. Let the seasoned fish rest for 30 minutes at room temperature before cooking.

While the fish is resting, wash the curly endive, dry it well, and roughly chop it into bite-sized pieces. In a large bowl, toss the curly endive with the mint and Christmas Lima Bean Salad. Taste and add salt or freshly ground black pepper, as needed. Divide the endive and bean mix between 4 plates.Heat the olive oil in a pan until it is hot, but not smoking. Turn the heat to medium high, and add the salmon. Cook for 3 – 5 minutes, or until the pan side of the salmon is lightly browned. Turn over and cook for 1 - 3 minutes, or until the salmon is done to your taste. The exact cooking time depends on the fillets’ thickness; keep in mind that salmon tastes better slightly underdone than it does when it's overdone.

Place the hot salmon fillets on top of the endive and bean beds. Serve immediately.

Christmas Lima Bean SaladChristmas Lima Bean Salad
Serves 4-6

The amount of jalapeño in the dressing, and whether you include the jalapeños’ seeds (which add heat), depends on how spicy you like your food. I last made this with 2 jalapeños including the seeds, and it was pleasantly spicy. My husband would’ve preferred it with 3 whole jalapeños. If you don’t like spicy food, remove the seeds before adding the jalapeños. Keep in mind that jalapeños are not uniformly hot. If your jalapeños are too mild, add a little
sambal oelek or crushed red pepper flakes to make a spicier dressing. I prefer the taste of capers preserved in salt to those preserved in brine (although either works here), and usually rinse and soak the capers to remove excess salt. However, for this dressing, I used the capers salt and all, and didn’t separately add salt to the dressing.

Beans:
1 cup dried Christmas lima beans (6 ounces dried or 2 1/2 cups cooked)
5 bay leaves
Water

Dressing:
2-3 red or green jalapeño peppers
4 tsp. capers, preferably salted
2 garlic cloves
1/4 cup red wine vinegar
3/4 cup olive oil
Salt
Freshly ground black pepper

Salad:
1 cup thinly sliced red onion
1/2 cup
chiffonade-cut fresh mint

Cook the Beans: Place the beans in a large pot, cover them with lots of water, and let soak overnight. The next day, drain and rinse the beans. Return them to the pot; add the bay leaves and enough water to cover the beans by 3 inches. Bring to a boil, cover, turn down the heat to low, and simmer the beans for 60-90 minutes, just until the flesh is tender (be careful not to cook the beans until they are mushy). Drain the beans, reserving the bean cooking water (see Note below).

Make the Dressing: While the beans are cooking, purée the jalapeños, capers, garlic, and red wine vinegar in a blender. Add the oil to the other ingredients slowly, while the blender is running. Season to taste with salt and freshly ground black pepper.

Make the Salad: Mix the cooked Christmas lima beans with the dressing, red onions, and fresh mint. Serve warm or at room temperature.

Note on Bean Cooking Water: If I’m not using it right away, I freeze bags of bean cooking water and use it instead of stock in soup and stew recipes. The cooking water from Christmas lima beans tastes particularly good, and is definitely worth saving.

~~~~~~~~~~~~~~~~~~~~~~~~~~~~~~~~~~~~~

This is my entry for My Legume Love Affair – 9th Edition (MLLA9) which I am hosting this month and which was created by Susan of The Well-Seasoned Cook.

Tuesday, February 17, 2009

Recipe for Edamame Pesto Spread (Ενταμάμε Πέστο Σαλάτα)

I always keep a bag of shelled edamame beans in the freezer. They’re colorful, taste great, and very versatile.

Edamames are green soybeans, harvested while the pod is still soft and bright green. In Japanese, “eda” means branches and “mame” means beans; thus, edamames grow in clusters on the soybean plant’s many branches. Edamames are rich in fiber and protein and, like all soybeans, may have significant health benefits.

Last weekend I used them to make Edamame Pesto Spread, a garlicky bean spread loaded with fresh basil, fresh mint, and parmesan cheese. The recipe was inspired by, but quite different from, Marcella Hazan’s Ligurian Raw Fava Bean Spread in
Marcella Cucina.

I often use edamames as a substitute for fresh fava beans in Greek recipes, such as braised favas with dill and onions or favas and potatoes baked in grape leaves (recipes for both are in
Tastes Like Home: Mediterranean Cooking in Alaska). Recently, I used edamames in Seafood and Vegetable Stew with Rouille.

Except for the fresh herbs, which are readily available at most grocery stores, Edamame Pesto Spread is made with pantry staples. It goes together in minutes and can be served right away. As a result it’s a handy recipe to keep in mind for last minute entertaining, especially in summer when herb gardens flourish.

Edamame Pesto SpreadEdamame Pesto Spread (Ενταμάμε Πέστο Σαλάτα)
Makes about 2 cups

Serve as an appetizer with pita chips or thin slices of bread. Edamame Pesto Spread is also good in sandwiches or on pasta.

1/2 cup freshly grated (or finely ground in a food processor) parmesan cheese
2 cups shelled edamame beans (frozen), thawed
2-3 garlic cloves
1/4 cup whole mint leaves
1/4 cup whole basil leaves
1/4 cup fresh lemon juice
1/2 cup olive oil
Salt
Freshly ground black pepper

Put all the ingredients in a food processor and process until smooth, being sure to scrape down the sides of the processor bowl. Taste and add salt, freshly ground black pepper, or lemon juice, as needed.
~~~~~~~~~~~~~~~~~~~~~~~~
This is my entry for
My Legume Love Affair, created and hosted by Susan from The Well-Seasoned Cook.

Grilled Cheese and Edamame Pesto SandwichesGrilled Cheese and Edamame Pesto Spread Sandwich

Friday, January 9, 2009

Recipe for Leek Mousaka (Μουσακάς με Πράσα)

Happy New Year to one and all!

I’m back from recent travels and recovered from holidays full of family, parties, and baking. You heard it here first: I’m never eating cookies or candy again. Ever. Or at least until memories of the last month fade into nothingness.

It’s hard to decide what to write about because I have a giant backlog of recipes and photographs. So instead of actually making a decision, I jumbled my stack of notes, and randomly drew out the recipe for Leek Mousaka.

When we arrive in Greece from Alaska, the first thing we do is go to an airport newsstand for newspapers and at least one cooking magazine. Properly armed, we head for our hotel to read and relax from the long trip.

Lately, my favorite Greek magazine is
Olive (a spin-off of BBC Olive). Sprightly Greek food personality Ilias Mamalakis first drew me to Olive, but I continue reading it for updates on the Greek food world and interesting recipes. Sadly, Olive isn’t available in Alaska, even by subscription.

LeeksAs a leek lover and someone with a healthy supply of homemade Greek egg noodles (hilopites), Olive’s recipe for Leek Mousaka was intriguing. Out of curiosity, I googled “Μουσακάς + Πράσα” (Mousaka + Leeks) to see if Olive’s recipe was unique. A number of websites had identical Leek Mousaka recipes, but only one credited the magazine. None credited Georgia Kofinas (Γεωργία Κοφινάς), who Olive identifies as the recipe’s creator.

There’s no way for me to know whether the recipe actually originated with Kofinas or someone else. However, the issue of copying recipes without attribution is one that, sooner or later, all food writers must confront. It’s infuriating when others appropriate recipes without permission or attribution. On the other hand, it’s easy to give credit to those whose work contributed to your creation.

Here's my practice and, if I could wave a magic wand, it’s one all food bloggers and writers would follow:


1. If I use a recipe exactly as written (which I rarely do), under the name of the recipe I write “recipe by” and identify the author and source of the recipe. My article about the recipe also includes a review of the source book, magazine, or blog and applicable permalinks.


2. If I make only minor changes to a recipe, under the name of the recipe I write “recipe adapted from” and identify the author and source of the original recipe.

3. If I make major changes to someone else’s recipe, under the name of the recipe I write “recipe inspired by” and identify the author and source of the inspirational recipe.

4. If I don’t designate “recipe by,” “recipe adapted from,” or “recipe inspired by,” the recipe is my creation.

Of course, there are simple dishes that many cooks discover or invent on their own, without ever having seen a similar recipe. Oven-roasted vegetables, vinaigrettes, risottos, soups, and eggs are only a few examples of such recipes. Any similarities in recipes like this are, more likely than not, coincidental.

In the case of Leek Mousaka, I significantly changed the original recipe. I cooked the leeks without water to boost their flavor, used a personal recipe for tomato-meat sauce, enhanced the topping with cream and cheese, and adapted the recipe so it can be made with ingredients available in the United States. Even though I made major changes to the original recipe, I wouldn’t’ve made it without Olive’s inspiration, so included a credit for both the magazine and the recipe’s creator.

Leek Mousaka is quite different from the
typical Mousaka found in Greek restaurants around the world, and is wonderfully delicious. The sweetness of sautéed leeks enhances the minty tomato-meat sauce and contrasts with the tart yogurt. Noodles play harmony to Leek Mousaka’s aromatic flavors, and form a pleasurably crispy top crust. The resulting dish is attractive, delectable, and suitable for any occasion.

Leek MousakaLeek Mousaka (Μουσακάς με Πράσα)
Serves 6 – 9
Inspired by Μουσακάς με Πράσα, <<Φθινοπωρινή συμφωνία>> by Γεωργία Κοφινάς in BBC Olive (Greek version),
Issue 19, October 2008
Leek Mousaka can be made for vegetarians by using my recipe for
Tomato Sauce with Celery and Mint (and simmering it until it’s thick) instead of the meat sauce described below. Although Leek Mousaka has many steps, it goes together quickly once the component parts are done. The meat sauce may be made days ahead (or months ahead if you freeze it). The yogurt may also be made well ahead (or purchased, if strained Greek yogurt is available where you live). Because I prefer strained yogurt for all purposes, I usually strain yogurt right after I bring it home from the market so it’s ready when I want it. Leeks can hold dirt between their layers, so must be carefully cleaned. After removing the dark green portions and the root ends (both of which can be saved for vegetable stock), cut the leeks in half. Under running water, rinse out any dirt trapped between the leeks’ layers, using your fingers to help remove any stubborn clumps of dirt. Every layer of Leek Mousaka is separately salted (doing so brings out the full flavor of each ingredient), so be careful not to over-salt any one layer or the finished dish will be too salty.

Yogurt Filling:
2 cups plain yogurt, preferably whole-milk (or 1 1/4 cup strained yogurt, see Note above)
2 medium-sized garlic cloves
1/4 tsp. salt

Meat and Tomato Sauce with Celery and Mint:
1 pound ground beef
Salt
Freshly ground black pepper
2 cups diced onions, 1/4” dice
1 cup diced celery, 1/4” dice (2 – 3 stalks)
1 Tbsp. minced garlic
1 tsp. Aleppo pepper or 1/2 tsp. crushed red pepper
1 14.5-ounce can, or 2 cups fresh, crushed tomatoes
3/4 cup dry white wine
1/4 cup minced fresh mint

Noodles:
1/2 pound
thin egg noodles, vermicelli, fides, broken-up angel hair pasta, or any other similarly-shaped pasta

Leeks:
8 cups diced leeks, white and light green parts only, 1/2” dice (4-5 leeks)
3 Tbsp. olive oil
Salt
Freshly ground black pepper

Topping:
2 eggs
1/2 cup heavy cream
Salt
Freshly ground black pepper

Olive oil for coating the baking pan
1 cup freshly grated kefalotyri, parmesan, or Romano cheese, divided

Straining YogurtMake the Yogurt Filling: Line a strainer with a paper towel and dump in the yogurt. Let the yogurt drain for at least 1 hour (straining for 2 hours is better if you have time). Purée garlic by mashing it into the salt with the flat of a knife or in a mortar and pestle. Mix the puréed garlic into the strained yogurt.

Make the Meat and Tomato Sauce with Celery and Mint: Sauté the ground meat, lightly seasoned with salt and freshly ground pepper, until it is nicely browned. Add the diced onions and celery and sauté until the onions begin to brown. Stir in the garlic and Aleppo pepper and cook for 1 minute. Stir in the crushed tomatoes and white wine and bring to a boil. Cook rapidly for five minutes, stirring constantly. Turn the heat down to medium, and simmer for 15 – 20 minutes or until most of the liquid in the sauce has evaporated. Taste and add salt and freshly ground black pepper, as needed. Stir in the mint and take the sauce off the burner.

Cook the Noodles: Add the noodles to boiling salted water and cook until they’re half done. (Because the noodles are small, they cook quickly.) Drain and set aside.

Make the Leeks: Sauté the diced leeks in olive oil, lightly seasoned with salt and freshly ground black pepper, until the leeks are soft.

Make the Topping: Whisk together the eggs, cream, a little salt, freshly ground black pepper, and 1/3 cup of grated cheese.

Assemble the Mousaka: Preheat the oven to 400°F.

Thoroughly oil a 10” x 10” baking pan. Spread half the noodles over the bottom of the pan. Evenly sprinkle 1/3 cup grated cheese over the noodles. Evenly spread the leeks over the grated cheese, the yogurt filling over the leeks, the meat sauce over the yogurt, 1/3 cup grated cheese over the meat sauce, the remaining noodles over the grated cheese, and the egg/cream topping over the noodles.

Bake for 50 to 55 minutes. Let cool for at least 10 minutes before cutting into pieces with a very sharp or serrated knife.

Serve with a crisp green salad, Kalamata olives, and crusty bread.
~~~~~~~~~~~~~~~~~~~~~~~~~~~~~
This is my entry for
Weekend Herb Blogging, hosted this week by Pam from The Backyard Pizzeria.