Monday, December 31, 2007

Recipes: Fig Tapenade, Garlicky Goat Cheese Spread, and Garlic Croutons

When I was shopping for Christmas Eve dinner, I spied a tempting display of organic dried fruits. I succumbed to the call of black mission figs, and brought home a large bag. When the time came for holiday entertaining, I turned to the figs.

Several months ago, I’d read a recipe for fig and olive tapenade. I love tapenade, a Provençal paste of black olives, anchovies, capers, herbs, garlic, lemon, and olive oil, so decided to pair it with my bounty of figs. Unfortunately, I couldn’t remember where I’d read about fig tapenade, a distressing complication of owning too many cookbooks.

I did find a few recipes for tapenade with figs on the internet, but either the ingredient list or procedure didn’t appeal to me, so I was stuck with creating my own version. I started with a basic tapenade, left out the anchovies, and added figs and a healthy dose of wild thyme.

The sweet figs and salty olives and capers combine to form a deliciously vibrant spread. I made it this morning, enjoyed Fig Tapenade and Rosemary Bread for lunch, and brought the rest to a New Year’s Eve party tonight.

The best thing about Fig Tapenade is how easy it is to make. The ingredients are simply tossed into the food processor and processed until smooth. The flavor comes from good ingredients, not hard work on the part of the cook.

Fig Tapenade is rich and flavorful. It can be served on its own with crusty bread, or dressed up, as I did tonight, with Garlicky Goat Cheese Spread and Croutons.


Fig Tapenade
Makes about 2 cups
Although it may be tempting to buy pitted olives, their flavor pales in comparison to that of olives with pits. To easily pit Kalamata olives, spread them out on a cutting board and smash each olive with a meat pounder or other heavy object. After being pounded, the pits slip right out of the olives.

1 cup dried black mission figs
1 1/2 cups Kalamata olives
2 Tbsp. capers, preferably salt-cured
1 Tbsp. dried thyme, crushed
1 Tbsp. minced fresh rosemary
1 Tbsp. chopped garlic
3 Tbsp. lemon juice
1/2 tsp. salt
1/2 tsp. freshly ground black pepper
1/2 cup olive oil

Cut any stems off the figs, and cut the figs into quarters. Rinse, drain, and dry the olives and capers. Remove the pits from the olives.

Place all the ingredients, except the olive oil, in a food processor, and process until the ingredients are chopped into small pieces. While the machine is running, pour in the olive oil and continue processing until the ingredients form a smooth paste. Scrape down the sides of the bowl and process again. Place in a glass container and refrigerate for at least 3 hours before serving.

Garlicky Goat Cheese Spread
Makes 2 cups
If you prefer mild hints of garlic, use the smaller amount; bolder palates may prefer the full measure. Garlicky Goat Cheese Spread may be served in a bowl, or unmolded onto a platter. If you want to serve it unmolded, line a bowl large enough to hold the spread with plastic wrap. Spoon the spread into the plastic-lined bowl, press down to remove any air pockets, and cover the spread with plastic wrap. To unmold, open up the plastic wrap so the spread is exposed, invert the bowl onto a platter, then remove the bowl and plastic wrap.

1 – 3 cloves garlic
1/2 tsp. salt
1 cup (8 ounces) chèvre (soft goat cheese)
1/2 cup mascarpone or cream cheese
1/2 cup whole-milk yogurt or sour cream

Puree the garlic by mashing it together with the salt either in a mortar and pestle or on a cutting board with the flat side of a knife blade. Mash the pureed garlic, chèvre, mascarpone, and yogurt together (this may be done in a food processor). Refrigerate for at least 3 hours before serving.

Garlic Croutons
1 clove garlic, minced
1/4 cup olive oil
1/4 cup butter, melted
1/4 tsp. salt
2 baguettes, cut into thin slices

Preheat the oven to 325°F. Mix all the ingredients together in a small bowl. Brush the garlic butter-oil mixture onto one side of each baguette slice. Put the buttered baguette slices in one layer on a baking sheet and cook for 10 – 15 minutes, or until the bread slices are crispy.
~~~~~~~~~~~~~~~~~~~~~~~~~~~~~~~~~~
This is my entry for A Fruit of the Month: Dried Fruit hosted by The 'Yum' Blog. It is also my entry for Antioxidant Rich Foods/5-a-Day Tuesdays sponsored by Sweetnicks.

Recipe: Spicy Squash Soup (Σούπα με Kολοκύθα)

Squash tends to build up at our house. I love it; my husband doesn’t. It’s one of the few areas where our palates don’t overlap.

Squash roasted at high temperature with olive oil and salt is acceptable to us both. That’s pretty much it; Oven Roasted Squash is the lone star on a long list of squash recipes I’ve tried over the years.

This might not be a problem except that it’s squash season and we’ve been regularly getting one variety of squash or another in our Full Circle Farm CSA box. Since my perpetual New Year’s resolution is not to waste food, I keep trying new squash recipes and hoping I’ll hit on another one we both like. As good as it is, there are only so many days in a month I can eat roasted squash.

I hit the jackpot last Friday.

Chelsea Greigh’s Spicy Squash Soup is a winner. Its rich spicing counteracts the tendency of winter squash to be overly sweet, the characteristic to which my husband objects. We both loved the soup and happily enjoyed it two meals in a row.

I tried Chelsea’s soup as part of Taste and Create, an event in which food writers are paired with a randomly assigned partner, and asked to cook one recipe off their partner’s blog. Taste and Create gives writers the opportunity to have their recipes tested by a peer.


Spicy Squash Soup (Σούπα με Kολοκύθα)
Serves 4 - 6
Adapted from Chelsea Greigh of Rolling in Dough

If you prefer less spicy food, leave out the crushed red pepper flakes. There are three ways to serve Spicy Squash Soup: 1) Drizzle the soup with high quality olive oil and sprinkle it with green onions and minced parsley (my husband's way); 2) Sprinkle the soup with green onions and minced parsley (my way); or 3) Add a dollop of sour cream to the soup and sprinkle it with chives (Chelsea’s way). All three versions are delicious. I’ve adjusted Chelsea’s recipe to the size of my squash and the level of spicing we prefer. You can find Chelsea’s original version of Spicy Squash Soup here.

3 Tbsp. olive oil
1/2 cup diced carrot, 1/2” dice
2 1/2 cups diced onions, 1/2” dice
Salt
Freshly ground black pepper
1 Tbsp. chili powder blend
1 Tbsp. cumin seeds, crushed
1/2 tsp. crushed red pepper flakes (optional)
1 3/4 lbs. cleaned, peeled, and diced winter squash (6 cups), any variety
3/4 lb. peeled and diced potatoes, 1/2” dice (2 cups)
8 cups water
1 Tbsp. Worcestershire sauce

Optional Garnishes:
2 green onions, finely chopped for sprinkling
2 Tbsp. minced parsley for sprinkling
Olive oil for drizzling
Sour cream for dolloping
Chives for sprinkling

Sauté the carrots and onions, lightly seasoned with salt and freshly ground black pepper, in olive oil until the onions soften and start to turn golden. Stir in the chili powder, cumin seeds, and red pepper flakes and cook for 1 minute. Stir in the squash, potato, and water and bring to a boil. Turn down the heat and cook at a slow boil until the vegetables are soft, about 30 – 40 minutes.

Puree the soup (this is easiest to do with a stick blender). Simmer the soup for 10 - 15 minutes or until it is the thickness you prefer. Stir in the Worcestershire sauce. Taste and add salt or freshly ground black pepper, as needed (squash and potatoes really suck up salt; you may need to add more than you normally would).

Garnish and serve.

Saturday, December 29, 2007

Recipe: Rosemary Bread (Ψωμί με Δενδρολίβανο)

Tissy gave us a wonderful loaf of homemade bread for Christmas. It made me remember how tasty homemade bread can be, and how infrequently I’ve been baking of late.

I’ve gone through periods where I baked all our bread. Since local stores started carrying high-quality, artisan-style bread, I’ve been baking less and less. We finished Tissy’s bread yesterday, so today I decided to follow her example and bake my own.

My sister’s holiday present was a cookbook from Le Pain Quotidien, a Belgian bakery and restaurant that has stores in 12 countries around the world. The bread from Le Pain Quotidien is reported to be extremely good, so I wanted to make it.

I turned to the recipe for Le Pain Quotidien’s signature loaf, sourdough wheat bread, and read the recipe. It called for sourdough starter which, unfortunately, takes 11 days to make. This was not the loaf I would be baking today.

I used to make rosemary bread quite often, but haven’t done so in years. It goes together quickly, is always full of flavor, and would be an ideal accompaniment to the squash soup I was planning for lunch. Rosemary bread it would be.

As I described in an earlier post, we brought our herbs – including rosemary – in from the garden this year. When I cut off two branches to use in the bread, the smell was intoxicating; the aroma of freshly picked rosemary is much richer than that of herbs in plastic boxes from the supermarket produce section.

When I cut into the bread after it came out of the oven, I could tell by the smell that it would be delicious. It was.

Rosemary Bread (Ψωμί με Δενδρολίβανο)
Makes one large loaf

I prefer using a baking stone when I make bread as it helps my home oven maintain an even temperature and gives bread a crisper crust. I also have an old baking sheet with edges that I use when I make bread. I preheat the baking sheet and baking stone for at least 30 minutes at 500°F. I turn the heat down to 450°F when I put the bread in to bake. Just before I close the oven, I dump a cup of water into the baking sheet and quickly shut the door. (Do not throw water directly on the oven floor or it will warp. Trust me, I know this from experience.) The water creates steam which prevents the bread from quickly forming a hard surface, thus allowing the bread to rise to its fullest extent. The water cooks off quickly, and leaves a hot, dry oven which, together with the baking stone, helps ensure a crispy crust.

2 cups warm water
1 Tbsp. honey
2 1/4 tsp. dry yeast (1 packet)
2 Tbsp. minced rosemary
2 tsp. salt
2 Tbsp. olive oil
2 cups semolina flour
2 – 2 1/2 cups all-purpose flour
Coarse salt

In a large bowl, mix the warm water and honey. Sprinkle the yeast over the water and let it sit for 10 minutes, or until the yeast begins to foam. Using a stand mixer with the paddle attachment (or by hand with a wooden spoon), mix in the rosemary, salt, olive oil, and semolina flour. Let sit for 10 minutes (this is necessary to properly hydrate the semolina).


Start mixing in the all-purpose flour. When the dough starts clumping together, switch to the dough hook (or to kneading by hand), and keep adding all-purpose flour until you have a moist, but not quite sticky, dough. Flour a board or counter, dump out the dough, and knead in the remaining flour as needed to make a smooth, soft dough.

Let the dough rise for 1 hour, or until the dough has doubled in size. Punch down the dough, shape into a large round loaf, place on a parchment-paper-lined rimless baking sheet, and let rise until the loaf has almost doubled in size. (You can also rise the bread directly on a wooden peel sprinkled with semolina flour or corn meal.)

Preheat the oven to 450°F. Cut an asterisk in the center of the loaf with a razor blade or extremely sharp knife. Brush lightly with water and sprinkle with coarse salt. (If you have a baking stone, slide the bread - and parchment paper if using - from the baking sheet or wooden peel onto the stone.) Bake for 15 minutes. Without removing the bread from the oven, turn the heat down to 325°F and bake for an additional 20 - 25 minutes, or until the loaf sounds hollow when tapped on the bottom.


Cool, cut, and serve.

Note: My recipe Chicken in Rosemary Bread uses this bread, and stuffs it with a chicken, prosciutto, and herb filling. Chicken in Rosemary Bread makes a showy company meal, or lovely, portable, hold-in-your-hand chicken sandwiches.

~~~~~~~~~~~~~~~~~~~~~~~~~~~~
This is my entry for this month’s Grow Your Own hosted by Andrea of Andrea’s Recipes. Andrea's round-up of recipes is here.

Seven Seafoods 2007: Recipe for Scallops Piccata (Χτένια Πικάντικο)

Scallops Piccata, with its vibrant lemon sauce, is a variation of Veal Piccata, a classic Italian dish. Although purists may claim capers don’t belong in Piccata sauce, I enjoy the piquant flavors of capers and lemon together. Capers also pair particularly well with seafood, so I included them in my Scallops Piccata recipe.

Capers are sold pickled or preserved in salt. Salt helps retain the subtle floral flavor of capers, which too often is overwhelmed by the vinegar used during pickling. For this reason, I recommend using salt-cured capers whenever capers are used uncooked or cooked for only a short time, as they are in Scallops Piccata.

Many gourmet stores carry salted capers, and they are available from internet sellers. Salt-cured capers are not cheap, but because of their intense flavor, are worth buying. For more information about capers, go here.

Scallops PiccataPan Seared Scallops Piccata (Χτένια Πικάντικο)
Serves 2 as a main course or 4 as an appetizer

4 Tbsp. capers (preferably preserved in salt)
12 large scallops (about 1 pound)
Salt
Freshly ground black pepper
1 Tbsp. olive oil
1/3 cup lemon juice
1/2 cup dry white wine
4 Tbsp. butter

If using salt-preserved capers, rinse off the salt and let them soak in cold water for 10 – 15 minutes, and rinse them again. If using brined capers, rinse off the brine. Dry the capers and roughly chop them if they are large.

Wash the scallops, removing any tough muscle clinging to the side of the scallop. Dry and season them on both sides with salt and freshly ground black pepper.

ScallopHeat the olive oil over high heat in a frying pan large enough to hold the scallops. If you are serving more than two people as a main course, you may need to use two frying pans for this task; scallops too close together in a pan will steam rather than pan-fry.

When the oil is very hot, add the seasoned scallops, and cook for 2 – 3 minutes, depending on the size of the scallops. Turn the scallops over and cook for 2 – 3 minutes more. Except for turning them over the one time, do not move the scallops or fidget with them while they cook. The scallops will brown better if they aren’t repeatedly turned.

While the scallops are cooking, warm up a plate (this is easiest to do in a microwave; put the dry plate in the microwave for 1 minute on high). When the scallops are done, put them on the warmed plate while you make the sauce.

Add the lemon juice and white wine to the frying pan, scraping up any browned bits or caramelization on the bottom of the pan. Cook until the liquid has reduced to 1/3 cup. Turn off the heat and whisk in the butter, 1 Tbsp. at a time. Stir in 3 Tbsp. of the capers.

Spoon a pool of sauce onto each of 2 (or 4) plates, top with the browned scallops, and sprinkle with the remaining capers.

Seven Seafoods 2007: Recipe for Fennel Steamed Clams with Italian Sausage (Αχηβάδες με Μάραθο και Ιταλικό Λουκάνικο)

My parents faithfully read my blog.

After I wrote my first post about this year’s Seven Seafoods Feast, my mother found the menu she had saved and annotated from our 1998 Christmas Eve dinner. It was a great time. My sister and I spent the day cooking, and my seafood-loving parents were able to attend. My father e-mailed me the menu today.

1998 Seven Seafoods MenuThe menu shows we ate well in 1998: gravlax, oysters, clams, calamari, shrimp, king crab, and scallops were all part of the meal. Although the food was just as good, this year’s Christmas Eve dinner was no match for 1998, when much of my family was happily together and the food was joyously cooked with my sister. I’ll remember the 1998 meal for the rest of my life.

This year we only made it through four courses. We started slowly with Oysters and Mignonette Sauce. We gorged on Tuna Tartare with Mint, Sesame Oil, and Hot Peppers, and finished off the Spicy Pesto Grilled Shrimp. By the time we started in on the Periwinkles in Dill-Onion Wine Broth, we were whipped.

We couldn’t eat the clams, crab, or scallops.

For Christmas Eve, I’d planned to simply steam the clams with fennel. But for lunch on Christmas Day, when clams were the only thing on the menu, I enhanced the broth with sweet Italian sausage. The result was a rich, warming stew, perfect for a snowy winter day.

Fennel-Steamed Clams with Italian SausageFennel Steamed Clams with Italian Sausage (Αχηβάδες με Μάραθο και Ιταλικό Λουκάνικο)
Serves 2 as a main course or 4 as an appetizer
The Italian sausage is optional. If you leave it out, sauté the onions and fennel in 3 Tbsp. of olive oil.

3 pounds clams
1/4 lb. Italian sausage (optional)
1 1/2 cups diced yellow onion, 1/2” dice
1 cup diced fennel bulb, 1/2” dice (1 fennel bulb)
1 tsp. Aleppo pepper or 1/2 tsp. crushed red pepper
1 tsp. fennel seed, ground
1 1/2 cups dry white wine
Freshly ground black pepper
1/4 cup minced fresh parsley

Wash the clams to remove any sand or dirt; discard any that will not close or have broken shells.

If the sausage is in a casing, remove the casing. Using a pot that has a lid and is large enough to hold all the clams, crumble the sausage into the pan and cook until all the pieces have browned. Add the yellow onion and fennel bulb and sauté them in the sausage fat until the vegetables soften and start to turn golden. Stir in the Aleppo pepper and fennel seed and cook for 1 minute.

Add the clams, white wine, and freshly ground black pepper, and stir to evenly distribute the ingredients, being careful not to break the clam shells. Bring the wine to a boil, cover, turn the heat down to medium, and cook just until the clams open. Remove the pan from the heat and stir in the parsley.

Serve the clams and sausage with the broth and plenty of crusty bread.

Friday, December 28, 2007

Seven Seafoods 2007: Recipe for Garlic Roasted Crab (Καβούρι με Σκόρδο στο Φούρνο)

I’ve always lived near the sea and my favorite meals come from its bounty.

When I was a kid we regularly dug clams; littlenecks (Protothaca staminea) and razors (Siliqua patula) were our favorites. We feasted on salmon my dad brought home from fishing expeditions with his friends. When we went out to dinner, I only ordered shrimp.

I was happiest when my dad brought out his lantern and hip waders because it meant we soon would have Dungeness crab (Cancer magister) for dinner. Its sweet delicate meat is one of my favorite foods.

I’d been of the opinion that the best way to eat Dungeness crab is unadulterated. Crab cakes with the leftovers are fine, but when it is fresh, plain boiled crab was my preparation of choice.

Then I had Garlic Roasted Crab at Tra Vigne, a restaurant in St. Helena, California, the heart of California wine country. The crab came ready cracked, and was richly dressed with garlic, butter, and parsley. It was as good as any crab I’d ever had before; maybe better.

I interrogated the waiter about how the chef made Garlic Roasted Crab, and investigated further on the internet when I returned home. Although I still love plain boiled crab and eat it often, Tra Vigne’s Garlic Roasted Crab now appears regularly on our dinner table.

Because the garlic is roasted, it does not overwhelm the sweet flavor of Dungeness crab. I stir in parsley shortly before the crab comes out of the oven to give the parsley a little crunch and mute its herby flavor. The combination of the ingredients’ tastes and textures enhances the crab’s naturally good flavor, something I would not have thought possible before I visited Tra Vigne.

You don’t need silverware to eat Garlic Roasted Crab, but you do need plenty of napkins!

Garlic Roasted CrabGarlic Roasted Crab (Καβούρι με Σκόρδο στο Φούρνο)
Serves 2 as a main course and 4 as an appetizer

Adapted from Tra Vigne Restaurant
Dungeness crab should be alive when it goes into the boiling water; the crab has more flavor if you don’t clean it before you cook it.


2 live Dungeness crabs
1/4 cup butter (1/2 stick)
1/4 cup extra virgin olive oil
1/4 cup chopped fresh garlic
Salt
Freshly ground black pepper
1/4 cup minced fresh flat-leaf parsley

Bring a large pot of salted water to a boil. Put in the live crabs. Cook for 12 minutes. (The crab is only partially cooked because it will be oven-roasted; it takes 15 - 20 minutes, depending on the size, to fully cook Dungeness crab.) Remove the crab from the boiling water, and run it under cold water to cool it down. When the crab is cool enough to handle, remove the back, gills, and guts. With cold running water, carefully rinse off any guts that are sticking to the crab meat. (The crab may be made ahead to this point and refrigerated for 24 hours).

Preheat the oven to 500 °F.

Break the crab bodies in half down the center. With your hands, carefully remove the legs and claws, leaving the bodies intact. Use your hands to break the bodies in half again (in other words, the full body of each crab is broken into four pieces). Using a nut cracker or lobster cracker, carefully crack open each section of the crab legs and claws; try to keep each leg and claw in one piece. Put the crab in a large roasting pan.

Melt the butter. Drizzle the butter and olive oil over the crab, and sprinkle it with minced garlic, salt, and freshly ground black pepper. Thoroughly toss the crab with the other ingredients so that all the pieces of crab are coated.

Roast the crab for 10 minutes. Remove from the oven, sprinkle the parsley over the crab and toss again. Return the crab to the oven for 2 minutes.

Place the crab on a large serving platter and serve immediately with napkins and an empty bowl for the shells.

~~~~~~~~~~~~~~~~~~~~~~~~~~~~~~

This is my entry for Think Spice, created and hosted by Sunita of Sunita's World.

Seven Seafoods 2007: Recipe for Periwinkles in Dill-Onion Wine Broth (Όστρακα “της Πλώρις”)

Periwinkles are usually in stock at Sagaya, our local Asian grocery. I’ve looked at them for years, but Christmas Eve was the first time I bought them. They were delicious; from now on, I will buy periwinkles regularly.

Common periwinkles, Littorina littorea, are small edible sea snails. They are hand harvested from the rocky Maine coast by local periwinkle pickers, shipped to distributors in Boston and then to Alaska, other states, Europe, and Asia.

The flavor is similar to clams, although periwinkle meat is slightly sweeter. Based on their flavor, I would substitute periwinkles for clams in any steamed clam recipe. They were surprisingly tender and easily slipped out of their shells on the point of a toothpick.

Last September we ate at an Athens restaurant called Logia tis Ploris, and enjoyed shellfish cooked in wine with dill and onions. This combination went beautifully with the periwinkles, as it would with any kind of shellfish.

PeriwinklesPeriwinkles in Dill-Onion Wine Broth (Όστρακα “της Πλώρις”)
Serves 2 as a main course or 4 – 6 as an appetizer


2 pounds live periwinkles
1/4 cup olive oil
1 cup diced yellow onions, 1/4” dice
1 cup thinly sliced green onions
1/4 cup minced dill
1 cup white wine
Freshly ground black pepper
Wedges of lemon

Wash the periwinkles to remove any sand or dirt.

Using a pot that has a lid and is large enough to hold all the periwinkles, sauté the yellow onion in olive oil until the onion softens and starts to turn golden. Add the periwinkles, green onions, dill, wine, and lots of freshly ground black pepper. Stir to evenly distribute the ingredients. Bring the wine to a boil, cover, turn down the heat to medium-low, and cook for 5 minutes, or until the periwinkle meat can easily be slipped out of the shell.

Serve the periwinkles and broth with toothpicks, wedges of lemon, and plenty of crusty bread. To eat the periwinkles, use a toothpick to knock off the operculum, a thin scale that covers the periwinkle’s opening (don’t worry if the periwinkle doesn’t have an operculum; it may have fallen into the broth). Stick the toothpick down into the periwinkle shell, hook the meat, and carefully slide it out of the shell. Eat and enjoy. The broth is delicious and can be eaten with a spoon, or soaked up on pieces of bread.

Seven Seafoods 2007: Recipe for Spicy Pesto Grilled Shrimp (Γαρίδες με Πικάντικο Πέστο)

Spicy Pesto Grilled Shrimp was on our 1993 Christmas Eve menu. My recipe notes from that year conclude, “Extraordinary! Very very good!!!”

Once I found the notes, I had to include Spicy Pesto Grilled Shrimp on our 2007 menu. I couldn’t ignore those exuberant exclamation marks.

This extremely flavorful dish is simple to put together and cooks quickly. As with many of my favorite foods, it is a little messy to eat. We started out with cloth napkins and quickly shifted to a combination of paper towels and licking our fingers and lips.

Spicy Pesto Grilled Shrimp tastes best when cooked on an outside grill, but it’s also very tasty when cooked inside on a very hot cast iron grill pan. Since it was cold and snowy here this Christmas Eve, we wanted to stay inside where we were warm and cozy beside our burning Yule Log. I opted for the grill pan.

In 2007, as in 1993, we agreed Spicy Pesto Grilled Shrimp was “Extraordinary! Very very good!!!”

Spicy Pesto Grilled ShrimpSpicy Pesto Grilled Shrimp (Γαρίδες με Πικάντικο Πέστο)
Serves 2 as a main course or 4 for appetizers
As you peel the grilled shrimp, your fingers will get covered with pesto which transfers to and flavors the sweet meat of the shrimp. If you prefer a stronger pesto flavor on the shrimp, cut open each shell down the back of the body only; be sure to rub pesto into the openings. For extra flavor, don’t forget to suck the heads. This dish should be spicy. Since the heat in jalapeños and serranos can vary from mild to very hot, be sure and taste the peppers as you are mixing the pesto. If your peppers are mild, mix in a teaspoon (or more, to suit your taste) of sambal oelek (ground red chiles).

1 pound head-on, shell-on shrimp
2 Tbsp. minced ginger
3 Tbsp. minced garlic
3 Tbsp. minced jalapeño or serrano peppers
1/4 cup minced Thai or sweet basil
1 tsp. coarse salt
1 tsp. freshly ground black pepper
1 Tbsp. sherry
1 tsp. dark sesame oil
3 Tbsp. olive or peanut oil

Wash the shrimp and dry them well. If desired, cut the shrimp shell down the back on the body only; do not remove the shell. Put the shrimp in a bowl.

Put the ginger, garlic, peppers, basil, salt, pepper, sherry, sesame oil, and olive oil in a blender or small food processor and puree to form a pesto. Scrape down the sides of the blender and puree again.

Thoroughly mix the pesto into the shrimp. I prefer doing this with my hands to make sure the pesto goes into all the shrimps’ nooks and crannies. Marinate the shrimp for 1 – 2 hours in the refrigerator.

Grill the shrimp on an outside grill or on a cast iron grill pan that has been preheated until it is white hot. Shrimp cook very quickly; depending on their size, they will be done after being on the grill for 2 – 3 minutes per side.

Serve with crusty bread and plenty of napkins.

Thursday, December 27, 2007

Seven Seafoods 2007: Recipe for Tuna Tartare with Mint, Sesame Oil, and Hot Peppers (Ταρτάρ Τόνου)

On an eating trip to San Francisco, we enjoyed a meal at San Francisco’s Aqua restaurant when Michael Mina was still the chef. Everything we ordered was delicious; there was not a single false note among the dishes we devoured.

Tuna Tartare Ready to MixAt the time, Tuna Tartare was one of Aqua’s signature dishes, and rightly so. It was beautifully presented: a pile of chopped sashimi grade ahi tuna in the middle of a white plate, surrounded by piles of spices, perfectly ripe pears, mint, and habanero chiles, topped with a quail egg and dressed with sesame oil. With two spoons, the server mixed all the ingredients together tableside, and gracefully created a mountain of tuna tartare in the center of the plate, accented by toast points.

The flavors of tuna, pears, mint, sesame oil, and hot peppers were perfectly balanced in this single dish. After the tuna tartare was gone, we were left wanting more.

Shortly after returning to Alaska, we recreated Aqua’s tuna tartare. I make it regularly for special occasions; my husband wants it every year on his birthday and we often have it as part of our Seven Seafoods Feast on Christmas Eve. I’m always happy to make it; Aqua’s Tuna Tartare is delicious.

Tuna TartareTuna Tartare with Mint, Sesame Oil, and Hot Peppers (Ταρτάρ Τόνου)
Serves 2 as a main dish, or 4 as an appetizer
Adapted from Aqua Restaurant, San Francisco
When buying tuna to be eaten raw, as it is in this dish, buy the highest grade big-eye tuna (also called ahi) available. Make sure your fishmonger trims off any skin or dark flesh before you buy it. We prefer making Tuna Tartare with habanero chiles, as at Aqua. However, habaneros are very spicy and not always available at our markets. If you prefer less spicy food, or can’t find habaneros, substitute jalepeno or serrano peppers. To toast the pine nuts, put them in a dry frying pan over low heat and cook just until the pine nuts are lightly brown. Pine nuts burn very easily, so watch them carefully. Because the yolks are eaten raw, I use the freshest, free range, vegetarian, organic eggs I can find.


1/2 pound sashimi grade bigeye tuna
4 tsp. minced garlic
1/2 – 1 tsp. minced habanero chiles, or 4 tsp. minced jalepeno or serrano peppers
1/4 cup diced ripe pear, 1/4” dice
2 Tbsp. minced fresh mint
2 Tbsp. toasted pine nuts
1 tsp. salt
1 tsp. freshly ground black pepper
1 tsp. chile powder, preferably New Mexican
2 Tbsp. dark sesame oil
2 Tbsp. extra virgin olive oil
2 small chicken egg yolks, or 4 quail egg yolks
8 thin slices of bread

Wash and dry the tuna very well. Cut it into 1/2” dice, and arrange half the tuna in the center of each of two plates (or a quarter of the tuna on four plates, if making appetizer servings). Use a measuring cup or ring mold to shape the tuna into attractive rounds. Make a small depression in the center of each tuna mound deep enough to contain an egg yolk.

Divide the remaining ingredients by two or four, depending on the size of the servings, and arrange them in small piles in a circle around each tuna mound. Drizzle the sesame and extra virgin olive oils over each tuna mound, and top with an egg yolk.


Toast the bread; cut large slices into cracker-sized pieces. Serve two spoons with each plate, so guests can mix their own tuna tartare.

Seven Seafoods 2007: Recipe for Alaskan Oysters on the Half Shell with Mignonette Sauce (Στρείδια με Σος Μαυρού Πιπεριού)

We feast on seven seafoods and champagne every Christmas Eve. At least we try to.

Our menu always includes seven seafoods, and we always have the full complement of ingredients in the refrigerator at the start of the evening. But sometimes – and lately, more often than not – we eat too much of the opening courses and are unable to finish the rest of the meal.

I no longer remember when we started this family tradition, but we’ve been doing it every year since at least 1993, which I know because I have notes about that year’s dinner. I’d read about the Italian Feast of the Seven Fishes, and it sounded like an excellent idea. As in Italy, the day before Christmas is a fasting day in Greece, so an all-seafood menu for Christmas Eve had natural appeal.

As I worked on one of this year’s menu items, my husband prowled around, impatient for the feast to begin. He straightened up, poked in corners, and tossed the detritus that mysteriously accumulates in the hidden depths of our kitchen. He handed me an envelope covered with scribbling, wanting to know if it could be thrown away.

On inspection, the scribbling was last year’s Christmas Eve menu, surfacing exactly one year after it was used: perfect timing. In 2006, with friends Jake and Moira, we enjoyed Shrimp Pâté with Garlic Toasts, Tuna Tartare with Mint, Sesame Oil, and Hot Peppers, Oysters with Blood Orange Champagne Granita, Fried Calamari with Anchovy Mayonnaise, Scallops with Lemon Vinaigrette over Roasted Tomatoes and Broccoli Raab, and King Crab Cakes, accompanied by green salad, crusty bread, champagne, and lemon ice cream for dessert.

This year it was just the two of us for dinner, and our menu was simpler: Alaskan Oysters with Mignonette Sauce, Tuna Tartare with Mint, Sesame Oil, and Hot Peppers, Spicy Pesto Grilled Shrimp, Periwinkles in Dill-Onion Wine Broth, Fennel-Steamed Clams, Garlic Roasted Crab, and Pan Seared Scallops Piccata, accompanied by crusty bread and champagne.


On Christmas Eve, we only made it from the oysters through the periwinkles before we had to stop. We ate Fennel-Steamed Clams for Christmas lunch with Italian sausage added, Garlic Roasted Crab for dinner the day after Christmas, and had Pan Seared Scallops Piccata for dinner tonight.

For ease of finding them later, I’ll separately post recipes for each of the seven seafoods we enjoyed this year.


Oysters with Mignonette SauceAlaskan Oysters on the Half Shell with Mignonette Sauce (Στρείδια με Σος Μαυρού Πιπεριού)
Serves 2 as appetizers

Because they grow in cold water, Alaskan Oysters are briny sweet. They are particularly tasty when served raw and dressed with a simple sauce of freshly ground black pepper, shallots, and champagne vinegar.

1/4 cup minced shallots
2 teaspoons freshly ground black pepper
Pinch of salt
1/3 cup champagne vinegar

12 oysters, shucked and on the half shell

Mix together the shallots, freshly ground black pepper, salt, and champagne vinegar. The sauce is best when it is steeped for at least 1 hour, however, I usually make it while my husband is shucking oysters and serve it immediately.

Arrange the shucked oysters on a plate with mignonette sauce on the side. Eaters should drizzle a spoonful of sauce over each oyster, and slurp it down immediately.

Wednesday, December 26, 2007

Recipe: Pine Nut Cookies (Biscotti con Pignoli)

One of our most memorable Christmases was spent in Italy. We traveled there, as did the rest of my husband’s family, and met up at a hotel in Rome. A week later, we all moved to a rented house called Tinaione in Borgo Stomennano, just outside the village of Monteriggioni (Siena).

I usually go to Italy and gawk at the vegetable and meat markets, but walk away unfulfilled because I don’t have a kitchen to make use of the lovely ingredients. Renting a house with a kitchen made all the difference in the world. For our Christmas dinner, I shopped with abandon at outdoor village markets and at the giant Coop supermarket in nearby Poggibonsi. It was exhilarating.

In Siena, we bought a box of fresh Riccarelli, diamond-shaped traditional Sienese cookies made with ground almonds. We found a bakery selling Biscotti con Pignoli, round cookies with almond paste centers and coated with pine nuts, and also bought them. Both kinds of cookies were addictively delicious.

The next year we were back in Alaska for Christmas. When baking time came around, I couldn’t stop thinking about the Italian pine nut cookies. I found three recipes for them on the Uncle Phaedrus website, and made all three versions.

Of the three recipes, the one that tasted most like the cookies we bought in Siena was made with almond paste, sugar, egg whites, and pine nuts. The cookies were delicious, but a little too sweet. The next year, I reduced the amount of sugar and increased the amount of pine nuts until I was satisfied with the cookies’ taste and texture.

The dough is very sticky. I had a hard time handling it until I began using a scoop to help shape the cookies. With the scoop, you dig up some dough, scrape the scoop flat on the side of the bowl, and release the dough over a shallow bowl of pine nuts. I do this four times, so there are four small wads of dough on the pine nuts (with more than four at a time, the dough pieces roll into each other and stick together). I then roll the dough balls in pine nuts to completely coat them. I prefer wearing disposable food safety gloves for this task because it keeps my hands from getting sticky.

I’ve made my version of Biscotti con Pignoli (Pine Nut Cookies) every Christmas since I worked out the recipe, and they are one of my very favorite cookies. I love their crunchy crust with lightly toasted pine nuts and soft interior rich with the flavor of almonds. I have to give them away quickly so I won't eat too many.


Pine Nut Cookies (Biscotti con Pignoli)
Makes 60 cookies, 2 1/2 inches in diameter
There are four kinds of prepared almond products in Alaska supermarkets: almond paste in cans, almond paste in tubes, marzipan in tubes, and almond filling in cans. I prefer using canned almond paste; almond paste in tubes will work in a pinch, but the cookies aren't as good. Marzipan and canned almond filling will not work for this recipe. If you want to make more than 60 cookies, make the dough in two batches; a double recipe will not fit in an average-sized food processor. I use a 2 tsp. (size 100) scoop to shape the cookies. If you use a 1 Tbsp. scoop (size 60) bake the cookies for 25 – 30 minutes; with the larger scoop, the recipe makes 35 cookies.

1 pound almond paste
1 1/2 cups sugar
4 egg whites
1 1/2 pounds pine nuts (4 3/4 cups)

Preheat the oven to 325°F (300°F in a convection oven).

Put the almond paste and sugar in a food processor and pulse until the almond paste is broken up into small pieces. Add the egg whites and process until the dough is smooth and all the almond paste is fully incorporated. Be sure to scrape down the sides of the bowl from time to time. The dough will be soft and sticky. (You can make the dough ahead and refrigerate it. Remove the dough from the refrigerator 30 minutes before you are ready to shape and bake the cookies.)

Line a baking sheet with parchment paper or a silicone baking mat.

Put one third of the pine nuts in a shallow bowl. Scoop out the batter (scraping the scoop flat on the side of the bowl) using a 2 tsp. (size 100) scoop. Drop scoopfuls of dough onto the pine nuts, and roll them around until the dough is covered in pine nuts. Add more pine nuts to the bowl, as needed. Place on the lined baking sheet about 2 inches apart.

Bake the cookies until pale brown, but still soft, about 20 – 25 minutes. Cool for 5 minutes on the baking sheet before transferring the cookies to a wire rack to cool completely.

Store in an airtight container. If you need the cookies to last more than a few days, store them in the freezer.

Saturday, December 22, 2007

Recipes: Puffy Pancakes (Dutch Babies) and Apple Pancakes

Janeen was nine when she came to live with us in Greece.

I smile when I think of her at that age. It was Janeen’s first time out of Alaska, and our first time living with a child. For all of us, the world was new and filled with possibilities.

For special breakfasts, Janeen loved baked pancakes (Dutch babies). We called them “puffy pancakes” because, like the Yorkshire pudding they resemble, the pancakes puff up beautifully in the oven.

When Janeen returned to Alaska for school, she wanted to make sure she knew how to make “puffy pancakes.” The proportions were easy, I explained; just follow the Rule of 3: 3 eggs, 3 quarter cups of flour, 3 quarter cups of milk, 3 Tbsp. sugar. I wrote down the recipe, in case she forgot.

Because I repeated the Rule of 3 so many times, I’ve never forgotten the recipe for puffy pancakes. I think of Janeen every time I make them.

Puffy pancakes may be eaten plain, with berries and cream, or with a light sprinkling of powdered sugar and a squeeze of lemon juice (my favorite). I also bake them with an apple, cinnamon, and sugar topping.

Granny Smith Apples and Cipolinni OnionsAs with apple pies, the pancake topping tastes best when more than one type of apple is used to make it. Most recently, I made this with 2 Granny Smith apples and 1 Empire apple, all from my Full Circle Farm CSA box. Over the years, I've made this with every type of apple available, and it tastes wonderful no matter what kind is used.


The amount of cinnamon added to the apple topping depends on the kind of cinnamon you are using and how long it has been sitting in your cupboard. If I use regular grocery store cinnamon of uncertain age and often of lower grade than that available from specialty stores, I use 2 teaspoons of cinnamon. If I use delicate “true” cinnamon from Ceylon, I add 3 teaspoons, and if I use spicy Vietnamese “cassia” cinnamon, I add 1 teaspoon.

If you are unsure about the strength of your cinnamon, stir in 1 teaspoon and taste the apples. Add more cinnamon, as needed. Cinnamon is an essential flavor in Apple Pancakes, and is balanced by the plain batter.

No matter which version I make, puffy pancakes are a showy, but easy, treat.

Puffy Pancakes (Dutch Babies)
Serves 2 – 3
I prefer making this in a 10-inch seasoned, cast-iron skillet, but I’ve also successfully made it in a 10-inch Pyrex pie pan and a 9” aluminum cake pan. It can be made in any 10-inch, oven-proof, round pan.


3 eggs
3/4 cup milk
3/4 cup flour
3 Tbsp. sugar
Pinch of salt
3 Tbsp. butter

Preheat oven to 425°F.

Whisk together the eggs, milk, flour, sugar, and salt until thoroughly blended and the batter is smooth.

Place a 10” oven-proof pan in the preheated oven until it is heated through. Add the butter, and swirl it around the pan until the butter melts. Pour the batter into the hot buttered pan, return it to the oven, and bake for 20 – 25 minutes; do not open the door during the first 20 minutes while the pancake is baking. The pancake is done when the center is fully cooked, and the sides of the pancake have puffed up, forming a partial bowl.

Apple PancakeApple Pancakes
Serves 3 - 4
As with the Puffy Pancakes, I prefer making this in a 10-inch seasoned, cast-iron skillet, but I’ve also successfully made it in a 10-inch Pyrex pie pan and a 9” aluminum cake pan. It can be made in any 10-inch, oven-proof, round pan.

3 Tbsp. butter
3 apples, peeled, cored, and sliced
3 Tbsp. sugar
1 – 3 tsp. cinnamon
3 eggs
3/4 cup milk
3/4 cup flour
Pinch of salt

Preheat oven to 425°F.

Melt the butter in a 10-inch oven-proof pan. Add the apples, and turn them until all sides are coated with butter. Cook the apples over medium heat for 5 minutes. Stir in the sugar and cinnamon, and cook for 5 minutes, or until the apples start to soften.

Whisk together the eggs, milk, flour, and salt until thoroughly blended and the batter is smooth.

Evenly distribute the apples over the bottom of the pan. Pour the batter over the apples, and immediately put the hot pan into the preheated oven. Bake for 20 – 25 minutes; do not open the door during the first 20 minutes while the pancake is baking. The pancake is done when the center is fully cooked, and the sides are puffed up.

Remove the pancake from the oven and invert it onto a serving platter so the apples are on top of the pancake. If any apples stick to the bottom of the pan, return them to where they belong on the pancake. (The pancake flattens out when you turn it over.)
~~~~~~~~~~~~~~~~~~~~~~~~~
This is my entry for Fresh Produce of the Month: Apples sponsored by An Italian in the US, and my entry for Think Spice: Cinnamon sponsored by Sunita’s World.

Friday, December 21, 2007

Novel Food: Corelli's Mandolin and Recipe for Cephalonian Meat Pie (Κεφαλονίτικη Κρεατόπιτα)

KreatopitaCephalonia, a Greek island in the Ionian Sea, is famous throughout the world for its meat pies.

In recent years, Cephalonia has also become known as the beautiful setting for the novel (and movie) Corelli’s Mandolin by Louis De Bernières (Pantheon Books 1994).

Corelli’s Mandolin opens in Cephalonia during the early years of World War II, shortly before the invasion of Greece. In those years, despite the hovering threat of war, life on Cephalonia continued unchanged. A procession celebrating the death of St. Gerasimos, the patron saint of Cephalonia, was held as it had been for the last hundred years:

“Outside in the beautiful meadows of the valley and amongst the plane trees that lined the road from Kastro, pilgrims and Corybants had been arriving for two days, some of them from distant parts indeed. … The pews were filled with distant acquaintances renewing their friendship by means of the animated and voluble conversation that non-Greeks mistakenly construe as irreverence. Outside, the pilgrims unloaded animals laden with feta, melons, cooked fowl, and Cephalonian meat pie, shared it with their neighbors, and composed epigrammatic couplets’ at each others’ expense. Groups of laughing girls strolled about, arm in arm, smiling sideways at potential husbands and possible sources of flirtation, and the men, pretending to ignore them, stood about in knots, gesticulating and waving bottles as they solved the outstanding problems of the world.“ Corelli’s Mandolin at p. 74 - 75.

Eight days after the celebration of St. Gerasimos described by De Bernières, the Italian dictator Mussolini demanded that Greece allow Italy to occupy certain strategic parts of the country. On October 28, 1940, the Greek prime minister refused this demand and Italy immediately invaded Greece. (Today, October 28 is a Greek national holiday honoring the 1940 refusal to submit to foreign tyranny.)

Although the Greek army held off the Italians, the country fell when Germany joined the battle. Greece was occupied by a joint force of Germans, Italians, and Bulgarians for the duration of World War II. Corelli’s Mandolin describes life in occupied Cephalonia.

Captain Antonio Corelli was a reluctant officer of the Italian garrison on Cephalonia. The fictional Captain Corelli loved music, culture, and his mandolin. Corelli tried to be a benevolent member of the occupation. He was quartered in the home of the town’s doctor and eventually fell in love with Pelagia, the doctor’s daughter.

When the doctor became aware that Pelagia was in love with Corelli, he tried to dissuade her from consummating the affair. The doctor warned Pelagia of the many dire consequences, tangible and intangible, that could result from consorting with an Italian occupier.

Leaving Cephalonia and forsaking its meat pies were some of those consequences: “Are you ready to leave this island and this people? What do you know of life over there? Do you think that Italians know how to make meat pie and have churches dedicated to St. Gerasimos? No, they do not.” Corelli’s Mandolin at p. 281

Corelli’s Mandolin is ultimately the story of Pelagia’s life and the life of Cephalonia, and how both survived the upheaval brought by war. De Bernières used Cephalonian meat pie (Kreatopita) in describing idyllic island life before the war and, when Pelagia is at a crossroads that could lead her away from the island, as a symbol of all that is good about Cephalonia.

The phrase “Cephalonian meat pie” encompasses a multitude of recipes. Most households on Cephalonia have their own version of this delicious dish. In Prospero’s Kitchen: Mediterranean Cooking of the Ionian Islands from Corfu to Kythera, Diana Farr Louis and June Marinos say, “Recipes for Kreatopita in Cephalonia are like recipes for bouillabaisse in Marseille: each one is offered as the only truly authentic version handed down by a mythical grandmother.”

Louis and Marinos describe Kreatopita recipes with prunes, raisins, almonds, and pine nuts. Some recipes use rice, others potatoes; some use marjoram, others oregano. Some Kreatopitas are made with goat, beef, pork, or lamb, and still others with a combination of two or three different meats. Some recipes add hard-boiled eggs to the filling. Louis and Marinos conclude, “It all boils down to a matter of taste.”

Here is the version of Kreatopita that suits my taste. It is based on one I had many years ago at an Athens restaurant that no longer exists. I’d forgotten this dish until recently, when I ate it in a dream and woke up with the taste of Kreatopita in my mouth. The garlic yogurt accompaniment, while not traditional, is how the Kreatopita was served in my dream. It provides a wonderful counterpoint to the meat pie.

For company, I prefer making Kreatopita in 4 - 4 1/2” tart pans (with removable bottoms) so that each person gets their own individual pie. The individual pies may also be frozen whole, to serve later for easy meals. One large meat pie is equally good for serving a crowd, and easier to make than individual pies.

A Bite of KreatopitaCephalonian Meat Pie (Κεφαλονίτικη Κρεατόπιτα)
Makes eight 4 1/2” pies or one 10” pie
Cephalonian Meat Pie may be made with pork, beef, lamb, or a combination of some or all of these meats. It may also be made with leftover roast. (If using leftovers, start by sautéing the onions, and add the cooked meat along with the tomatoes, herbs, and spices.)Traditionally, kefalotyri cheese is used for Kreatopita, but any firm cheese may be substituted. I most recently made this with P’tit Basque sheep cheese, and its earthy flavor paired well with the cinnamon-scented meat.

Using a little butter in the crust (filo) isn’t traditional, but it adds good flavor and flakiness. Olive oil can fully replace the butter, and the crust will still be tasty, but slightly tougher. More water is needed to make the crust if butter is left out. The dough may also be made by hand. If mixing by hand, make sure the olive oil is evenly distributed in the flour and use a fork or pastry cutter to add the butter.

Crust (Filo):
3 cups flour
1/2 tsp. salt
1/2 cup olive oil
1/4 cup cold butter, cut into small chunks
1/3 – 2/3 cup ice water

Filling:
2 pounds meat, cleaned of all bones, fat, and gristle
1/4 cup olive oil
Salt
Freshly ground black pepper
4 cups diced onions, 1/2” dice
2 Tbsp. minced garlic
2 tsp. Aleppo pepper or 1 tsp. crushed red pepper
3 cups ground tomatoes, fresh or canned
1 cup red wine
1 cup beef or chicken stock
1 cinnamon stick
1 tsp. allspice
1/2 tsp. nutmeg
1 Tbsp. dried oregano, crushed
3 bay leaves
1 pound peeled and diced waxy potatoes (red or Yukon gold), 1/2” dice

1 cup minced fresh parsley
2 cups grated kefalotyri, kasseri, or other firm cheese

For the crust: In a food processor, mix the flour, salt, and olive oil until the olive oil is thoroughly incorporated into the flour. Add the butter and pulse three or four times to break up and distribute the butter; when you are done, the butter pieces should be the size of small lentils. Add 1/3 cup ice water and pulse to mix. Pinch together some of the dough to see if it holds together. If it does not, add small amounts of water, pulsing to mix, until the dough holds together when pinched.

Dump the dough onto a piece of plastic wrap and knead lightly until the dough holds together. If you are making individual pies, separate the dough into sixteen pieces, shape the pieces into flat disks, wrap in plastic wrap, and refrigerate for at least 30 minutes. If you are making one large pie, separate the dough into two pieces, shape them into flat disks, wrap in plastic wrap, and refrigerate for at least 30 minutes.

For the filling: Dice the meat into 1/2” pieces, and season it with salt and freshly ground black pepper. Sauté the meat in olive oil until it is browned on all sides. Stir in the onions, and continue to sauté until the onions soften and begin to turn golden. Stir in the garlic and Aleppo pepper and sauté for 1 minute.

Stir in the tomatoes, wine, stock, cinnamon stick, allspice, nutmeg, oregano, bay leaves, salt, and freshly ground black pepper. Bring to a boil, reduce the heat, and simmer for 30 minutes. Stir in the potatoes and continue to cook until the sauce is rich and thick (it is not necessary to fully cook the potatoes). Taste, and add salt, freshly ground black pepper, or oregano, as needed. Let cool. (The filling may be made ahead to this point.) After the filling has cooled a little, stir in the parsley.

Preheat oven to 400°F.

Roll out the bottom crusts (or crust if you are making one large pie) and press into the bottoms and sides of the tart pans (the bottom crust needs to overhang the pan). Divide the filling between the pans, and top with the grated cheese. Roll out the top crusts and place over the filling. Trim the edges of dough if they are too long, roll the edge of the bottom crust over the top crust, crimp the two crusts together, and tightly seal the edges. Use a sharp knife to cut a slit in the top crust; this will allow steam to escape as the Kreatopita bakes.

Bake for 45 - 50 minutes, until the top of the pies are golden brown. (If you are making one large pie, cook for 45 minutes at 400°F, turn the heat down to 350°F, and cook for 30 minutes more. Cover the edges of the pie with foil if they get too dark.)

Serve with Garlic Yogurt on the side, a crisp green salad, dried black olives, and crusty bread.

Garlic Yogurt
2 cups whole-milk yogurt
4 cloves garlic
1 tsp. coarse-grained salt
1 Tbsp. white wine vinegar
2 Tbsp. olive oil

Line a colander with paper towels. Dump the yogurt into the lined colander and let the liquid drain out of the yogurt for 30 – 60 minutes. Puree the garlic by mashing it into the salt. Mix together the drained yogurt, mashed garlic, salt, vinegar, and olive oil. Taste and adjust the seasoning by adding garlic, salt, or vinegar, as needed.

~~~~~~~~~~~~~~~~~~~~~~~~~~~~~~~
This is my entry for Novel Food sponsored by Simona of Briciole and Lisa of Champaign Taste. Simona's half of the wonderful round-up is here and Lisa's half is here.

Tuesday, December 18, 2007

Recipe: Oven-Roasted Vegetables (Λαχανικά στο Φούρνο)

Red Pumpkin ready to be peeled and cut up for roasting

I gave up steaming and boiling vegetables years ago.

It started with grilled asparagus. The concentrated flavor of the asparagus was glorious, and put its water-logged boiled brothers to shame. We went on a vegetable-grilling kick, and discovered they all tasted better when cooked over fire.

Then the weather turned cold. Grilling outside when it’s 10°F is no fun. Even so, we didn't want to go back to cooking vegetables in water.

No problem. Cranking up the oven, and roasting vegetables for a short time at high temperature, provided the concentrated vegetable flavor we’d grown to love over the summer. Without smoke from the grill, the pure essence of roasted vegetables was the highlight of our meals that winter and in all the years since.

Nothing could be easier.

Roasted Delicata Squash

Oven-Roasted Vegetables (Λαχανικά στο Φούρνο)
Vegetables from asparagus to zucchini are suitable for roasting. Today, my favorites are cauliflower, winter squash, sweet potatoes, and turnips. Tomorrow, who knows? My favorites change with the seasons.

Preheat the oven to 475°F. Clean and dry the vegetables. Cut them into whatever size pieces you prefer. I usually cut the vegetables small, so they are bite-sized and cook more quickly.

Toss the vegetables with plenty of olive oil and salt, and spread them out on a rimmed baking sheet. Don’t crowd the pan or the vegetables will steam rather than roast.

Roast the vegetables for 10 to 30 minutes, depending on the size of the pieces and the type of vegetable used. I set the timer for 10 minutes, and then add time as necessary until the vegetables are fully cooked. Roasted vegetables taste best when the edges are a little charred.
~~~~~~~~~~~~~~~~~~~~~~~~~~~~~~~
This is my entry for Heart of the Matter’s Quick and Easy event for heart healthy food, sponsored this month by Lucullian Delights.

Monday, December 17, 2007

Recipe: Christmas Nougat Cookies

I met Kate in college. She was my first friend who liked to cook as much as I did, a rarity in the days before celebrity chefs, non-stop televised cooking shows, and internet recipe exchanges.

I haven’t seen Kate in ages, but I fondly think of her every year when I make Christmas cookies. Since the years Kate and I joined together for holiday baking binges, I’ve made Christmas Nougat Cookies (aka Angel Cookies), a recipe her mom sweet-talked out of a commercial baker in Seattle and scaled down for home use.

Christmas Nougat Cookies are sweet and crisp, nutty and almost like candy. Their flavor is similar to Torrone, the white Italian nougat that is my favorite candy. They're also a dead ringer for Archway holiday nougat cookies, a Christmas treat that, sadly, has disappeared from the grocery store.

Over the years, I’ve made Christmas Nougat Cookies with every kind of nut – cashews are my current favorites, but the cookies are also delicious with pecans, walnuts, hazelnuts, almonds, macadamias, and peanuts. I make at least 15 dozen every year; Christmas Nougat Cookies are one of the most requested items on my annual holiday cookie tray.

Before I tasted Christmas Nougat Cookies, I questioned making them with pure vegetable shortening rather than butter. Even in those days, I was a believer in baking only with butter; shortening in cookies seemed just plain wrong. Tasting made a believer out of me; these cookies are amazingly good.

Christmas Nougat Cookies (Angel Cookies)
Makes 5 1/2 dozen cookies

The soft dough doesn’t need to be refrigerated, and rolls out easily. The cookies do not spread when they are baked, so can be placed closely together on the baking sheet. As a result, they are quick and easy to make.

1 1/2 cups vegetable shortening
3 cups powdered sugar
1 1/2 tsp. salt
2 tsp. vanilla
2 cups flour
2 cups roasted nuts, chopped

Preheat oven to 325°F (300°F for convection ovens).

In an electric mixer, cream the shortening and powdered sugar, scraping down the sides from time to time. Add the salt and vanilla, and mix thoroughly. Using the mixer’s paddle attachment, mix in the chopped nuts. Add the flour, and mix just until it is thoroughly combined with the other ingredients.

On a well-floured surface, with a well-floured rolling pin, roll out the dough 1/4” thick. Using a 1 1/2” round cookie cutter, cut out the cookies and place 1/2” apart on a cookie sheet.

Bake 8 minutes, being careful not to let the cookies brown (they should still be white when you remove them from the oven). Transfer to racks and let the cookies cool completely. Store Christmas Nougat Cookies in an airtight container.

~~~~~~~~~~~~~~~~~~~~~~~~~~~~~
Christmas Nougat CookiesThis is my entry for Eat Christmas Cookies, sponsored by Food Blogga. Susan's round-up of all the cookie recipes is here.


~~~~~~~~~~~~~~~~~~~~~~~~~~

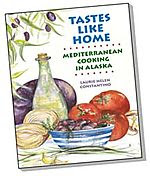
Don't forget to buy your Menu for Hope raffle tickets no later than December 21-- all proceeds go to the UN World Food Program. The Menu for Hope prize I am offering is described here (wild oregano, handmade sheep cheese, handmade egg noodles, and autographed copy of Tastes Like Home: Mediterranean Cooking in Alaska), the list of all West Coast Menu for Hope prizes is here, and the list of all worldwide Menu for Hope prizes is here. For more information about Menu for Hope, go here.

Friday, December 14, 2007

Greek Cookbooks: The Cuisine of Kimolos with Recipe for Ladenia – Olive Oil Bread with Tomato-Onion Topping (Λαδένια)


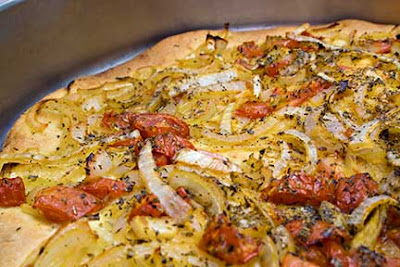
LadeniaLadenia is so good I’ve made it three times in three days.

Ladenia is a specialty of Kimolos, a tiny Greek island in the Aegean Sea. It is bread dough topped with fresh tomatoes, onions, and olive oil (from which it gets its name: “ladi” means “oil” in Greek), and baked until the edges are crunchy and the onions caramelized.

Filena Venardou documented the traditional foods of Kimolos in Η Κουζίνα της Κιμώλου (The Cuisine of Kimolos). Venardou says Ladenia is the most “original and characteristic” dish of Kimolos, and is “considered the precursor” of modern pizza. According to Venardou, Ladenia has been made in Kimolos since the time of its domination by the Venetians (1207 – 1566 AD/CE).


Mediterranean Cooking in Alaska has moved as of March 2011. To read this post please go to


http://www.laurieconstantino.com/ladenia-pizzas-greek-forerunner-from-kimolos/


Please click on over and visit my new site. Thank you!

Wednesday, December 12, 2007

Recipe: Chicken with Pomegranate-Wine Sauce

I hardly knew Tom and Joanna when they first invited me for dinner. I thought they were smart, funny, and sarcastic, and looked forward to an amusing evening. The evening was entertaining, but not in the way I’d expected.

The pair made their home in a nondescript apartment complex, which they managed in exchange for reduced rent. The kitchen was tiny. The walls were sterile. The kitchen equipment was rudimentary.

When I arrived, Tom and Joanna hadn’t yet started cooking. The intended main course was chicken in pomegranate sauce. It was an ambitious undertaking; in those days, we experimented with complex recipes calling for skills we did not yet possess.

The difficulty with the recipe was it required juiced pomegranates. This was before pomegranate juice was readily available, and Tom and Joanna had purchased a pile of pomegranates to liquify.

Joanna had no idea how to juice a pomegranate. Neither did Tom and neither did I; the only pomegranates I’d ever had were Christmas treats, savored seed by seed. I was dubious whether pomegranates could actually be turned into juice. The kitchen equipment was clearly not up to the task.We steeled ourselves with stiff shots of Jack Daniels.

I don’t remember the exact juicing method we finally settled on. What I do remember is the pomegranates contained very little juice; not nearly enough to make the recipe. What juice there was ended up on the counters. And on the walls and backsplash, no longer sterile. And on our clothes, hands, and faces. It was a dramatic mess.

By the time all the pomegranates had been mangled, we couldn’t quit laughing. It was that laughter that sealed our lifetime friendship. In circumstances where some might be frantic or upset, Joanna just laughed and poured us another drink.

The evening left me with an indelible impression that cooking with pomegranates was more trouble than it was worth. I steered clear of them until recently, when I read
Maryann’s advice on Finding La Dolce Vita to juice pomegranates by breaking them down in the blender and straining out the seeds. This sounded easy enough to try.

Pomegranate SeedsMaryann's advice came at a time when the local Costco store was carrying flats of huge, gorgeous pomegranates. It was kismet; I had to buy them. Once the pomegranates were piled on my counter, I couldn’t stop thinking about Tom and Joanna’s chicken in pomegranate sauce. I decided to create my own version.
I removed the pomegranate seeds in the sink, under water, to prevent their staining juice from spraying all over the kitchen. I whirred batches of seeds in the food processor and used my mom’s old
Foley food mill to strain out the pits. Each large pomegranate made two cups of cleaned seeds which, in turn, made 3/4 cup of juice.

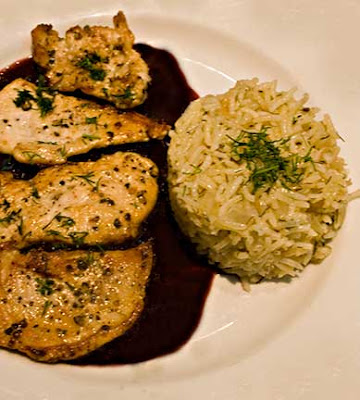
The final dish was a rousing success. The chicken, pounded thin and cooked quickly in butter, had a nutty taste that complimented the slightly sweet, but tangy, pomegranate-wine sauce. I'm not ashamed to admit I licked my plate.

I will make this recipe over and over again. Each time I do, I will laugh at the happy memory of that first dinner with Tom and Joanna, so many years ago.

Chicken with Pomegranate-Wine SauceChicken with Pomegranate-Wine Sauce
Serves 4
For a more refined sauce, strain out the shallots after the sauce has thickened, and before stirring in the butter. I love the shallots' added texture, so I leave them in. Serve with Dill and Rice Pilaf, and crusty bread for mopping up the sauce.

Sauce:
3/4 cup diced shallots, 1/4” dice
2 Tbsp. olive oil
Salt
Freshly ground black pepper
3/4 cup dry red wine
3/4 cup chicken stock
1 1/2 cups pomegranate juice (2 – 3 pomegranates)
1 bay leaf
2 Tbsp. butter

Chicken:
2 skinless, boneless chicken breast halves
Salt
Freshly ground black pepper
2 Tbsp. butter
Fresh dill or parsley, minced for garnishk

For the sauce: Sauté the shallots, lightly seasoned with salt and freshly ground black pepper, in olive oil until they soften and start to turn golden. Stir in the wine, bring to a boil, and cook until the wine is reduced by half. Add the chicken stock, pomegranate juice, and bay leaf. Bring to a boil, turn the heat to medium, and cook until the sauce is reduced to 1 cup, and is slightly syrupy. (I made the sauce ahead to this point.) Just before serving, warm up the sauce. When the sauce is hot, turn off the heat and whisk in the butter, 1 Tbsp. at a time.

For the chicken: Wash the chicken breasts, and dry them well. Remove the “fillet” from each breast, and cut the rest into two slices by holding the pieces flat with one hand and cutting parallel to the cutting board. Pound the sliced chicken pieces, including the fillets, between pieces of waxed paper or plastic wrap until they are 1/4” thick. Cut the pounded chicken into approximately 3” pieces. Season both sides with salt and freshly ground black pepper. (The chicken may be prepared ahead to this point and refrigerated until ready to cook).

Heat the butter in a frying pan until it just starts to bubble. Quickly cook the chicken pieces until they are lightly browned and cooked through. Cook the chicken in batches, being careful not to crowd the pan, or the chicken will steam rather than brown. When all the pieces are done, quickly toss them in the frying pan to make sure all pieces are hot.

For serving: Spoon a pool of sauce onto each of 4 plates, top with pieces of browned chicken, and sprinkle with minced fresh dill or parsley.

~~~~~~~~~~~~~~~~~~~~~~~~~~~~~~~~~~~

This is my entry for Weekend Herb Blogging #113, hosted this week by Astrid from Paulchen's Food Blog.
~~~~~~~~~~~~~~~~~~~~~~~~~~~~
Pomegranates are a popular item this season, in part because of "the heavy promotion of the crimson fruit and its juice as rich in antioxidants." This antioxidant rich dish is my entry for this week's Antioxident Rich Food/Five-a-Day Tuesday sponsored by Sweetnicks.
~~~~~~~~~~~~~~~~~~~~~~~~~~~~~~~~~~~
Don't forget to buy your Menu for Hope raffle tickets no later than December 21-- all proceeds go to the UN World Food Program. The Menu for Hope prize I am offering is here (wild oregano, handmade sheep cheese, handmade egg noodles, and autographed copy of Tastes Like Home: Mediterranean Cooking in Alaska), the list of all West Coast Menu for Hope prizes is here, and the list of all worldwide Menu for Hope prizes is here. For more information about Menu for Hope, go here.