Showing posts with label squash. Show all posts

Sunday, January 11, 2009

About Pancetta with Recipes for Pasta with Squash, Arugula, and Pancetta & Pasta with Pork in Garlic-Wine Sauce (Ιταλική Πανσέτα με Ζυμαρικά)

Alaska has been having a cold snap.

I imagine many of you thinking, “So what else is new?” Even though Alaskans expect and are used to cold weather, the last couple weeks really have been colder than usual. To see what cold weather looks like, check out Marc Lester's
lovely photo-essay showing Southcentral Alaska’s chilly wonderland.

Hearty food, including pasta, is a good antidote for cold weather blues. One of my favorite ways to boost the flavor of winter pasta sauces is adding pancetta (cured Italian pork belly). Only a small amount of pancetta is needed improve the taste of savory sauces (a corollary to the principle that everything tastes better with bacon).

Salumi's hand-crafted pancetta

Pancetta is often sold in packages of very thinly cut pre-sliced meat. Although I use pre-sliced pancetta in a pinch, I mostly buy pancetta direct from the deli counter. I ask for either a chunk of pancetta, which I hand slice and dice at home, or have the deli staff cut the pancetta into slices the thickness of regular bacon. With thicker slices, eaters enjoy bursts of pancetta flavor when devouring the sauce; thinner slices tend to melt into the other flavors.

I was recently at Seattle’s
Metropolitan Market where I bought several pounds of hand-crafted pancetta from Salumi Artisan-Cured Meats. This is far and away the best pancetta I’ve ever eaten; Salumi’s hand-rolled pancetta is meaty, with superior texture and flavor. Although more expensive than pre-sliced pancetta, Salumi’s product is well worth the price, and may be ordered online.

Two delicious pasta sauces that benefit from pancetta are Pasta with Squash, Arugula, and Pancetta and Pasta with Pork in Garlic-Wine Sauce. Either is just right for even the coldest winter day.

Pasta with Squash, Arugula, and Pancetta
Serves 4

Inspired by Cookthink
If using artisan-cured pancetta, it may be quite salty, so be careful not to over-salt the other components of the dish.

Squash:
1 small Kabocha, butternut, or other winter squash, peeled and cut into 3/4” chunks (4 cups)
1/4 cup olive oil
Salt
Freshly ground black pepper

Pancetta and Onions:
3 thick slices pancetta, cut in 1/2” dice (1/2 cup)
2 Tbsp. olive oil
3 cups diced onion, 1/2” dice
Freshly ground black pepper
1 Tbsp. minced fresh garlic
2 Tbsp. minced fresh sage

Pasta:
1/2 pound casarecci or similarly shaped pasta
4 cups arugula, cleaned and roughly chopped
1 cup freshly grated parmesan cheese

Make the Squash: Preheat the oven to 515°F. On a baking sheet with rims, toss the squash cubes with olive oil, salt, and freshly ground black pepper. Put the squash in the oven and immediately turn the heat down to 475°F. Bake for 20 to 25 minutes, turning the squash cubes halfway though, until the squash is cooked through and lightly browned.

Put a large pot of salted water on a burner over high heat.

Make the Onions and Pancetta: Sauté the pancetta in olive oil until it begins to brown. Stir in the onions and freshly ground black pepper, scraping up any browned bits on the bottom of the pan, and sauté until the onions soften. If the onions start sticking to the bottom of the pan, add 1/4 – 1/2 cup water. When the onions are lightly browned, stir in the garlic and sage and keep warm over very low heat.

Make the Pasta: Add the pasta to the boiling salted water and cook until it is al dente. While the pasta is cooking, put the arugula in a large bowl. When the pasta is done, remove 1 cup of pasta cooking water, drain the pasta well, and put the drained pasta on top of the arugula in the bowl. Add the roasted squash and cooked onions to the bowl and toss all the ingredients well. If the dish is too dry, add as much of the pasta cooking water as necessary (usually 1/4 - 1/2 cup). Taste and add freshly ground black pepper or salt, as needed.

Serve sprinkled with freshly grated parmesan cheese.

Pasta with Pork in Garlic-Wine Sauce
Serves 4
Spruce vinegar and salt-cured spruce buds add interesting highlights to the sauce, but aren’t necessary to the success of the dish. If you’re among the 99.99% of people who don’t have either ingredient, red wine vinegar and capers work equally well. For capers, I prefer the taste of salt-cured; when I can’t find salt-cured, I use capers in brine. If using artisan-cured pancetta or salt-cured capers, they may be quite salty, so be careful not to over-salt. Bacon may be substituted for pancetta; it adds a pleasant smoky flavor.

Sauce:
1 pork tenderloin (about 1 pound), cut in 3/4” dice
1 Tbsp. minced garlic
1/2 tsp. black peppercorns, crushed
1 Tbsp. spruce vinegar or red wine vinegar
3 thick slices pancetta, cut in 1/4” dice (1/2 cup)
2 Tbsp. olive oil
1 cup finely diced onion, 1/8” dice
1/4 cup sun-dried or regular tomato paste
1 Tbsp. salt-cured spruce buds or capers, well-rinsed and minced
3/4 cup dry red wine
2 cups chicken stock

Pasta:
1/2 pound
gemelli or similarly shaped pasta
1/2 cup freshly grated parmesan cheese

Mix the pork, garlic, peppercorns, and vinegar and let marinate at least 1 hour (overnight is fine).

Sauté the pancetta in olive oil until it begins to brown. Add the pork mixture and cook until the pork is browned on all sides. Stir in the onion, using the moisture in the onions to scrape up any browned bits on the bottom of the pan. Continue cooking until the onions soften and begin to turn golden. Stir in the tomato paste until it is thoroughly combined. Mix in the wine and cook until it is reduced by half. Stir in the chicken stock and bring to a boil. Turn down the heat and simmer for 40 - 45 minutes, until the sauce slightly thickens. Taste and add salt or freshly ground black pepper, as needed.

Cook the pasta in boiling salted water until it is al dente. Drain the pasta and toss it with the pork sauce. Serve sprinkled with freshly grated parmesan cheese.

The road we live on

Monday, April 7, 2008

Recipe: Smoky Tunisian Oven-Roasted Vegetables with Tabil (Τυνησιακό Μπριάμ)

It’s no secret to my regular readers that I favor oven-roasted vegetables.

Roasting vegetables in a hot oven concentrates and develops subtle vegetable flavors that are lost when the same vegetables are boiled, stewed, or fried. Briam (Μπριάμ), a classic Greek medley of roasted vegetables, is one of my favorite ways to serve an abundance of vegetables. (My Briam recipe is in
Tastes Like Home: Mediterranean Cooking in Alaska.)

While Briam is what I make most often, grilled and roasted vegetable combinations are popular throughout the Mediterranean region; I like them all. For example, in Tunisia, tomatoes, onions, and peppers are grilled and mixed with Tabil (pronounced “table”), a spice mix containing coriander seeds, caraway seeds, garlic, and dried red peppers, to make a refreshing cold salad called Mechouia.

This weekend I needed a main course, not a salad, but really had a taste for Mechouia. Inspired by a Paul Gayler recipe in
A Passion for Vegetables, I decided to combine Tunisian Mechouia with Greek Briam. I used a vegetable combination typical of Briam and, as for Briam, oven-roasted the vegetables. However, instead of the herbs used in Briam, I seasoned the vegetables with Tabil and quickly charred them, two essential elements of Mechouia.

The vegetables can be completely cooked on a grill, in which case, the oven-roasting step is unnecessary. However, when I’m cooking on a stovetop grill pan (as I was yesterday due to the snow), it’s much easier to quickly char the vegetables on the grill pan and then finish cooking them in the oven.

A benefit to pre-cooking the vegetables on the grill is this step can be done well ahead. Although you can skip charring them and completely cook the vegetables in the oven, I don’t recommend it because you lose the smokiness, an important flavor element in this dish.


Oven-Roasted Vegetables with TabilSmoky Tunisian Oven-Roasted Vegetables with Tabil (Τυνησιακό Μπριάμ)
Serves 4 as a main course or 6 as a side dish
Adapted from
A Passion for Vegetables by Paul Gayler (Lyons Press 2000)
This dish is a combination of Briam and Mechouia; it has Briam’s oven-roasted vegetable medley, with Mechouia’s smokiness and spicing. We like spicy food, so I use the larger amounts shown in the ingredient list for Tabil. If you prefer less highly seasoned food, use the smaller amounts. If you’re unsure, mix up the dry spices and add half to the vegetables along with all of the garlic; when the vegetables are done, taste and add more dry spice mix, as needed. Tabil tastes great with any kind of vegetable (or fish, meat, or poultry), so consider the list of vegetables as only a suggestion. Leftovers may be roughly chopped and added to vegetable or chicken stock for an easy mid-week soup.


Tabil:
1 – 2 Tbsp. coriander seeds
1 – 2 tsp. caraway seeds
1” – 2” piece of dried red pepper or 1/4 – 1/2 tsp. crushed red pepper
2 tsp. finely minced fresh garlic

Vegetables:
4 medium Yukon Gold or red potatoes
2 medium zucchini
2 red bell peppers
1 large fennel bulb
1 extra large onion
Olive oil
Salt
Freshly ground black pepper

For the Tabil spice mix: Mix all the ingredients together.

For the Vegetables: Preheat the oven to 400°F.

Wash all the vegetables. Peel the potatoes, and cut into large chunks. Parboil the potatoes in salted water for 7 minutes, drain, and put them in a large roasting pan.

Cut the zucchini on the diagonal into 3/4” slices. Discard the peppers’ seeds and stems, and cut each into six lengthwise slices. Cut off the stalks and leaves of the fennel, and cut the bulb in lengthwise quarters. Remove most of the core, leaving enough so the layers of fennel stay together. Cut each quarter in half lengthwise. Peel the onion, leaving the stem end intact so the layers of onion stay together, and cut into 3/4” wide lengthwise sections. Put all the vegetables in the roasting pan, sprinkle with salt and freshly ground black pepper, liberally drizzle with olive oil, and toss the vegetables to coat them with oil.

Heat a grill pan until it's white hot (or fire up the grill). Quickly char the vegetables on both sides, but don’t cook the vegetables through. Char the vegetables in batches; for me, it's easiest to lay them out on the grill pan one at a time. As each vegetable is done, return it to the roasting pan. (I set the peppers aside, and peel them before adding them to the pan; this step is optional.)


When all the vegetables are done, sprinkle the Tabil over, and toss the vegetables to evenly distribute the spices. If the vegetables seem dry, drizzle with a little more olive oil. Spread the vegetables out into a single layer.

Roast the vegetables for 30 minutes. Serve immediately with couscous, green salad, olives, and plenty of bread for soaking up the splendidly spicy oil and vegetable juices.

Variation: For a saucier version, stir in one 14.5 ounce can of diced tomatoes (or 2 cups freshly diced tomatoes) just before putting the roasting pan in the oven.

~~~~~~~~~~~~~~~~~~~~~~~
Oven-Roasted Vegetable Recipes

Roast Cauliflower with Dukkah (Dukkah, a Middle Eastern spice mix, enhances roasted cauliflower).
Oven-Roasted Vegetables (Λαχανικά στο Φούρνο) (How to bring out the flavor of vegetables by oven-roasting them).
Rosemary and Garlic Roasted Sweet Potatoes (Oven roasted vegetables are an ideal accompaniment to holiday meals.)
Roasted Beets with Celery Root Skordalia (Roasted celery root is a low-calorie, high-flavor alternative to bread or potatoes in the wonderful Greek garlic spread called skordalia.)

To find more oven-roasted vegetable recipes, Food Blog Search is a great tool.
~~~~~~~~~~~~~~~~~~~
This is my entry for
Antioxidant Rich Foods/Five-a-Day Tuesdays hosted by Sweetnicks.

Wednesday, March 12, 2008

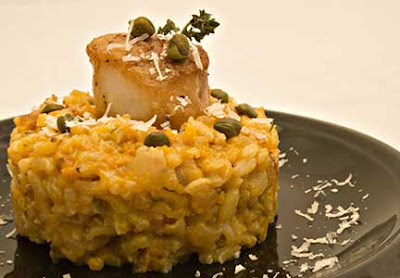
Recipes: Butternut Squash and Pancetta Risotto & Pan Fried Scallops and Capers (Κολοκύθα Ριζότο με Ιταλική Πανσέτα & Χτένια με Κάπαρης)

When I first started making risotto, Arborio rice wasn’t available in Anchorage, Alaska’s largest city. Because Arborio, a short-grain Italian rice, makes superior risotto, I imported it in my luggage or by mail-order. In those years, risotto was special occasion fare.

More recently, local stores stocked Arborio rice, but charged a premium for it. Although it became a pantry staple, ever cost-conscious, I still limited how often I made this toothsome treat.

Last month, our local Costco began selling imported Arborio rice in 3 kilo (6.6 pound) boxes for a very reasonable price. Now I guiltlessly make risotto whenever I want.

The firm, yet creamy, texture of perfectly cooked risotto is the perfect foil for vegetables of all kinds. Combined with
beets or squash, risotto is warming winter fare. In spring, I like it with peas or artichokes. In summer, I look forward to lighter risottos flavored with basil or lemons.

Yesterday, I needed to use a butternut squash that had been sitting on the counter for way too long. I also had a handful of leftover sea scallops. It was definitely time to make an old favorite: Butternut Squash Risotto with Pan-Fried Scallops.

Black-pepper pancetta from Salumi and salt-cured capers, booty from a recent trip to Seattle, rounded out my list of risotto ingredients. The result was an attractive, full-flavored dish that we enjoyed for a mid-week meal and that would be perfect for serving to company.

Butternut Squash and Pancetta RisottoButternut Squash and Pancetta Risotto (Κολοκύθα Ριζότο με Ιταλική Πανσέτα)
Serves 4 - 6
Butternut Squash and Pancetta Risotto makes a filling meal served on its own with a light salad. It pairs well with seafood; see recipe below for Pan-Fried Scallops and Capers, a lovely partner for the risotto. To make vegetarian Butternut Squash Risotto, leave out the pancetta, sauté the onions in olive oil, and use vegetable stock. To make the vegetarian version extra special, stir in a little truffle oil just before serving.

Squash:
1 1/4 pound butternut squash (1 pound cleaned; 3 cups cut in 3/4” dice)
3 Tbsp. olive oil
Salt
Freshly ground black pepper

Risotto:
1/2 cup diced pancetta, 1/4" dice
1 cup diced onion, 1/4” dice
Salt
(if the pancetta is very salty, omit the salt)
Freshly ground black pepper
1 cup Arborio rice
1 Tbsp. minced garlic
1 cup dry white wine
1 Tbsp. minced fresh thyme, sage, or rosemary
4 – 5 cups vegetable or chicken stock
3/4 cup freshly grated Parmesan cheese

Preheat oven to 450°F.

Roasting the Squash: Remove the squash skin with a knife or vegetable peeler, cut in half, remove the seeds, and cut into 3/4” dice. Put the diced squash on a rimmed baking sheet and toss it with salt, freshly ground black pepper, and 2 tbsp. olive oil. Bake for 20 – 25 minutes or until the squash is browned on at least one side. Remove from the oven and place in a strainer to drain off excess oil.
(The recipe may be made ahead to this point.)

Making the Risotto: In a sauté pan large enough to hold the finished risotto, sauté the pancetta until the fat renders and the pancetta begins to brown. Stir in the onions, lightly seasoned with salt and freshly ground black pepper, and sauté until the onions soften and begin to turn golden. Stir in the rice so it is completely coated with oil and cook, stirring, for 1 minute. Stir in the garlic and cook for one minute. Add the wine; bring to a medium boil and cook, stirring, until the wine is almost absorbed. Stir in the roasted squash.

Add 1/2 cup of stock and cook over moderate heat, stirring constantly, until the stock is almost absorbed. Keep adding stock, 1/2 cup at a time, and stirring until each addition of stock is almost absorbed. When the rice is half done, stir in the thyme.
(The recipe can be made ahead to this point, and finished right before serving. If you are going to make it ahead, after you take the rice off the burner, stir it until it cools down.)

Continue adding stock, 1/2 cup at a time, and stirring until the rice is tender, but still firm in the center (this takes 18 – 22 minutes). There may be stock left over. Stir in 1/2 cup of grated parmesan. Add stock until the risotto is the consistency you desire; it should be moist and creamy, not dry. Taste and add salt and freshly ground black pepper, as needed.

Serve immediately with the remaining grated parmesan on the side for sprinkling on top.

Scallops and Capers with Butternut Squash RisottoPan Fried Scallops and Capers with Butternut Squash Risotto (Χτένια και Κάπαρης με Κολοκύθα Ριζότο)
Serves 6

Don’t start cooking the scallops until the risotto is done.

1 recipe Roasted Butternut Squash Risotto (see above)
2 Tbsp. capers (preferably preserved in salt)
12 large scallops (about 1 pound)
Salt
Freshly ground black pepper
1 Tbsp. olive oil
3 Tbsp. fresh lemon juice

If using salt-preserved capers, rinse off the salt and let them soak in cold water for 10 – 15 minutes, and then rinse them again. If using brined capers, rinse off the brine. Dry the capers.

Wash the scallops, removing any tough muscle clinging to the scallops' sides. Dry and season them on both sides with salt and freshly ground black pepper.

Heat the olive oil over high heat in a frying pan large enough to hold all the scallops. When the oil is very hot, add the seasoned scallops, and cook for 2 – 3 minutes, depending on the scallops’ size. Turn the scallops over and cook for 2 – 3 minutes more. Except for turning them over the one time, do not move the scallops or fidget with them while they cook. The scallops will brown better if they aren’t repeatedly turned.

While the scallops are cooking, warm up 6 plates (this is easiest to do in a microwave; put the dry plates in the microwave for 1 minute on high). Place equal amounts of risotto on each of the warmed plates.

When the scallops are done, turn off the heat and top each serving of risotto with two scallops. Stir the lemon juice and capers into the still-warm pan, scraping up any browned bits on the pan’s bottom.

Top each scallop with a drizzle of pan juices and a sprinkling of capers. Serve immediately.

~~~~~~~~~~~~~~~~~~~~~~~~~

Τhis is my entry for Weekend Herb Blogging hosted this week by Kel from Green Olive Tree.

Friday, February 15, 2008

Recipe: Roasted Butternut Squash and Onion Gratin (Κολοκύθα και Κρεμμύδια στο Φούρνο)

Snowy Day in Anchorage AlaskaIt's been snowing off and on for three days. Today the wind started up. I went outside to retrieve the garbage can lid and came back chilled to the bone.

For dinner, I wanted something solid and warming, so decided to roast butternut squash and turn it into a gratin. To balance the squash's sweetness, I added caramelized onions and nutty graviera cheese.

The result was exactly what I wanted. By the time dinner was over, I was warm and cozy and once again enjoying our snowy vistas.


Roasted Butternut Squash and Onion GratinRoasted Butternut Squash and Onion Gratin (Κολοκύθα και Κρεμμύδια στο Φούρνο)
Serves 4 - 6 as a main course or 8 - 12 as a side dish
The gratin may be baked in either a 9” square pan or a 9” x 13” pan, depending on whether you want a thicker gratin (use the square pan) or more area of cheese crust (use the rectangular pan). I cut up and roast the squash in olive oil before layering it with onions. I do this because caramelizing the squash significantly improves the gratin’s flavor. If you want to avoid olive oil, cut the squash in half, roast halves on parchment paper - cut-side down - at 375°F until tender, scoop out the flesh, and cut into 3/4” dice.

2 1/2 pound butternut squash (2 pounds cleaned; 6 cups cut in 3/4” dice)
4 cups diced onions (1/2” dice) (1 1/2 pounds)
4 Tbsp. olive oil, divided
Salt
Freshly ground black pepper
4 tsp. minced garlic
1 tsp. Aleppo pepper or 1/2 tsp. crushed red pepper (optional)
4 tsp. minced fresh rosemary
4 tsp. minced fresh thyme
1 - 2 cups (4 ounces) grated graviera, comte, or gruyere cheese (1 cup for 9” pan, 2 cups for 9” x 13” pan)
1 cup half and half

Preheat oven to 450°F.

Roasting the Squash: Remove the skin of the squash with a knife or vegetable peeler, cut in half and remove the seeds, and cut into 3/4” dice. Put the squash on a rimmed baking sheet and toss it with salt, freshly ground black pepper, and 2 tbsp. olive oil. Bake for 40 – 45 minutes or until the squash is browned on at least one side. Remove from the oven. (The recipe may be made ahead to this point.) Turn the oven heat down to 375°F.

Cooking the Onions: While the squash is cooking, sauté the onion, lightly seasoned with salt and freshly ground black pepper, in the remaining 2 Tbsp. olive oil until it starts to brown. Add the garlic and Aleppo pepper and cook for 1 minute. Turn off the heat, and stir in the rosemary and thyme. (The recipe may be made ahead to this point.)

Layering the Gratin: In an oiled baking pan, spread out half the onions. Top with a layer of roasted squash, then a layer of the remaining onions, then a layer of the cheese. Pour the half and half evenly over the cheese. Bake at 375°F for 30 – 40 minutes or until the cheese has formed a nice brown crust. Serve immediately.

Monday, December 31, 2007

Recipe: Spicy Squash Soup (Σούπα με Kολοκύθα)
Squash tends to build up at our house. I love it; my husband doesn’t. It’s one of the few areas where our palates don’t overlap.

Squash roasted at high temperature with olive oil and salt is acceptable to us both. That’s pretty much it; Oven Roasted Squash is the lone star on a long list of squash recipes I’ve tried over the years.

This might not be a problem except that it’s squash season and we’ve been regularly getting one variety of squash or another in our Full Circle Farm CSA box. Since my perpetual New Year’s resolution is not to waste food, I keep trying new squash recipes and hoping I’ll hit on another one we both like. As good as it is, there are only so many days in a month I can eat roasted squash.

I hit the jackpot last Friday.

Chelsea Greigh’s Spicy Squash Soup is a winner. Its rich spicing counteracts the tendency of winter squash to be overly sweet, the characteristic to which my husband objects. We both loved the soup and happily enjoyed it two meals in a row.

I tried Chelsea’s soup as part of Taste and Create, an event in which food writers are paired with a randomly assigned partner, and asked to cook one recipe off their partner’s blog. Taste and Create gives writers the opportunity to have their recipes tested by a peer.


Spicy Squash Soup (Σούπα με Kολοκύθα)
Serves 4 - 6
Adapted from Chelsea Greigh of Rolling in Dough

If you prefer less spicy food, leave out the crushed red pepper flakes. There are three ways to serve Spicy Squash Soup: 1) Drizzle the soup with high quality olive oil and sprinkle it with green onions and minced parsley (my husband's way); 2) Sprinkle the soup with green onions and minced parsley (my way); or 3) Add a dollop of sour cream to the soup and sprinkle it with chives (Chelsea’s way). All three versions are delicious. I’ve adjusted Chelsea’s recipe to the size of my squash and the level of spicing we prefer. You can find Chelsea’s original version of Spicy Squash Soup here.

3 Tbsp. olive oil
1/2 cup diced carrot, 1/2” dice
2 1/2 cups diced onions, 1/2” dice
Salt
Freshly ground black pepper
1 Tbsp. chili powder blend
1 Tbsp. cumin seeds, crushed
1/2 tsp. crushed red pepper flakes (optional)
1 3/4 lbs. cleaned, peeled, and diced winter squash (6 cups), any variety
3/4 lb. peeled and diced potatoes, 1/2” dice (2 cups)
8 cups water
1 Tbsp. Worcestershire sauce

Optional Garnishes:
2 green onions, finely chopped for sprinkling
2 Tbsp. minced parsley for sprinkling
Olive oil for drizzling
Sour cream for dolloping
Chives for sprinkling

Sauté the carrots and onions, lightly seasoned with salt and freshly ground black pepper, in olive oil until the onions soften and start to turn golden. Stir in the chili powder, cumin seeds, and red pepper flakes and cook for 1 minute. Stir in the squash, potato, and water and bring to a boil. Turn down the heat and cook at a slow boil until the vegetables are soft, about 30 – 40 minutes.

Puree the soup (this is easiest to do with a stick blender). Simmer the soup for 10 - 15 minutes or until it is the thickness you prefer. Stir in the Worcestershire sauce. Taste and add salt or freshly ground black pepper, as needed (squash and potatoes really suck up salt; you may need to add more than you normally would).

Garnish and serve.

Tuesday, December 18, 2007

Recipe: Oven-Roasted Vegetables (Λαχανικά στο Φούρνο)

Red Pumpkin ready to be peeled and cut up for roasting

I gave up steaming and boiling vegetables years ago.

It started with grilled asparagus. The concentrated flavor of the asparagus was glorious, and put its water-logged boiled brothers to shame. We went on a vegetable-grilling kick, and discovered they all tasted better when cooked over fire.

Then the weather turned cold. Grilling outside when it’s 10°F is no fun. Even so, we didn't want to go back to cooking vegetables in water.

No problem. Cranking up the oven, and roasting vegetables for a short time at high temperature, provided the concentrated vegetable flavor we’d grown to love over the summer. Without smoke from the grill, the pure essence of roasted vegetables was the highlight of our meals that winter and in all the years since.

Nothing could be easier.

Roasted Delicata Squash

Oven-Roasted Vegetables (Λαχανικά στο Φούρνο)
Vegetables from asparagus to zucchini are suitable for roasting. Today, my favorites are cauliflower, winter squash, sweet potatoes, and turnips. Tomorrow, who knows? My favorites change with the seasons.

Preheat the oven to 475°F. Clean and dry the vegetables. Cut them into whatever size pieces you prefer. I usually cut the vegetables small, so they are bite-sized and cook more quickly.

Toss the vegetables with plenty of olive oil and salt, and spread them out on a rimmed baking sheet. Don’t crowd the pan or the vegetables will steam rather than roast.

Roast the vegetables for 10 to 30 minutes, depending on the size of the pieces and the type of vegetable used. I set the timer for 10 minutes, and then add time as necessary until the vegetables are fully cooked. Roasted vegetables taste best when the edges are a little charred.
~~~~~~~~~~~~~~~~~~~~~~~~~~~~~~~
This is my entry for Heart of the Matter’s Quick and Easy event for heart healthy food, sponsored this month by Lucullian Delights.

Tuesday, November 27, 2007

Onion Day Recipes: Winter Squash with Onions (Κολοκύθι Κόκκινο με Κρεμμύδι) and Leek Pilaf (Πρασόρυζο)

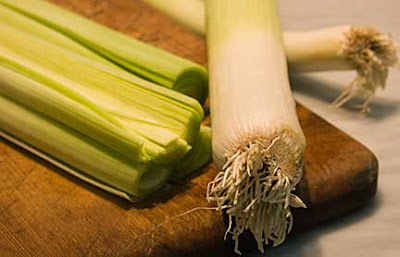
LeeksBetween Thanksgiving feasting, leftovers, and dinner out at a steakhouse, we’ve been eating entirely too much meat. Or at least more meat than normal.

I’m ready for vegetables. Thanks to my CSA box from Full Circle Farm, all I had to do for inspiration was open the refrigerator.

Delicata SquashGiant leeks caught my eye first: four leeks, weighing a little over a pound each. I also noticed Delicata squash, a mild-tasting, thin-skinned heirloom variety that had been in the refrigerator a couple weeks. The skin was shiny and the flesh was firm, but it was time to cook the Delicata.

The traditional onion market (Zibelemärit) opens November 26 in Berne, Switzerland. Zorra of Kochtopf blog decreed the 26th to be Onion Day, and challenged cooks around the world to use onions in honor of the market. I decided to take up the challenge and showcase Delicata squash, onions, and leeks, a member of the onion family.

Kimolos, a tiny Greek island in the Aegean Sea, is part of the Cyclades island group. In 2001, less than 800 people lived on its 20 square miles. That year, Filena Venardou, who came to Kimolos as a teacher, published a book of traditional recipes from Kimolos: Η Κουζίνα της Κιμώλου (The Cuisine of Kimolos).

Winter Squash with Onions (Κολοκύθι Κόκκινο με Κρεμμύδι) is one of the traditional recipes Venardou collected. She says winter squash is much tastier than summer squash, and the Kimolos method of cooking it in hot oil gives the squash a crispy crust and seals in its juices.

I adapted Venardou’s recipe using Delicata squash and finished the fried squash and onions with a dusting of the dried wild thyme we collected last summer in Greece. The resulting dish, which must be served hot, was robust and filling. It would be a good side dish for any kind of meat or poultry, although Venardou suggests serving it as an appetizer and we enjoyed it as an Onion Day main course.

Chopping LeeksTo round out the meal, I made Leek Pilaf (Πρασόρυζο), an easy and flavorful Greek dish enjoyed during the many fasting periods that fill the Greek Orthodox calendar. The light, herby flavors of dill and mint contrasted nicely with the rich flavors of fried squash and onions.

Since it is difficult for me to cook without using onions or garlic, it is fitting that Onion Day closes my first month of serious food blogging. It is also the day on which the thousandth visitor stopped by my blog. Happy Onion Day!

Squash&Onions and PrasorizoWinter Squash with Onions (Κολοκύθι Κόκκινο με Κρεμμύδι)
Serves 4 - 6
Delicata squash is easily peeled with a sturdy vegetable peeler. After peeling the squash, cut it in half, use a spoon to scrape out the stringy centers and seeds, and dice the flesh.

3 cups diced Delicata or other winter squash, 3/4” dice (approximately one squash)
4 cups diced yellow onions, 3/4” dice
3/4 cup flour
Salt
Freshly ground black pepper
1 tsp. dried thyme, crushed
Oil for frying

Put the diced squash and onions in a bag with the flour, salt, and freshly ground pepper. Shake the bag around so the flour evenly coats the vegetables. Dump the floured vegetables into a strainer and shake the strainer to remove the excess flour.

Heat 1/2” of olive oil in a large frying pan until it is very hot, but not smoking. Add 1/3 of the floured squash and onions to the hot oil, and fry until the undersides are browned. Turn the vegetables over, and brown the other side. Using a slotted spoon, remove the vegetables from the oil and place on paper towels to drain. Repeat with the remaining vegetables, being careful not to crowd them in the frying pan, or they will steam rather than brown.

Sprinkle the crushed dried thyme over the browned vegetables, taste and add salt or freshly ground black pepper, as needed.

Leek Pilaf (Πρασόρυζο)
Serves 6
Leek pilaf is good on its own, or as a tasty accompaniment to any kind of fish, seafood, or poultry. Before dicing leeks, be sure to slit them lengthwise and clean thoroughly under running water to remove the dirt and grime that often is trapped between the leek’s layers.

6 cups diced leeks, white and pale green parts only, 1/2” dice (2 – 3 leeks)
1/4 cup olive oil
Salt
Freshly ground black pepper
1 cup rice
1 Tbsp. tomato paste
2 cups water
1/3 cup minced fresh dill
1/3 cup minced fresh mint

Sauté the leeks, lightly seasoned with salt and freshly ground black pepper, in olive oil until they soften and start to turn golden around the edges. Add the rice and sauté for one minute, stirring constantly to evenly distribute the leeks and oil. Add the tomato paste, and thoroughly mix it into the rice. Stir in the water, dill, and mint, bring to a boil, cover, and turn the heat down as low as possible. Cook for 20 minutes, or until the rice absorbs all the water. Turn off the heat, and let the pilaf sit covered for 15 minutes before serving. Taste and add salt or freshly ground black pepper, as needed.