Showing posts with label pears. Show all posts

Saturday, November 22, 2008

Recipe for Pear Pecan Cake with Lemon Glaze (Κέικ με Aχλάδια και Πεκάν)

Pear Pecan CakeWhen I was growing up, cupcakes were a homey lunchbox treat. They weren’t seen in upscale bakeries or on fancy tables.

That all changed in 1996 when New York City’s
Magnolia Bakery started making cupcakes with extra cake batter. After Magnolia’s cupcakes were featured on Sex and the City, it set off a nationwide cupcake craze. Cupcakes’ popularity continues; Barack Obama recently gave Joe Biden a dozen for his birthday.

In 1999, the owners of Magnolia Bakery, Allysa Torey and Jennifer Appel, published
The Magnolia Bakery Cookbook: Old-Fashioned Recipes from New York’s Sweetest Bakery. The slim volume is filled with old-fashioned recipes for cake, cookies, and other desserts, all made with the best possible ingredients.

Last week, I had ripe pears that needed to be used immediately. Magnolia Bakery’s Pear Pecan Cake seemed a wonderful way to use them. I modified the original recipe by adding grated lemon peel to the batter and finishing the cake with a light lemon glaze. The clear lemon flavor balances the pear cake’s richness.

Pear Pecan Cake with Lemon Glaze is moist and delicious. With a cup of hot coffee or tea, it makes a decadent breakfast or mid-morning snack.
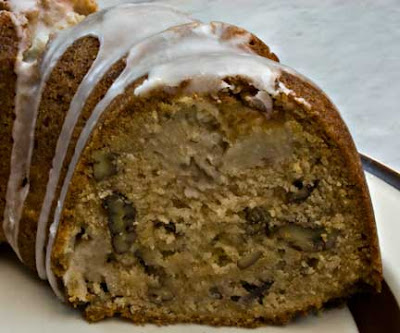
Pear Pecan CakePear Pecan Cake with Lemon Glaze (Κέικ με Aχλάδια και Πεκάν)
Adapted from
The Magnolia Bakery Cookbook
The batter for this cake is thicker than normal cake batter, so don’t worry if you can't pour it. Apples may be substituted for the pears, and walnuts may be used instead of pecans.


Cake:
2 – 3 ripe pears (2 cups chopped)
3 cups all-purpose flour
2 cups sugar
1/2 tsp. baking soda
1/2 tsp. salt
1 cup plus 2 Tbsp. vegetable oil
3 eggs
1 tsp. vanilla extract
1 Tbsp. freshly grated lemon peel
1 1/3 cups coarsely chopped pecans

Glaze:
2 cups powdered sugar
3 – 4 Tbsp. lemon juice

Preheat the oven to 350°F.

Thoroughly oil a Bundt or tube pan. After it’s oiled, if the pan isn’t nonstick, lightly flour it to ensure the cake will properly release from the pan.

Peel and quarter the pears. Remove the core, cut each quarter in half lengthwise, and then cut each slice in crosswise pieces.

Sift together the flour, sugar, baking soda, and salt. Stir the oil, eggs, and vanilla extract into the dry ingredients. Fold in the chopped pears and pecans. Evenly spoon the batter into the prepared pan, lightly smoothing out the top. Bake for 60 minutes or until a thin skewer inserted into the middle of the cake comes out clean. Let the cake cool in the pan for 20 minutes, turn the cake upside down onto a wire rack to release it, and finish cooling the cake.

Mix the powdered sugar and 3 Tbsp. lemon juice in a small bowl. If the glaze is too thick, mix in the remaining lemon juice. Spoon the glaze over the very top of the cake so that it drips down the sides and center of the cake.

Slide the cake onto a serving plate. To store, cover the cake with aluminum foil.


~~~~~~~~~~~~~~~~~~~~~~~
Nuria, who writes
Spanish Recipes from Barcelona, Spain and Maryann of Finding La Dolce Vita from the state of New York are two of the world’s nicest people. Both are excellent cooks. At their requests, I’ve completed a know-your-fellow-bloggers meme. For those whose blogs I’ve named below, if you want to complete the meme on your blog, feel free, but please don’t feel obligated, to do so. Here goes:

Who are the last 10 people who commented on your blog?

10) Peter from Souvlaki for the Soul
9) Joan from FOODalogue: Meandering Meals and Travels
8) Maria from Organically Cooked
7) MAG from Hommus & Tabbouli
6) Lydia from The Perfect Pantry
5) Maryann from Finding La Dolce Vita
4) Mariana from History of Greek Food
3) Bijoux from
Keep It Simple
2) Kalyn from Kalyn’s Kitchen
1) Susan from The Well-Seasoned Cook

Now answer the following:

1. Has number 10 taken any pictures that moved you? Peter at Souvlaki for the Soul takes some of the best pictures in the food blogosphere. His moody pictures of the Acropolis may be the best I’ve ever seen of this well-photographed site.

2. Have you ever tried something from number 9's blog? I only recently learned about Joan’s blog. As someone who grew up eating Pigs in a Blanket and who loves greens of all kinds, I want to try Joan’s recipe for “This Ain’t Yo Mama’s Pigs in a Blanket.” It looks wonderful.

3. Do you wait excitedly for number 8 to post? Yes. Maria of
Organically Cooked is one of my favorite writers; as a storyteller she is without peer among food bloggers.

4. If you could give one piece of advice to number 7 what would it be? MAG’s Lebanese recipes at
Hommus & Tabbouli are mouth-wateringly good. She doesn’t need any advice; MAG knows what she's doing!

5. Does number 6 reply to comments on her blog? Yes, Lydia does reply to comments left on
The Perfect Pantry. She also gives us a weekly peek into other people’s pantries, a series I find endlessly entertaining.

6. How did number 5's blog change your life? When
Finding La Dolce Vita had its first anniversary, Maryann did a drawing for an anniversary present that I was lucky to win. The package included a pizza chopper that has revolutionized how I cut up pizzas and tarts. Thanks Maryann!

7. How often do you comment on number 4's blog? I comment on most, if not all, posts on Mariana’s blog,
History of Greek Food.

8. What is your favorite post from number 3's blog? Bijoux of Keep It Simple helps keep me current on modern design trends. Her latest post on a
cutting-edge Japanese product is my current favorite.

9. Where is number 2 from? Kalyn of Kalyn’s Kitchen is from Salt Lake City, Utah.

10. Has number 1 blogged something that inspired you? Pretty much everything Susan of The Well-Seasoned Cook puts on her blog is inspirational. Her photographs jump off the screen and her descriptions of food are smoothly creative.

11. Do you know any of the 10 bloggers in person? Yes, I know Maria from Organically Cooked.

12. Do any of the 10 bloggers know each other in person? Yes, Kalyn and Lydia met at this year’s BlogHer conference. Maria from Organically Cooked and Mariana from History of Greek Food are friends. If others know each other, it’s news to me.

13. Out of the 10, who updates her blog most frequently? Kalyn of Kalyn’s Kitchen, Queen Mother of Weekend Herb Blogging, updates most frequently.

14. Which of the 10 makes you laugh? Maria’s quirky sense of humor is just one of the reasons I keep going back to Organically Cooked.

15. Which of the 10 makes you cry (good or bad tears)? Cry? Why in the world would I cry when reading about good food and looking at pictures that make my mouth water?
~~~~~~~~~~~~~~~~~~~~
This is my recipe for Bookmarked Recipes, hosted and created by Ruth of Ruth’s Kitchen Experiments.


Saturday, January 19, 2008

Recipe: Pear and Almond Tart (Τάρτα Αμύγδαλο και Αχλάδια)

My friend Teeny had her own recipe disaster last week. Her problem had the same cause as mine: a restaurant cookbook that hadn’t been adequately vetted for home use.

Teeny attempted a Pear and Almond Tart that looked good on paper. However, the 12” tart had 2 sticks of butter in the crust and 3 sticks of butter in the filling (a little less than a 1/2 stick butter per serving). Since the recipe said to cook it at 300°F for only 40 minutes, the unfortunate tart came out of the oven a partially cooked, slagged down mess.

I decided to come up with an alternate version. I studied the recipe; its flaws were too significant to bother modifying it. I started from scratch with only the concept in mind.

My first attempt looked gorgeous. I was afraid if I cut into it at home, I’d have “an accident” and eat it all myself. Instead, I took it to the sushi restaurant where I was lunching with friends. A whole table of tasters; nothing is better for food in beta testing.

The tart was tasty. Everyone liked it, although one taster thought it a little sweet. I liked the flavor, but the texture of the almond filling was off.

When I got home, I tried again. I made three different variations of the filling, and baked them in separate ramekins. I changed the proportions of eggs, sugar, and flavorings. When the three came out of the oven, the filling using egg whites only was my clear favorite.

I tried a final batch and added a little lemon peel to the egg white filling, and it was exactly what I’d been aiming for. The filling was rich with ground almonds, slightly crunchy on the top, and laced with the full clear flavor of pear.

Pear and Almond Tart is easy to make, easy on the eyes, and easy to enjoy.

Pear and Almond Tart (Τάρτα Αμύγδαλο και Αχλάδια)
Makes one 9” tart – Serves 8
Ground almond meal can be substituted for the whole almonds, and is a good choice for those who don’t have a food processor. Bob’s Red Mill, a brand available in many US supermarkets, sells ground almond meal. Health food stores often carry almond meal in the refrigerator section. If you have leftover almond meal, store it in the refrigerator as it can easily turn rancid. I used unblanched almonds in the tart because almond skins have abundant antioxidants and also taste good; blanched almonds work fine too. Apples may be substituted for the pears in this tart.

Crust:
1 1/2 cups all purpose flour
1/2 cup powdered sugar
Pinch of salt
2 tsp. finely grated lemon peel
10 Tbsp. unsalted butter (1 stick plus 2 Tbsp.)
1 egg, whisked to combine the white and yolk

Filling:
1 1/2 cups whole unblanched almonds
3/4 cup sugar
3 egg whites
1/4 tsp. pure almond extract
1 Tbsp. finely grated lemon peel

2 large ripe pears
Sugar for sprinkling on top of tart

Make the crust: Mix the flour, powdered sugar, salt, and lemon peel together in a food processor. Cut the butter into 3/4” squares, add to the food processor, and pulse five or six times to break up and distribute the butter. When you are done, the butter pieces should be the size of small lentils. Add the whisked egg and pulse to mix. Pinch together some of the dough to see if it holds together (it should). If it does not, add small amounts of water, pulsing to mix, until the dough holds together when pinched.

Dump the dough onto a piece of plastic wrap, press the dough together, and shape it into a flat disk. Wrap the disk in plastic wrap, and refrigerate for at least 30 minutes.

Preheat the oven to 400°F.

Roll out the dough on a well-floured pastry cloth until it forms a 10 1/2 inch circle. Use the rolling pin to lift the dough and place it over a 9” tart pan with removable bottom. Press the dough firmly into the sides and bottom of the tart pan. Cut the edges of the dough so there is just enough to fold under and cover the sides of the pan with a double layer of dough. Use a fork to prick tiny holes all over the bottom crust.

Press a double layer of aluminum foil onto the dough (this will prevent it from bubbling up when it bakes). Bake the crust for 15 minutes. Remove the foil and bake for 5 minutes or until the crust is set and lightly golden. Remove the tart crust from the oven and place it on a cooling rack. Reduce the oven heat to 350°F.

Make the filling: Put the almonds and sugar in the food processor and process until the almonds are very finely ground. Add the egg whites and almond extract and process until the mixture is smooth, scraping down the sides from time to time. Add the lemon peel and pulse to evenly distribute.

Make the tart: Spread the almond filling in the bottom of the pre-baked tart crust.

Peel the pears and cut them in half. Use a melon baller or teaspoon to scoop out the core. Place each pear half flat on a cutting board, and cut crosswise into 1/8” slices. Keep the slices together in the shape of a half pear. Remove the last three slices from the wide end of each half pear and reserve. Lightly push down the slices in each half pear to fan them out, fanning from the narrow end to the wide end.

With a spatula, carefully lift each fan of pear slices and place it on top of the almond filling, with the narrow end at the center, and the four fans of pear slices spaced evenly apart. Put the reserved three slices from each pear half in the spaces between the pear fans. Lightly press the pears into the filling. Sprinkle the pears with granulated sugar.

Bake for 30 minutes at 350°F. Turn the heat down to 300°F and cook for 30 minutes, or until the filling is set and the tart golden.

Serve plain or with scoops of vanilla gelato.

~~~~~~~~~~~~~~~~~~~~~~~~~~~~~~~
This is my entry for In the Bag, with the ingredients being pears, lemons, and nuts, hosted by A Slice of Cherry Pie.

Thursday, November 15, 2007

I Swear I Was Sleepwalking (with Recipes for Pear and Apple Tarte Tatin and Salted Honey Caramels)

I rarely eat sweets. I don’t make them (except for Christmas presents, of course). I don’t buy them.

It’s not that I don’t want them; it’s that when they are in my house, they won’t shut up. They talk to me. They say, “Please eat me. Please, now. I want to be eaten now. Please don’t abandon me in the kitchen. Please eat me.”

So what can I do? Who wants to be cruel to a cookie? Or a tart? Not me, that’s for sure. So I do. Eat them, that is. Eat them until they are gone. I’m the ultimate can’t eat just one girl. My sister is the same way.

I can’t explain what happened today. One minute I was reading the Apples & Thyme round-ups here and here, and the next thing I knew there were honey caramels bubbling on the stove and a Pear and Apple Tarte Tatin in the oven. The power of the recipes that cooks had submitted to Apples & Thyme was too much for me.

I may have to extend the “don’t make them, don’t buy them” rule to include a new proviso: don’t read about them. I'm too suggestible.

As soon as they were done, I bundled up the Pear and Apple Tarte Tatin (minus one piece) and the Salted Honey Caramels (honest, I only had one) and delivered them to my husband's office. The cacophony of pleading coming from the kitchen overwhelmed me. The sweets had to get out of the house before I succumbed.

The worst part is, both items tasted absolutely delicious. But they had to go, so they did.


Pear and Apple Tarte TatinPear and Apple Tarte Tatin
Adapted from Riana Ligarde’s recipe for Tarte Tatin at Garlic Breath.
Tarte Tatin is a tart cooked upside down, usually made with apples. In this variation, I’ve combined apples with pears for a lovely fall dessert.

Crust
1 1/3 cups flour
1/3 cup sugar
1/4 tsp. salt
6 Tbsp. butter
1/3 cup milk

Filling
1/3 cup dark brown sugar
4 Tbsp. butter
2 apples
3 pears

Preheat the oven to 350°F.

Crust: Combine the flour, sugar, and salt in a food processor (if doing by hand, whisk the dry ingredients together). Cut the butter into cubes, add the cubes to the dry ingredients, and pulse until the mixture looks like coarse cornmeal (if doing by hand, cut the butter into the dry ingredients). Add the milk and pulse (or stir) just until the dough starts to come together. Form the dough into a disk, wrap in plastic wrap, and refrigerate while you make the filling.

Filling: Peel and core the apples and pears. Slice into eighths. Put the sugar in a dry cast iron frying pan, and cook over medium low to medium heat just until the sugar starts to melt. Quickly whisk in the butter. Evenly distribute the melted butter and sugar over the bottom of the cast iron pan. Arrange the apples and pears over the butter and sugar, alternating slices of apples and pears. (If you don't have a cast iron pan, you can make the Tarte Tatin in a 10-inch buttered cake pan, make the caramel in a saucepan, and pour the caramel into the bottom on the cake pan.)

Roll out the dough until it is slightly larger than the frying pan. Place the rolled-out dough over the apple and pear slices. Tuck the edges under. Place in the oven and bake for 45 – 50 minutes, until the dough is nicely golden brown.

Take the pan out of the oven and run a knife or spatula around the edges of the Tarte Tatin to make sure the dough won’t stick to the pan when you turn it over. Place a serving plate over the frying pan, and flip the pan so the Tarte Tatin is fruit side up on the serving plate. If any fruit sticks to the bottom on the pan, return it to where it belongs on the Tarte. Serve warm.

Salted Honey CaramelsSalted Honey Caramels
Makes 18 1 1/2” square caramels
Adapted from Pille at Nami Nami’s version of Heidi’s Honey-Espresso Caramels. I wanted to emphasize the flavor of the excellent thyme honey I brought back from Greece, so made the caramels using only honey, cream, and coarse Greek sea salt. These are very easy and quite delicious, although it takes about an hour for them to reach the proper temperature.

1 cup heavy cream
1 cup thyme honey (or other strong-flavored honey)
1 tsp. coarse sea salt, plus extra to sprinkle over

Mix the cream, honey, and salt in a heavy-bottomed, deep-sided saucepan. Bring to a boil, then lower the heat (or else the pan will boil over; trust me, I know what I'm talking about here), and cook at a low boil until the mixture reaches 245 - 250°F or the firm ball stage (firm ball is when a tiny bit of the caramel is dropped in cold water it will form a firm, but pliable, ball). Remove the pan of caramels from the heat.

Shaping CaramelsLightly butter a piece of parchment paper, and pour the caramels onto the paper. Lightly sprinkle with salt. I placed boxes of plastic wrap and waxed paper under the parchment paper, and against the edges of the candy, to square up the sides. When the caramels firm up, cut into squares and, if you desire, wrap them in parchment paper.