Showing posts with label cream. Show all posts

Sunday, January 18, 2009

Two Recipes for Bagna Càuda (Δύο Συνταγές για Μπάνια Καούντα)

Last night, we had a hot olive oil bath and went to bed happy. We didn’t dive into olive oil; our dinner did.

Bagna Càuda, a specialty of Italy’s
Piedmont Region, combines oil with anchovies and garlic to make a hot dip for vegetables and bread. Cooked over low heat, anchovies melt into oil and garlic’s strength turns smooth and mild.

I was first introduced to Bagna Càuda by the proprietors of
Genoa Restaurant in Portland, Oregon (now closed). It was love at first taste. Genoa’s Bagna Càuda was rich and luxurious, creamy and indefinably delicious. I wanted more.

After I discovered Genoa’s recipe in a cookware store handout, its Bagna Càuda regularly showed up on the tables of me and my friends. Unlike the Bagna Càuda I make now, Genoa’s recipe doesn’t contain a speck of olive oil; its richness comes exclusively from butter and cream.

In the Portland years, I was young and undeterred by buckets of cream and butter. As time passed, I lost my enthusiasm for both. I used to cook with butter, using olive oil mostly for salad dressings. Now, I rarely use butter; olive oil has replaced it in my kitchens. I stopped making Bagna Càuda.

Even so, when my husband and I travelled to Italy’s Piedmont Region in 1997, I was eager to try Bagna Càuda in its homeland. We found it in a tiny lakeside restaurant in
La Morra, where we were the only customers. The television was blaring, the florescent lights blazing, and our expectations for the food low.

When the Bagna Càuda arrived at our table, it was a revelation. It didn’t contain cream or butter. Instead, garlic and anchovies were melted in olive oil and served in a roasted red pepper half. Every bite was a pleasure.

As with Genoa’s Bagna Càuda so many years ago, the taste and aroma of this new-to-me version lingered in my memory. Back in Alaska, I developed a simple recipe incorporating its flavors, using only olive oil, garlic, and anchovies.
.
Last Thursday, my regular
CSA box of vegetables arrived from Full Circle Farm. The refrigerator was overflowing; I couldn’t find space for an extra-large bunch of broccoli. Bagna Càuda (my version) was the solution. While the anchovy and garlic sauce simmered, I steamed broccoli and roasted a couple red peppers over a gas burner.

When the Bagna Càuda was done, we dipped our vegetables and bread in the hot savory bath, ate our fill, and licked our fingers clean.


Bagna CaudaLaurie's Bagna Càuda (Μπάνια Καούντα)
Makes about 1 1/2 cups
Though the recipe contains a lot of garlic and anchovies, their pungency disappears after simmering in hot oil. For a group, serve Bagna Càuda in a fondue dish or other pot which keeps the sauce hot. For quick weekday meals, serve the sauce in individual unheated dishes for dipping, or even just spooned, straight from the stove, over the vegetables.

Sauce:
1/4 cup chopped anchovy fillets (2 ounces/24 cleaned fillets)
(see Note below)
1/3 cup chopped fresh garlic
1 1/4 cups olive oil

Selection of Vegetables: Raw or roasted red peppers, raw or lightly steamed broccoli or cauliflower, celery, carrots, zucchini, cardoons, radishes, green onions, radicchio, fennel, cherry tomatoes, boiled potatoes


Selection of Bread: artisan-style bread, foccacia, breadsticks

Put the anchovy fillets, garlic, and olive oil in a saucepan over medium-low heat. Cook, stirring from time to time, until the oil starts to bubble. Cook for 20 – 30 minutes, until the anchovies melt into the oil and the garlic is very soft. Don’t let the garlic brown; if the oil is cooking hard enough to brown the garlic, immediately turn down the heat.

While the sauce is cooking, cut the vegetables and bread into shapes appropriate for dipping. When the sauce is done, dip the cold vegetables in the hot sauce.

NOTE:
Anchovies preserved in salt have much more flavor than anchovies canned in olive oil. In dishes like Bagna Càuda, where anchovies are a central ingredient, I prefer the salt-cured variety (the dish is delicious even when made with oil-canned anchovies). Some places, you can buy salted anchovies by the ounce from the deli counter; in Alaska, this isn’t possible. Instead, I buy large cans of salt-preserved anchovies in Greece or when I travel outside the state (Big John’s PFI in Seattle carries them, as does Amazon.com). Anchovies packed in salt keep in the refrigerator for up to a year. To clean salt-cured anchovies, carefully rinse off all the salt. Starting from the head end, peel each fillet off the backbone, and then remove as many of the fine bones from the fillet as possible. Dry the cleaned fillets on paper towels before using in recipes.


Genoa's Bagna Càuda (Μπάνια Καούντα)
Makes about 1 1/2 cups
Adapted from Genoa Restaurant recipe, Portland, Oregon
Genoa’s Bagna Càuda must be kept warm over a burner at all times; the reduced cream stiffens up when it cools. The anonymous author of Genoa’s recipe explains how to eat it: “[This] is a dish to be enjoyed without ceremony – pick up vegetable or bread stick with fingers, dip it in the sauce until well covered, and consume. If butter and cream separate, pour in a bit of cold cream and whisk hard. The sauce will return to its former velvet-like texture.”

Sauce:
2 cups heavy cream
8 cloves garlic, roughly chopped
1 2-ounce can anchovy fillets, drained of oil
Dash of cayenne
1/4 cup unsalted butter

Selection of Vegetables: Raw or roasted red peppers, raw or lightly steamed broccoli or cauliflower, celery, carrots, zucchini, cardoons, radishes, green onions, radicchio, fennel, cherry tomatoes, boiled potatoes

Selection of Bread: artisan-style bread, foccacia, breadsticks

In a heavy saucepan, simmer cream with garlic until the cream is thick and reduced to 1 cup. Watch the cream carefully as it cooks; don't let it boil over. Put the reduced cream, anchovies, and cayenne into a blender and purée until the mixture is very smooth. (The recipe may be made ahead to this point.)

Return the mixture to the pan and bring to a very slow simmer. Stir in the butter until it melts. While the dip simmers, cut the vegetables and bread into shapes appropriate for dipping.

Serve in a fondue dish or other pot which can keep the dip hot. Dip the cold vegetables in the hot sauce.

~~~~~~~~~~~~~~~~~~~~~~
This is my entry for Foodie Films: Big Night - Italian! created and hosted by Joelen's Culinary Adventures.

Saturday, April 26, 2008

Recipe: Cannelloni with Spinach Filling (Κανελόνια με Σπανάκι)
Last week I found a bag of cookbooks in my basement that I’d never read.

I’d bought the books last year at a thrift store two days before my head exploded. By the time I was up and cooking, I’d completely forgotten about the thrift store cookbook score. My recent discovery was a lovely Easter present. A new cookbook always puts me in a good mood, and here were five of them. A bonanza!

The first book I picked up was Michael Field’s
Culinary Classics and Improvisations: Creative Leftovers Made from Main Course Masterpieces.

Michael Field was a successful concert pianist in the fifties and early sixties who had a passion for cooking. By 1964, that passion had become Field’s career. He got started by holding “
socialite cooking classes in his Manhattan apartment.” Ultimately, he started a culinary school in New York City, wrote cookbooks and magazine articles, and was a consulting editor for the Time-Life Foods of the World series.

Field
died in 1971 at age 56. Among the accomplishments cited in his Time magazine obituary are debunking “such myths as the need to wash mushrooms, devein shrimp and press garlic” and preaching the “imaginative use of leftovers.”

Field’s primary rule for using leftovers is the source of leftovers must be “of the highest quality.” To this end, Field provides classic recipes for roasted and braised meat, fish, and fowl. He uses the leftovers from these dishes for the remaining recipes.

For example, Field gives a recipe for Yankee Pot Roast, the leftovers of which can be used in his recipes for Pot Roast Pie with Braised White Onions and Mushrooms, Pirog of Beef, Bigos, Cannelloni with Beef and Spinach Filling, Pâté of Pot Roast, or Cold Braised Beef Vinaigrette.

Here’s my take on Field's Cannelloni:

Cannelloni with Spinach Filling (Κανελόνια με Σπανάκι)
Serves 4 (makes 8 cannelloni)
Adapted from
Culinary Classics and Improvisations by Michael Field (Alfred A. Knopf 1967)
Cannelloni is a very flexible dish, and is a terrific way to use up leftovers. For stuffing, combine the spinach with sautéed mushrooms or leftover chicken, beef, pork, lamb, or roasted vegetables. It’s great with homemade pasta, but can also be made with plain crêpes or store-bought manicotti tubes. The tomato sauce may be made special for Cannelloni, but the dish tastes great with leftover or jarred sauce. I made my own pasta, hand-cutting noodles with the extra dough. The noodles are terrific in homemade chicken soup. Although Cannelloni may be made in one large pan, I like using individual gratin dishes for ease of serving and because it allows me to freeze assembled but unbaked cannelloni for future use.


Pasta (or substitute crêpes or purchased manicotti shells):
2 eggs
1 1/2 cups all purpose flour
1 tsp. salt
2 Tbsp. olive oil
2 Tbsp. water

Cream Sauce:
3 Tbsp. butter
3 Tbsp. all purpose flour
1 1/2 cups half and half
1/8 tsp. cayenne pepper
Salt

Filling:
1/2 pound cleaned, fresh spinach or 10 ounces frozen spinach, thawed
1 cup diced onion, 1/8” dice
2 Tbsp. olive oil
Salt
Freshly ground black pepper
1 Tbsp. minced garlic
1 cup finely chopped leftover roast meat or leftover roast vegetables (see vegetarian variation below)
1 Tbsp. dried oregano, crushed
1/2 cup finely grated parmesan cheese
1 egg

1 cup tomato pasta sauce, puréed (use your favorite tomato sauce recipe or a good quality jarred pasta sauce)
1/4 cup freshly grated parmesan cheese

Make the Pasta: Mix all the ingredients in a food processor and process until the dough clumps together, adding water if necessary. The finished dough should be very stiff. Dump the dough out on a floured surface and knead for 2 – 3 minutes, or until the dough is smooth, shiny, and elastic. Wrap in plastic wrap and let rest for 30 minutes.

Following the manufacturer’s instructions, use a pasta machine to roll out the dough, half at a time, until the pasta has gone through the second to the last setting on the pasta machine. Let the pasta sheets dry for 10 minutes. Trim the edges and cut the pasta sheets into 5” lengths. You need 8 pasta rectangles. (NOTE: Cut the rest of the pasta into noodles, let them dry, and store in an air-tight container until ready to use.)

Cook the pasta rectangles in boiling, salted water until they are al dente. With a slotted spoon, lift out the pasta sheets and put them in a bowl of cold water. Dry the pasta rectangles by laying them out on paper towels.

Make the Cream Sauce: Melt the butter in a small saucepan. Whisk in the flour and cook, stirring, for 2 minutes. Add the cream in a slow stream, whisking rapidly and cook, stirring constantly, until the sauce thickens. Stir in the cayenne and salt, remove from the heat, and set aside until ready to use.

Make the Filling: Blanch the spinach in boiling, salted water for 1 minute. Drain and rinse with cold water. Squeeze as much liquid as possible out of the blanched (or thawed) spinach, and finely chop it. Put in a bowl.

Sauté the onion, lightly seasoned with salt and freshly ground black pepper, in olive oil until the onions soften and start to turn golden. Stir in the garlic and cook for 1 minute. Add the onion mix, meat, oregano, and parmesan to the filling and mix together thoroughly. Taste and add salt or freshly ground black pepper, as needed. Mix in the egg.

Assemble the Cannelloni: Preheat the oven to 375°F

Lay out 8 rectangles of pasta, evenly divide the filling between them, and roll them up. Spread a little white sauce in the bottom of a baking dish large enough to hold all the cannelloni or 4 individual gratin dishes. Place the cannelloni in the pan seam side down and side by side. Cover the cannelloni with tomato sauce and then cover the tomato sauce with the remaining cream sauce. Sprinkle with parmesan cheese. (The recipe may be made ahead to this point and refrigerated or frozen.)

Bake for 20 minutes, or until the sauce is bubbling. Put under the broiler until the tops are nicely browned; watch carefully, it is easy to burn the cheese.

Vegetarian Cannelloni
For meat in the filling, substitute 2 1/2 cups diced mushrooms (1/4” dice). Sauté the mushrooms, lightly seasoned with salt and freshly ground black pepper, in 1 Tbsp. butter and 1 Tbsp. olive oil until the mushrooms are nicely browned.
~~~~~~~~~~~~~~~~~~~~~~~
This is my entry for
Weekend Cookbook Challenge: Vintage Cookbooks hosted by Chocolate Moosey.

Saturday, March 15, 2008

Recipe: Artichoke and Swiss Chard Gratin (Αγγινάρες και Χόρτα στο Φούρνο)

Work-related travel may be necessary, but it’s far from fun.

Hotels rooms blur together in a cloud of mediocre sameness. Long meetings in new time zones keep life off-kilter and make it extraordinarily difficult to explore the terrain.

I’ve worked in jobs where too much business travel was unavoidable. For self-preservation, I began introducing an element of pleasure into each dreary trip by finding an exciting restaurant to visit.

In Boston, this is how I discovered Hamersley’s Bistro. Hamersley’s has one of those menus where you want to order everything. The chef specializes in imaginative preparations of seasonally fresh vegetables.

I ignored the entrees and ordered a mixture of appetizers and vegetable side dishes. I ate slowly, savoring each bite, and left the restaurant invigorated and momentarily happy for the chance to travel, even on business.


Shortly after I first ate at Hamersley’s, its owner, Gordon Hamersley, published a cookbook,
Bistro Cooking at Home. I bought it immediately, and was glad I did. Although they have complex flavors, Hamersley’s dishes are easy to make, use readily available ingredients, and are consistently delicious.

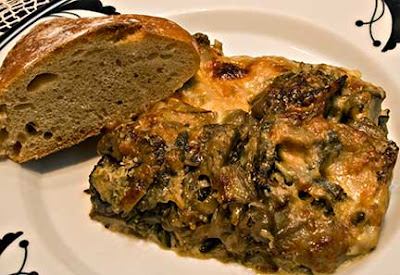
Last night I made a version of Hamersley’s Artichoke and Swiss Chard Gratin. The gratin’s cream, which I rarely use, blends nicely with the vegetables’ earthy flavors to form a delicious sauce.

Hamersley makes his gratin with fresh artichokes. I substituted frozen artichoke quarters. Using fresh artichokes just for the hearts requires too much time and effort (and costs too much) for a mid-week meal. I'd rather save fresh artichokes for uses that let me enjoy the delicious leaves, which too often are tossed when fresh artichokes are used for their hearts.

Artichoke and Swiss Chard GratinArtichoke and Swiss Chard Gratin (Αγγινάρες και Χόρτα στο Φούρνο)
Serves 4 – 6
Adapted from Bistro Cooking at Home by Gordon Hamersley (Broadway Books 2003)
Spinach, nettles, poppies, or other mild-flavored greens may be substituted for the Swiss chard. Salting vegetables as they cook brings out their flavor in a way that salting only at the end can’t achieve. For this reason, small amounts of salt are added as each vegetable cooks; be careful not to fully salt each ingredient or the finished gratin will be too salty.

5 – 6 whole Swiss chard leaves (1 bunch), or any other mild-flavored greens, wild or domestic
12 ounces frozen artichoke quarters, thawed
3 Tbsp. olive oil, divided
Salt
Freshly ground black pepper
3 cups thinly sliced yellow onion
1 Tbsp. minced garlic
1 Tbsp. minced fresh thyme
1 cup heavy cream
1/2 cup grated parmesan cheese

Preheat the oven to 375°F.

Wash the chard leaves and shake off the excess water (do not dry). Separate the leaves from the stems. Cut the stems into 1/2” dice and roughly chop the leaves; keep the stems and leaves separate.

Sauté the thawed artichoke quarters, lightly seasoned with salt and freshly ground black pepper, in 1 Tbsp. olive oil until they are lightly browned. Place the artichokes in a large bowl.

In the same pan, sauté the onions, lightly seasoned with salt and freshly ground black pepper, in 1 Tbsp. olive oil until the onions soften and start to turn golden. Stir in the garlic and fresh thyme and cook for 1 minute. Add the onions to the bowl with the artichoke hearts.

In the same pan, sauté the Swiss chard stems, lightly seasoned with salt and freshly ground black pepper, in 1 Tbsp. olive oil for 5 minutes. Stir in the leaves, and cook until the stems and leaves are tender and any liquid in the pan has evaporated. Add the chard to the bowl with the other ingredients and toss to combine.

Oil a 9” x 9” baking pan (or 10” x 10” pan or 1 1/2 quart gratin dish). Spread the vegetables in the pan, pour the cream evenly over, and top with the grated parmesan cheese. Bake for 30 minutes. Raise the heat to 425°F and bake for 8 – 10 minutes, or until the cheese topping is nicely browned. Serve immediately.
~~~~~~~~~~~~~~~~~~~~~~~~~~~~~~

This is my entry for Antioxidant Rich Food/5-a-Day Tuesday created and hosted by Sweetnicks.

Sunday, February 17, 2008

Recipe: Celery Root Waffles with Smoked Salmon and Horseradish Cream

I love second-hand stores.

What do I buy? Pretty much anything. Most frequently it’s clothes, dishes, glassware, kitchen tools, or books.

I’m happier wearing clothes that didn’t cost an arm and a leg. Because I'm a thrift store regular, I make amazing finds. Lately, my husband’s been looking debonair in an Armani blazer I bought for $1.00. It’s in flawless condition and fits him perfectly.

Since I’ve been writing Mediterranean Cooking in Alaska, I’ve purchased an assortment of second-hand plates and bowls. They help make my photographs more interesting and allow me to use dishes that best set off each individual recipe.

Since we’re both notorious breakers, I long ago gave up buying nice wine glasses. The few we have left are put away and brought out only for company. For us, thrift store glassware is definitely the way to go.

Most of the dishes, pots and pans, and kitchen tools in our Greek house came from American second-hand stores and were hauled to Greece in our baggage. The pride of my Greek kitchen is a Kitchenaid stand mixer I bought for $12.50 at Salvation Army.

Our Greek relatives don’t understand why I would buy anything second-hand. They find the whole concept to be confusing and vaguely distasteful. Why would we want something that had been previously owned by a stranger? Not surprisingly, there isn’t a single second-hand store on the island.

I’ve bought and thoroughly enjoyed used books I never would've bought new. One of these books is A Passion for Vegetables: Simple and Inspired Recipes from Around the Globe by British chef Paul Gayler. Published in 2000 for $35.00, I brought the book home for the shockingly high price of $3.50.

A Passion for Vegetables is full of interesting ideas for cooking vegetables (it is not 100% vegetarian). Gus Filgate’s photographs are gorgeous and very inspirational.

Lately I’ve been thinking about Gayler’s recipe for celery root (celeriac) waffles and smoked salmon. I had a celery root from Full Circle Farm and plenty of Gravlax in the freezer. I paired the two for brunch last Saturday.

Although I liked Gayler’s concept, I modified his recipe to eliminate waste and make a batter that worked in my waffle iron. The result was a crisp waffle with a mild celery flavor that nicely complemented Gravlax. I finished the dish with a dollop of tasty horseradish cream and a sprinkling of fresh dill.

Although we enjoyed it for brunch, Celery Root Waffles with Smoked Salmon (or Gravlax) and Horseradish Cream would make a scrumptious cold appetizer. I’m definitely making this again.

Celery Root Waffles with GravlaxCelery Root Waffles with Smoked Salmon and Horseradish Cream
Makes 6 6 - 7” waffles (serves 4 for brunch) or 24 appetizer pieces
Adapted from
A Passion for Vegetables by Paul Gayler (Lyons Press 2000)

Waffles:
1 pound celery root (3/4 pound cleaned)
1 1/2 cups milk
2 eggs
1/2 cup all purpose flour
2 tsp. baking powder
1/2 tsp baking soda
1/4 tsp. salt
Freshly ground black or pepper
3 Tbsp. butter

Horseradish cream:
6 Tbsp. whipping cream
1 1/2 Tbsp. prepared horseradish
3 Tbsp. finely minced red onion or chives
1 Tbsp. lemon juice
1/8 tsp. salt

6 - 8 ounces thinly sliced smoked salmon, lox, or gravlax
2 Tbsp. minced dill

Prepare the Celery Root: Cut the top and bottom off the celery root, leaving broad flat surfaces on either end. Put the celery root on a cutting board with a flat side down. Use a sharp knife and cut down towards the board to remove the peel; doing this in small pieces makes the job faster and easier. Once the celery root is peeled, cut it in half and then in wedges. Use a paring knife to remove the soft cottony center of each wedge. For pictures of how to do this, go
here.

Cut the wedges of celery root into chunks. Put the milk and celery root in a saucepan, bring to a boil, turn down the heat, and simmer for 20 minutes, or until the celery root is tender.

Make the Horseradish Cream: While the celery root is simmering, whisk the whipping cream until it starts to stiffen. Whisk in the horseradish, minced onions, lemon juice, and salt until the cream is fully whipped.

Make the Waffles: When the celery root is tender, remove it from the heat. Puree the milk and celery root using a stick blender, food processor, or blender. Quickly whisk 1/2 cup of celery root puree into the eggs, and then whisk this mixture back into the celery root puree.

Whisk in the flour, baking powder, baking soda, salt, and freshly ground black pepper. Melt the butter and whisk it into the batter.

Preheat the waffle iron and cook the waffles. As each waffle is done, put it on a baking rack to cool; this helps prevent condensation and keeps the waffles crisp.

To Serve: Cut or break each waffle into quarters. Arrange a slice of smoked salmon or gravlax on the waffle, top with a small dollop of horseradish cream, and sprinkle with minced dill.

~~~~~~~~~~~~~~~~~~~~~~~~~~~~~~
This is my entry for Weekend Herb Blogging, hosted this week by Lia from Swirling Notions.